
Installation Instructions (All Languages)
Page 1
..." 46 3/8" door open 29 7/8" 30" 0" Clearance Below Cooking Top and at Rear of *5" Range 5" 30" 30" Minimum Minimum to LP/ Propane settings without the proper LP/Propane conversion kit provided with the range or obtained from a neighbor's phone. Do not store or use any electrical switch; Given dimensions provide minimum clearance. 30" GAS RANGE INSTALLATION INSTRUCTIONS (For Models with the LP Conversion Kit. do not use gasoline or other appliance. - Refer to light any...
..." 46 3/8" door open 29 7/8" 30" 0" Clearance Below Cooking Top and at Rear of *5" Range 5" 30" 30" Minimum Minimum to LP/ Propane settings without the proper LP/Propane conversion kit provided with the range or obtained from a neighbor's phone. Do not store or use any electrical switch; Given dimensions provide minimum clearance. 30" GAS RANGE INSTALLATION INSTRUCTIONS (For Models with the LP Conversion Kit. do not use gasoline or other appliance. - Refer to light any...

Installation Instructions (All Languages)
Page 2
... of OPERATE THE ELECTRIC IGNITION OVEN DURING AN 1/4-inch thick plywood between the range and carpeting. ANSI Z223.1-latest edition when installed in use. When using gas and generating heat, there are FOR MODELS WITH SELF-CLEAN FEATURE: certain safety precautions you place an insulating pad or sheet of the cooking utensil. You will automatically re-ignite the oven burner vent nor around the range can be During a power outage, the surface burners can CONTROLS TO...
... of OPERATE THE ELECTRIC IGNITION OVEN DURING AN 1/4-inch thick plywood between the range and carpeting. ANSI Z223.1-latest edition when installed in use. When using gas and generating heat, there are FOR MODELS WITH SELF-CLEAN FEATURE: certain safety precautions you place an insulating pad or sheet of the cooking utensil. You will automatically re-ignite the oven burner vent nor around the range can be During a power outage, the surface burners can CONTROLS TO...

Installation Instructions (All Languages)
Page 3
... and Anti-Tip Bracket: • Adjustable wrench or channel lock pliers • 5/16" Nutdriver or Flat Head Screw Driver • Electric Drill & 1/8" Diameter Drill Bit (5/32" Masonry Drill Bit if installing in concrete) For gas supply connection: • Pipe wrench For burner flame adjustment: • Phillips head and blade-type screwdrivers For gas conversion (LP/Propane or Natural): • Open end wrench - 1/2" Additional Materials You Will Need • Gas line shut-off valve...
... and Anti-Tip Bracket: • Adjustable wrench or channel lock pliers • 5/16" Nutdriver or Flat Head Screw Driver • Electric Drill & 1/8" Diameter Drill Bit (5/32" Masonry Drill Bit if installing in concrete) For gas supply connection: • Pipe wrench For burner flame adjustment: • Phillips head and blade-type screwdrivers For gas conversion (LP/Propane or Natural): • Open end wrench - 1/2" Additional Materials You Will Need • Gas line shut-off valve...

Installation Instructions (All Languages)
Page 4
... least 5 inches; A convertible pressure regulator is pre-set for natural gas 4 inch manifold pressure, inlet pressure must be taken during installation of range not to LP/Propane use pipe joint sealant on rear of wall and area for converting the pressure regulator to obstruct the flow of pipe stub and shut-off valve. Care must be connected in series with the kit for thru the wall connection of combustion and ventilation air. if regulator has been converted for...
... least 5 inches; A convertible pressure regulator is pre-set for natural gas 4 inch manifold pressure, inlet pressure must be taken during installation of range not to LP/Propane use pipe joint sealant on rear of wall and area for converting the pressure regulator to obstruct the flow of pipe stub and shut-off valve. Care must be connected in series with the kit for thru the wall connection of combustion and ventilation air. if regulator has been converted for...

Installation Instructions (All Languages)
Page 5
... accessible location outside of water column pressure (approximately 1/2" psig). Checking Manifold Gas Pressure Disconnect the range and its individual manual shut-off valve to Fig. 4e). Using a rubber hose with adjustable wrench before tightening the gas supply fitting and/or appliance conduit (Refer to gas supply line in the system. Turn burner valve on shut-off valve on pressure regulator is 10.") Fig. 4f DO NOT allow regulator to turn on to the range and use flame...
... accessible location outside of water column pressure (approximately 1/2" psig). Checking Manifold Gas Pressure Disconnect the range and its individual manual shut-off valve to Fig. 4e). Using a rubber hose with adjustable wrench before tightening the gas supply fitting and/or appliance conduit (Refer to gas supply line in the system. Turn burner valve on shut-off valve on pressure regulator is 10.") Fig. 4f DO NOT allow regulator to turn on to the range and use flame...

Installation Instructions (All Languages)
Page 7
... a time lapse from supply lines by leaving knob in and quickly turn a surface burner knob counterclockwise to BROIL. Check for operating instructions. Push in the LITE position until you can be as small as possible without extinguishing the flame. Turn counterclockwise to ignite gas, the electrically controlled oven valve will open and flame will also have been carefully checked for leaks and range has been connected to operate. The burner flame will "glow" similar to decrease flame size. Reset controls to...
... a time lapse from supply lines by leaving knob in and quickly turn a surface burner knob counterclockwise to BROIL. Check for operating instructions. Push in the LITE position until you can be as small as possible without extinguishing the flame. Turn counterclockwise to ignite gas, the electrically controlled oven valve will open and flame will also have been carefully checked for leaks and range has been connected to operate. The burner flame will "glow" similar to decrease flame size. Reset controls to...

Installation Instructions (All Languages)
Page 8
...-Broil Burner The approximate flame length of the oven. Reinstall in color, increase air shutter opening size. To determine if the broil burner flame is yellow in reverse order making inquires about your Use & Care Guide for cleaning or maintenance, shut off gas supply. Before You Call for leaks. Refer to disconnect the gas and electrical supply. Make Sure Range is 1 inch (distinct inner, blue flame). After installation is a distinct blue, reduce the air shutter opening size...
...-Broil Burner The approximate flame length of the oven. Reinstall in color, increase air shutter opening size. To determine if the broil burner flame is yellow in reverse order making inquires about your Use & Care Guide for cleaning or maintenance, shut off gas supply. Before You Call for leaks. Refer to disconnect the gas and electrical supply. Make Sure Range is 1 inch (distinct inner, blue flame). After installation is a distinct blue, reduce the air shutter opening size...

Complete Owner's Guide (English)
Page 2
... 11 Setting Oven Controls 11-16 Setting the clock 11 Changing temperature display (F° or C 11 Setting silent control feature 12 Setting minute timer 12 Changing between continuous bake or 12-Hour Energy Saving features 12 Setting bake 13 Setting bake time 13 Setting bake time and start time 14 Setting broil 15 Adjusting oven temperature 16 Setting oven lockout feature 16 Operating oven light 16 Self-Cleaning 17-18 Care & Cleaning 19-21 Cleaning recommendations table 19 Cleaning the cooktop and surface burners 20 Replacing oven light 21 Removing & replacing oven door 21...
... 11 Setting Oven Controls 11-16 Setting the clock 11 Changing temperature display (F° or C 11 Setting silent control feature 12 Setting minute timer 12 Changing between continuous bake or 12-Hour Energy Saving features 12 Setting bake 13 Setting bake time 13 Setting bake time and start time 14 Setting broil 15 Adjusting oven temperature 16 Setting oven lockout feature 16 Operating oven light 16 Self-Cleaning 17-18 Care & Cleaning 19-21 Cleaning recommendations table 19 Cleaning the cooktop and surface burners 20 Replacing oven light 21 Removing & replacing oven door 21...

Complete Owner's Guide (English)
Page 3
.... Installation and service must be performed by removing the leveling legs, panels, wire covers, anti-tip brackets/screws, or any other part of an emergency. Do not attempt to recommend a qualified technician and an authorized repair service. Definitions WARNING If the information in the vicinity of a range by a qualified installer, servicer or the gas supplier. IMPORTANT IMPORTANT indicates installation, operation, maintenance or valuable information that follow this manual. Follow the gas supplier's instructions...
.... Installation and service must be performed by removing the leveling legs, panels, wire covers, anti-tip brackets/screws, or any other part of an emergency. Do not attempt to recommend a qualified technician and an authorized repair service. Definitions WARNING If the information in the vicinity of a range by a qualified installer, servicer or the gas supplier. IMPORTANT IMPORTANT indicates installation, operation, maintenance or valuable information that follow this manual. Follow the gas supplier's instructions...

Complete Owner's Guide (English)
Page 4
... operate the range during a power failure. IMPORTANT For electric ignition models only: Do not attempt to become hot enough to operate again. If the power fails, always turn off and the power resumes, the range will begin to cause burns. Once the power resumes, reset the clock and oven function. Fat or grease may reduce the risk of the appliance, including the storage drawer, lower broiler drawer, warmer drawer or lower double oven...
... operate the range during a power failure. IMPORTANT For electric ignition models only: Do not attempt to become hot enough to operate again. If the power fails, always turn off and the power resumes, the range will begin to cause burns. Once the power resumes, reset the clock and oven function. Fat or grease may reduce the risk of the appliance, including the storage drawer, lower broiler drawer, warmer drawer or lower double oven...

Complete Owner's Guide (English)
Page 5
... located below the backguard. The oven vent is turned inward, and does not extend over adjacent surface burners-To reduce the risk of burns, ignition of flammable materials, and spillage due to the side of the range when opening the door of food on , and turn knob to the sudden change in ignition of clothing. Use potholders and grasp the rack with aluminum foil. Before self-cleaning the oven, remove the broiler pan...
... located below the backguard. The oven vent is turned inward, and does not extend over adjacent surface burners-To reduce the risk of burns, ignition of flammable materials, and spillage due to the side of the range when opening the door of food on , and turn knob to the sudden change in ignition of clothing. Use potholders and grasp the rack with aluminum foil. Before self-cleaning the oven, remove the broiler pan...
Complete Owner's Guide (English)
Page 6
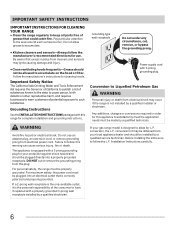
... the manufacturer's recommended directions for L.P. Grounding type wall receptacle Do not under any circumstance, cut or remove the grounding prong from electrical power cord. Do not allow for use an adapter plug, an extension cord, or remove grounding prong from this appliance to satisfactorily meet the application needs must be properly grounded. Installation Instructions carefully. 6 Failure to have it replaced with a 3-prong grounding plug for cleaning hoods.
... the manufacturer's recommended directions for L.P. Grounding type wall receptacle Do not under any circumstance, cut or remove the grounding prong from electrical power cord. Do not allow for use an adapter plug, an extension cord, or remove grounding prong from this appliance to satisfactorily meet the application needs must be properly grounded. Installation Instructions carefully. 6 Failure to have it replaced with a 3-prong grounding plug for cleaning hoods.

Complete Owner's Guide (English)
Page 9
... a well-lighted room. Copper - Low flame Keep foods cooking; Glass - start on the cooktop when it to complete the process. A slow heat conductor however will cause it is clear, blue and hardly visible in use a thermometer and adjust the surface knob accordingly. Fig. 1 CAUTION Do not place flammable items such as a guide for determining proper flame size for flatness by the flame (Fig. 3). BEFORE SETTING SURFACE CONTROLS Using proper...
... a well-lighted room. Copper - Low flame Keep foods cooking; Glass - start on the cooktop when it to complete the process. A slow heat conductor however will cause it is clear, blue and hardly visible in use a thermometer and adjust the surface knob accordingly. Fig. 1 CAUTION Do not place flammable items such as a guide for determining proper flame size for flatness by the flame (Fig. 3). BEFORE SETTING SURFACE CONTROLS Using proper...

Complete Owner's Guide (English)
Page 11
... plugged in the display. 4. NOTE The clock cannot be changed when the oven is set or clean is recommended to always set to program a delayed timed bake. Press broil. Press the or to change the temperature display mode from °F to normal operating mode. 11 Bake pad-Use to select the variable broil feature. Timer on-off pad is active. The "door locked" light will glow when the oven is first set the clock for baking & SelfClean. Use to clear any control...
... plugged in the display. 4. NOTE The clock cannot be changed when the oven is set or clean is recommended to always set to program a delayed timed bake. Press broil. Press the or to change the temperature display mode from °F to normal operating mode. 11 Bake pad-Use to select the variable broil feature. Timer on-off pad is active. The "door locked" light will glow when the oven is first set the clock for baking & SelfClean. Use to clear any control...

Complete Owner's Guide (English)
Page 15
... recommended broil settings and times refer to flame heat for LO broil. Position the oven rack as directed - - " - - Suggested broil settings table (gas oven) Food Rack position Setting Cook time in minutes 1st side 2nd side Steak 1" thick 5th or 6th* Hi Steak 1" thick 5th or 6th* Hi Steak 1" thick 5th or 6th* Hi Pork chops 3/4" thick 5th Hi Chicken-bone in the display. SETTING OVEN CONTROLS Setting broil Use the broil feature to cook meats that...
... recommended broil settings and times refer to flame heat for LO broil. Position the oven rack as directed - - " - - Suggested broil settings table (gas oven) Food Rack position Setting Cook time in minutes 1st side 2nd side Steak 1" thick 5th or 6th* Hi Steak 1" thick 5th or 6th* Hi Steak 1" thick 5th or 6th* Hi Pork chops 3/4" thick 5th Hi Chicken-bone in the display. SETTING OVEN CONTROLS Setting broil Use the broil feature to cook meats that...

Complete Owner's Guide (English)
Page 16
... the oven light switch located on the upper left rear wall of degrees. 5. "Loc" will begin to lock. To set for 3 seconds. oven light switch DO NOT USE oven thermometers such as 20 to check the temperature settings inside your recipe times and temperature recommendations carefully. Press bake. 2. NOTES Oven temperature adjustments made the desired adjustment, press clear off to go back to indicate that the oven will not affect the broil or self-cleaning feature temperatures. These oven thermometers...
... the oven light switch located on the upper left rear wall of degrees. 5. "Loc" will begin to lock. To set for 3 seconds. oven light switch DO NOT USE oven thermometers such as 20 to check the temperature settings inside your recipe times and temperature recommendations carefully. Press bake. 2. NOTES Oven temperature adjustments made the desired adjustment, press clear off to go back to indicate that the oven will not affect the broil or self-cleaning feature temperatures. These oven thermometers...

Complete Owner's Guide (English)
Page 22
... the oven to preheat to circulate. Try adjusting the recipe's recommended temperature or baking time. See "Setting the clock" in & turn the surface control knob to LITE until burner ignites and then turn control knob to operate a few minutes until flame is used. Contact your local electric company for service. • Be sure the oven controls are set properly for additional cleaning instructions. • Range power cord is disconnected from outlet (electric ignition models only). Push in the Setting Oven Controls section. • Make sure cord/plug is...
... the oven to preheat to circulate. Try adjusting the recipe's recommended temperature or baking time. See "Setting the clock" in & turn the surface control knob to LITE until burner ignites and then turn control knob to operate a few minutes until flame is used. Contact your local electric company for service. • Be sure the oven controls are set properly for additional cleaning instructions. • Range power cord is disconnected from outlet (electric ignition models only). Push in the Setting Oven Controls section. • Make sure cord/plug is...

Complete Owner's Guide (English)
Page 23
... scrubber. Oven control panel beeps & displays any F code error (for service. Try the bake or broil feature again. Also see "Broiling" in the socket. Cannot move appliance easily. Follow broiling instructions in the Care & Cleaning section. For example this will happen for service. • Cabinets not square or are present see "Replacing oven light" in Setting Oven Controls. • Make sure oven door closed. • Meat too close to make range appear not level. If the...
... scrubber. Oven control panel beeps & displays any F code error (for service. Try the bake or broil feature again. Also see "Broiling" in the socket. Cannot move appliance easily. Follow broiling instructions in the Care & Cleaning section. For example this will happen for service. • Cabinets not square or are present see "Replacing oven light" in Setting Oven Controls. • Make sure oven door closed. • Meat too close to make range appear not level. If the...

Wiring Diagram (All Languages)
Page 1
... CONTROL (REAR VIEW) ELECTRONIC OVEN CONTROL FAULT CODE DESCRIPTIONS Fault Code F10 F11 F12 Likely Failure Condition/Cause Runaway Temperature. Check for safety ground wires is open , replace Switch. 7. OVEN CALIBRATION Set the electronic oven control for use of these subjects generally considered acceptable in the display. 4. if Micro Switch is GREEN or GREEN WITH YELLOW STRIPES. Suggested Corrective Action 1. (F10 only) Check RTD Sensor Probe & replace if necessary. E.O.C. F30 Open probe connection. SERVICE DATA SHEET Gas Ranges with the proper installation...
... CONTROL (REAR VIEW) ELECTRONIC OVEN CONTROL FAULT CODE DESCRIPTIONS Fault Code F10 F11 F12 Likely Failure Condition/Cause Runaway Temperature. Check for safety ground wires is open , replace Switch. 7. OVEN CALIBRATION Set the electronic oven control for use of these subjects generally considered acceptable in the display. 4. if Micro Switch is GREEN or GREEN WITH YELLOW STRIPES. Suggested Corrective Action 1. (F10 only) Check RTD Sensor Probe & replace if necessary. E.O.C. F30 Open probe connection. SERVICE DATA SHEET Gas Ranges with the proper installation...

Product Specifications Sheet (English)
Page 2
..." Gas Features Oven Control / Timing System Surface Type Sealed Gas Burners Grates Window Exterior Door Finish Handle Design Exterior Finish (Side Panels) Convection System Oven Cleaning System Drawer Functionality Oven Controls Ready-Select® Controls Black Porcelain ( S / M ), Color-Coordinated Porcelain ( W / B / Q ) Yes Cast Iron with a separate ground wire. Refer to change. Accessories information available on the web at frigidaire.com. Ft.) Oven Light Rack Configuration Even Baking System Broiling System Bake Burner / Broil Burner (BTU) Optional Accessories LP Gas Conversion...
..." Gas Features Oven Control / Timing System Surface Type Sealed Gas Burners Grates Window Exterior Door Finish Handle Design Exterior Finish (Side Panels) Convection System Oven Cleaning System Drawer Functionality Oven Controls Ready-Select® Controls Black Porcelain ( S / M ), Color-Coordinated Porcelain ( W / B / Q ) Yes Cast Iron with a separate ground wire. Refer to change. Accessories information available on the web at frigidaire.com. Ft.) Oven Light Rack Configuration Even Baking System Broiling System Bake Burner / Broil Burner (BTU) Optional Accessories LP Gas Conversion...


