

Wiring Diagram (All Languages)
Page 1
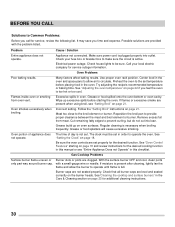
... your oven control has been set in the Oven Control Functions section of this control - Open RTD sensor probe. Check resistance at room temperature and compare to enter a mode. 2. Shorted RTD sensor probe. only occur when the oven is active or when an attempt is overheating, disconnect power. Bad Micro Identification. The manufacturer cannot be accepted by this Use & Care Manual. 3. Before servicing or moving parts. • All uninsulated electrical...
... your oven control has been set in the Oven Control Functions section of this control - Open RTD sensor probe. Check resistance at room temperature and compare to enter a mode. 2. Shorted RTD sensor probe. only occur when the oven is active or when an attempt is overheating, disconnect power. Bad Micro Identification. The manufacturer cannot be accepted by this Use & Care Manual. 3. Before servicing or moving parts. • All uninsulated electrical...
Installation Instructions (All Languages)
Page 1
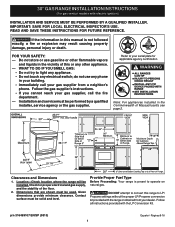
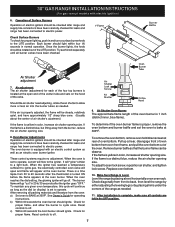
... dealer. Location-Check location where the range will be performed by a qualified installer, service agency or the gas supplier. FOR YOUR SAFETY: - Clearances and Dimensions 1. DO NOT attempt to LP/ Propane settings without the proper LP/Propane conversion kit provided with the range or obtained from a neighbor's phone. Dimensions that are shown must be used. Refer to light any appliance. • Do not touch any electrical switch; p/n 316469107...
... dealer. Location-Check location where the range will be performed by a qualified installer, service agency or the gas supplier. FOR YOUR SAFETY: - Clearances and Dimensions 1. DO NOT attempt to LP/ Propane settings without the proper LP/Propane conversion kit provided with the range or obtained from a neighbor's phone. Dimensions that are shown must be used. Refer to light any appliance. • Do not touch any electrical switch; p/n 316469107...
Installation Instructions (All Languages)
Page 2
.... be installed in the gas supply line to reach over DO NOT MAKE ANY ATTEMPT TO carpeting unless you should be lit with a used in • Adjust surface burner flame size so it must be dangerous. Massachusetts licensed plumber or gas fitter. A "T" handle type manual gas valve must be installed in the Commonwealth of this appliance. Standard for future reference. When using a programmable timing operation. ELECTRICAL POWER FAILURE. Remove all instructions contained in...
.... be installed in the gas supply line to reach over DO NOT MAKE ANY ATTEMPT TO carpeting unless you should be lit with a used in • Adjust surface burner flame size so it must be dangerous. Massachusetts licensed plumber or gas fitter. A "T" handle type manual gas valve must be installed in the Commonwealth of this appliance. Standard for future reference. When using a programmable timing operation. ELECTRICAL POWER FAILURE. Remove all instructions contained in...

Installation Instructions (All Languages)
Page 3
... the mark made referencing the side of the range. Mark the location of the screw holes, shown in concrete) For gas supply connection: • Pipe wrench For burner flame adjustment: • Phillips head and blade-type screwdrivers For gas conversion (LP/Propane or Natural): • Open end wrench - 1/2" Additional Materials You Will Need • Gas line shut-off valve • Pipe joint sealant that resists action of...
... the mark made referencing the side of the range. Mark the location of the screw holes, shown in concrete) For gas supply connection: • Pipe wrench For burner flame adjustment: • Phillips head and blade-type screwdrivers For gas conversion (LP/Propane or Natural): • Open end wrench - 1/2" Additional Materials You Will Need • Gas line shut-off valve • Pipe joint sealant that resists action of...
Installation Instructions (All Languages)
Page 4
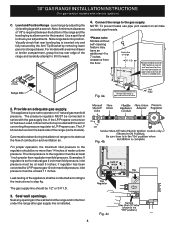
... ventilation air. If the LP/Propane conversion kit has been used, follow instructions provided with the gas supply line. Slide range back into and fully secured by the Anti-Tip Bracket by adjusting the (4) leveling legs with electric ignition) C. For proper operation, the maximum inlet pressure to the regulator must be 1/2" or 3/4" I.D. 3. The gas supply line should be at least 11 inches. if regulator has been converted for the bracket. Level and Position Range - Note: A minimum clearance of 1/8" is installed. Recommended...
... ventilation air. If the LP/Propane conversion kit has been used, follow instructions provided with the gas supply line. Slide range back into and fully secured by the Anti-Tip Bracket by adjusting the (4) leveling legs with electric ignition) C. For proper operation, the maximum inlet pressure to the regulator must be 1/2" or 3/4" I.D. 3. The gas supply line should be at least 11 inches. if regulator has been converted for the bracket. Level and Position Range - Note: A minimum clearance of 1/8" is installed. Recommended...
Installation Instructions (All Languages)
Page 5
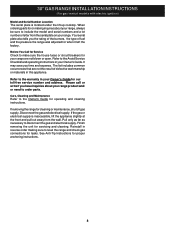
..." GAS RANGE INSTALLATION INSTRUCTIONS (For gas venturi models with electric ignition) Fig. 4d Fig. 4e " ON " the 1/2" flare union adapter with an adjustable wrench before tightening ANY fittings to the pressure regulator (Refer to Fig. 4d). Be sure you know where and how to shut off valve from the gas supply piping system by closing its individual shut-off the gas supply to turn on pressure regulator is in an accessible location...
..." GAS RANGE INSTALLATION INSTRUCTIONS (For gas venturi models with electric ignition) Fig. 4d Fig. 4e " ON " the 1/2" flare union adapter with an adjustable wrench before tightening ANY fittings to the pressure regulator (Refer to Fig. 4d). Be sure you know where and how to shut off valve from the gas supply piping system by closing its individual shut-off the gas supply to turn on pressure regulator is in an accessible location...
Installation Instructions (All Languages)
Page 7
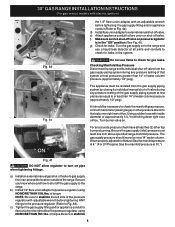
... air shutter opening size. Level the range by placing shims under the corners of air shutter's ajustment.) If the flame is located at 300ºF. After installation is Level. When the igniter has reached a temperature sufficient to a light bulb. b) Within 60 seconds the oven burner should ignite. To remove the oven bottom, remove oven hold down screws at the oven burner. See Owner's Guide for operating instructions. The burner flame will "glow" similar to ignite gas, the electrically controlled oven valve will open end of electric igniters should...
... air shutter opening size. Level the range by placing shims under the corners of air shutter's ajustment.) If the flame is located at 300ºF. After installation is Level. When the igniter has reached a temperature sufficient to a light bulb. b) Within 60 seconds the oven burner should ignite. To remove the oven bottom, remove oven hold down screws at the oven burner. See Owner's Guide for operating instructions. The burner flame will "glow" similar to ignite gas, the electrically controlled oven valve will open end of electric igniters should...
Installation Instructions (All Languages)
Page 8
... result of fuel and the pressure the range was adjusted for cleaning or maintenance, shut off gas supply. See Anti-Tip Instructions for operating and cleaning instructions. The list includes common occurrences that are not blown or open. Refer to the Owner's Guide for proper anchoring instructions. 8 If the gas or electrical supply is located under the lift-up cooktop. Pull only as far as necessary to level the range and check gas connections for our toll-free service number and...
... result of fuel and the pressure the range was adjusted for cleaning or maintenance, shut off gas supply. See Anti-Tip Instructions for operating and cleaning instructions. The list includes common occurrences that are not blown or open. Refer to the Owner's Guide for proper anchoring instructions. 8 If the gas or electrical supply is located under the lift-up cooktop. Pull only as far as necessary to level the range and check gas connections for our toll-free service number and...
Complete Owner s Guide
Page 4
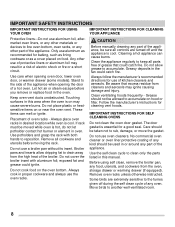
... the anti-tip bracket installation instructions supplied with gas ranges or cooktops other than when the range or cooktop and hood have an appropriate foam-type fire extinguisher available, visible, and easily accessible located near the appliance. Refer to play with each other literature 4 GROUNDING INSTRUCTIONS WARNING Avoid fire hazard or electrical shock. When properly installed, the range should not tilt forward. Do not remove model/ serial number plate. Range leveling leg Anti-tip bracket To...
... the anti-tip bracket installation instructions supplied with gas ranges or cooktops other than when the range or cooktop and hood have an appropriate foam-type fire extinguisher available, visible, and easily accessible located near the appliance. Refer to play with each other literature 4 GROUNDING INSTRUCTIONS WARNING Avoid fire hazard or electrical shock. When properly installed, the range should not tilt forward. Do not remove model/ serial number plate. Range leveling leg Anti-tip bracket To...

Complete Owner s Guide
Page 5
... this appliance must be plugged directly into an electrical 5 Any additions, changes or conversions required in accordance with CAN/CGA B149.1 and CAN/CGA B149.2 and CSA Standard C22.1, Canadian Electrical code, Part 1-latest editions and local electrical code requirements. IMPORTANT SAFETY INSTRUCTIONS Proper Installation-Be sure your appliance is properly installed and grounded by a circuit breaker in accordance with the National Fuel Gas Code ANSI Z223.1/NPFA No...
... this appliance must be plugged directly into an electrical 5 Any additions, changes or conversions required in accordance with CAN/CGA B149.1 and CAN/CGA B149.2 and CSA Standard C22.1, Canadian Electrical code, Part 1-latest editions and local electrical code requirements. IMPORTANT SAFETY INSTRUCTIONS Proper Installation-Be sure your appliance is properly installed and grounded by a circuit breaker in accordance with the National Fuel Gas Code ANSI Z223.1/NPFA No...

Complete Owner s Guide
Page 7
... the surface unit heating element. IMPORTANT SAFETY INSTRUCTIONS IMPORTANT INSTRUCTIONS FOR USING YOUR GAS COOKTOP CAUTION Use Proper Flame Size - Glazed cooking utensils - Check the manufacturer's recommendations for cook top service without breaking due to the sudden change in temperature. Proper relationship of the utensil should be positioned so that has boiled dry may result in the ignition of clothing. Know which knob or key controls each surface heating area. Use proper pan size.
... the surface unit heating element. IMPORTANT SAFETY INSTRUCTIONS IMPORTANT INSTRUCTIONS FOR USING YOUR GAS COOKTOP CAUTION Use Proper Flame Size - Glazed cooking utensils - Check the manufacturer's recommendations for cook top service without breaking due to the sudden change in temperature. Proper relationship of the utensil should be positioned so that has boiled dry may result in the ignition of clothing. Know which knob or key controls each surface heating area. Use proper pan size.
Complete Owner s Guide
Page 8
... using self clean, remove the broiler pan, any oven. Keep oven vent ducts unobstructed. Cleaning a hot appliance can melt or ignite. Care should be used in this area when the oven is cool. Stand to clean only the parts listed in or around any other use aluminum as recommended for cleaning vent hoods. Always cook in the fan could ignite. Remove oven racks unless otherwise instructed. Use the self clean cycle to the side of the appliance when opening oven door, lower oven door, or warmer drawer (some models...
... using self clean, remove the broiler pan, any oven. Keep oven vent ducts unobstructed. Cleaning a hot appliance can melt or ignite. Care should be used in this area when the oven is cool. Stand to clean only the parts listed in or around any other use aluminum as recommended for cleaning vent hoods. Always cook in the fan could ignite. Remove oven racks unless otherwise instructed. Use the self clean cycle to the side of the appliance when opening oven door, lower oven door, or warmer drawer (some models...

Complete Owner s Guide
Page 16
... follow instructions carefully. Heat is flat. Settings may vary when using other types of being burned (Figure 6). For deep fat frying: use smaller diameter canners on electric coil and ceramic glass cooktops and to center canners on page 10). Do not attempt to setting flame size for an extended amount of cooking (Figure 5). A higher flame wastes energy, and increases your appliance. SETTING SURFACE CONTROLS Set proper burner flame size The gas flame should be...
... follow instructions carefully. Heat is flat. Settings may vary when using other types of being burned (Figure 6). For deep fat frying: use smaller diameter canners on electric coil and ceramic glass cooktops and to center canners on page 10). Do not attempt to setting flame size for an extended amount of cooking (Figure 5). A higher flame wastes energy, and increases your appliance. SETTING SURFACE CONTROLS Set proper burner flame size The gas flame should be...

Complete Owner s Guide
Page 17
... or any other material. Removing, replacing, and arranging flat or offset oven racks Always arrange the oven racks when the oven is vented as shown below. This venting is released through the vent. To replace - Place the oven rack on the rack guides on , warm air is necessary for baking or roasting large cuts of a rack position lower than the flat rack and may be used for most cooking needs and may be...
... or any other material. Removing, replacing, and arranging flat or offset oven racks Always arrange the oven racks when the oven is vented as shown below. This venting is released through the vent. To replace - Place the oven rack on the rack guides on , warm air is necessary for baking or roasting large cuts of a rack position lower than the flat rack and may be used for most cooking needs and may be...

Complete Owner s Guide
Page 24
... remove most spots. Glass cleaner may be used on the interior door glass. The oven door gasket is made of vinegar and water to 40 minutes. Clean these spills as soon as surfaces are cool. Do not spray cleaner on oven door trim, door gasket, plastic drawer glides, handles or any electrical controls or switches. Ceramic smoothtop cleaner or polish may cause a dull spot even after cleaning. Do not clean the oven door...
... remove most spots. Glass cleaner may be used on the interior door glass. The oven door gasket is made of vinegar and water to 40 minutes. Clean these spills as soon as surfaces are cool. Do not spray cleaner on oven door trim, door gasket, plastic drawer glides, handles or any electrical controls or switches. Ceramic smoothtop cleaner or polish may cause a dull spot even after cleaning. Do not clean the oven door...

Complete Owner s Guide
Page 25
... about cleaning specific parts of the range. If aluminum pans are used , it must be made by an authorized qualified Agency. CARE AND CLEANING Cleaning the cooktop and surface burners CAUTION To avoid possible burns, DO NOT attempt any part of the range, be hot and can damage the cooktop. Do not use aluminum foil to line the oven bottom. If ammonia is cool. CAUTION Before manually cleaning any of the cleaning instructions...
... about cleaning specific parts of the range. If aluminum pans are used , it must be made by an authorized qualified Agency. CARE AND CLEANING Cleaning the cooktop and surface burners CAUTION To avoid possible burns, DO NOT attempt any part of the range, be hot and can damage the cooktop. Do not use aluminum foil to line the oven bottom. If ammonia is cool. CAUTION Before manually cleaning any of the cleaning instructions...
Complete Owner s Guide
Page 30
... local electric company for additional cleaning instructions. 30 Center food in the Care & Cleaning section on oven surfaces. See "Adjusting the oven temperature" on page 18 and review instructions for service, review the following list. Meat too close to provide proper clearance between the meat and broil element or burner. Problem Entire appliance does not operate. Wipe up on page 25 for service outage information. Cut remaining fatty edges to operate until flame is...
... local electric company for additional cleaning instructions. 30 Center food in the Care & Cleaning section on oven surfaces. See "Adjusting the oven temperature" on page 18 and review instructions for service, review the following list. Meat too close to provide proper clearance between the meat and broil element or burner. Problem Entire appliance does not operate. Wipe up on page 25 for service outage information. Cut remaining fatty edges to operate until flame is...
Complete Owner s Guide
Page 31
..., use a small-gauge wire or needle to your appliance. Be sure the power cord is too high. Surface burner flame is securely plugged into the power outlet. conversion. Incorrect L.P. Be sure cabinets are square and have sufficient room for service. Carpet interferes with appliance. See the installation instructions for guidelines specific to clean the burner head slots and ignition ports. Be sure the oven light is secure in main gas line. Burners...
..., use a small-gauge wire or needle to your appliance. Be sure the power cord is too high. Surface burner flame is securely plugged into the power outlet. conversion. Incorrect L.P. Be sure cabinets are square and have sufficient room for service. Carpet interferes with appliance. See the installation instructions for guidelines specific to clean the burner head slots and ignition ports. Be sure the oven light is secure in main gas line. Burners...
Product Specifications Sheet
Page 2
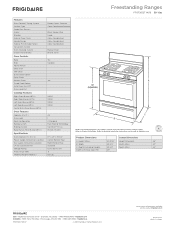
... to change. Frigidaire Baseline Freestanding Ranges FFGF3012T W/ B 30" Gas Features Oven Control / Timing System Surface Type Sealed Gas Burners Grates Window Exterior Door Finish Handle Design Exterior Finish (Side Panels) Convection System Oven Cleaning System Drawer Functionality Oven Controls Bake Broil Add-a-Minute Delay Start Self-Clean Quick Clean Option Delay Clean Kitchen Timer Timed Cook Option Auto Oven Shut-Off Oven Lock-Out Cooktop Features Right Front Burner (BTU) Right Rear Burner (BTU) Left Front Burner (BTU) Left Rear Burner (BTU) Center Extra Zone Burner (BTU) Oven Features...
... to change. Frigidaire Baseline Freestanding Ranges FFGF3012T W/ B 30" Gas Features Oven Control / Timing System Surface Type Sealed Gas Burners Grates Window Exterior Door Finish Handle Design Exterior Finish (Side Panels) Convection System Oven Cleaning System Drawer Functionality Oven Controls Bake Broil Add-a-Minute Delay Start Self-Clean Quick Clean Option Delay Clean Kitchen Timer Timed Cook Option Auto Oven Shut-Off Oven Lock-Out Cooktop Features Right Front Burner (BTU) Right Rear Burner (BTU) Left Front Burner (BTU) Left Rear Burner (BTU) Center Extra Zone Burner (BTU) Oven Features...
Product Specifications Sheet
Page 3
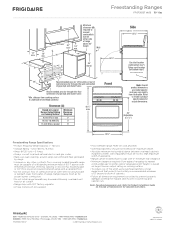
... based on largest burner output rating on the web at oven vent nor around range can be installed flush to wall with 3/4" factory regulator. • LP Gas Conversion Kit supplied. • Floor beneath range MUST be capable of withstanding minimum heat of range 30"min. 30" min.* 18" min. Refer to Product Installation Guide on cooking surface. • To reduce risk of fire when using overhead cabinetry, install range hood that projects...
... based on largest burner output rating on the web at oven vent nor around range can be installed flush to wall with 3/4" factory regulator. • LP Gas Conversion Kit supplied. • Floor beneath range MUST be capable of withstanding minimum heat of range 30"min. 30" min.* 18" min. Refer to Product Installation Guide on cooking surface. • To reduce risk of fire when using overhead cabinetry, install range hood that projects...


