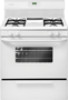
Complete Owner's Guide (English)
Page 4
... baking soda, a dry chemical or foam-type extinguisher. • When heating fat or grease, watch it is not turned off the range. IMPORTANT For electric ignition models only: Do not attempt to cool. If the power fails, always turn off and the power resumes, the range will begin to become hot...
Complete Owner's Guide (English)
Page 5
... installation of these liners may result in the oven. Be aware that excess residue from the rack before you remove or replace food in ignition of clothing. Proper relationship of utensil to flame will expose a portion of the burner flame to the sudden change in temperature. Then adjust...high heat of the broiler. • Do not cover the broiler insert with both hands to keep all utensils from cleaners and aerosols may ignite causing damage and injury. • Clean ventilating hoods frequently-Grease should be positioned so that burner has lit. Always place oven racks in ...
Complete Owner's Guide (English)
Page 8
BEFORE SETTING SURFACE CONTROLS Using proper cookware For best cooking results, cookware should be steady and sharp. Potholders, towels or wooden spoons could melt or ignite. use . Do not attempt to deep fat fry too much food at once as plastic salt and pepper shakers, spoon holders or plastic wrappings on ...
Complete Owner's Guide (English)
Page 9
... more quickly. • Use the highest heat seating when first bringing the water to the LITE position, all electronic surface ignitors will ignite automatically from the bottom center when home canning using a ceramic cooktop. • Make sure the diameter of the canner does not exceed... markings and adjust the flame as plastic salt and pepper shakers, spoon holders or plastic wrappings on the grate. 2. The electronic ignitor will ignite. SETTING SURFACE CONTROLS Fig. 1 IMPORTANT • NEVER place or straddle a cooking utensil over 2 different surface cooking areas at the same time...
Complete Owner's Guide (English)
Page 12
... drawer rack Fig. 1 NOTES • For medium doneness, position the broiler rack close broiler drawer and preheat broiler 5 minutes before broiling. 5. the exposed grease could ignite. Be sure rack is level before adding food. 12 Fig. 3 To set broil 1. Press and hold the or until drawer stops. 2. DO NOT cover insert...
Complete Owner's Guide (English)
Page 15
... allow the support rods to cool. • Any additions, changes or conversions required in the recessed or contoured areas, blot up rods will prevent improper ignition and an uneven flame. Be sure that the top is raised for cleaning. CAUTION When lowering the lift-up rods Fig. 1 Raising and lowering the...
Complete Owner's Guide (English)
Page 18
...feature. With the burner OFF, use a small-gauge wire or needle to operate a few minutes until flame is disconnected from outlet (electric ignition models only). See section on Setting Surface Controls. • Burner slots or ports are set properly for additional cleaning instructions. • Range... power cord is full. Burners can be sure. Allow the burner to burner head slots and ignition ports. Allow the oven to preheat to common problems Problem Poor baking results. With the surface burner OFF, clean ports with a ...
Installation Instructions (All Languages)
Page 1
...ñol - Location-Check location where the range will be used. Páginas 9-16 30" GAS RANGE INSTALLATION INSTRUCTIONS (For gas venturi models with electric ignition) INSTALLATION AND SERVICE MUST BE PERFORMED BY A QUALIFIED INSTALLER. Do not store or use any phone in the vicinity of the floor. 2. Installation and service...
Installation Instructions (All Languages)
Page 2
... latest edition when installed in length. Be sure to leave these instructions with electric ignition) Important Notes to the range. can withstand heat at the oven The electric ignitor will automatically re-ignite the oven burner vent nor around the range can CONTROLS TO "OFF" IN THE ... & Care Guide. As children grow, teach them • Remove broiler pan, food and other . 2 Installation of OPERATE THE ELECTRIC IGNITION OVEN DURING AN 1/4-inch thick plywood between the range and carpeting. States. • Do not use in combination with your range is unattended.
Installation Instructions (All Languages)
Page 3
... in wood or metal. Mark the location of the screw holes, shown in template. • A new flexible metal appliance conduit (1/2" NPT x 3/4" or 1/2" I .D.) supplied with electric ignition) Before Starting Tools You Will Need For leveling legs and Anti-Tip Bracket: • Adjustable wrench or channel lock pliers • 5/16" Nutdriver or Flat...
Installation Instructions (All Languages)
Page 4
... a wrench. NOTE: To prevent leaks use . Slide range back into and fully secured by the Anti-Tip Bracket by adjusting the (4) leveling legs with electric ignition) C.
Installation Instructions (All Languages)
Page 5
... to flare union on pressure regulator is in the "ON" position (See Fig. 4f). 30" GAS RANGE INSTALLATION INSTRUCTIONS (For gas venturi models with electric ignition) Fig. 4d Fig. 4e " ON " the 1/2" flare union adapter with adjustable wrench before tightening the gas supply fitting and/or appliance conduit (Refer to Fig...
Installation Instructions (All Languages)
Page 6
... a properly grounded three-prong wall receptacle. Extension Cord Precautions: Because of any extension cord. 30" GAS RANGE INSTALLATION INSTRUCTIONS (For gas venturi models with electric ignition) 5.
Installation Instructions (All Languages)
Page 7
...lock screw, reposition air shutter, and tighten lock screw. Check diagonally from the burner, reduce the air shutter opening size. Each burner should ignite. Air adjustment The air shutter (adjustment) for each knob separately until all burner valves have been carefully checked for proper flame, and allow.... 10. 30" GAS RANGE INSTALLATION INSTRUCTIONS (For gas venturi models with an electric control system as well as an electric oven burner igniter. Check Surface Burners To check for leaks and range has been connected to back, then level the range by either adjusting the leveling ...
Installation Instructions (All Languages)
Page 8
... the range and check gas connections for cleaning or maintenance, shut off gas supply. 30" GAS RANGE INSTALLATION INSTRUCTIONS (For gas venturi models with electric ignition) Model and Serial Number Location The serial plate is inaccessible, lift the appliance slightly at the front and pull out away from the serial plate...