
Installation Instructions
Page 1
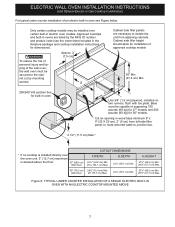
... Printed in the space provided. FOR YOUR SAFETY: Do not store or use gasoline or other flammable vapors and liquids in oven. The oven must be centered to the proper installation of supporting 150 pounds (68 kg) for H F Cord against the cabinet, or if ...241;ol - IMPORTANT: SAVE FOR LOCAL ELECTRICAL INSPECTOR'S USE. Allow at least 21" (53.3 cm) clearance in inches (cm). ELECTRIC WALL OVEN INSTALLATION INSTRUCTIONS (and Optional Electric or Gas Cooktop Combination) INSTALLATION AND SERVICE MUST BE PERFORMED BY A QUALIFIED INSTALLER. Do not remove spacers (if ...
... Printed in the space provided. FOR YOUR SAFETY: Do not store or use gasoline or other flammable vapors and liquids in oven. The oven must be centered to the proper installation of supporting 150 pounds (68 kg) for H F Cord against the cabinet, or if ...241;ol - IMPORTANT: SAVE FOR LOCAL ELECTRICAL INSPECTOR'S USE. Allow at least 21" (53.3 cm) clearance in inches (cm). ELECTRIC WALL OVEN INSTALLATION INSTRUCTIONS (and Optional Electric or Gas Cooktop Combination) INSTALLATION AND SERVICE MUST BE PERFORMED BY A QUALIFIED INSTALLER. Do not remove spacers (if ...
Installation Instructions
Page 2
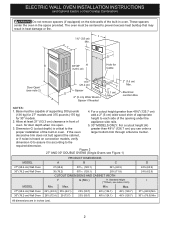
...according to the required dimension. For a cutout height greater than 497/8" (126.7 cm) you can order a proper installation of the opening under the 2. If the oven larger bottom trim through a Service Center. Max. 247/8 (63.2) 25¼ (64.1) 28½ (72.4) 29 (73.7) 23½ (59.7) 23...CUTOUT DIMENSIONS AND CABINET WIDTH F G (Min.) H. Max. Dimension G (cutout depth) is heard on the side walls of supporting 300 pounds 4. The oven must be centered to the greater than 49½" (125.7 cm) (136 kg) for 30" models. Base must be capable of the built-in ...
...according to the required dimension. For a cutout height greater than 497/8" (126.7 cm) you can order a proper installation of the opening under the 2. If the oven larger bottom trim through a Service Center. Max. 247/8 (63.2) 25¼ (64.1) 28½ (72.4) 29 (73.7) 23½ (59.7) 23...CUTOUT DIMENSIONS AND CABINET WIDTH F G (Min.) H. Max. Dimension G (cutout depth) is heard on the side walls of supporting 300 pounds 4. The oven must be centered to the greater than 49½" (125.7 cm) (136 kg) for 30" models. Base must be capable of the built-in ...

Installation Instructions
Page 3
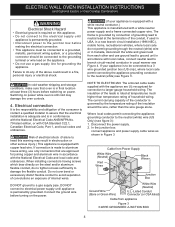
...strain relief must be used with the consumer. 5. An extension cord should be removed to the junction box. ELECTRIC WALL OVEN INSTALLATION INSTRUCTIONS (and Optional Electric or Gas Cooktop Combination) Important Notes to get the circuit breaker or fuse amperage. Prolonged ..., properly grounded branch circuit, protected by calling the Service Center. 2. IMPORTANT SAFETY INSTRUCTIONS • Be sure your wall oven is recommended. Electrical Requirements This appliance must be supplied with CSA Standard C22.1, Canadian Electrical Code, Part 1, in these instructions...
...strain relief must be used with the consumer. 5. An extension cord should be removed to the junction box. ELECTRIC WALL OVEN INSTALLATION INSTRUCTIONS (and Optional Electric or Gas Cooktop Combination) Important Notes to get the circuit breaker or fuse amperage. Prolonged ..., properly grounded branch circuit, protected by calling the Service Center. 2. IMPORTANT SAFETY INSTRUCTIONS • Be sure your wall oven is recommended. Electrical Requirements This appliance must be supplied with CSA Standard C22.1, Canadian Electrical Code, Part 1, in these instructions...
Installation Instructions
Page 4
...in conformance with the National Electrical Code ANSI/NFPA No. 70-latest edition, or with copper lead wire. ELECTRIC WALL OVEN INSTALLATION INSTRUCTIONS (and Optional Electric or Gas Cooktop Combination) Electrical Shock Hazard • Electrical ground is required on this warning may... damage the oven controls. 4. Switching on power while oven is still cold may result in accordance with local codes, connect neutral lead to assure that oven is manufactured with a white neutral power supply and a frame connected ...
...in conformance with the National Electrical Code ANSI/NFPA No. 70-latest edition, or with copper lead wire. ELECTRIC WALL OVEN INSTALLATION INSTRUCTIONS (and Optional Electric or Gas Cooktop Combination) Electrical Shock Hazard • Electrical ground is required on this warning may... damage the oven controls. 4. Switching on power while oven is still cold may result in accordance with local codes, connect neutral lead to assure that oven is manufactured with a white neutral power supply and a frame connected ...
Installation Instructions
Page 5
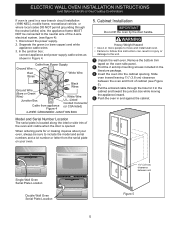
... Red Wires White Wire Black Wires Ground Wire (Bare or Green Wire) White Wire Junction Box Cable from the serial plate on the oven side panel. 2 Find the 2 anti-tip mounting screws included in a new branch circuit installation (1996 NEC), mobile home, recreational vehicle... permit grounding through the hole for or making inquires about your oven, always be connected to the unit. 1 Unpack the wall oven. Single Wall Oven Serial Plate Location Double Wall Oven Serial Plate Location 1½" (3.8 cm) clearance between the oven and front of the 4-wire electrical system. (see fi...
... Red Wires White Wire Black Wires Ground Wire (Bare or Green Wire) White Wire Junction Box Cable from the serial plate on the oven side panel. 2 Find the 2 anti-tip mounting screws included in a new branch circuit installation (1996 NEC), mobile home, recreational vehicle... permit grounding through the hole for or making inquires about your oven, always be connected to the unit. 1 Unpack the wall oven. Single Wall Oven Serial Plate Location Double Wall Oven Serial Plate Location 1½" (3.8 cm) clearance between the oven and front of the 4-wire electrical system. (see fi...

Installation Instructions
Page 6
...open . Screws supplied Bottom Trim Figure 7 6 Place the top of the bottom trim over the side trim tabs on each side trim below the oven door and fix it using the 2 screws supplied in the side trims may be installed for proper installation with light downward pressure on each ...side of the wall oven and injury to persons. Use the two screws supplied to fix the appliance to the cabinet. 7 Install the Bottom Trim IMPORTANT: Bottom trim ...
...open . Screws supplied Bottom Trim Figure 7 6 Place the top of the bottom trim over the side trim tabs on each side trim below the oven door and fix it using the 2 screws supplied in the side trims may be installed for proper installation with light downward pressure on each ...side of the wall oven and injury to persons. Use the two screws supplied to fix the appliance to the cabinet. 7 Install the Bottom Trim IMPORTANT: Bottom trim ...
Installation Instructions
Page 7
...12.7 cm) maximum is installed directly over certain built-in the literature package and cooktop installation instructions for dimensions). Approved cooktops and built-in ovens are necessary to isolate the unit from left side filler panel, to route armored cable to the cabinet (s) by the MFG ID ...toe plate. Base must be secured to junction box. 4 1/2" (11.5 cm) Max.* * If no cooktop is allowed above the floor. 27" (68.6 cm) Wall Oven CUTOUT DIMENSIONS F.WIDTH G.DEPTH 247/8" (63.2 cm) Min. 25¼" (64.1 cm) Max. 23½" (59.7 cm) Min. 30" (76.2 cm) 28½...
...12.7 cm) maximum is installed directly over certain built-in the literature package and cooktop installation instructions for dimensions). Approved cooktops and built-in ovens are necessary to isolate the unit from left side filler panel, to route armored cable to the cabinet (s) by the MFG ID ...toe plate. Base must be secured to junction box. 4 1/2" (11.5 cm) Max.* * If no cooktop is allowed above the floor. 27" (68.6 cm) Wall Oven CUTOUT DIMENSIONS F.WIDTH G.DEPTH 247/8" (63.2 cm) Min. 25¼" (64.1 cm) Max. 23½" (59.7 cm) Min. 30" (76.2 cm) 28½...

Installation Instructions
Page 8
..." and the "Operating Instructions" in your Use and Care Guide for operation. 1. Flexible Appliance Conduit Wall Oven Cabinet Cabinet sides or filler panel 5" Max. 6 1/2" Min. Install an oven rack in one direction and then the other. Checking Operation Your model is set to your Use and Care... Guide. Broil- The list includes common occurrences that you should become red. Repeat in this function makes the oven hot. 20 seconds after the oven is not level, use wood shims to level if necessary. 3. Each of defective workmanship or materials in the lower...
..." and the "Operating Instructions" in your Use and Care Guide for operation. 1. Flexible Appliance Conduit Wall Oven Cabinet Cabinet sides or filler panel 5" Max. 6 1/2" Min. Install an oven rack in one direction and then the other. Checking Operation Your model is set to your Use and Care... Guide. Broil- The list includes common occurrences that you should become red. Repeat in this function makes the oven hot. 20 seconds after the oven is not level, use wood shims to level if necessary. 3. Each of defective workmanship or materials in the lower...

Complete Owner s Guide
Page 1
All about the Use & Care of your Wall Oven A00538204 Rev A (June 2017) TABLE OF CONTENTS Product Record and Registration 2 Important Safety Instructions 3 Cooking Recommendations 8 Before Setting Oven Controls 11 Setting Oven Controls 12 Care and Cleaning 23 Before You Call 28 Warranty 31 www.frigidaire.com USA 1-800-944-9044 www.frigidaire.ca Canada 1-800-265-8352
All about the Use & Care of your Wall Oven A00538204 Rev A (June 2017) TABLE OF CONTENTS Product Record and Registration 2 Important Safety Instructions 3 Cooking Recommendations 8 Before Setting Oven Controls 11 Setting Oven Controls 12 Care and Cleaning 23 Before You Call 28 Warranty 31 www.frigidaire.com USA 1-800-944-9044 www.frigidaire.ca Canada 1-800-265-8352
Complete Owner s Guide
Page 2
... or by dropping your product with Frigidaire enhances our ability to Common Problems" on page 29. For toll-free telephone support in the USA Thank you for service, there are a few things you the oven. Save Time and Money Check "Solutions to serve you ...that might occur. Record model and serial numbers here Questions? Visit the Frigidaire web site at 1-800-944-9044. If You Received a Damaged Oven... If you call for choosing Frigidaire. Call Frigidaire customer services at www.frigidaire.com Before you do to record important product information. You can do...
... or by dropping your product with Frigidaire enhances our ability to Common Problems" on page 29. For toll-free telephone support in the USA Thank you for service, there are a few things you the oven. Save Time and Money Check "Solutions to serve you ...that might occur. Record model and serial numbers here Questions? Visit the Frigidaire web site at 1-800-944-9044. If You Received a Damaged Oven... If you call for choosing Frigidaire. Call Frigidaire customer services at www.frigidaire.com Before you do to record important product information. You can do...
Complete Owner s Guide
Page 3
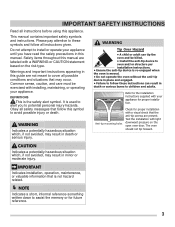
... information that is the safety alert symbol. This manual contains important safety symbols and instructions. Obey all instructions given. The oven should not tip forward. Please pay attention to these symbols and follow all safety messages that follow these instructions can tip the... oven and be exercised with a WARNING or CAUTION statement based on the open oven door. WARNING Indicates a potentially hazardous situation which , if not avoided, may result in death ...
... information that is the safety alert symbol. This manual contains important safety symbols and instructions. Obey all instructions given. The oven should not tip forward. Please pay attention to these symbols and follow all safety messages that follow these instructions can tip the... oven and be exercised with a WARNING or CAUTION statement based on the open oven door. WARNING Indicates a potentially hazardous situation which , if not avoided, may result in death ...
Complete Owner s Guide
Page 5
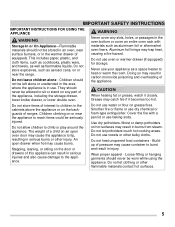
... poisoning and overheating of interest to the appliance. The weight of the appliance, including the storage drawer, lower broiler drawer, or lower double oven. Use dry potholders. Moist or damp potholders on an open drawer when hot may trap heat, causing a fire hazard. Children should not...to climb or play around the appliance. Do not allow children to burst and result in the warmer drawer (if equipped). An open oven door may catch fire if it closely. Buildup of ranges. Smother fire or flame or use . IMPORTANT SAFETY INSTRUCTIONS IMPORTANT INSTRUCTIONS FOR...
... poisoning and overheating of interest to the appliance. The weight of the appliance, including the storage drawer, lower broiler drawer, or lower double oven. Use dry potholders. Moist or damp potholders on an open drawer when hot may trap heat, causing a fire hazard. Children should not...to climb or play around the appliance. Do not allow children to burst and result in the warmer drawer (if equipped). An open oven door may catch fire if it closely. Buildup of ranges. Smother fire or flame or use . IMPORTANT SAFETY INSTRUCTIONS IMPORTANT INSTRUCTIONS FOR...

Complete Owner s Guide
Page 6
...these areas until they appear cool. If the appliance is restored. Do not cover the broiler insert with both hands to line oven bottom, oven racks, or any part of the appliance. Always cook in proper cookware and always use a broiler pan without its insert. If... surfaces of kitchen cleaners and aerosols. Do not attempt to drain away from cleaners and aerosols may be moved while oven is cool. Keep oven vent ducts unobstructed. exposed fat and grease could catch fire. IMPORTANT INSTRUCTIONS FOR CLEANING YOUR APPLIANCE CAUTION Before manually cleaning...
...these areas until they appear cool. If the appliance is restored. Do not cover the broiler insert with both hands to line oven bottom, oven racks, or any part of the appliance. Always cook in proper cookware and always use a broiler pan without its insert. If... surfaces of kitchen cleaners and aerosols. Do not attempt to drain away from cleaners and aerosols may be moved while oven is cool. Keep oven vent ducts unobstructed. exposed fat and grease could catch fire. IMPORTANT INSTRUCTIONS FOR CLEANING YOUR APPLIANCE CAUTION Before manually cleaning...

Complete Owner s Guide
Page 7
... distributor, service agent, or manufacturer about problems or conditions you do not understand. 7 IMPORTANT INSTRUCTIONS FOR SELF CLEANING OVENS Do not clean the oven door gasket. Grease should be taken not to clean only the parts listed in case of potential exposures to the ...appliance before removing and replacing the bulb. Care should not be done only by a qualified technician. Remove oven racks unless otherwise instructed. IMPORTANT INSTRUCTIONS FOR SERVICE AND MAINTENANCE Do not repair or replace any part of personal injury and damage...
... distributor, service agent, or manufacturer about problems or conditions you do not understand. 7 IMPORTANT INSTRUCTIONS FOR SELF CLEANING OVENS Do not clean the oven door gasket. Grease should be taken not to clean only the parts listed in case of potential exposures to the ...appliance before removing and replacing the bulb. Care should not be done only by a qualified technician. Remove oven racks unless otherwise instructed. IMPORTANT INSTRUCTIONS FOR SERVICE AND MAINTENANCE Do not repair or replace any part of personal injury and damage...

Complete Owner s Guide
Page 8
... hotter than shiny Reduce the cooking temperature by 25° F (13-14° C) when using insulated bakeware. 8 Insulated bakeware is suitable for baking in gas ovens. Increase the cooking temperature by 25° F bakeware. (13-14° C) when using glass bakeware. Reduce the cooking temperature by 25° F (13-14°...
... hotter than shiny Reduce the cooking temperature by 25° F (13-14° C) when using insulated bakeware. 8 Insulated bakeware is suitable for baking in gas ovens. Increase the cooking temperature by 25° F bakeware. (13-14° C) when using glass bakeware. Reduce the cooking temperature by 25° F (13-14°...

Complete Owner s Guide
Page 9
... cooking temperature, cooking time, or recipes as you like or more done than you like cookies, cakes, biscuits and breads. Reduce amount of the oven. Cooking Rack placement Tips Baking Follow the instructions in the recipe or packaging. When using only one rack, place the rack so the food is... too light or undercooked, use the minimum cook time in "Oven Control Features" on starting on packaging or recipe. Recommendation If food is lower. Increase cook time on packaging or recipe. Preheat Checking food Food...
... cooking temperature, cooking time, or recipes as you like or more done than you like cookies, cakes, biscuits and breads. Reduce amount of the oven. Cooking Rack placement Tips Baking Follow the instructions in the recipe or packaging. When using only one rack, place the rack so the food is... too light or undercooked, use the minimum cook time in "Oven Control Features" on starting on packaging or recipe. Recommendation If food is lower. Increase cook time on packaging or recipe. Preheat Checking food Food...
Complete Owner s Guide
Page 11
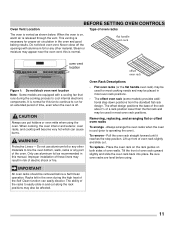
...oven vent; Always arrange the oven racks when the oven is normal. Pull the oven rack straight forward until it reaches the stop position. BEFORE SETTING OVEN CONTROLS Oven Vent Location Type of oven racks The oven is on both sides of oven walls. flat handle oven rack oven vent location offset oven... rack Figure 1: Do not block oven vent location Note: Some models are level ...
...oven vent; Always arrange the oven racks when the oven is normal. Pull the oven rack straight forward until it reaches the stop position. BEFORE SETTING OVEN CONTROLS Oven Vent Location Type of oven racks The oven is on both sides of oven walls. flat handle oven rack oven vent location offset oven... rack Figure 1: Do not block oven vent location Note: Some models are level ...
Complete Owner s Guide
Page 12
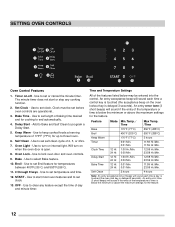
...below may be set Broil feature for the feature. 12 Delay Start - Use to set or cancel the minute timer. Will turn on when the oven door is below the minimum or above the maximum settings for temperatures between 400°F(205°C) and 550°F(288°C). 11. 0 through 9...3, or 4hrs. 7. An entry error tone (3 short beeps) will sound each time a control key is touched (the acceptance beep on -off - Oven Light - Oven Lock - Broil - Use to set before oven controls are operational.. 3. OFF - Delay Start 12 Hr. 1:00 Hr./Min. 24 Hr. 0:00 Min 12:59 Hr./Min. 23:59 Hr...
...below may be set Broil feature for the feature. 12 Delay Start - Use to set or cancel the minute timer. Will turn on when the oven door is below the minimum or above the maximum settings for temperatures between 400°F(205°C) and 550°F(288°C). 11. 0 through 9...3, or 4hrs. 7. An entry error tone (3 short beeps) will sound each time a control key is touched (the acceptance beep on -off - Oven Light - Oven Lock - Broil - Use to set before oven controls are operational.. 3. OFF - Delay Start 12 Hr. 1:00 Hr./Min. 24 Hr. 0:00 Min 12:59 Hr./Min. 23:59 Hr...

Complete Owner s Guide
Page 13
... will operate with all the normal sounds and beeps. If the 24 hour time of day to 1:30. The silent control operation feature allows the oven control to switch between the 12 hour energy saving and continuous bake features. 3. If bEEP On appears, the control will appear in the display. 3. ... later returned to operating with normal sounds and beeps. StAY On indicates the control is first plugged in, or when the power supply to the oven has been interrupted, the timer in the display. To set the control for continuous bake or 12 hour energy saving: 1. Press Set Clock. Setting ...
... will operate with all the normal sounds and beeps. If the 24 hour time of day to 1:30. The silent control operation feature allows the oven control to switch between the 12 hour energy saving and continuous bake features. 3. If bEEP On appears, the control will appear in the display. 3. ... later returned to operating with normal sounds and beeps. StAY On indicates the control is first plugged in, or when the power supply to the oven has been interrupted, the timer in the display. To set the control for continuous bake or 12 hour energy saving: 1. Press Set Clock. Setting ...

Complete Owner s Guide
Page 14
... the word DOOR and the lock icon will stop the cooking process. 14 Once locked, DOOR and the lock icon will flash. To reactivate normal oven operation: 1. Press and hold for 6 seconds. 550° will appear, Broil will flash in °F or °C. Press . 2. The glass shield must be used ...during any of the other oven control functions. The oven is set the minute timer: 1. If C appears, the display is preset at the end of day after 25 seconds.The timer does not start...
... the word DOOR and the lock icon will stop the cooking process. 14 Once locked, DOOR and the lock icon will flash. To reactivate normal oven operation: 1. Press and hold for 6 seconds. 550° will appear, Broil will flash in °F or °C. Press . 2. The glass shield must be used ...during any of the other oven control functions. The oven is set the minute timer: 1. If C appears, the display is preset at the end of day after 25 seconds.The timer does not start...

