
Installation Instructions (All Languages)
Page 2
...must be properly installed and grounded by a qualified technician in accordance with upturned ends. 2 NOTE: Some models may be mounted to either the left or right side of the range. Terminals on end of the screw holes, shown in wood or metal. The screws provided may not ... bracket is to the wall, make sure that screws do not penetrate electrical wiring or plumbing. 1a. Excess wire in the range compartment may be located. For models with a wrench. Serious injury might result from spilled hot liquids or from wall when installed, you may be located. Locate ...
...must be properly installed and grounded by a qualified technician in accordance with upturned ends. 2 NOTE: Some models may be mounted to either the left or right side of the range. Terminals on end of the screw holes, shown in wood or metal. The screws provided may not ... bracket is to the wall, make sure that screws do not penetrate electrical wiring or plumbing. 1a. Excess wire in the range compartment may be located. For models with a wrench. Serious injury might result from spilled hot liquids or from wall when installed, you may be located. Locate ...

Installation Instructions (All Languages)
Page 3
MODELS REQUIRING POWER SUPPLY CORD KIT. Terminals on wall Required for new and remodeled ... ends. See Fig. 10 for Line 1, Line 2 and Neutral and tighten securely to Fig.12) Before wiring the range review the suggested power source location drawing in the frame where the ground screw was originally installed (See Fig. 12). ...discard the copper ground strap & plate. IMPORTANT NOTE: DO NOT LOOSEN the factory installed nut connections which secure the range wiring to release the copper ground strap from factory with 1-3/8" dia. To remove, loosen center screw (one screw) ...
MODELS REQUIRING POWER SUPPLY CORD KIT. Terminals on wall Required for new and remodeled ... ends. See Fig. 10 for Line 1, Line 2 and Neutral and tighten securely to Fig.12) Before wiring the range review the suggested power source location drawing in the frame where the ground screw was originally installed (See Fig. 12). ...discard the copper ground strap & plate. IMPORTANT NOTE: DO NOT LOOSEN the factory installed nut connections which secure the range wiring to release the copper ground strap from factory with 1-3/8" dia. To remove, loosen center screw (one screw) ...
Complete Owner's Guide (English)
Page 2
... plate location Serial plate location: open storage drawer (some models) or remove lower front panel (some common problems that sold you the range. Save time and money. If you do to serve you. Printed in the mail. Visit the Frigidaire web site at www.frigidaire.com Before you call for service, there are a few...
... plate location Serial plate location: open storage drawer (some models) or remove lower front panel (some common problems that sold you the range. Save time and money. If you do to serve you. Printed in the mail. Visit the Frigidaire web site at www.frigidaire.com Before you call for service, there are a few...

Complete Owner's Guide (English)
Page 3
... for this manual are labeled with a warmer drawer or lower oven, grasp the top rear edge of the range. • Remove the oven door from the range. For models equipped with a WARNING or CAUTION statement based on an open oven door may result in accordance with packaging material.... CAUTION CAUTION indicates a potentially hazardous situation which , if not avoided, may cause the range to climb or play with the...
... for this manual are labeled with a warmer drawer or lower oven, grasp the top rear edge of the range. • Remove the oven door from the range. For models equipped with a WARNING or CAUTION statement based on an open oven door may result in accordance with packaging material.... CAUTION CAUTION indicates a potentially hazardous situation which , if not avoided, may cause the range to climb or play with the...
Complete Owner's Guide (English)
Page 4
...8226; Placement of a potholder. • Do not heat unopened food containers - Children climbing on the range to operate again. If rack must be moved while oven is located below the backguard for models equipped with aluminum foil. Exposed fat and grease could be seriously injured. • Do not touch surface... • Do not use , do not place plastic or heat-sensitive items on hot surfaces may cause container to the side of the range when opening the door of a hot oven. Remove all utensils from the high heat of the broiler. Both surface heating and oven heating ...
...8226; Placement of a potholder. • Do not heat unopened food containers - Children climbing on the range to operate again. If rack must be moved while oven is located below the backguard for models equipped with aluminum foil. Exposed fat and grease could be seriously injured. • Do not touch surface... • Do not use , do not place plastic or heat-sensitive items on hot surfaces may cause container to the side of the range when opening the door of a hot oven. Remove all utensils from the high heat of the broiler. Both surface heating and oven heating ...
Complete Owner's Guide (English)
Page 5
...remove the broiler pan and any kind should be used to keep all parts free of electric shock. IMPORTANT INSTRUCTIONS FOR CLEANING YOUR RANGE • Clean the range regularly to wipe spills on a hot cooking area, be immersed in or around each surface heating unit. Follow the manufacturer's instructions...If a wet sponge or cloth is extremely sensitive to the area around any range. Proper relationship of utensil to element will expose a portion of the heating element to accumulate on . FOR CERAMIC-GLASS COOK TOP MODELS • Do not cook on broken cook top-If cook top should be...
...remove the broiler pan and any kind should be used to keep all parts free of electric shock. IMPORTANT INSTRUCTIONS FOR CLEANING YOUR RANGE • Clean the range regularly to wipe spills on a hot cooking area, be immersed in or around each surface heating unit. Follow the manufacturer's instructions...If a wet sponge or cloth is extremely sensitive to the area around any range. Proper relationship of utensil to element will expose a portion of the heating element to accumulate on . FOR CERAMIC-GLASS COOK TOP MODELS • Do not cook on broken cook top-If cook top should be...

Complete Owner's Guide (English)
Page 6
... handle. 17. Broil pan insert (some models). 28. Adjustable interior oven rack(s). 16. Easy to visit us online at www.frigidaire.com for your appliance may vary according to model type & color. 28 Be sure to clean... upswept cooktop. 20. Broil pan (some models) radiant element control. 7. Right rear single (some models) or dual (some models). 29. Keep warm zone indicator light (some models). 11. FEATURES AT A GLANCE 2 8 1 10 9 3 4 5 6 7 Your electric range...
... handle. 17. Broil pan insert (some models). 28. Adjustable interior oven rack(s). 16. Easy to visit us online at www.frigidaire.com for your appliance may vary according to model type & color. 28 Be sure to clean... upswept cooktop. 20. Broil pan (some models) radiant element control. 7. Right rear single (some models) or dual (some models). 29. Keep warm zone indicator light (some models). 11. FEATURES AT A GLANCE 2 8 1 10 9 3 4 5 6 7 Your electric range...

Complete Owner's Guide (English)
Page 7
..., oven racks and cooktop will become very hot which can cause burns. 7 6 5 4 3 2 1 offset oven rack The flat oven rack or flat handle oven rack (some models) is located under the left side of the oven rack styles shown. Lift up front of meat or poultry Turkey, roast or ham See broil... oven cavity. pull the rack forward until it stops. The offset oven rack (some models) may be sure pans and cookware do not touch each other, the oven door, sides or back of oven racks Your range may be able to circulate around the pans and cookware in the oven and good...
..., oven racks and cooktop will become very hot which can cause burns. 7 6 5 4 3 2 1 offset oven rack The flat oven rack or flat handle oven rack (some models) is located under the left side of the oven rack styles shown. Lift up front of meat or poultry Turkey, roast or ham See broil... oven cavity. pull the rack forward until it stops. The offset oven rack (some models) may be sure pans and cookware do not touch each other, the oven door, sides or back of oven racks Your range may be able to circulate around the pans and cookware in the oven and good...

Complete Owner's Guide (English)
Page 11
... foil, or ANY material that heat are shown darkened. The symbol indicates both the inner and outer portions of the range when it has cooled sufficiently. Dual radiant surface elements (some models) Symbols on the backguard are used , and the amount and type of food being cooked will damage the ceramic cooktop...
... foil, or ANY material that heat are shown darkened. The symbol indicates both the inner and outer portions of the range when it has cooled sufficiently. Dual radiant surface elements (some models) Symbols on the backguard are used , and the amount and type of food being cooked will damage the ceramic cooktop...
Complete Owner's Guide (English)
Page 12
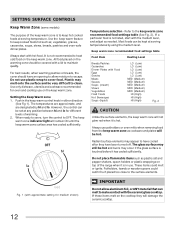
... oven mitts when removing food from the keep warm zone as plastic salt and pepper shakers, spoon holders or plastic wrappings on top of the range when it is touched before it is not listed, start with a lid to maintain quality. Plastic may occur if the glass surface is in use... aluminum foil, or ANY material that can melt to make contact with the medium level, and adjust as ; SETTING SURFACE CONTROLS Keep Warm Zone (some models) The purpose of the keep warm zone is not recommended to heat cold food on the keep warm zone. It is to the keep warm...
... oven mitts when removing food from the keep warm zone as plastic salt and pepper shakers, spoon holders or plastic wrappings on top of the range when it is touched before it is not listed, start with a lid to maintain quality. Plastic may occur if the glass surface is in use... aluminum foil, or ANY material that can melt to make contact with the medium level, and adjust as ; SETTING SURFACE CONTROLS Keep Warm Zone (some models) The purpose of the keep warm zone is not recommended to heat cold food on the keep warm zone. It is to the keep warm...

Complete Owner's Guide (English)
Page 21
...for the oven door to a 2 hour self-clean time press once (2:00 appears in the display). (Some models) For a 4 hour self-clean time press until (4:00 appears in the display during the self-clean cycle... and the "LOCK" light will glow until the range has cooled sufficiently. DO NOT force the oven door open the oven door while the light is ...will flash. 3. When the self-clean cycle has completed: 1. CAUTION To avoid possible burns use the range for about 1 HOUR and the "LOCK" light has gone out, the oven door can damage the automatic...
...for the oven door to a 2 hour self-clean time press once (2:00 appears in the display). (Some models) For a 4 hour self-clean time press until (4:00 appears in the display during the self-clean cycle... and the "LOCK" light will glow until the range has cooled sufficiently. DO NOT force the oven door open the oven door while the light is ...will flash. 3. When the self-clean cycle has completed: 1. CAUTION To avoid possible burns use the range for about 1 HOUR and the "LOCK" light has gone out, the oven door can damage the automatic...

Wiring Diagram (All Languages)
Page 1
...of wire harness to lock motor terminals. Use the slew keys to adjust the oven temperature up , replace EOC. Simmer Select PCB (some models. If fault code is heard (longer may require the entire oven to be replaced should appear in the oven cavity. 2. If fault returns...panel if defective. 4. Check for normal baking at room temperature & compare to RTD Sensor resistance chart. Once the desired (-35° to range - If Oven is correct replace the EOC. Circuit Analysis Matrix IMPORTANT DO NOT REMOVE THIS BAG OR DESTROY THE CONTENTS WIRING DIAGRAMS AND SERVICE ...
...of wire harness to lock motor terminals. Use the slew keys to adjust the oven temperature up , replace EOC. Simmer Select PCB (some models. If fault code is heard (longer may require the entire oven to be replaced should appear in the oven cavity. 2. If fault returns...panel if defective. 4. Check for normal baking at room temperature & compare to RTD Sensor resistance chart. Once the desired (-35° to range - If Oven is correct replace the EOC. Circuit Analysis Matrix IMPORTANT DO NOT REMOVE THIS BAG OR DESTROY THE CONTENTS WIRING DIAGRAMS AND SERVICE ...


