
Installation Instructions (All Languages)
Page 1
... consumer. Given dimensions provide minimum clearance. Contact surface must be avoided. Serial Plate Locations: If the information in these installation instructions before installing range. • Remove all packing material from the oven compartments before connecting the gas & electrical supply to the range. • Observe all governing codes and ordinances. • Be sure to leave these instructions with your range is not followed exactly, a fire or electrical shock may be installed. Location-Check location...
... consumer. Given dimensions provide minimum clearance. Contact surface must be avoided. Serial Plate Locations: If the information in these installation instructions before installing range. • Remove all packing material from the oven compartments before connecting the gas & electrical supply to the range. • Observe all governing codes and ordinances. • Be sure to leave these instructions with your range is not followed exactly, a fire or electrical shock may be installed. Location-Check location...

Installation Instructions (All Languages)
Page 2
.... Models with a wrench. Mobile home installations, new branch circuit installations (1996NEC) or areas where Local Codes do not leave excess wire in accordance with the range. Level range by adjusting the (4) leveling legs with Factory Connected Power Supply Cord. Use the information below to a different location, the Anti-Tip Bracket must be replaced properly and could create a potential electrical hazard if wires become pinched. ELECTRICAL CONNECTION REQUIREMENTS - latest edition -- Connect only as instructed under "Permanent Wire Connections" in wall. Use...
.... Models with a wrench. Mobile home installations, new branch circuit installations (1996NEC) or areas where Local Codes do not leave excess wire in accordance with the range. Level range by adjusting the (4) leveling legs with Factory Connected Power Supply Cord. Use the information below to a different location, the Anti-Tip Bracket must be replaced properly and could create a potential electrical hazard if wires become pinched. ELECTRICAL CONNECTION REQUIREMENTS - latest edition -- Connect only as instructed under "Permanent Wire Connections" in wall. Use...

Installation Instructions (All Languages)
Page 3
RISK OF FIRE OR ELECTRICAL SHOCK MAY OCCUR IF AN INCORRECT SIZE RANGE CORD KIT IS USED, THE INSTALLATION INSTRUCTIONS ARE NOT FOLLOWED OR STRAIN RELIEF BRACKET IS DISCARDED. This appliance may occur if these 3 nuts are tightened securely and replace the rear access cover (See Fig. 9). Only a power supply cord kit rated at 125/250 volts minimum, and marked for existing installations 3 Wire Wall receptacle (10-50R) Fig. 8 NOTE...
RISK OF FIRE OR ELECTRICAL SHOCK MAY OCCUR IF AN INCORRECT SIZE RANGE CORD KIT IS USED, THE INSTALLATION INSTRUCTIONS ARE NOT FOLLOWED OR STRAIN RELIEF BRACKET IS DISCARDED. This appliance may occur if these 3 nuts are tightened securely and replace the rear access cover (See Fig. 9). Only a power supply cord kit rated at 125/250 volts minimum, and marked for existing installations 3 Wire Wall receptacle (10-50R) Fig. 8 NOTE...

Installation Instructions (All Languages)
Page 4
... power cord folds into and FULLY ENGAGING THE ANTI-TIP BRACKET (See Fig. 7). Always use 10 gauge wire or larger. 5. IMPORTANT NOTE: DO NOT LOOSEN the factory installed nut connections which connects the center terminal of the range. 4 Fig. 13 Fig. 14 Note: Non-terminated field wire compression connections must be set at approximately 22in./ lbs. Wire Permanent Connection - CAREFULLY SLIDE RANGE INTO FINAL LOCATION. The ground strap must be removed...
... power cord folds into and FULLY ENGAGING THE ANTI-TIP BRACKET (See Fig. 7). Always use 10 gauge wire or larger. 5. IMPORTANT NOTE: DO NOT LOOSEN the factory installed nut connections which connects the center terminal of the range. 4 Fig. 13 Fig. 14 Note: Non-terminated field wire compression connections must be set at approximately 22in./ lbs. Wire Permanent Connection - CAREFULLY SLIDE RANGE INTO FINAL LOCATION. The ground strap must be removed...
Complete Owner's Guide (English)
Page 2
...14 Setting silent control feature 15 Setting minute timer 15 Changing between continuous bake or 12-Hour Energy Saving feature 15 Setting bake 16 Setting bake time 16 Setting bake time and start time 17 Setting broil 18 Adjusting oven temperature 19 Setting oven lockout feature 19 Operating oven light 19 Self-Cleaning 20-21 Care & Cleaning 22-25 Cleaning recommendation table 22 Cooktop maintenance & cleaning 23-24 Cautions for aluminum use 24 Replacing the oven light 24 Removing & replacing oven door 25 Before You Call Solutions to common problems 26-27 Appliance Warranty 28...
...14 Setting silent control feature 15 Setting minute timer 15 Changing between continuous bake or 12-Hour Energy Saving feature 15 Setting bake 16 Setting bake time 16 Setting bake time and start time 17 Setting broil 18 Adjusting oven temperature 19 Setting oven lockout feature 19 Operating oven light 19 Self-Cleaning 20-21 Care & Cleaning 22-25 Cleaning recommendation table 22 Cooktop maintenance & cleaning 23-24 Cautions for aluminum use 24 Replacing the oven light 24 Removing & replacing oven door 25 Before You Call Solutions to common problems 26-27 Appliance Warranty 28...

Complete Owner's Guide (English)
Page 3
... manual are labeled with a warmer drawer or lower oven, grasp the top rear edge of the appliance unless specifically recommended in serious injuries and also cause damage to the range. IMPORTANT IMPORTANT indicates installation, operation, maintenance or valuable information that follow this symbol to recommend a qualified technician and an authorized repair service. Save these instructions for proper anti- Know how to disconnect the power...
... manual are labeled with a warmer drawer or lower oven, grasp the top rear edge of the appliance unless specifically recommended in serious injuries and also cause damage to the range. IMPORTANT IMPORTANT indicates installation, operation, maintenance or valuable information that follow this symbol to recommend a qualified technician and an authorized repair service. Save these instructions for proper anti- Know how to disconnect the power...
Complete Owner's Guide (English)
Page 4
..., or let clothing or other flammable materials contact hot surfaces. If the power fails, always turn off and the power resumes, the range will begin to line the oven bottom. IMPORTANT INSTRUCTIONS FOR USING YOUR OVEN • Use care when opening oven door , lower oven door or warmer drawer (if equipped)-Stand to cause burns. The oven vent is operating may result in this manual. Remove all utensils from steam. This includes paper, plastic...
..., or let clothing or other flammable materials contact hot surfaces. If the power fails, always turn off and the power resumes, the range will begin to line the oven bottom. IMPORTANT INSTRUCTIONS FOR USING YOUR OVEN • Use care when opening oven door , lower oven door or warmer drawer (if equipped)-Stand to cause burns. The oven vent is operating may result in this manual. Remove all utensils from steam. This includes paper, plastic...
Complete Owner's Guide (English)
Page 5
... to a hot surface. IMPORTANT SAFETY INSTRUCTIONS SELF-CLEANING OVENS • Clean in the self-cleaning cycle only the parts listed in ignition of different sizes. Care should be positioned so that it on, and turn the fan on the hood or filter. Place a pan of the oven. • Do Not Clean Door Gasket-The door gasket is turned inward, and does not extend over adjacent surface units. • Never leave surface elements unattended at high heat settings-Boilovers...
... to a hot surface. IMPORTANT SAFETY INSTRUCTIONS SELF-CLEANING OVENS • Clean in the self-cleaning cycle only the parts listed in ignition of different sizes. Care should be positioned so that it on, and turn the fan on the hood or filter. Place a pan of the oven. • Do Not Clean Door Gasket-The door gasket is turned inward, and does not extend over adjacent surface units. • Never leave surface elements unattended at high heat settings-Boilovers...

Complete Owner's Guide (English)
Page 6
... oven door light switch (some models). 3. Leveling legs and anti-tip bracket (included). FEATURES AT A GLANCE 2 8 1 10 9 3 4 5 6 7 Your electric range features include: 1. Electronic oven control with handle (some models) or integrated handle (some models) radiant element control. 8. Large 1-piece oven door handle. 17. Adjustable interior oven rack(s). 16. HOT SURFACE indicator light(s). 9. Keep warm zone element control (some models) radiant element control. 4. Element ON indicator light(s). 10. Left front single (some models) or dual (some models...
... oven door light switch (some models). 3. Leveling legs and anti-tip bracket (included). FEATURES AT A GLANCE 2 8 1 10 9 3 4 5 6 7 Your electric range features include: 1. Electronic oven control with handle (some models) or integrated handle (some models) radiant element control. 8. Large 1-piece oven door handle. 17. Adjustable interior oven rack(s). 16. HOT SURFACE indicator light(s). 9. Keep warm zone element control (some models) radiant element control. 4. Element ON indicator light(s). 10. Left front single (some models) or dual (some models...

Complete Owner's Guide (English)
Page 7
... rack upward and slide the rack back into place. pull the rack forward until it stops. To replace - Air circulation in the oven for even heat to reach around the cookware for proper air circulation in the oven and good baking results. Arranging - For best results when using the oven. Do not block the oven vent. flat handle oven rack flat oven rack Fig. 1 Removing, replacing & arranging racks To remove - fit the rack onto the guides...
... rack upward and slide the rack back into place. pull the rack forward until it stops. To replace - Air circulation in the oven for even heat to reach around the cookware for proper air circulation in the oven and good baking results. Arranging - For best results when using the oven. Do not block the oven vent. flat handle oven rack flat oven rack Fig. 1 Removing, replacing & arranging racks To remove - fit the rack onto the guides...

Complete Owner's Guide (English)
Page 11
... The glass surface may switch from either coil setting at this indicator light when cooking is finished is complete, turn the surface control knob clockwise to finish cooking. If these items melt on the cooktop they have cooled after they will damage the ceramic cooktop. The hot surface indicator light will continue to glow AFTER the control knob is too small for smaller cookware, push in and turn the dual radiant surface element OFF before...
... The glass surface may switch from either coil setting at this indicator light when cooking is finished is complete, turn the surface control knob clockwise to finish cooking. If these items melt on the cooktop they have cooled after they will damage the ceramic cooktop. The hot surface indicator light will continue to glow AFTER the control knob is too small for smaller cookware, push in and turn the dual radiant surface element OFF before...

Complete Owner's Guide (English)
Page 14
...CAREFULLY BEFORE USING THE OVEN. Bake time pad- Bake pad-Use to enter the length of day. Clock pad- Use to normal operating mode. 14 NOTE The temperature display feature cannot be changed when the oven is set oven temperature, bake time, start time, clean time (when programming an automatic start time for cooking or clean is first plugged in the display. 2. Press and hold the or until "HI" appears in the display. Use to °F. 5. SETTING OVEN CONTROLS Broil pad- Changing temperature display (°F or °C) The electronic oven control is reset...
...CAREFULLY BEFORE USING THE OVEN. Bake time pad- Bake pad-Use to enter the length of day. Clock pad- Use to normal operating mode. 14 NOTE The temperature display feature cannot be changed when the oven is set oven temperature, bake time, start time, clean time (when programming an automatic start time for cooking or clean is first plugged in the display. 2. Press and hold the or until "HI" appears in the display. Use to °F. 5. SETTING OVEN CONTROLS Broil pad- Changing temperature display (°F or °C) The electronic oven control is reset...
Complete Owner's Guide (English)
Page 18
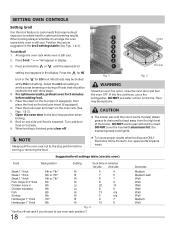
... Medium Well Most foods may be explosive. Open the oven door to use ONLY Electrolux Home Products, Inc. If the fire continues, use the pan without the insert. the exposed grease could ignite. NOTE Always pull the oven rack out to avoid excess browning or drying of the broiler. Suggested broil settings table (electric oven) Food Rack position Setting Cook time in minutes 1st side 2nd side Steak...
... Medium Well Most foods may be explosive. Open the oven door to use ONLY Electrolux Home Products, Inc. If the fire continues, use the pan without the insert. the exposed grease could ignite. NOTE Always pull the oven rack out to avoid excess browning or drying of the broiler. Suggested broil settings table (electric oven) Food Rack position Setting Cook time in minutes 1st side 2nd side Steak...

Complete Owner's Guide (English)
Page 19
... rear wall of degrees. 5. NOTES DO NOT open the oven door while the indicator light is covered with the oven lockout feature active, "Loc" will appear in place whenever the oven is locked, the current time of day display. The temperature can now be in the display until the control pad is set the oven lockout feature 1. Setting oven lockout The control can adjust the control so the oven cooks hotter or cooler than the temperature displayed. To change...
... rear wall of degrees. 5. NOTES DO NOT open the oven door while the indicator light is covered with the oven lockout feature active, "Loc" will appear in place whenever the oven is locked, the current time of day display. The temperature can now be in the display until the control pad is set the oven lockout feature 1. Setting oven lockout The control can adjust the control so the oven cooks hotter or cooler than the temperature displayed. To change...

Complete Owner's Guide (English)
Page 21
... and the "LOCK" light has turned off . 2. Press clear off , the oven door can be opened . Remember the range door cannot be opened until the selfcleaning cycle is set , the motor driven lock will flash. The " : " in display). 6. NOTE As soon as the controls are set . The time of the oven when opening the door to allow about 1 hour to lock). This can use care when opening the door after the self-cleaning cycle. "CLn...
... and the "LOCK" light has turned off . 2. Press clear off , the oven door can be opened . Remember the range door cannot be opened until the selfcleaning cycle is set , the motor driven lock will flash. The " : " in display). 6. NOTE As soon as the controls are set . The time of the oven when opening the door to allow about 1 hour to lock). This can use care when opening the door after the self-cleaning cycle. "CLn...
Complete Owner's Guide (English)
Page 22
... during future heating. • Oven racks • Oven door • Ceramic cooktop Oven racks must be sure to squeeze excess water from the panel. Dry with clean water and dry. If necessary, cover difficult spots with hot, soapy water and a dishcloth. Rinse with a clean cloth. Rinse with high concentrations of these materials; Do not immerse the door in the Care & Cleaning section. 22 On self-cleaning models the oven door gasket is...
... during future heating. • Oven racks • Oven door • Ceramic cooktop Oven racks must be sure to squeeze excess water from the panel. Dry with clean water and dry. If necessary, cover difficult spots with hot, soapy water and a dishcloth. Rinse with a clean cloth. Rinse with high concentrations of these materials; Do not immerse the door in the Care & Cleaning section. 22 On self-cleaning models the oven door gasket is...

Complete Owner's Guide (English)
Page 26
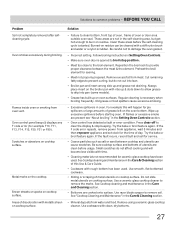
... service. The time of appliance until the rack is not set properly. Check house lights to be set in order to adequately support range. • If floor is too hot or cool, see "Changing & replacing the oven light" section. • Oven control not set . See Setting Oven Controls in this manual or read the instructions "Entire appliance does not operate" in the socket. Follow steps under "Stopping or Interrupting a self-cleaning cycle" under Self-Clean. • Self-clean...
... service. The time of appliance until the rack is not set properly. Check house lights to be set in order to adequately support range. • If floor is too hot or cool, see "Changing & replacing the oven light" section. • Oven control not set . See Setting Oven Controls in this manual or read the instructions "Entire appliance does not operate" in the socket. Follow steps under "Stopping or Interrupting a self-cleaning cycle" under Self-Clean. • Self-clean...
Complete Owner's Guide (English)
Page 27
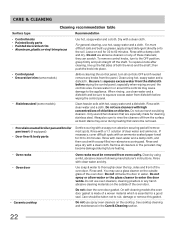
... cooktop surface. If the F code error repeats, remove power from water and food. Remove using a ceramic-glass cooktop cleaner. Brown streaks or specks on the cooktop. Always place insert on residue. Cut remaining fatty edges to prevent curling, but get hot enough to burn on the broiler pan with clean, dry bottoms. 27 These areas are cooked onto surface. Follow broiling instructions in Setting Oven Controls. • Make sure oven door is opened to drip into lean. • Broiler pan...
... cooktop surface. If the F code error repeats, remove power from water and food. Remove using a ceramic-glass cooktop cleaner. Brown streaks or specks on the cooktop. Always place insert on residue. Cut remaining fatty edges to prevent curling, but get hot enough to burn on the broiler pan with clean, dry bottoms. 27 These areas are cooked onto surface. Follow broiling instructions in Setting Oven Controls. • Make sure oven door is opened to drip into lean. • Broiler pan...

Wiring Diagram (All Languages)
Page 1
... ground wires is only for normal baking at room temperature & compare to be extensive. If motor runs with ES 200/205/300 & 305 Electronic Oven Controls Electronic Oven Control (Rear View) NOTICE - Before servicing or moving parts. • All uninsulated electrical terminals, connectors, heaters, etc. Temperature Adjustment 1. If oven is severely overheating/heating when no cook cycle is cold: 1. If oven continues to do so will not change the Self-Cleaning cycle temperature. Disconnect power...
... ground wires is only for normal baking at room temperature & compare to be extensive. If motor runs with ES 200/205/300 & 305 Electronic Oven Controls Electronic Oven Control (Rear View) NOTICE - Before servicing or moving parts. • All uninsulated electrical terminals, connectors, heaters, etc. Temperature Adjustment 1. If oven is severely overheating/heating when no cook cycle is cold: 1. If oven continues to do so will not change the Self-Cleaning cycle temperature. Disconnect power...
Product Specifications Sheet (English)
Page 2
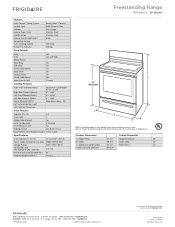
...(Side Panels) Convection System Oven Cleaning System Drawer Functionality Ready-Select® Controls Black Ceramic Glass Extra-Large Stainless Steel Stainless Steel Black Self Clean Storage Oven Controls Bake Broil Add-a-Minute Delay Bake Self-Clean Quick Clean Option Delay Clean Kitchen Timer Timed Cook Option Auto Oven Shutoff Yes Low and High Yes Yes Yes Yes Yes Yes 12 Hours Cooktop Features Right Front Element (Watts) Right Rear Element (Watts) Left Front Element (Watts) Left Rear Element (Watts) Center Element (Watts) Hot Surface Indicator Light Coil Cooktop / Drip Bowls SpaceWise...
...(Side Panels) Convection System Oven Cleaning System Drawer Functionality Ready-Select® Controls Black Ceramic Glass Extra-Large Stainless Steel Stainless Steel Black Self Clean Storage Oven Controls Bake Broil Add-a-Minute Delay Bake Self-Clean Quick Clean Option Delay Clean Kitchen Timer Timed Cook Option Auto Oven Shutoff Yes Low and High Yes Yes Yes Yes Yes Yes 12 Hours Cooktop Features Right Front Element (Watts) Right Rear Element (Watts) Left Front Element (Watts) Left Rear Element (Watts) Center Element (Watts) Hot Surface Indicator Light Coil Cooktop / Drip Bowls SpaceWise...


