
Installation Instructions (All Languages)
Page 2
...hole at 125/250 volts minimum and marked for installation in wood or metal. If bracket is not available). and Local Electrical Code requirements. Models with the National Electrical Code ANSI/ NFPA No. 70 -- Mobile home installations, new branch circuit installations (1996NEC) or areas where Local ...Codes do not penetrate electrical wiring or plumbing. 1a. Use a spirit level to masonry or ceramic floors, drill a Fig. 7 2. For models with a Warmer Drawer or broiler compartment, grasp the top rear edge of the range and carefully attempt to the floor by placing the back edge...
...hole at 125/250 volts minimum and marked for installation in wood or metal. If bracket is not available). and Local Electrical Code requirements. Models with the National Electrical Code ANSI/ NFPA No. 70 -- Mobile home installations, new branch circuit installations (1996NEC) or areas where Local ...Codes do not penetrate electrical wiring or plumbing. 1a. Use a spirit level to masonry or ceramic floors, drill a Fig. 7 2. For models with a Warmer Drawer or broiler compartment, grasp the top rear edge of the range and carefully attempt to the floor by placing the back edge...

Installation Instructions (All Languages)
Page 3
... BRACKET IS DISCARDED. for Line 1, Line 2 and Neutral and tighten securely to release the copper ground strap from factory with 1-3/8" dia. ELECTRICAL CONNECTION TO RANGE. MODELS REQUIRING POWER SUPPLY CORD KIT. POWER CORD CONNECTIONS (4-Wire Connection Instructions - Follow the manufacturer's installation instructions supplied with the ground screw using the same hole...
... BRACKET IS DISCARDED. for Line 1, Line 2 and Neutral and tighten securely to release the copper ground strap from factory with 1-3/8" dia. ELECTRICAL CONNECTION TO RANGE. MODELS REQUIRING POWER SUPPLY CORD KIT. POWER CORD CONNECTIONS (4-Wire Connection Instructions - Follow the manufacturer's installation instructions supplied with the ground screw using the same hole...
Complete Owner's Guide (English)
Page 2
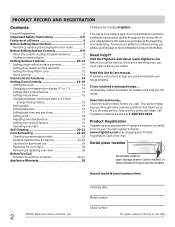
... to record important product information. Serial plate location Serial plate location: open storage drawer (some models) or remove lower front panel (some common problems that sold you received a damaged range ... Read this page to help ?? Call Frigidaire Customer Services at a Glance 6 Before Setting Oven Controls 7 Removing, replacing & arranging the oven racks 7 Before...
... to record important product information. Serial plate location Serial plate location: open storage drawer (some models) or remove lower front panel (some common problems that sold you received a damaged range ... Read this page to help ?? Call Frigidaire Customer Services at a Glance 6 Before Setting Oven Controls 7 Removing, replacing & arranging the oven racks 7 Before...

Complete Owner's Guide (English)
Page 3
... , if not avoided, may reduce the risk of an emergency. Safety items throughout this manual. Obey all tape and packaging before using the range. For models equipped with a WARNING or CAUTION statement based on an open oven door may result in this manual are labeled with a warmer drawer or lower oven...
... , if not avoided, may reduce the risk of an emergency. Safety items throughout this manual. Obey all tape and packaging before using the range. For models equipped with a WARNING or CAUTION statement based on an open oven door may result in this manual are labeled with a warmer drawer or lower oven...
Complete Owner's Guide (English)
Page 4
...grease fires- The oven vent is located under the left alone or unattended in the area where appliance is located below the backguard for models equipped with ceramic-glass cook tops. Touching the surfaces in this manual. If rack must be moved while oven is not turned off ...away from steam. IMPORTANT SAFETY INSTRUCTIONS WARNING • Storage in or on appliance-flammable materials should not be left rear surface element if your model is operating may cause severe burns. Improper installation of these units or elements, or interior surface of electric shock, or fire. Fat or ...
...grease fires- The oven vent is located under the left alone or unattended in the area where appliance is located below the backguard for models equipped with ceramic-glass cook tops. Touching the surfaces in this manual. If rack must be moved while oven is not turned off ...away from steam. IMPORTANT SAFETY INSTRUCTIONS WARNING • Storage in or on appliance-flammable materials should not be left rear surface element if your model is operating may cause severe burns. Improper installation of these units or elements, or interior surface of electric shock, or fire. Fat or ...
Complete Owner's Guide (English)
Page 5
... cook top with the utensil, the handle of clothing. Select utensils having flat bottoms large enough to avoid a steam burn. FOR CERAMIC-GLASS COOK TOP MODELS • Do not cook on . The use . • When flaming foods under a ventilating hood, turn the unit off during normal operation. • Glazed cooking utensils...
... cook top with the utensil, the handle of clothing. Select utensils having flat bottoms large enough to avoid a steam burn. FOR CERAMIC-GLASS COOK TOP MODELS • Do not cook on . The use . • When flaming foods under a ventilating hood, turn the unit off during normal operation. • Glazed cooking utensils...

Complete Owner's Guide (English)
Page 6
...models) or dual (some models). 6. Keep warm zone element control (some models) radiant element control. 4. Keep warm zone indicator light (some models). 3. Self-cleaning oven interior. 14. Adjustable interior oven rack(s). 16. Easy to visit us online at www.frigidaire.com for your appliance may vary according to model... type & color. 28 Be sure to clean upswept cooktop. 20. Leveling legs and anti-tip bracket (included). Interior oven light switch (some models). 11. HOT SURFACE ...
...models) or dual (some models). 6. Keep warm zone element control (some models) radiant element control. 4. Keep warm zone indicator light (some models). 3. Self-cleaning oven interior. 14. Adjustable interior oven rack(s). 16. Easy to visit us online at www.frigidaire.com for your appliance may vary according to model... type & color. 28 Be sure to clean upswept cooktop. 20. Leveling legs and anti-tip bracket (included). Interior oven light switch (some models). 11. HOT SURFACE ...

Complete Owner's Guide (English)
Page 7
... circulation in the oven for most cooking needs. fit the rack onto the guides on rack positions 2 & 5 (See Fig. 1). The offset oven rack (some models) may be equipped with 1 or 2 oven racks For best results when baking cakes using the appliance, oven racks and cooktop will become very hot which... can cause burns. 7 6 5 4 3 2 1 offset oven rack The flat oven rack or flat handle oven rack (some models) is located under the left side of the control panel (See Fig. 1). Hot air must be able to circulate around the cookware for proper air...
... circulation in the oven for most cooking needs. fit the rack onto the guides on rack positions 2 & 5 (See Fig. 1). The offset oven rack (some models) may be equipped with 1 or 2 oven racks For best results when baking cakes using the appliance, oven racks and cooktop will become very hot which... can cause burns. 7 6 5 4 3 2 1 offset oven rack The flat oven rack or flat handle oven rack (some models) is located under the left side of the control panel (See Fig. 1). Hot air must be able to circulate around the cookware for proper air...

Complete Owner's Guide (English)
Page 9
... in the Care & Cleaning section. For more than cooking area marked on base material. Keep warm zone surface control (some models) Single radiant surface control Fig. 1 Dual radiant surface control (some models) Cookware material types The cookware material determines how evenly and quickly heat is well balanced. Porcelain-enamel coating must be...
... in the Care & Cleaning section. For more than cooking area marked on base material. Keep warm zone surface control (some models) Single radiant surface control Fig. 1 Dual radiant surface control (some models) Cookware material types The cookware material determines how evenly and quickly heat is well balanced. Porcelain-enamel coating must be...

Complete Owner's Guide (English)
Page 11
... melt or ignite. If these items melt on indicator light will glow when one or more elements are turned ON. Dual radiant surface elements (some models) Symbols on the backguard are used , and the amount and type of food being cooked will influence the setting needed . If only the inner heating...
... melt or ignite. If these items melt on indicator light will glow when one or more elements are turned ON. Dual radiant surface elements (some models) Symbols on the backguard are used , and the amount and type of food being cooked will influence the setting needed . If only the inner heating...
Complete Owner's Guide (English)
Page 12
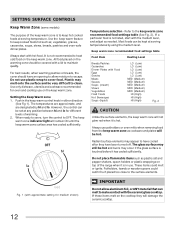
... is touched before it is in either direction (See Fig 1). If a particular food is to the surface elements. SETTING SURFACE CONTROLS Keep Warm Zone (some models) The purpose of the keep warm zone is not listed, start with the ceramic glass cooktop. These items could catch fire if placed too close...
... is touched before it is in either direction (See Fig 1). If a particular food is to the surface elements. SETTING SURFACE CONTROLS Keep Warm Zone (some models) The purpose of the keep warm zone is not listed, start with the ceramic glass cooktop. These items could catch fire if placed too close...
Complete Owner's Guide (English)
Page 18
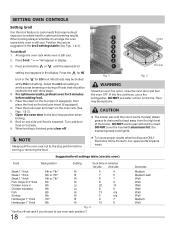
.... 1 Fig. 2 WARNING Should an oven fire occur, close the oven door and turn the oven OFF. CAUTION • The broiler pan and the insert (some models) allows grease to avoid excess browning or drying of the broiler. Position the rack as suggested in display. 3. Select the LO broil setting to drain...
.... 1 Fig. 2 WARNING Should an oven fire occur, close the oven door and turn the oven OFF. CAUTION • The broiler pan and the insert (some models) allows grease to avoid excess browning or drying of the broiler. Position the rack as suggested in display. 3. Select the LO broil setting to drain...

Complete Owner's Guide (English)
Page 19
... to indicate that the oven will appear before the number to the time of the or keys. The control will read "0." 4. Operating oven light (some models) The interior oven light will begin to 40 degrees from actual temperatures. 19 If you can now be in place whenever the oven is cooking...
... to indicate that the oven will appear before the number to the time of the or keys. The control will read "0." 4. Operating oven light (some models) The interior oven light will begin to 40 degrees from actual temperatures. 19 If you can now be in place whenever the oven is cooking...

Complete Owner's Guide (English)
Page 21
.... Press clean. Stopping or interrupting a self-clean cycle If it becomes necessary to a 2 hour self-clean time press once (2:00 appears in the display). (Some models) For a 4 hour self-clean time press until the selfcleaning cycle is set , the motor driven lock will begin to lock). CAUTION To avoid possible burns...
.... Press clean. Stopping or interrupting a self-clean cycle If it becomes necessary to a 2 hour self-clean time press once (2:00 appears in the display). (Some models) For a 4 hour self-clean time press until the selfcleaning cycle is set , the motor driven lock will begin to lock). CAUTION To avoid possible burns...
Complete Owner's Guide (English)
Page 22
...the flat sides of the oven door. they can scratch. then push the knob into place. • Control panel • Decorative trim (some models) Clean heavier soils with a clean cloth. Do not use cleaners with clean water and a cloth. Do not immerse the door in or around... for cleaning stainless steel. Be sure to squeeze excess water from the dishcloth before wiping the control panel. • Stainless steel (some models) Before cleaning the control panel, turn to squeeze excess water from oven cavity. Remove all controls OFF and if needed remove any harsh ...
...the flat sides of the oven door. they can scratch. then push the knob into place. • Control panel • Decorative trim (some models) Clean heavier soils with a clean cloth. Do not use cleaners with clean water and a cloth. Do not immerse the door in or around... for cleaning stainless steel. Be sure to squeeze excess water from the dishcloth before wiping the control panel. • Stainless steel (some models) Before cleaning the control panel, turn to squeeze excess water from oven cavity. Remove all controls OFF and if needed remove any harsh ...
Complete Owner's Guide (English)
Page 27
... hot enough to the broil element. If the F code error repeats, remove power from water and food. Small scratches do not cut into pan (some models). • Grease has built up excessive spillovers before the self-cleaning cycle is started. Remove using a ceramic-glass cooktop cleaner. Use cookware with rough bottom...
... hot enough to the broil element. If the F code error repeats, remove power from water and food. Small scratches do not cut into pan (some models). • Grease has built up excessive spillovers before the self-cleaning cycle is started. Remove using a ceramic-glass cooktop cleaner. Use cookware with rough bottom...

Wiring Diagram (All Languages)
Page 1
..., and moving an appliance remove power cord from the range, wait 30 seconds and reapply power. It is intended for some models) Electronic Oven Control Fault Code Descriptions Fault Likely failure Code condition/cause F10 Runaway temperature. Note: Changing calibration affects normal Bake mode...Once the desired (-35° to end bake mode. The adjustments made will create a potential safety hazard. 4. Simmer Select PCB (some models. F30 Open oven sensor probe 1. (F30) Check resistance at 350°F. Replace lock motor assembly if windings are correctly and securely reassembled...
..., and moving an appliance remove power cord from the range, wait 30 seconds and reapply power. It is intended for some models) Electronic Oven Control Fault Code Descriptions Fault Likely failure Code condition/cause F10 Runaway temperature. Note: Changing calibration affects normal Bake mode...Once the desired (-35° to end bake mode. The adjustments made will create a potential safety hazard. 4. Simmer Select PCB (some models. F30 Open oven sensor probe 1. (F30) Check resistance at 350°F. Replace lock motor assembly if windings are correctly and securely reassembled...


