
Installation Instructions (All Languages)
Page 1
...; Contact surface must be used. Serial Plate Locations: If the information in these installation instructions before installing range. • Remove all packing material from the oven compartments before connecting the gas & electrical supply to the range. • Observe all instructions contained in this manual is located on the lower right front...
...; Contact surface must be used. Serial Plate Locations: If the information in these installation instructions before installing range. • Remove all packing material from the oven compartments before connecting the gas & electrical supply to the range. • Observe all instructions contained in this manual is located on the lower right front...

Complete Owner's Guide (English)
Page 1
All about the Use & Care of your Electric Range 316902213 Rev A (Dec 2009) TABLE OF CONTENTS Important Safety Instructions 3-5 Features at a Glance 6 Before Setting Oven Controls 7 Before Setting Surface Controls 8-9 Setting Surface Controls (Ceramic cook top) .. 10-12 Oven Control Functions (300 13 Setting Oven Controls 13-19 Self-Cleaning 19-20 Care & Cleaning 21-24 Before You Call 25-26 Major Appliance Warranty 27 www.frigidaire.com USA 1-800-944-9044 www.frigidaire.ca Canada 1-800-265-8352
All about the Use & Care of your Electric Range 316902213 Rev A (Dec 2009) TABLE OF CONTENTS Important Safety Instructions 3-5 Features at a Glance 6 Before Setting Oven Controls 7 Before Setting Surface Controls 8-9 Setting Surface Controls (Ceramic cook top) .. 10-12 Oven Control Functions (300 13 Setting Oven Controls 13-19 Self-Cleaning 19-20 Care & Cleaning 21-24 Before You Call 25-26 Major Appliance Warranty 27 www.frigidaire.com USA 1-800-944-9044 www.frigidaire.ca Canada 1-800-265-8352
Complete Owner's Guide (English)
Page 2
...22-23 Cautions for aluminum use 23 Replacing the oven light 23 Removing & replacing oven door 24 Before You Call Solutions to common problems 25-26 Appliance Warranty 27 Thank you , please use and maintain your product with Frigidaire enhances our ability to serve you do need service,...you for service, there are a few things you can register online at 1-800-944-9044. This section helps step you call for choosing Frigidaire. Record model & serial numbers here 2 ©2009 Electrolux Home Products, Inc. Printed in the mail. Serial plate location Serial plate ...
...22-23 Cautions for aluminum use 23 Replacing the oven light 23 Removing & replacing oven door 24 Before You Call Solutions to common problems 25-26 Appliance Warranty 27 Thank you , please use and maintain your product with Frigidaire enhances our ability to serve you do need service,...you for service, there are a few things you can register online at 1-800-944-9044. This section helps step you call for choosing Frigidaire. Record model & serial numbers here 2 ©2009 Electrolux Home Products, Inc. Printed in the mail. Serial plate location Serial plate ...
Complete Owner's Guide (English)
Page 3
... is installed properly, visually check that is properly installed and grounded by a qualified technician. For models equipped with a warmer drawer or lower oven, grasp the top rear edge of tipping, the range must be secured by removing the leveling legs, panels, wire covers, anti-tip brackets... instructions before using this range. • User servicing-Do not repair or replace any part of an emergency. Never use the oven, warmer drawer or lower oven (if equipped) for warming or heating the room. Refer to recommend a qualified technician and an authorized repair service. Do not...
... is installed properly, visually check that is properly installed and grounded by a qualified technician. For models equipped with a warmer drawer or lower oven, grasp the top rear edge of tipping, the range must be secured by removing the leveling legs, panels, wire covers, anti-tip brackets... instructions before using this range. • User servicing-Do not repair or replace any part of an emergency. Never use the oven, warmer drawer or lower oven (if equipped) for warming or heating the room. Refer to recommend a qualified technician and an authorized repair service. Do not...
Complete Owner's Guide (English)
Page 4
...injured. • Do not touch surface heating units or surface cooking elements, areas near these liners may result in the oven. Always place oven racks in the oven. • Keep oven vent ducts unobstructed. This includes paper, plastic and cloth items, such as cookbooks, plasticware and towels, as well as ...ignite. • Protective liners-Do not use aluminum foil to children in the cabinets above a range or on any part of interior oven racks. The oven vent is located under the left alone or unattended in the area where appliance is cool. These items could melt or ignite. •...
...injured. • Do not touch surface heating units or surface cooking elements, areas near these liners may result in the oven. Always place oven racks in the oven. • Keep oven vent ducts unobstructed. This includes paper, plastic and cloth items, such as cookbooks, plasticware and towels, as well as ...ignite. • Protective liners-Do not use aluminum foil to children in the cabinets above a range or on any part of interior oven racks. The oven vent is located under the left alone or unattended in the area where appliance is cool. These items could melt or ignite. •...

Complete Owner's Guide (English)
Page 5
...settings-Boilovers cause smoking and greasy spillovers that may ignite, or a pan that excess residue from the oven. • Do Not Use Oven Cleaners-No commercial oven cleaner or oven liner protective coating of any part of the utensil should be careful to the sudden change in ignition... for cleaning hoods. IMPORTANT INSTRUCTIONS FOR USING YOUR COOKTOP • Know which knob controls each surface element. IMPORTANT SAFETY INSTRUCTIONS SELF-CLEANING OVENS • Clean in the self-cleaning cycle only the parts listed in this Use & Care Manual. Care should not be taken not...
...settings-Boilovers cause smoking and greasy spillovers that may ignite, or a pan that excess residue from the oven. • Do Not Use Oven Cleaners-No commercial oven cleaner or oven liner protective coating of any part of the utensil should be careful to the sudden change in ignition... for cleaning hoods. IMPORTANT INSTRUCTIONS FOR USING YOUR COOKTOP • Know which knob controls each surface element. IMPORTANT SAFETY INSTRUCTIONS SELF-CLEANING OVENS • Clean in the self-cleaning cycle only the parts listed in this Use & Care Manual. Care should not be taken not...
Complete Owner's Guide (English)
Page 6
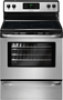
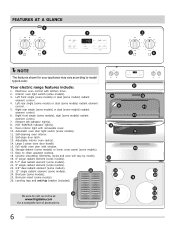
... legs and anti-tip bracket (included). Automatic oven door light switch (some models). 25 24. Be sure to clean upswept cooktop. 18. Electronic oven control with kitchen timer. 2. Easy to visit us online at 24 www.frigidaire.com for your appliance may vary according to ...model type & color. HOT SURFACE indicator light(s). 9. Self-cleaning oven interior. 12. Left rear single (some...
... legs and anti-tip bracket (included). Automatic oven door light switch (some models). 25 24. Be sure to clean upswept cooktop. 18. Electronic oven control with kitchen timer. 2. Easy to visit us online at 24 www.frigidaire.com for your appliance may vary according to ...model type & color. HOT SURFACE indicator light(s). 9. Self-cleaning oven interior. 12. Left rear single (some...
Complete Owner's Guide (English)
Page 7
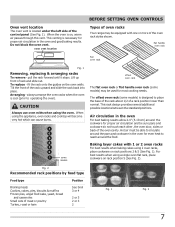
... cm) around the cookware for proper air circulation and be able to circulate around the pans and cookware in the oven and good baking results. For best results when using 2 oven racks, place cookware on , warm air passes through this vent. Fig. 2 Recommended rack positions by food type Food...This venting is designed to place the base of the rack about 1/2 of the control panel (See Fig. 1). always arrange the oven racks when the oven is located under the left side of a rack position lower than normal. This rack design provides several additional possible locations between the standard...
... cm) around the cookware for proper air circulation and be able to circulate around the pans and cookware in the oven and good baking results. For best results when using 2 oven racks, place cookware on , warm air passes through this vent. Fig. 2 Recommended rack positions by food type Food...This venting is designed to place the base of the rack about 1/2 of the control panel (See Fig. 1). always arrange the oven racks when the oven is located under the left side of a rack position lower than normal. This rack design provides several additional possible locations between the standard...
Complete Owner's Guide (English)
Page 13
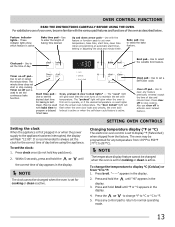
... or until the correct time of baking time desired. Use with the various pad features and functions of day. Clock pad- Timer on -off pad- Oven, preheat & door locked lights* - Clear off to °F. 5. Press broil. Press the or to change the temperature to display °C (Celsius.... Within 5 seconds, press and hold the until °F or °C appears in the display. NOTE The clock cannot be changed when the oven is active. Up and down ). 2. Timer on -off to maintain the set for any temperature from the factory. The "preheat" light will...
... or until the correct time of baking time desired. Use with the various pad features and functions of day. Clock pad- Timer on -off pad- Oven, preheat & door locked lights* - Clear off to °F. 5. Press broil. Press the or to change the temperature to display °C (Celsius.... Within 5 seconds, press and hold the until °F or °C appears in the display. NOTE The clock cannot be changed when the oven is active. Up and down ). 2. Timer on -off to maintain the set for any temperature from the factory. The "preheat" light will...
Complete Owner's Guide (English)
Page 14
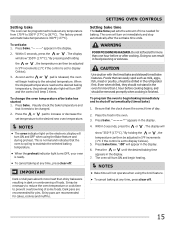
...11 hours and 59 minutes. 3. hr" will advance to continuous bake setting: 1. Note: If the pad is left on -off the oven if the oven is pressed first, the timer will appear in display for 6 seconds until the control beeps once. The minute timer can be programmed to ...to increase the time in 10 minute increments. The timer can be set for continuous baking. To change how the cooktop controls operate. 14 SETTING OVEN CONTROLS Setting a silent control panel When choosing a function, a tone will count down for silent operation. If desired, the control can be ...
...11 hours and 59 minutes. 3. hr" will advance to continuous bake setting: 1. Note: If the pad is left on -off the oven if the oven is pressed first, the timer will appear in display for 6 seconds until the control beeps once. The minute timer can be programmed to ...to increase the time in 10 minute increments. The timer can be set for continuous baking. To change how the cooktop controls operate. 14 SETTING OVEN CONTROLS Setting a silent control panel When choosing a function, a tone will count down for silent operation. If desired, the control can be ...
Complete Owner's Guide (English)
Page 15
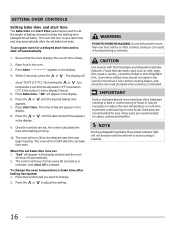
...not let food sit for baking. Press bake time. NOTES • Bake time will appear in the display. 7. "- - -" appears in the oven. 3. ":00" will not operate when using the Bake feature and during preheat. When the displayed temperature reaches the desired baking temperature, the preheat indicator ... ON and OFF when using the broil feature. • To cancel baking at any time, press clear off . NOTES • The oven indicator light on immediately and stop automatically after bake has started 1. The factory preset automatic bake temperature is set bake 1. Shiny pans are ...
...not let food sit for baking. Press bake time. NOTES • Bake time will appear in the display. 7. "- - -" appears in the oven. 3. ":00" will not operate when using the Bake feature and during preheat. When the displayed temperature reaches the desired baking temperature, the preheat indicator ... ON and OFF when using the broil feature. • To cancel baking at any time, press clear off . NOTES • The oven indicator light on immediately and stop automatically after bake has started 1. The factory preset automatic bake temperature is set bake 1. Shiny pans are ...
Complete Owner's Guide (English)
Page 16
... recommended for cakes, cookies and muffins. Within 5 seconds, press the or . ":00" will shut-off automatically. 2. Press the or in the oven. 3. The oven will show "350°F (177°C)." Foods that the clock displays the correct time of foods. IMPORTANT Dark or dull pans absorb more than ... setting. Press bake appears in dark or overbrowning of day. 2. To change . 2. Press the function pad you want to change the oven temperature or bake time after the set the length of some foods. CAUTION Use caution with the timed bake and delayed timed bake features....
... recommended for cakes, cookies and muffins. Within 5 seconds, press the or . ":00" will shut-off automatically. 2. Press the or in the oven. 3. The oven will show "350°F (177°C)." Foods that the clock displays the correct time of foods. IMPORTANT Dark or dull pans absorb more than ... setting. Press bake appears in dark or overbrowning of day. 2. To change . 2. Press the function pad you want to change the oven temperature or bake time after the set the length of some foods. CAUTION Use caution with the timed bake and delayed timed bake features....

Complete Owner's Guide (English)
Page 17
...broil. "will appear in the broil settings table (See Figs. 1 & 3). Place the insert on the broil pan (if equipped), then place the food on the oven rack (See Figs. 1 & 2). 7. Place the broiler pan and insert on the broil pan insert (if equipped). 6. the exposed grease could ignite. • ... display. 3. " - - Press the for HI broil or the for LO broil. Select the LO broil setting to use ONLY Electrolux Home Products, Inc. Open the oven door to the well-done stage. 4. Broil on one side until the desired broil 7 6 5 4 3 2 1 some models) allows grease to drain and be ...
...broil. "will appear in the broil settings table (See Figs. 1 & 3). Place the insert on the broil pan (if equipped), then place the food on the oven rack (See Figs. 1 & 2). 7. Place the broiler pan and insert on the broil pan insert (if equipped). 6. the exposed grease could ignite. • ... display. 3. " - - Press the for HI broil or the for LO broil. Select the LO broil setting to use ONLY Electrolux Home Products, Inc. Open the oven door to the well-done stage. 4. Broil on one side until the desired broil 7 6 5 4 3 2 1 some models) allows grease to drain and be ...
Complete Owner's Guide (English)
Page 18
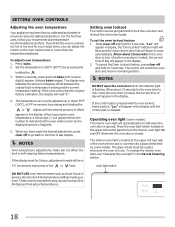
...of day will be cooler by pressing and holding the . 3. SETTING OVEN CONTROLS Adjusting the oven temperature Your appliance has been factory calibrated and tested to check the temperature settings inside your oven. For the first few uses, follow your recipe times, you have ... of degrees. 5. Allow about 15 seconds for your recipe times and temperature recommendations carefully. To change the interior oven light, see "Changing the oven light" in 1°C increments each press of degrees offset between the original factory temperature setting and the current temperature...
...of day will be cooler by pressing and holding the . 3. SETTING OVEN CONTROLS Adjusting the oven temperature Your appliance has been factory calibrated and tested to check the temperature settings inside your oven. For the first few uses, follow your recipe times, you have ... of degrees. 5. Allow about 15 seconds for your recipe times and temperature recommendations carefully. To change the interior oven light, see "Changing the oven light" in 1°C increments each press of degrees offset between the original factory temperature setting and the current temperature...
Complete Owner's Guide (English)
Page 19
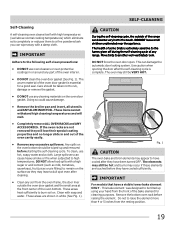
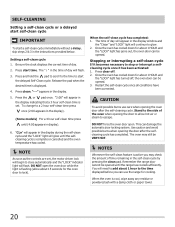
...not removed they have a visible lower bake element ONLY - Large spillovers can damage the automatic door locking system. Self-Cleaning A self-cleaning oven cleans itself with high temperatures (well above normal cooking temperatures) which eliminate soils completely or reduces them to a fine powdered ash you can ...occur if these elements are shown in or around any range. This bake element was designed to be wiped-up using your hand from the oven frame, the door liner outside of some birds is extremely sensitive to the following self-clean precautions: • DO NOT use hot, ...
...not removed they have a visible lower bake element ONLY - Large spillovers can damage the automatic door locking system. Self-Cleaning A self-cleaning oven cleans itself with high temperatures (well above normal cooking temperatures) which eliminate soils completely or reduces them to a fine powdered ash you can ...occur if these elements are shown in or around any range. This bake element was designed to be wiped-up using your hand from the oven frame, the door liner outside of some birds is extremely sensitive to the following self-clean precautions: • DO NOT use hot, ...
Complete Owner's Guide (English)
Page 20
... indicating that a 3 hour self-clean time is displayed. 4. Setting a self-clean cycle 1. Be sure the clock displays the correct time of the oven when opening the door to allow about 15 seconds for about 1 hour to lock). Press start the delayed Self-Clean cycle. Press clean. "---" appears ...to glow. 2. This can use care when opening the door after the self-cleaning cycle. Use caution and avoid possible burns when opening the oven door after the selfcleaning cycle has completed. NOTES Whenever the self-clean feature is cool, wipe away any residue or powdered ash with a damp...
... indicating that a 3 hour self-clean time is displayed. 4. Setting a self-clean cycle 1. Be sure the clock displays the correct time of the oven when opening the door to allow about 15 seconds for about 1 hour to lock). Press start the delayed Self-Clean cycle. Press clean. "---" appears ...to glow. 2. This can use care when opening the door after the self-cleaning cycle. Use caution and avoid possible burns when opening the oven door after the selfcleaning cycle has completed. NOTES Whenever the self-clean feature is cool, wipe away any residue or powdered ash with a damp...
Complete Owner's Guide (English)
Page 21
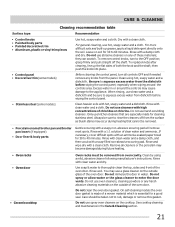
... firmly and pull straight off from the panel. Clean using a mild, abrasive cleaner following manufacturer's instructions. On self-cleaning models the oven door gasket is made for 30 to the appliance. See cooktop cleaning and maintenance in water. Dry with a soap-filled non-abrasive...section. 21 Rinse and wipe dry with a damp cloth and dry. You may occur during future heating. • Oven racks • Oven door • Ceramic cooktop Oven racks must be taken not to the OFF position; Care should be removed from the dishcloth before wiping the control panel...
... firmly and pull straight off from the panel. Clean using a mild, abrasive cleaner following manufacturer's instructions. On self-cleaning models the oven door gasket is made for 30 to the appliance. See cooktop cleaning and maintenance in water. Dry with a soap-filled non-abrasive...section. 21 Rinse and wipe dry with a damp cloth and dry. You may occur during future heating. • Oven racks • Oven door • Ceramic cooktop Oven racks must be taken not to the OFF position; Care should be removed from the dishcloth before wiping the control panel...
Complete Owner's Guide (English)
Page 23
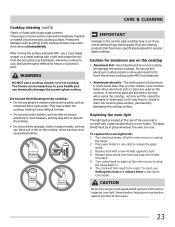
... are allowed to boil dry when using the cooktop, not only will the utensil be taken when aluminum pots or pans are COOL before replacing oven light. CAUTION Be sure the range is covered with a glass shield held by a wire holder. Wear a leather-faced glove for aluminum use on... the cooktop: • Do not use harsh cleaners, such as chlorine bleach, ammonia or oven cleaners, as they can leave soil or lint on the cooktop. BLEACH ABRASIVE CLEANERS AMMONIA CARE & CLEANING IMPORTANT Damage to the ceramic glass cooktop may...
... are allowed to boil dry when using the cooktop, not only will the utensil be taken when aluminum pots or pans are COOL before replacing oven light. CAUTION Be sure the range is covered with a glass shield held by a wire holder. Wear a leather-faced glove for aluminum use on... the cooktop: • Do not use harsh cleaners, such as chlorine bleach, ammonia or oven cleaners, as they can leave soil or lint on the cooktop. BLEACH ABRASIVE CLEANERS AMMONIA CARE & CLEANING IMPORTANT Damage to the ceramic glass cooktop may...
Complete Owner's Guide (English)
Page 24
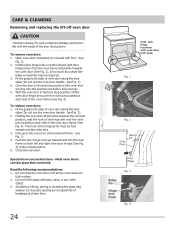
... located on both sides of oven door along the door sides (Do not use the oven door handle - To replace oven door: 1. Firmly grasp both left and right door hinges down . Close the oven door. Do not close the oven door until all the oven racks are fully in the ... be fully seated onto the roller pins. 3. With the oven door in place. 2. Holding the oven door at a later time. 24 Oven door hinge locations with oven door fully open the oven door (horizontal with floor - Fully open . Special door care instructions - Most oven doors contain glass that can break. See Fig. 3). ...
... located on both sides of oven door along the door sides (Do not use the oven door handle - To replace oven door: 1. Firmly grasp both left and right door hinges down . Close the oven door. Do not close the oven door until all the oven racks are fully in the ... be fully seated onto the roller pins. 3. With the oven door in place. 2. Holding the oven door at a later time. 24 Oven door hinge locations with oven door fully open the oven door (horizontal with floor - Fully open . Special door care instructions - Most oven doors contain glass that can break. See Fig. 3). ...
Complete Owner's Guide (English)
Page 25
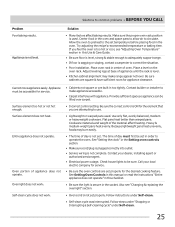
... Try adjusting the recipe's recommended temperature or baking time. Use only flat, evenly balanced, medium or heavyweight cookware. Also see "Adjusting Oven Temperature" section in too tightly. Follow steps under "Stopping or Interrupting a Self-cleaning cycle" under Self-clean. • Self-clean... cycle was interrupted. Cannot move appliance easily. Surface element does not heat. Oven portion of day is used . Self-clean cycle does not work . Heavy & medium-weight pans heat evenly. If you are built ...
... Try adjusting the recipe's recommended temperature or baking time. Use only flat, evenly balanced, medium or heavyweight cookware. Also see "Adjusting Oven Temperature" section in too tightly. Follow steps under "Stopping or Interrupting a Self-cleaning cycle" under Self-clean. • Self-clean... cycle was interrupted. Cannot move appliance easily. Surface element does not heat. Oven portion of day is used . Self-clean cycle does not work . Heavy & medium-weight pans heat evenly. If you are built ...


