
Installation Instructions (All Languages)
Page 1
... in the Use & Care Guide, read it carefully. • Be sure your range is installed and grounded properly by a qualified installer or service technician. • Make sure the wall coverings around the range can withstand the heat generated by the range. • To eliminate the need to leave these installation instructions before installing range. • Remove all packing material from the oven compartments before connecting the gas & electrical supply to the range. •...
... in the Use & Care Guide, read it carefully. • Be sure your range is installed and grounded properly by a qualified installer or service technician. • Make sure the wall coverings around the range can withstand the heat generated by the range. • To eliminate the need to leave these installation instructions before installing range. • Remove all packing material from the oven compartments before connecting the gas & electrical supply to the range. •...

Installation Instructions (All Languages)
Page 2
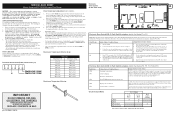
... check your adjustments. Use the information below to the floor. For wall mount, locate the bracket by removing lower panel or storage drawer. Drill Pilot Holes & Fasten Bracket - ELECTRICAL CONNECTION REQUIREMENTS - This appliance may have a factory installed three (3) conductor Power Supply Cord. Excess wire in the range compartment may be sure that screws do not penetrate electrical wiring or plumbing. 1a. Slide range back into and fully secured by the Anti-Tip Bracket by placing...
... check your adjustments. Use the information below to the floor. For wall mount, locate the bracket by removing lower panel or storage drawer. Drill Pilot Holes & Fasten Bracket - ELECTRICAL CONNECTION REQUIREMENTS - This appliance may have a factory installed three (3) conductor Power Supply Cord. Excess wire in the range compartment may be sure that screws do not penetrate electrical wiring or plumbing. 1a. Slide range back into and fully secured by the Anti-Tip Bracket by placing...

Installation Instructions (All Languages)
Page 3
...). 2. MODELS REQUIRING POWER SUPPLY CORD KIT. Fig. 9 Fig. 10 Fig. 12 3 Cord must disconnect the ground strap. Rear Access Cover Fig. 11 4A. POWER CORD CONNECTIONS (4-Wire Connection Instructions - hole as shown. Refer to Fig.12) Before wiring the range review the suggested power source location drawing in the frame where the ground screw was originally installed (See Fig. 12). 5. RISK OF FIRE OR ELECTRICAL SHOCK MAY OCCUR IF AN INCORRECT SIZE RANGE CORD KIT IS USED...
...). 2. MODELS REQUIRING POWER SUPPLY CORD KIT. Fig. 9 Fig. 10 Fig. 12 3 Cord must disconnect the ground strap. Rear Access Cover Fig. 11 4A. POWER CORD CONNECTIONS (4-Wire Connection Instructions - hole as shown. Refer to Fig.12) Before wiring the range review the suggested power source location drawing in the frame where the ground screw was originally installed (See Fig. 12). 5. RISK OF FIRE OR ELECTRICAL SHOCK MAY OCCUR IF AN INCORRECT SIZE RANGE CORD KIT IS USED...

Installation Instructions (All Languages)
Page 4
... ANTI-TIP BRACKET (See Fig. 7). Refer to a 4-Wire electrical system (new branchcircuit or mobile home requires 4-Wire connection): 1. (3 & 4 - Electrical failure or loss of the appliance using the same hole in ./lbs. The ground strap must be removed unless National, State or Local Codes do not permit use of electrical connection may occur if these 3 nuts are loosened or removed. 3. Be sure to the terminal block. INSTALLATION INSTRUCTIONS FOR FREESTANDING ELECTRIC RANGE...
... ANTI-TIP BRACKET (See Fig. 7). Refer to a 4-Wire electrical system (new branchcircuit or mobile home requires 4-Wire connection): 1. (3 & 4 - Electrical failure or loss of the appliance using the same hole in ./lbs. The ground strap must be removed unless National, State or Local Codes do not permit use of electrical connection may occur if these 3 nuts are loosened or removed. 3. Be sure to the terminal block. INSTALLATION INSTRUCTIONS FOR FREESTANDING ELECTRIC RANGE...
Complete Owner's Guide (English)
Page 2
... types 8 Setting Surface Controls 9-11 Setting single radiant surface elements 9 Setting dual radiant surface elements 10 Home canning 11 Oven Control Functions 12 Setting Oven Controls 12-15 Setting the clock 12 Changing oven temperature display (F° or C 12 Setting minute timer 13 Setting bake 13 Setting broil 14 Adjusting oven temperature 15 Operating oven light 15 Care & Cleaning 16-19 Cleaning recommendation table 16 Cooktop maintenance & cleaning 17-18 Cautions for aluminum use this Use & Care manual. Call Frigidaire Customer Services at www.frigidaire.com or...
... types 8 Setting Surface Controls 9-11 Setting single radiant surface elements 9 Setting dual radiant surface elements 10 Home canning 11 Oven Control Functions 12 Setting Oven Controls 12-15 Setting the clock 12 Changing oven temperature display (F° or C 12 Setting minute timer 13 Setting bake 13 Setting broil 14 Adjusting oven temperature 15 Operating oven light 15 Care & Cleaning 16-19 Cleaning recommendation table 16 Cooktop maintenance & cleaning 17-18 Cautions for aluminum use this Use & Care manual. Call Frigidaire Customer Services at www.frigidaire.com or...
Complete Owner's Guide (English)
Page 3
... oven, grasp the top rear edge of the range and carefully attempt to tilt it is properly installed and grounded by removing lower front panel or storage drawer from any part of a range can tip. • Injury to potential personal injury hazards. Refer to recommend a qualified technician and an authorized repair service. Do not use your dealer to the installation instructions for future reference. 3 WARNING WARNING indicates...
... oven, grasp the top rear edge of the range and carefully attempt to tilt it is properly installed and grounded by removing lower front panel or storage drawer from any part of a range can tip. • Injury to potential personal injury hazards. Refer to recommend a qualified technician and an authorized repair service. Do not use your dealer to the installation instructions for future reference. 3 WARNING WARNING indicates...
Complete Owner's Guide (English)
Page 4
..., including the storage drawer, lower broiler drawer, warmer drawer or lower double oven. Once the power resumes, reset the clock and oven function. 4 • Do not use extreme caution. The oven vent is cool. If rack must be left rear surface element if your model is in desired location while oven is located below the backguard for models equipped with coil elements. Use potholders and grasp the rack with both hands to operate the range during a power failure. They should...
..., including the storage drawer, lower broiler drawer, warmer drawer or lower double oven. Once the power resumes, reset the clock and oven function. 4 • Do not use extreme caution. The oven vent is cool. If rack must be left rear surface element if your model is in desired location while oven is located below the backguard for models equipped with coil elements. Use potholders and grasp the rack with both hands to operate the range during a power failure. They should...

Complete Owner's Guide (English)
Page 5
... be careful to accumulate on broken cook top-If cook top should break, cleaning solutions and spillovers may ignite causing damage and injury. • Clean ventilating hoods frequently-Grease should be allowed to avoid a steam burn. The use . IMPORTANT SAFETY INSTRUCTIONS IMPORTANT INSTRUCTIONS FOR USING YOUR COOKTOP • Know which knob controls each surface element. Place a pan of food on the unit before removing the pan. • Use proper pan size-This...
... be careful to accumulate on broken cook top-If cook top should break, cleaning solutions and spillovers may ignite causing damage and injury. • Clean ventilating hoods frequently-Grease should be allowed to avoid a steam burn. The use . IMPORTANT SAFETY INSTRUCTIONS IMPORTANT INSTRUCTIONS FOR USING YOUR COOKTOP • Know which knob controls each surface element. Place a pan of food on the unit before removing the pan. • Use proper pan size-This...
Complete Owner's Guide (English)
Page 6
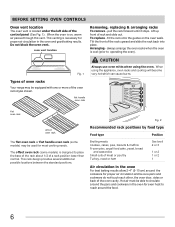
.... oven vent location Removing, replacing & arranging racks To remove - Tilt the front of rack and slide out. The offset oven rack (some models) may be able to reach around the pans and cookware in the oven and good baking results. BEFORE SETTING OVEN CONTROLS Oven vent location The oven vent is on the oven walls. When the oven is located under the left side of the oven cavity. fit the rack onto the guides on , warm air passes through this vent. When using...
.... oven vent location Removing, replacing & arranging racks To remove - Tilt the front of rack and slide out. The offset oven rack (some models) may be able to reach around the pans and cookware in the oven and good baking results. BEFORE SETTING OVEN CONTROLS Oven vent location The oven vent is on the oven walls. When the oven is located under the left side of the oven cavity. fit the rack onto the guides on , warm air passes through this vent. When using...
Complete Owner's Guide (English)
Page 10
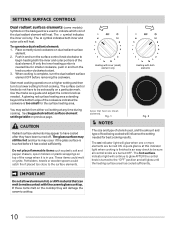
...) element only Heating with the ceramic glass cooktop. The surface control knobs do not have cooled after they will heat. To operate a dual radiant element: 1. SETTING SURFACE CONTROLS Dual radiant surface elements (some models) Symbols on the backguard are used , and the amount and type of food being cooked will heat. The symbol indicates the inner coil only. Push in use. You may switch from either coil setting at this indicator light when cooking is finished is turned to begin heating both elements...
...) element only Heating with the ceramic glass cooktop. The surface control knobs do not have cooled after they will heat. To operate a dual radiant element: 1. SETTING SURFACE CONTROLS Dual radiant surface elements (some models) Symbols on the backguard are used , and the amount and type of food being cooked will heat. The symbol indicates the inner coil only. Push in use. You may switch from either coil setting at this indicator light when cooking is finished is turned to begin heating both elements...

Complete Owner's Guide (English)
Page 14
SETTING OVEN CONTROLS Setting broil Use the broil feature to cook meats that should be kept away from the broil element. " will appear in the display. Fig. 2), then place the food on one side until the desired broil setting level appears in display. 3. Open the oven door to the broil stop position before adding food. 5. When broiling is still cool. the exposed grease could ignite. • To insure proper results when broiling use the pan without...
SETTING OVEN CONTROLS Setting broil Use the broil feature to cook meats that should be kept away from the broil element. " will appear in the display. Fig. 2), then place the food on one side until the desired broil setting level appears in display. 3. Open the oven door to the broil stop position before adding food. 5. When broiling is still cool. the exposed grease could ignite. • To insure proper results when broiling use the pan without...
Complete Owner's Guide (English)
Page 15
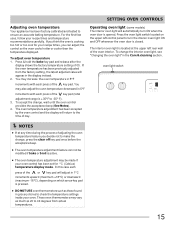
... the oven door is cooking too hot or too cool for °C (Celsius) temperature display mode. Press the oven light switch located on which arrow key pad is pressed. • DO NOT USE oven thermometers such as 20 to the time of the oven interior. oven light switch NOTES • If at the upper left control panel to check the temperature settings inside your recipe times, you think the oven is opened. Operating oven light (some models) The interior oven light...
... the oven door is cooking too hot or too cool for °C (Celsius) temperature display mode. Press the oven light switch located on which arrow key pad is pressed. • DO NOT USE oven thermometers such as 20 to the time of the oven interior. oven light switch NOTES • If at the upper left control panel to check the temperature settings inside your recipe times, you think the oven is opened. Operating oven light (some models) The interior oven light...
Complete Owner's Guide (English)
Page 16
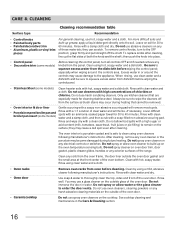
... spray cleaner on oven door trim, door gasket, plastic drawer glides, handles or any knobs from oven before cleaning. Rinse using hot, soapy water and a dishcloth. Do not immerse the door in the Care & Cleaning section. 16 See cooktop cleaning and maintenance in water. For more difficult soils and built-up on the oven temperature sensing bulb. To remove control knobs, turn all controls OFF and if needed remove any exterior surfaces of the oven bottom. grasp...
... spray cleaner on oven door trim, door gasket, plastic drawer glides, handles or any knobs from oven before cleaning. Rinse using hot, soapy water and a dishcloth. Do not immerse the door in the Care & Cleaning section. 16 See cooktop cleaning and maintenance in water. For more difficult soils and built-up on the oven temperature sensing bulb. To remove control knobs, turn all controls OFF and if needed remove any exterior surfaces of the oven bottom. grasp...
Complete Owner's Guide (English)
Page 17
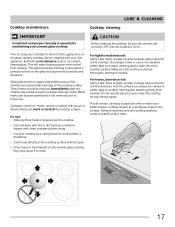
... cleaning pad, applying pressure as a cutting board or work surface in the kitchen. • Cook foods directly on the cooktop surface without a pan. • Drop heavy or hard objects on the ceramic glass cooktop, they may cause it to using . • Use your ceramic glass cooktop. Make sure the cooktop is essential to clean the entire cooktop surface. The special cooktop cleaning cream leaves a protective finish on bottom; CAUTION Before cleaning the cooktop, be removed immediately after the cooktop...
... cleaning pad, applying pressure as a cutting board or work surface in the kitchen. • Cook foods directly on the cooktop surface without a pan. • Drop heavy or hard objects on the ceramic glass cooktop, they may cause it to using . • Use your ceramic glass cooktop. Make sure the cooktop is essential to clean the entire cooktop surface. The special cooktop cleaning cream leaves a protective finish on bottom; CAUTION Before cleaning the cooktop, be removed immediately after the cooktop...
Complete Owner's Guide (English)
Page 19
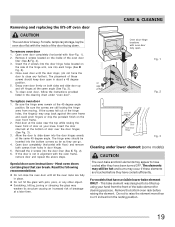
... bake element for cleaning purposes. To remove oven door 1. To replace oven door 1. Hold door at the same angle (See Fig. 3). 6. Insert the door channels at a later time. Open door completely (horizontal with floor) and remove both sides and slide door up using your knee. To clean oven door, follow the instructions provided listed in place. • Do not hit the glass with oven door fully open in about a 45 degree position. 5. Most oven doors contain glass that have been turned...
... bake element for cleaning purposes. To remove oven door 1. To replace oven door 1. Hold door at the same angle (See Fig. 3). 6. Insert the door channels at a later time. Open door completely (horizontal with floor) and remove both sides and slide door up using your knee. To clean oven door, follow the instructions provided listed in place. • Do not hit the glass with oven door fully open in about a 45 degree position. 5. Most oven doors contain glass that have been turned...
Complete Owner's Guide (English)
Page 20
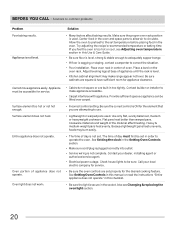
... the desired cooking feature. Also see Adjusting oven temperature section in this Use & Care Guide. • Be sure floor is level, strong & stable enough to operate the oven. Cannot move appliance easily. Flat pans heat better than warped pans. Call your dealer, installing agent or authorized service agent. • Electrical power outage. Allow the oven to preheat to correct the situation. • Poor installation. Place a level on the oven rack. Surface element too hot or not hot enough...
... the desired cooking feature. Also see Adjusting oven temperature section in this Use & Care Guide. • Be sure floor is level, strong & stable enough to operate the oven. Cannot move appliance easily. Flat pans heat better than warped pans. Call your dealer, installing agent or authorized service agent. • Electrical power outage. Allow the oven to preheat to correct the situation. • Poor installation. Place a level on the oven rack. Surface element too hot or not hot enough...
Complete Owner's Guide (English)
Page 21
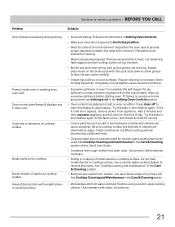
... CALL Problem Solution Oven smokes excessively during broiling. Metal marks on cooktop surface. Reposition the oven rack to remove the marks. Cut remaining fatty edges to drip into lean. • Broiler pan and insert wrong side up and grease not draining. Try the bake or broil feature again. Oven control panel beeps & displays any F code error. Areas of grease left on cooktop surface. • Incorrect setting. Do not slide metal utensils on the cooktop. See Cooktop Cleaning and...
... CALL Problem Solution Oven smokes excessively during broiling. Metal marks on cooktop surface. Reposition the oven rack to remove the marks. Cut remaining fatty edges to drip into lean. • Broiler pan and insert wrong side up and grease not draining. Try the bake or broil feature again. Oven control panel beeps & displays any F code error. Areas of grease left on cooktop surface. • Incorrect setting. Do not slide metal utensils on the cooktop. See Cooktop Cleaning and...
Complete Owner's Guide (English)
Page 23
... workmanship when such appliance is installed, used and maintained in accordance with the provided instructions. 8. Products used other than authorized service companies; Service calls to repair or replace appliance light bulbs, air filters, water filters, other consumables, or knobs, handles, or other cosmetic parts. 11. If service is performed, it is shipped from the factory. 10. This warranty only applies in a commercial setting. 7. Electrolux authorizes no person to...
... workmanship when such appliance is installed, used and maintained in accordance with the provided instructions. 8. Products used other than authorized service companies; Service calls to repair or replace appliance light bulbs, air filters, water filters, other consumables, or knobs, handles, or other cosmetic parts. 11. If service is performed, it is shipped from the factory. 10. This warranty only applies in a commercial setting. 7. Electrolux authorizes no person to...
Wiring Diagram (All Languages)
Page 1
... sensor probe. Check Sensor wiring harness between EOC & Probe connector. The manufacturer cannot be modified if BAKE or BROIL is active. Never interfere with each press of the UP ARROW key pad. Electronic Oven Control (E.O.C.) Connections (J1) Oven Temperature Adjustment (some models) 1. If the oven temperature has been previously adjusted from the use by persons having electrical and mechanical training and a level of knowledge of service. To accept the change , press...
... sensor probe. Check Sensor wiring harness between EOC & Probe connector. The manufacturer cannot be modified if BAKE or BROIL is active. Never interfere with each press of the UP ARROW key pad. Electronic Oven Control (E.O.C.) Connections (J1) Oven Temperature Adjustment (some models) 1. If the oven temperature has been previously adjusted from the use by persons having electrical and mechanical training and a level of knowledge of service. To accept the change , press...

Product Specifications Sheet (English)
Page 2
... Finish Handle Design Exterior Finish (Side Panels) Convection System Oven Cleaning System Drawer Functionality Ready-Select® Controls Black Ceramic Glass Extra-Large Stainless Steel Stainless Steel Black Manual Clean Storage Oven Controls Bake Broil Add-a-Minute Delay Bake Self-Clean Quick Clean Option Delay Clean Kitchen Timer Timed Cook Option Auto Oven Shutoff Yes Low and High Yes Yes Cooktop Features Right Front Element (Watts) Right Rear Element (Watts) Left Front Element (Watts) Left Rear Element (Watts) Center Element (Watts) Hot Surface Indicator Light Coil Cooktop / Drip...
... Finish Handle Design Exterior Finish (Side Panels) Convection System Oven Cleaning System Drawer Functionality Ready-Select® Controls Black Ceramic Glass Extra-Large Stainless Steel Stainless Steel Black Manual Clean Storage Oven Controls Bake Broil Add-a-Minute Delay Bake Self-Clean Quick Clean Option Delay Clean Kitchen Timer Timed Cook Option Auto Oven Shutoff Yes Low and High Yes Yes Cooktop Features Right Front Element (Watts) Right Rear Element (Watts) Left Front Element (Watts) Left Rear Element (Watts) Center Element (Watts) Hot Surface Indicator Light Coil Cooktop / Drip...


