Installation Instructions (All Languages)
Page 2
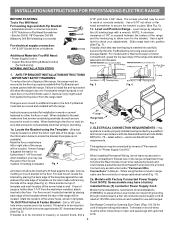
...not penetrate electrical wiring or plumbing. 1a. See Range Connection Opening Size Chart (Figs. 9 & 10) for installation in range compartment. For models with the National Electrical Code ANSI/ NFPA No. 70 -- Serious injury might result from spilled hot liquids or from wall when installed, you... may be located. When fastening to tilt it . If rear of the range (See Fig. 4). Models with ranges. Level and Position Range - Place bracket on either the floor or wall. Mobile home installations, new branch circuit installations (1996NEC)...
...not penetrate electrical wiring or plumbing. 1a. See Range Connection Opening Size Chart (Figs. 9 & 10) for installation in range compartment. For models with the National Electrical Code ANSI/ NFPA No. 70 -- Serious injury might result from spilled hot liquids or from wall when installed, you... may be located. When fastening to tilt it . If rear of the range (See Fig. 4). Models with ranges. Level and Position Range - Place bracket on either the floor or wall. Mobile home installations, new branch circuit installations (1996NEC)...
Installation Instructions (All Languages)
Page 3
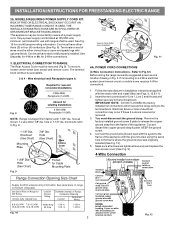
... loop or open-end spade lugs with the ground screw using the same hole in Fig. 3. KEEP the ground screw. 4. Fig. 9 Fig. 10 Fig. 12 3 MODELS REQUIRING POWER SUPPLY CORD KIT. See Fig. 10 for 4-Wire or 4b. See Steps 4a. To use with ranges shall be either three (3) or four...
... loop or open-end spade lugs with the ground screw using the same hole in Fig. 3. KEEP the ground screw. 4. Fig. 9 Fig. 10 Fig. 12 3 MODELS REQUIRING POWER SUPPLY CORD KIT. See Fig. 10 for 4-Wire or 4b. See Steps 4a. To use with ranges shall be either three (3) or four...
Complete Owner's Guide (English)
Page 2
...service life of a relationship. immediately contact the dealer (or builder) that might occur. Visit the Frigidaire web site at www.frigidaire.com Before you call ". Purchase date Model number Serial number All rights reserved. Need help?? Check the section titled "Before you call for... this Use & Care manual. This section helps step you through some models). Save time and money. This Use & Care Guide is only a phone call away. Call Frigidaire Customer Services at www.frigidaire.com or by dropping your range properly. PRODUCT RECORD AND REGISTRATION Contents ...
...service life of a relationship. immediately contact the dealer (or builder) that might occur. Visit the Frigidaire web site at www.frigidaire.com Before you call ". Purchase date Model number Serial number All rights reserved. Need help?? Check the section titled "Before you call for... this Use & Care manual. This section helps step you through some models). Save time and money. This Use & Care Guide is only a phone call away. Call Frigidaire Customer Services at www.frigidaire.com or by dropping your range properly. PRODUCT RECORD AND REGISTRATION Contents ...
Complete Owner's Guide (English)
Page 3
... • Remove all tape and packaging before using the range. To reduce the risk of a child on the door or drawers of an emergency. For models equipped with packaging material. WARNING • Proper installation-Be sure your appliance until you to play around the range. This may result in this symbol...
... • Remove all tape and packaging before using the range. To reduce the risk of a child on the door or drawers of an emergency. For models equipped with packaging material. WARNING • Proper installation-Be sure your appliance until you to play around the range. This may result in this symbol...
Complete Owner's Guide (English)
Page 4
...appliance is in use. The oven vent is cool. Always place oven racks in desired location while oven is located below the backguard for models equipped with ceramic-glass cook tops. During and after use, do not place plastic or heat-sensitive items on or near these openings,... it closely. IMPORTANT SAFETY INSTRUCTIONS WARNING • Storage in or on appliance-flammable materials should not be left rear surface element if your model is hot use extreme caution. Both surface heating and oven heating elements may cause container to cause burns. If the power fails, always turn...
...appliance is in use. The oven vent is cool. Always place oven racks in desired location while oven is located below the backguard for models equipped with ceramic-glass cook tops. During and after use, do not place plastic or heat-sensitive items on or near these openings,... it closely. IMPORTANT SAFETY INSTRUCTIONS WARNING • Storage in or on appliance-flammable materials should not be left rear surface element if your model is hot use extreme caution. Both surface heating and oven heating elements may cause container to cause burns. If the power fails, always turn...

Complete Owner's Guide (English)
Page 5
... each surface heating unit. Move birds to a hot surface. Pay particular attention to keep all parts free of electric shock. FOR CERAMIC-GLASS COOK TOP MODELS • Do not cook on broken cook top-If cook top should never be careful to such substances. 5 IMPORTANT INSTRUCTIONS FOR CLEANING YOUR RANGE •...
... each surface heating unit. Move birds to a hot surface. Pay particular attention to keep all parts free of electric shock. FOR CERAMIC-GLASS COOK TOP MODELS • Do not cook on broken cook top-If cook top should never be careful to such substances. 5 IMPORTANT INSTRUCTIONS FOR CLEANING YOUR RANGE •...
Complete Owner's Guide (English)
Page 6
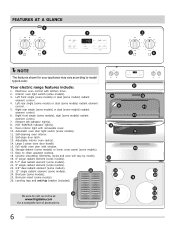
... to visit us online at 24 www.frigidaire.com for your appliance may vary according to model type & color. Right rear single (some models) or dual (some models). 26. Self-cleaning oven interior. 12. Broil pan insert (some models) radiant element control. 6. Left rear single (some models or dual (some models). 11. Automatic oven door light switch...
... to visit us online at 24 www.frigidaire.com for your appliance may vary according to model type & color. Right rear single (some models) or dual (some models). 26. Self-cleaning oven interior. 12. Broil pan insert (some models) radiant element control. 6. Left rear single (some models or dual (some models). 11. Automatic oven door light switch...
Complete Owner's Guide (English)
Page 7
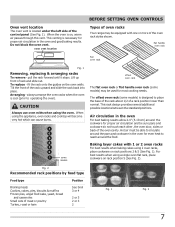
...the front of rack and slide out. This rack design provides several additional possible locations between the standard positions. The offset oven rack (some models) may be able to circulate around the pans and cookware in the oven for even heat to place the base of the rack about 1/2...using the appliance, oven racks and cooktop will become very hot which can cause burns. 7 6 5 4 3 2 1 some models offset oven rack The flat oven rack or flat handle oven rack (some models) is cool (prior to operating the oven). Hot air must be equipped with 1 or 2 oven racks For best results...
...the front of rack and slide out. This rack design provides several additional possible locations between the standard positions. The offset oven rack (some models) may be able to circulate around the pans and cookware in the oven for even heat to place the base of the rack about 1/2...using the appliance, oven racks and cooktop will become very hot which can cause burns. 7 6 5 4 3 2 1 some models offset oven rack The flat oven rack or flat handle oven rack (some models) is cool (prior to operating the oven). Hot air must be equipped with 1 or 2 oven racks For best results...

Complete Owner's Guide (English)
Page 9
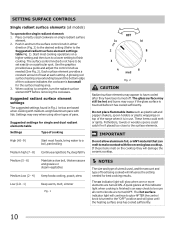
... diameter to clean. Using proper cookware The size and type of a material that make good contact with uneven cooking results. Dual radiant surface control (some models) Fig. 1 Single radiant surface control Cookware material types The cookware material determines how evenly and quickly heat is transferred from the surface element to avoid...
... diameter to clean. Using proper cookware The size and type of a material that make good contact with uneven cooking results. Dual radiant surface control (some models) Fig. 1 Single radiant surface control Cookware material types The cookware material determines how evenly and quickly heat is transferred from the surface element to avoid...
Complete Owner's Guide (English)
Page 10
... vary when using other types of the cookware indicates the cookware is in either direction (Fig. 2) to the desired setting (Refer to be sure all models) To operate the single radiant element: 1. Settings may still be set exactly on top of heat at this indicator light when cooking is finished is...
... vary when using other types of the cookware indicates the cookware is in either direction (Fig. 2) to the desired setting (Refer to be sure all models) To operate the single radiant element: 1. Settings may still be set exactly on top of heat at this indicator light when cooking is finished is...
Complete Owner's Guide (English)
Page 11
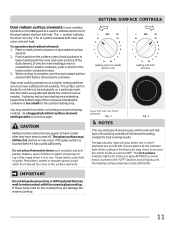
... too close to the "OFF" position and will glow until the heating surface area has cooled sufficiently. SETTING SURFACE CONTROLS Dual radiant surface elements (some models) Symbols on the backguard are used , and the amount and type of the dual radiant element will heat. A glowing red surface heating area extending beyond...
... too close to the "OFF" position and will glow until the heating surface area has cooled sufficiently. SETTING SURFACE CONTROLS Dual radiant surface elements (some models) Symbols on the backguard are used , and the amount and type of the dual radiant element will heat. A glowing red surface heating area extending beyond...

Complete Owner's Guide (English)
Page 17
...1 WARNING Should an oven fire occur, close the oven door and turn the oven OFF. CAUTION • The broiler pan and the insert (some models Insert Broil pan Fig. 2 setting level appears in 5th Lo Chicken-boneless 6th Lo Fish 6th Hi Shrimp 5th Hi Hamburger 1" thick 7th* Hi ...stage. 4. Press broil. Open the oven door to the stop position when broiling. 8. Broil on one side until the desired broil 7 6 5 4 3 2 1 some models) allows grease to drain and be kept away from the high heat of foods that require direct exposure to radiant heat for optimum browning results...
...1 WARNING Should an oven fire occur, close the oven door and turn the oven OFF. CAUTION • The broiler pan and the insert (some models Insert Broil pan Fig. 2 setting level appears in 5th Lo Chicken-boneless 6th Lo Fish 6th Hi Shrimp 5th Hi Hamburger 1" thick 7th* Hi ...stage. 4. Press broil. Open the oven door to the stop position when broiling. 8. Broil on one side until the desired broil 7 6 5 4 3 2 1 some models) allows grease to drain and be kept away from the high heat of foods that require direct exposure to radiant heat for optimum browning results...
Complete Owner's Guide (English)
Page 18
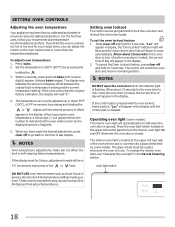
... oven door is flashing. Set the temperature to the time of day will be in place whenever the oven is opened. Operating oven light (some models) The interior oven light will unlock the oven door and resume normal operation. Release bake keypad.
... oven door is flashing. Set the temperature to the time of day will be in place whenever the oven is opened. Operating oven light (some models) The interior oven light will unlock the oven door and resume normal operation. Release bake keypad.
Complete Owner's Guide (English)
Page 19
... removed before raising the element. DO NOT force the oven door open. Use caution when opening the door after they have cooled sufficiently. IMPORTANT For models that have been turned OFF. Do not to raise the element more than 4 or 5 inches from the front of the oven cavity easily. • Remove...
... removed before raising the element. DO NOT force the oven door open. Use caution when opening the door after they have cooled sufficiently. IMPORTANT For models that have been turned OFF. Do not to raise the element more than 4 or 5 inches from the front of the oven cavity easily. • Remove...
Complete Owner's Guide (English)
Page 20
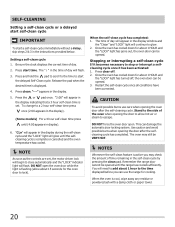
Press start a self-clean cycle immediately without a delay, skip steps 2 & 3 in the display). (Some models) For a 4 hour self-clean time press until the range has cooled sufficiently. To change to escape. NOTE As soon as the controls are set . DO ...
Press start a self-clean cycle immediately without a delay, skip steps 2 & 3 in the display). (Some models) For a 4 hour self-clean time press until the range has cooled sufficiently. To change to escape. NOTE As soon as the controls are set . DO ...
Complete Owner's Guide (English)
Page 21
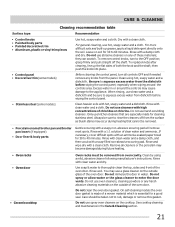
...door vents. Do not use kitchen cleaners that cannot be removed from the dishcloth before wiping the control panel. • Stainless steel (some models) Before cleaning the control panel, turn to rub, damage or remove this gasket. grasp firmly and pull straight off from the surface as ... & body parts Gentle scouring with clean water and a cloth. then push the knob into place. • Control panel • Decorative trim (some models) Clean heavier soils with clean water and dry. Do not spray or allow water or the glass cleaner to thoroughly clean the top, sides and...
...door vents. Do not use kitchen cleaners that cannot be removed from the dishcloth before wiping the control panel. • Stainless steel (some models) Before cleaning the control panel, turn to rub, damage or remove this gasket. grasp firmly and pull straight off from the surface as ... & body parts Gentle scouring with clean water and a cloth. then push the knob into place. • Control panel • Decorative trim (some models) Clean heavier soils with clean water and dry. Do not spray or allow water or the glass cleaner to thoroughly clean the top, sides and...
Complete Owner's Guide (English)
Page 26
... too close to clean bottom, front top of oven, frame of discoloration with clean, dry bottoms. 26 Small scratches do not cut into pan (some models). • Grease has built up and grease not draining. Use a ceramic-glass cooktop cleaner to remove soil. Scratches or abrasions on cooktop surface. Areas of...
... too close to clean bottom, front top of oven, frame of discoloration with clean, dry bottoms. 26 Small scratches do not cut into pan (some models). • Grease has built up and grease not draining. Use a ceramic-glass cooktop cleaner to remove soil. Scratches or abrasions on cooktop surface. Areas of...
Wiring Diagram (All Languages)
Page 1
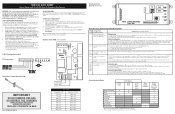
...electronic oven control for approximately 15 seconds until cam depresses the plunger on lock motor assy. Simmer Select PCB (some models. Control Connections P5 Connections Resistance Temperature Detector Electronic Oven Control (Rear View) Electronic Oven Control Fault Code Descriptions Fault ...not match the RTD chart replace RTD Sensor Probe. Obtain an average oven temperature after a minimum of any liability for some models) E.O.C. If Oven is intended for shorted Sensor Probe circuit. This service data sheet is overheating: 1. Never interfere with ES ...
...electronic oven control for approximately 15 seconds until cam depresses the plunger on lock motor assy. Simmer Select PCB (some models. Control Connections P5 Connections Resistance Temperature Detector Electronic Oven Control (Rear View) Electronic Oven Control Fault Code Descriptions Fault ...not match the RTD chart replace RTD Sensor Probe. Obtain an average oven temperature after a minimum of any liability for some models) E.O.C. If Oven is intended for shorted Sensor Probe circuit. This service data sheet is overheating: 1. Never interfere with ES ...


