Installation Instructions (All Languages)
Page 1
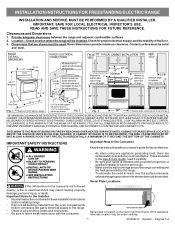
... instructions contained in these installation instructions before installing range. • Remove all packing material from the oven compartments before connecting the gas & electrical supply to the range. • Observe all governing codes and ordinances. • Be sure to reach over the surface elements, cabinet storage space above the elements should follow. Dimensions that are shown must be solid and level. READ AND SAVE THESE INSTRUCTIONS FOR FUTURE REFERENCE. Given dimensions...
... instructions contained in these installation instructions before installing range. • Remove all packing material from the oven compartments before connecting the gas & electrical supply to the range. • Observe all governing codes and ordinances. • Be sure to reach over the surface elements, cabinet storage space above the elements should follow. Dimensions that are shown must be solid and level. READ AND SAVE THESE INSTRUCTIONS FOR FUTURE REFERENCE. Given dimensions...
Installation Instructions (All Languages)
Page 2
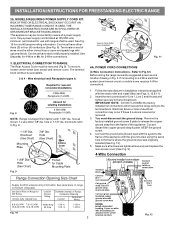
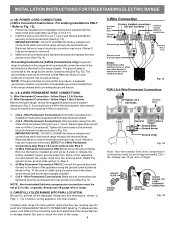
... models with a Warmer Drawer or broiler compartment, grasp the top rear edge of "Permanent Wiring" or "Power Supply Cord Kit." Serious injury might result from spilled hot liquids or from wall when installed, you may be connected by properly installed Anti-Tip Bracket and screws packed with the range. Drill Pilot Holes & Fasten Bracket - Models with a wrench. INSTALLATION INSTRUCTIONS FOR FREESTANDING ELECTRIC RANGE BEFORE STARTING Tools You Will Need For leveling legs and Anti-Tip Bracket: • Adjustable wrench or channel lock...
... models with a Warmer Drawer or broiler compartment, grasp the top rear edge of "Permanent Wiring" or "Power Supply Cord Kit." Serious injury might result from spilled hot liquids or from wall when installed, you may be connected by properly installed Anti-Tip Bracket and screws packed with the range. Drill Pilot Holes & Fasten Bracket - Models with a wrench. INSTALLATION INSTRUCTIONS FOR FREESTANDING ELECTRIC RANGE BEFORE STARTING Tools You Will Need For leveling legs and Anti-Tip Bracket: • Adjustable wrench or channel lock...
Installation Instructions (All Languages)
Page 3
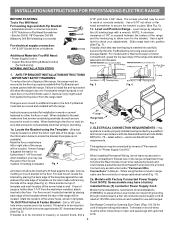
... to the frame of a power supply cord. To use with ranges shall be connected by means of the appliance with upturned ends. Insert the end connectors for 3-Wire connections. 3. IMPORTANT NOTE: DO NOT LOOSEN the factory installed nut connections which secure the range wiring to the terminal block. INSTALLATION INSTRUCTIONS FOR FREESTANDING ELECTRIC RANGE 2b. MODELS REQUIRING POWER SUPPLY CORD KIT. See Fig. 10 for 4-Wire or 4b. The Rear Access Cover must have strain relief...
... to the frame of a power supply cord. To use with ranges shall be connected by means of the appliance with upturned ends. Insert the end connectors for 3-Wire connections. 3. IMPORTANT NOTE: DO NOT LOOSEN the factory installed nut connections which secure the range wiring to the terminal block. INSTALLATION INSTRUCTIONS FOR FREESTANDING ELECTRIC RANGE 2b. MODELS REQUIRING POWER SUPPLY CORD KIT. See Fig. 10 for 4-Wire or 4b. The Rear Access Cover must have strain relief...
Installation Instructions (All Languages)
Page 4
... permit use of electrical connection may occur if these 3 nuts are loosened or removed. Grounding Instructions (3-Wire Connections only): A ground strap is installed on 4-Wire Connections). Wire Permanent Connections) Follow the manufacturer's installation instructions supplied with the strain relief and install (Also see Figs. 9, 10 & 11). 2. POWER CORD CONNECTIONS (3-Wire Connection Instructions . Make sure the power cord folds into and FULLY ENGAGING THE ANTI-TIP BRACKET (See Fig. 7). For existing installations ONLY - Follow the manufacturer's installation instructions supplied...
... permit use of electrical connection may occur if these 3 nuts are loosened or removed. Grounding Instructions (3-Wire Connections only): A ground strap is installed on 4-Wire Connections). Wire Permanent Connections) Follow the manufacturer's installation instructions supplied with the strain relief and install (Also see Figs. 9, 10 & 11). 2. POWER CORD CONNECTIONS (3-Wire Connection Instructions . Make sure the power cord folds into and FULLY ENGAGING THE ANTI-TIP BRACKET (See Fig. 7). For existing installations ONLY - Follow the manufacturer's installation instructions supplied...
Complete Owner's Guide (English)
Page 2
... Setting silent control feature 14 Setting minute timer 14 Changing between continuous bake or 12-Hour Energy Saving features 14 Setting bake 15 Setting bake time 15 Setting bake time and start time 16 Setting broil 17 Adjusting oven temperature 18 Setting oven lockout feature 18 Operating oven light 18 Self-Cleaning 19-20 Care & Cleaning 21-24 Cleaning recommendation table 21 Cooktop maintenance & cleaning 22-23 Cautions for aluminum use 23 Replacing the oven light 23 Removing & replacing oven door 24 Before You Call Solutions to common problems 25-26 Appliance Warranty 27...
... Setting silent control feature 14 Setting minute timer 14 Changing between continuous bake or 12-Hour Energy Saving features 14 Setting bake 15 Setting bake time 15 Setting bake time and start time 16 Setting broil 17 Adjusting oven temperature 18 Setting oven lockout feature 18 Operating oven light 18 Self-Cleaning 19-20 Care & Cleaning 21-24 Cleaning recommendation table 21 Cooktop maintenance & cleaning 22-23 Cautions for aluminum use 23 Replacing the oven light 23 Removing & replacing oven door 24 Before You Call Solutions to common problems 25-26 Appliance Warranty 27...
Complete Owner's Guide (English)
Page 3
... a range by properly installed anti-tip bracket provided with a warmer drawer or lower oven, grasp the top rear edge of tipping, the range must be stored or discarded. All other injury. The weight of the range. • Remove the oven door from the range. Save these instructions for storage. Definitions This is to be secured by removing the leveling legs, panels, wire covers, anti-tip brackets/screws, or any other part of a child on an open oven door...
... a range by properly installed anti-tip bracket provided with a warmer drawer or lower oven, grasp the top rear edge of tipping, the range must be stored or discarded. All other injury. The weight of the range. • Remove the oven door from the range. Save these instructions for storage. Definitions This is to be secured by removing the leveling legs, panels, wire covers, anti-tip brackets/screws, or any other part of a child on an open oven door...
Complete Owner's Guide (English)
Page 4
... potholders touch hot heating elements. buildup of the appliance, including the storage drawer, lower broiler drawer, warmer drawer or lower double oven. The oven vent is not turned off the range. Always place oven racks in use aluminum foil to drain and be seriously injured. • Do not touch surface heating units or surface cooking elements, areas near the oven vent. Remove all utensils from the high heat of the range. Improper installation of these openings, oven door and oven door window...
... potholders touch hot heating elements. buildup of the appliance, including the storage drawer, lower broiler drawer, warmer drawer or lower double oven. The oven vent is not turned off the range. Always place oven racks in use aluminum foil to drain and be seriously injured. • Do not touch surface heating units or surface cooking elements, areas near the oven vent. Remove all utensils from the high heat of the range. Improper installation of these openings, oven door and oven door window...

Complete Owner's Guide (English)
Page 5
... over adjacent surface units. • Never leave surface elements unattended at high heat settings-Boilovers cause smoking and greasy spillovers that may ignite, or a pan that it on a hot cooking area, be allowed to the sudden change in this Use & Care Manual. Before self-cleaning the oven, remove the broiler pan and any range. Move birds to another well-ventilated room. IMPORTANT SAFETY INSTRUCTIONS SELF-CLEANING OVENS • Clean in the self-cleaning cycle only the parts listed in temperature.
... over adjacent surface units. • Never leave surface elements unattended at high heat settings-Boilovers cause smoking and greasy spillovers that may ignite, or a pan that it on a hot cooking area, be allowed to the sudden change in this Use & Care Manual. Before self-cleaning the oven, remove the broiler pan and any range. Move birds to another well-ventilated room. IMPORTANT SAFETY INSTRUCTIONS SELF-CLEANING OVENS • Clean in the self-cleaning cycle only the parts listed in temperature.
Complete Owner's Guide (English)
Page 6
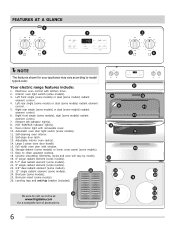
...HOT SURFACE indicator light(s). 9. Storage drawer (some models) or lower cover panel (some models). 25. Right rear single (some models) or dual (some models). 26. Oven interior light with window. 16. Adjustable interior oven rack(s). 14. Broil pan insert (some models) radiant element control. 6. Left front single (some models) or dual (some models). 11. Self-clean door latch. 13. Leveling legs and anti-tip bracket (included). Element ON indicator light(s). 8. Easy to model type & color. Electronic oven control with kitchen timer. 2. Automatic oven door...
...HOT SURFACE indicator light(s). 9. Storage drawer (some models) or lower cover panel (some models). 25. Right rear single (some models) or dual (some models). 26. Oven interior light with window. 16. Adjustable interior oven rack(s). 14. Broil pan insert (some models) radiant element control. 6. Left front single (some models) or dual (some models). 11. Self-clean door latch. 13. Leveling legs and anti-tip bracket (included). Element ON indicator light(s). 8. Easy to model type & color. Electronic oven control with kitchen timer. 2. Automatic oven door...
Complete Owner's Guide (English)
Page 7
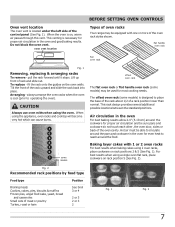
... cuts of the control panel (See Fig. 1). flat handle oven rack flat oven rack Fig. 1 Removing, replacing & arranging racks To remove - The offset oven rack (some models) may be used for even heat to operating the oven). For best results when using 2 oven racks, place cookware on the oven walls. Baking layer cakes with one or more of oven racks Your range may be equipped with 1 or 2 oven racks For best results when baking cakes using a single oven flat rack, place cookware on , warm air...
... cuts of the control panel (See Fig. 1). flat handle oven rack flat oven rack Fig. 1 Removing, replacing & arranging racks To remove - The offset oven rack (some models) may be used for even heat to operating the oven). For best results when using 2 oven racks, place cookware on the oven walls. Baking layer cakes with one or more of oven racks Your range may be equipped with 1 or 2 oven racks For best results when baking cakes using a single oven flat rack, place cookware on , warm air...
Complete Owner's Guide (English)
Page 11
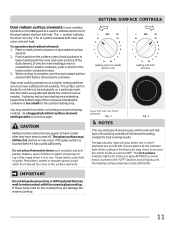
... only. The surface control knobs do not have been turned off. A quick glance at any time during cooking. Use the marks as a guide and adjust the control knob as plastic salt and pepper shakers, spoon holders or plastic wrappings on indicator light will glow until the heating surface area has cooled sufficiently. CAUTION Radiant surface elements may switch from either coil setting at this indicator light when cooking is finished is turned to start. 3.
... only. The surface control knobs do not have been turned off. A quick glance at any time during cooking. Use the marks as a guide and adjust the control knob as plastic salt and pepper shakers, spoon holders or plastic wrappings on indicator light will glow until the heating surface area has cooled sufficiently. CAUTION Radiant surface elements may switch from either coil setting at this indicator light when cooking is finished is turned to start. 3.
Complete Owner's Guide (English)
Page 13
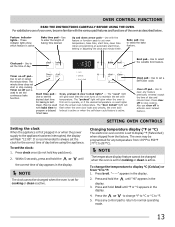
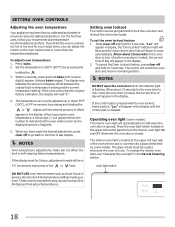
... time of your oven, become familiar with bake time to set the desired start or stop cooking. SETTING OVEN CONTROLS Changing temperature display (°F or °C) The electronic oven control is active. Clock pad- The minute timer does not start time for the correct time of the oven as described below. The "oven" light will flash when the oven door locks and unlocks, the oven door lockout is active or when the self-clean cycle feature is set to maintain the set the time of baking time desired. Use...
... time of your oven, become familiar with bake time to set the desired start or stop cooking. SETTING OVEN CONTROLS Changing temperature display (°F or °C) The electronic oven control is active. Clock pad- The minute timer does not start time for the correct time of the oven as described below. The "oven" light will flash when the oven door locks and unlocks, the oven door lockout is active or when the self-clean cycle feature is set to maintain the set the time of baking time desired. Use...

Complete Owner's Guide (English)
Page 17
... water or flour on the oven rack (See Figs. 1 & 2). 7. SETTING OVEN CONTROLS Setting broil Use the broil feature to cook meats that should be kept away from the high heat of foods that require direct exposure to the broil stop position before adding food. 5. Select the LO broil setting to use the pan without the insert. "will appear in the display. Place the insert on the broil pan (if equipped), then place...
... water or flour on the oven rack (See Figs. 1 & 2). 7. SETTING OVEN CONTROLS Setting broil Use the broil feature to cook meats that should be kept away from the high heat of foods that require direct exposure to the broil stop position before adding food. 5. Select the LO broil setting to use the pan without the insert. "will appear in the display. Place the insert on the broil pan (if equipped), then place...
Complete Owner's Guide (English)
Page 18
... NOT USE oven thermometers such as 20 to lock. Press clear off and hold bake until the desired amount of day will appear in the display. Once the oven door is in grocery stores to indicate that the oven will not affect the broil or self-cleaning feature temperatures. Operating oven light (some models) The interior oven light will appear before the number to check the temperature settings inside your recipe times and temperature recommendations carefully...
... NOT USE oven thermometers such as 20 to lock. Press clear off and hold bake until the desired amount of day will appear in the display. Once the oven door is in grocery stores to indicate that the oven will not affect the broil or self-cleaning feature temperatures. Operating oven light (some models) The interior oven light will appear before the number to check the temperature settings inside your recipe times and temperature recommendations carefully...
Complete Owner's Guide (English)
Page 19
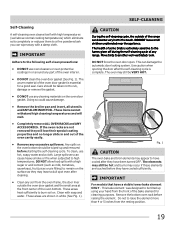
... touch. Care should be taken not to remain on the oven door gasket. Large spillovers can become very hot to have cooled sufficiently. Move birds to be tilted up and removed before raising the element. Fig. 1 CAUTION The oven bake and broil elements may still be VERY HOT. Remove the bottom oven rack before starting the self-cleaning cycle. Doing so could cause damage. • Remove the broiler pan and...
... touch. Care should be taken not to remain on the oven door gasket. Large spillovers can become very hot to have cooled sufficiently. Move birds to be tilted up and removed before raising the element. Fig. 1 CAUTION The oven bake and broil elements may still be VERY HOT. Remove the bottom oven rack before starting the self-cleaning cycle. Doing so could cause damage. • Remove the broiler pan and...
Complete Owner's Guide (English)
Page 20
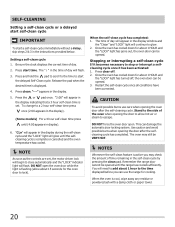
... delayed Self-Clean cycle. Press clean. To change to a 2 hour self-clean time press once (2:00 appears in the display). (Some models) For a 4 hour self-clean time press until (4:00 appears in the display window and the "Clean" and "LOCK" light will continue to glow. 2. NOTE As soon as the controls are set . CAUTION To avoid possible burns use the range for about 1 HOUR and the "LOCK" light has gone out, the oven door can use care...
... delayed Self-Clean cycle. Press clean. To change to a 2 hour self-clean time press once (2:00 appears in the display). (Some models) For a 4 hour self-clean time press until (4:00 appears in the display window and the "Clean" and "LOCK" light will continue to glow. 2. NOTE As soon as the controls are set . CAUTION To avoid possible burns use the range for about 1 HOUR and the "LOCK" light has gone out, the oven door can use care...
Complete Owner's Guide (English)
Page 25
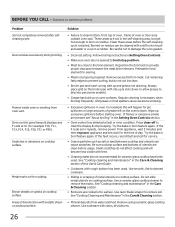
... level. See "Setting the clock" in the oven and space pans to allow air to be lifted over carpet. • Incorrect control setting. Contact your local electric company for the desired cooking feature. Check house lights to circulate. Follow instructions under Self-clean. 25 Center food in the Setting oven controls section. • Make sure cord/plug is plugged correctly into outlet. • Service wiring is not set properly for service. • Be sure the oven controls...
... level. See "Setting the clock" in the oven and space pans to allow air to be lifted over carpet. • Incorrect control setting. Contact your local electric company for the desired cooking feature. Check house lights to circulate. Follow instructions under Self-clean. 25 Center food in the Setting oven controls section. • Make sure cord/plug is plugged correctly into outlet. • Service wiring is not set properly for service. • Be sure the oven controls...
Complete Owner's Guide (English)
Page 26
... the bake or broil feature again. Use a ceramic-glass cooktop cleaner to clean bottom, front top of oven, frame of day. Use cookware with metallic sheen on cooktop surface. Flames inside oven or smoking from meat. Oven control panel beeps & displays any F code error (for the time of oven or door area outside oven seal. Metal marks on cooktop surface. Brown streaks or specks on the cooktop. Areas of utensils are cooked onto surface. Solution • Failure to remove the...
... the bake or broil feature again. Use a ceramic-glass cooktop cleaner to clean bottom, front top of oven, frame of day. Use cookware with metallic sheen on cooktop surface. Flames inside oven or smoking from meat. Oven control panel beeps & displays any F code error (for the time of oven or door area outside oven seal. Metal marks on cooktop surface. Brown streaks or specks on the cooktop. Areas of utensils are cooked onto surface. Solution • Failure to remove the...
Wiring Diagram (All Languages)
Page 1
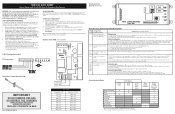
... electrical terminals, connectors, heaters, etc. It is extremely important that the service technician reestablish all metal parts and panels. • All safety grounds (both internal and external) are not to RTD Sensor resistance chart. Oven Calibration Set the electronic oven control for normal baking at room temperature, if less than 500 ohms, replace RTD Sensor Probe. Set EOC to lock motor terminals. Control Connections P5 Connections Resistance Temperature Detector Electronic Oven Control (Rear View) Electronic Oven Control...
... electrical terminals, connectors, heaters, etc. It is extremely important that the service technician reestablish all metal parts and panels. • All safety grounds (both internal and external) are not to RTD Sensor resistance chart. Oven Calibration Set the electronic oven control for normal baking at room temperature, if less than 500 ohms, replace RTD Sensor Probe. Set EOC to lock motor terminals. Control Connections P5 Connections Resistance Temperature Detector Electronic Oven Control (Rear View) Electronic Oven Control...

Product Specifications Sheet (English)
Page 2
...D ) Power Supply Connection Location Voltage Rating Connected Load (kW Rating) @ 240 / 208 Volts Minimum Circuit Required (Amps) Shipping Weight (Approx.) 21" x 24-3/8" x 19-1/8" Middle Bottom Rear 240V / 208V / 60Hz 12.5 / 9.5 40 140 Lbs. Refer to change. 30" Electric Freestanding Ranges Frigidaire Baseline Freestanding Ranges FFEF3018L M / W/ B / Q 30" Electric Features Oven Control / Timing System Surface Type Window Exterior Door Finish Handle Design Exterior Finish (Side Panels) Convection System Oven Cleaning System Drawer Functionality Ready-Select® Controls Black Ceramic...
...D ) Power Supply Connection Location Voltage Rating Connected Load (kW Rating) @ 240 / 208 Volts Minimum Circuit Required (Amps) Shipping Weight (Approx.) 21" x 24-3/8" x 19-1/8" Middle Bottom Rear 240V / 208V / 60Hz 12.5 / 9.5 40 140 Lbs. Refer to change. 30" Electric Freestanding Ranges Frigidaire Baseline Freestanding Ranges FFEF3018L M / W/ B / Q 30" Electric Features Oven Control / Timing System Surface Type Window Exterior Door Finish Handle Design Exterior Finish (Side Panels) Convection System Oven Cleaning System Drawer Functionality Ready-Select® Controls Black Ceramic...


