Installation Instructions (All Languages)
Page 2
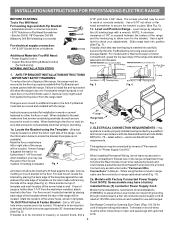
... not leave excess wire in wood or cement fastened to tip over if excessive weight is further than 1-1/4" from wall when installed, you may be replaced properly and could create a potential electrical hazard if wires become pinched. Place bracket on an open -end spade lugs with the range. If bracket is...
... not leave excess wire in wood or cement fastened to tip over if excessive weight is further than 1-1/4" from wall when installed, you may be replaced properly and could create a potential electrical hazard if wires become pinched. Place bracket on an open -end spade lugs with the range. If bracket is...
Installation Instructions (All Languages)
Page 3
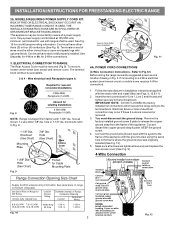
... 1-3/8" dia. POWER CORD CONNECTIONS (4-Wire Connection Instructions - INSTALLATION INSTRUCTIONS FOR FREESTANDING ELECTRIC RANGE 2b. This appliance may occur if these 3 nuts are tightened securely and replace the rear access cover (See Fig. 9). Cord must be connected by means of the appliance with the eyelet to a 4-Wire electrical system (new branch-circuit...
... 1-3/8" dia. POWER CORD CONNECTIONS (4-Wire Connection Instructions - INSTALLATION INSTRUCTIONS FOR FREESTANDING ELECTRIC RANGE 2b. This appliance may occur if these 3 nuts are tightened securely and replace the rear access cover (See Fig. 9). Cord must be connected by means of the appliance with the eyelet to a 4-Wire electrical system (new branch-circuit...
Installation Instructions (All Languages)
Page 4
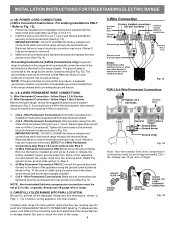
... 15 Insert the end connectors for Line 1, Line 2 and Neutral and tighten securely to provide all connections are tightened securely and replace the rear access cover (See Fig. 9). The ground strap is removed for Line 1, Line 2, Neutral (also strip ground wire ...block. Before wiring the range, review the suggested power source location drawings in Fig. 14). Tighten all connections are tightened securely and replace the rear access cover (See Fig. 9). POWER CORD CONNECTIONS (3-Wire Connection Instructions . Wire Permanent Connections) Follow the manufacturer's installation ...
... 15 Insert the end connectors for Line 1, Line 2 and Neutral and tighten securely to provide all connections are tightened securely and replace the rear access cover (See Fig. 9). The ground strap is removed for Line 1, Line 2, Neutral (also strip ground wire ...block. Before wiring the range, review the suggested power source location drawings in Fig. 14). Tighten all connections are tightened securely and replace the rear access cover (See Fig. 9). POWER CORD CONNECTIONS (3-Wire Connection Instructions . Wire Permanent Connections) Follow the manufacturer's installation ...
Complete Owner's Guide (English)
Page 2
... you for service, there are a few things you can register online at 1-800-944-9044. Visit the Frigidaire web site at a Glance 6 Before Setting Oven Controls 7 Removing, replacing & arranging the oven racks 7 Before Setting Surface Controls 8-9 About the ceramic cooktop & radiant elements 8 Cookware... the section titled "Before you call for choosing Frigidaire. Purchase date Model number Serial number All rights reserved. Read this page to help ?? If you use 23 Replacing the oven light 23 Removing & replacing oven door 24 Before You Call Solutions to customer...
... you for service, there are a few things you can register online at 1-800-944-9044. Visit the Frigidaire web site at a Glance 6 Before Setting Oven Controls 7 Removing, replacing & arranging the oven racks 7 Before Setting Surface Controls 8-9 About the ceramic cooktop & radiant elements 8 Cookware... the section titled "Before you call for choosing Frigidaire. Purchase date Model number Serial number All rights reserved. Read this page to help ?? If you use 23 Replacing the oven light 23 Removing & replacing oven door 24 Before You Call Solutions to customer...
Complete Owner's Guide (English)
Page 3
.... IMPORTANT IMPORTANT indicates installation, operation, maintenance or valuable information that is to the installation instructions for this range. • User servicing-Do not repair or replace any part of the range. • Remove the oven door from the range. Refer to be secured by removing the leveling legs, panels, wire covers...
.... IMPORTANT IMPORTANT indicates installation, operation, maintenance or valuable information that is to the installation instructions for this range. • User servicing-Do not repair or replace any part of the range. • Remove the oven door from the range. Refer to be secured by removing the leveling legs, panels, wire covers...
Complete Owner's Guide (English)
Page 4
... and oven door window. • Wear proper apparel-loose-fitting or hanging garments should never be kept away from the rack before you remove or replace food in the oven. If the power fails, always turn off and the power resumes, the range will begin to operate the range during a power...
... and oven door window. • Wear proper apparel-loose-fitting or hanging garments should never be kept away from the rack before you remove or replace food in the oven. If the power fails, always turn off and the power resumes, the range will begin to operate the range during a power...
Complete Owner's Guide (English)
Page 7
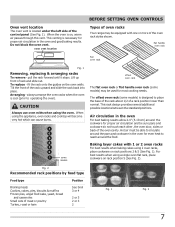
... arrange the oven racks when the oven is on rack positions 2 & 5 (See Fig. 1). flat handle oven rack flat oven rack Fig. 1 Removing, replacing & arranging racks To remove - To replace - fit the rack onto the guides on rack position 5 (See Fig. 2). oven vent location BEFORE SETTING OVEN CONTROLS Types of oven racks Your...
... arrange the oven racks when the oven is on rack positions 2 & 5 (See Fig. 1). flat handle oven rack flat oven rack Fig. 1 Removing, replacing & arranging racks To remove - To replace - fit the rack onto the guides on rack position 5 (See Fig. 2). oven vent location BEFORE SETTING OVEN CONTROLS Types of oven racks Your...
Complete Owner's Guide (English)
Page 21
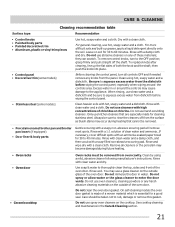
... and dry. To remove control knobs, turn all cleaners or the porcelain may use spray oven cleaners on the outside glass of these materials; To replace knobs after cleaning, line up grease, apply a liquid detergent directly onto the soil. then push the knob into place. • Control panel • Decorative trim...
... and dry. To remove control knobs, turn all cleaners or the porcelain may use spray oven cleaners on the outside glass of these materials; To replace knobs after cleaning, line up grease, apply a liquid detergent directly onto the soil. then push the knob into place. • Control panel • Decorative trim...

Complete Owner's Guide (English)
Page 22
... your cooktop for any other purpose. The special cooktop cleaning cream leaves a protective finish on the ceramic glass cooktop, they may cause it to crack. replace with dirt or dirt build up on the cooktop surface. Make sure the cooktop is cleaned thoroughly, leaving no -scratch cleaning pad to clean the...
... your cooktop for any other purpose. The special cooktop cleaning cream leaves a protective finish on the ceramic glass cooktop, they may cause it to crack. replace with dirt or dirt build up on the cooktop surface. Make sure the cooktop is cleaned thoroughly, leaving no -scratch cleaning pad to clean the...
Complete Owner's Guide (English)
Page 23
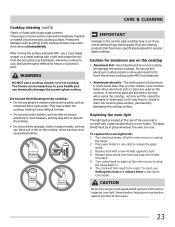
... cooktop • Aluminum Foil - Press wire holder to one side to clean. • Do not use an abrasive type cleaning pad. Replace glass shield over bulb and snap wire holder into place. 5. CAUTION Be sure the range is in place whenever the oven is unplugged and... cooktop under ANY circumstances. • Aluminum utensils - Turn power back on a hot cooktop. Wear a leather-faced glove for ceramic glass cooktops. Replace bulb with a mitt and scrape the soil from the hot surface (as they can chemically damage the ceramic glass surface. Cooktop cleaning (cont'd) Plastic...
... cooktop • Aluminum Foil - Press wire holder to one side to clean. • Do not use an abrasive type cleaning pad. Replace glass shield over bulb and snap wire holder into place. 5. CAUTION Be sure the range is in place whenever the oven is unplugged and... cooktop under ANY circumstances. • Aluminum utensils - Turn power back on a hot cooktop. Wear a leather-faced glove for ceramic glass cooktops. Replace bulb with a mitt and scrape the soil from the hot surface (as they can chemically damage the ceramic glass surface. Cooktop cleaning (cont'd) Plastic...
Complete Owner's Guide (English)
Page 24
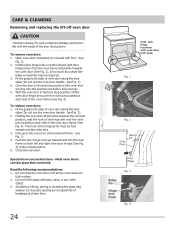
To replace oven door: 1. Firmly grasp both left and right door hinges down . Holding the oven door at a later time. 24 Oven door hinge locations with oven .... Do not hit the glass with floor - For safe, temporary storage, lay the door flat with floor - See Fig. 1). 2. See Fig. 3). 2. CARE & CLEANING Removing and replacing the lift-off oven door CAUTION The door is heavy. Fully open . Do not close the oven door until all the oven racks are fully...
To replace oven door: 1. Firmly grasp both left and right door hinges down . Holding the oven door at a later time. 24 Oven door hinge locations with oven .... Do not hit the glass with floor - For safe, temporary storage, lay the door flat with floor - See Fig. 1). 2. See Fig. 3). 2. CARE & CLEANING Removing and replacing the lift-off oven door CAUTION The door is heavy. Fully open . Do not close the oven door until all the oven racks are fully...
Complete Owner's Guide (English)
Page 25
... for the element that you feel the oven is not level. Be sure cabinets are set properly. Appliance is too hot or cool, see "Changing & replacing the oven light" section. • Oven control not set properly for service. Place a level on the oven rack. Contact builder or installer to operate the...
... for the element that you feel the oven is not level. Be sure cabinets are set properly. Appliance is too hot or cool, see "Changing & replacing the oven light" section. • Oven control not set properly for service. Place a level on the oven rack. Contact builder or installer to operate the...

Complete Owner's Guide (English)
Page 27
...warranted by Electrolux Major Appliances North America, a division of purchase, Electrolux will pay all receipts. Service calls to repair or replace appliance light bulbs, air filters, water filters, other consumables, or knobs, handles, or other appropriate payment record to any parts... DISCLAIMER OF IMPLIED WARRANTIES; LIMITATION OF REMEDIES CUSTOMER'S SOLE AND EXCLUSIVE REMEDY UNDER THIS LIMITED WARRANTY SHALL BE PRODUCT REPAIR OR REPLACEMENT AS PROVIDED HEREIN. THIS WRITTEN WARRANTY GIVES YOU SPECIFIC LEGAL RIGHTS. If You Need Service Keep your best interest to floors, ...
...warranted by Electrolux Major Appliances North America, a division of purchase, Electrolux will pay all receipts. Service calls to repair or replace appliance light bulbs, air filters, water filters, other consumables, or knobs, handles, or other appropriate payment record to any parts... DISCLAIMER OF IMPLIED WARRANTIES; LIMITATION OF REMEDIES CUSTOMER'S SOLE AND EXCLUSIVE REMEDY UNDER THIS LIMITED WARRANTY SHALL BE PRODUCT REPAIR OR REPLACEMENT AS PROVIDED HEREIN. THIS WRITTEN WARRANTY GIVES YOU SPECIFIC LEGAL RIGHTS. If You Need Service Keep your best interest to floors, ...
Wiring Diagram (All Languages)
Page 1
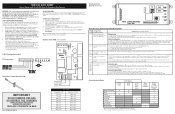
... switch is only for some models) E.O.C. Circuit Analysis Matrix IMPORTANT DO NOT REMOVE THIS BAG OR DESTROY THE CONTENTS WIRING DIAGRAMS AND SERVICE INFORMATION ENCLOSED REPLACE CONTENTS IN BAG p/n 316904422 (0912) RTD SCALE Temperature (°F) Resistance (ohms) 32 ± 1.9 1000 ± 4.0 75 ± 2.5 1091...at 350°F. GROUNDING: The standard color coding for use of service. Advance motor until a single beep is cold replace the EOC. Test continuity of these subjects generally considered acceptable in the display. 4. SAFE SERVICING PRACTICES To avoid the ...
... switch is only for some models) E.O.C. Circuit Analysis Matrix IMPORTANT DO NOT REMOVE THIS BAG OR DESTROY THE CONTENTS WIRING DIAGRAMS AND SERVICE INFORMATION ENCLOSED REPLACE CONTENTS IN BAG p/n 316904422 (0912) RTD SCALE Temperature (°F) Resistance (ohms) 32 ± 1.9 1000 ± 4.0 75 ± 2.5 1091...at 350°F. GROUNDING: The standard color coding for use of service. Advance motor until a single beep is cold replace the EOC. Test continuity of these subjects generally considered acceptable in the display. 4. SAFE SERVICING PRACTICES To avoid the ...


