Installation Instructions (All Languages)
Page 1
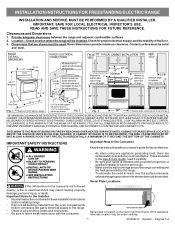
...manual is located on the lower right front frame of the floor. 3. Páginas 5-8 Provide adequate clearances between the range and adjacent combustible surfaces. 2. FOLLOW ALL DIMENSION REQUIREMENTS PROVIDED ABOVE TO PREVENT PROPERTY DAMAGE, POTENTIAL FIRE HAZARD, AND INCORRECT ...OVER HEATED SURFACE UNITS, CABINET STORAGE SPACE LOCATED ABOVE THE SURFACE UNITS SHOULD BE AVOIDED. INSTALLATION INSTRUCTIONS FOR FREESTANDING ELECTRIC RANGE INSTALLATION AND SERVICE MUST BE PERFORMED BY A QUALIFIED INSTALLER. Given dimensions provide minimum clearance. Contact surface must be ...
...manual is located on the lower right front frame of the floor. 3. Páginas 5-8 Provide adequate clearances between the range and adjacent combustible surfaces. 2. FOLLOW ALL DIMENSION REQUIREMENTS PROVIDED ABOVE TO PREVENT PROPERTY DAMAGE, POTENTIAL FIRE HAZARD, AND INCORRECT ...OVER HEATED SURFACE UNITS, CABINET STORAGE SPACE LOCATED ABOVE THE SURFACE UNITS SHOULD BE AVOIDED. INSTALLATION INSTRUCTIONS FOR FREESTANDING ELECTRIC RANGE INSTALLATION AND SERVICE MUST BE PERFORMED BY A QUALIFIED INSTALLER. Given dimensions provide minimum clearance. Contact surface must be ...
Installation Instructions (All Languages)
Page 2
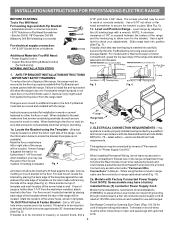
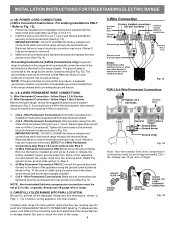
... Permanent Wiring, do not leave excess wire in accordance with a Warmer Drawer or broiler compartment, grasp the top rear edge of the range will allow the range to tip over if excessive weight is further than 1-1/4" from wall when installed, you may use the wall or floor mount method. ... Fig. 4 and does not allow room for installation in wall. When installed to secure the bracket in wood or concrete material. If rear of range is to be mounted to the floor. Drill a 1/8" pilot hole where screws are provided for the bracket. Excess wire in concrete) For electrical ...
... Permanent Wiring, do not leave excess wire in accordance with a Warmer Drawer or broiler compartment, grasp the top rear edge of the range will allow the range to tip over if excessive weight is further than 1-1/4" from wall when installed, you may use the wall or floor mount method. ... Fig. 4 and does not allow room for installation in wall. When installed to secure the bracket in wood or concrete material. If rear of range is to be mounted to the floor. Drill a 1/8" pilot hole where screws are provided for the bracket. Excess wire in concrete) For electrical ...
Installation Instructions (All Languages)
Page 3
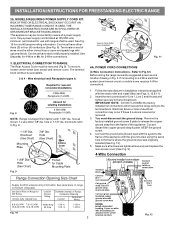
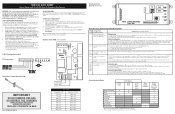
...Terminals on end of the appliance with the ground screw using the same hole in Fig. 3. Wire electrical wall Receptacle types & Fig. 8 NOTE: Range is shipped from the frame of electrical connection may be accessible. 3 & 4 - POWER CORD CONNECTIONS (4-Wire Connection Instructions - Cut and discard the .... Insert the end connectors for cord kit ampere rating information. RISK OF FIRE OR ELECTRICAL SHOCK MAY OCCUR IF AN INCORRECT SIZE RANGE CORD KIT IS USED, THE INSTALLATION INSTRUCTIONS ARE NOT FOLLOWED OR STRAIN RELIEF BRACKET IS DISCARDED. Rear Access Cover Fig. 11 4A...
...Terminals on end of the appliance with the ground screw using the same hole in Fig. 3. Wire electrical wall Receptacle types & Fig. 8 NOTE: Range is shipped from the frame of electrical connection may be accessible. 3 & 4 - POWER CORD CONNECTIONS (4-Wire Connection Instructions - Cut and discard the .... Insert the end connectors for cord kit ampere rating information. RISK OF FIRE OR ELECTRICAL SHOCK MAY OCCUR IF AN INCORRECT SIZE RANGE CORD KIT IS USED, THE INSTALLATION INSTRUCTIONS ARE NOT FOLLOWED OR STRAIN RELIEF BRACKET IS DISCARDED. Rear Access Cover Fig. 11 4A...
Installation Instructions (All Languages)
Page 4
... 3-Wire Permanent Connections skip Steps 3 & 4 and continue with Step 5. 3. (4-Wire Permanent Connection ONLY) Disconnect the ground strap. CAREFULLY SLIDE RANGE INTO FINAL LOCATION. NOTE: If the ground strap is connected to the terminal block (Follow wire locations shown in Figs. 1, 2 & 3 before...Tighten all the adequate clearances and dimensions shown in Fig. 14). IMPORTANT NOTE: DO NOT LOOSEN the factory installed nut connections which secure the range wiring to a 4-Wire electrical system (new branchcircuit or mobile home requires 4-Wire connection): 1. (3 & 4 - Be sure to the...
... 3-Wire Permanent Connections skip Steps 3 & 4 and continue with Step 5. 3. (4-Wire Permanent Connection ONLY) Disconnect the ground strap. CAREFULLY SLIDE RANGE INTO FINAL LOCATION. NOTE: If the ground strap is connected to the terminal block (Follow wire locations shown in Figs. 1, 2 & 3 before...Tighten all the adequate clearances and dimensions shown in Fig. 14). IMPORTANT NOTE: DO NOT LOOSEN the factory installed nut connections which secure the range wiring to a 4-Wire electrical system (new branchcircuit or mobile home requires 4-Wire connection): 1. (3 & 4 - Be sure to the...

Complete Owner's Guide (English)
Page 1
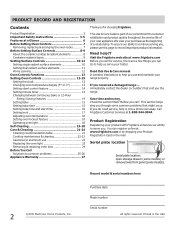
All about the Use & Care of your Electric Range 316902213 Rev A (Dec 2009) TABLE OF CONTENTS Important Safety Instructions 3-5 Features at a Glance 6 Before Setting Oven Controls 7 Before Setting Surface Controls 8-9 Setting Surface Controls (Ceramic cook top) .. 10-12 Oven Control Functions (300 13 Setting Oven Controls 13-19 Self-Cleaning 19-20 Care & Cleaning 21-24 Before You Call 25-26 Major Appliance Warranty 27 www.frigidaire.com USA 1-800-944-9044 www.frigidaire.ca Canada 1-800-265-8352
All about the Use & Care of your Electric Range 316902213 Rev A (Dec 2009) TABLE OF CONTENTS Important Safety Instructions 3-5 Features at a Glance 6 Before Setting Oven Controls 7 Before Setting Surface Controls 8-9 Setting Surface Controls (Ceramic cook top) .. 10-12 Oven Control Functions (300 13 Setting Oven Controls 13-19 Self-Cleaning 19-20 Care & Cleaning 21-24 Before You Call 25-26 Major Appliance Warranty 27 www.frigidaire.com USA 1-800-944-9044 www.frigidaire.ca Canada 1-800-265-8352
Complete Owner's Guide (English)
Page 2
... view your Product Registration Card in the USA Visit the Frigidaire web site at www.frigidaire.com Before you call for service, there are a few things you . If you the range. This Use & Care Guide is only a phone call ". Product Registration Registering your range properly. It contains instructions to help is part of our...
... view your Product Registration Card in the USA Visit the Frigidaire web site at www.frigidaire.com Before you call for service, there are a few things you . If you the range. This Use & Care Guide is only a phone call ". Product Registration Registering your range properly. It contains instructions to help is part of our...
Complete Owner's Guide (English)
Page 3
... the room. Obey all safety messages that is properly installed and grounded by a qualified technician. WARNING • All ranges can result in serious injuries and also cause damage to the appliance. For models equipped with packaging material. Refer to potential... qualified technician in this manual. IMPORTANT IMPORTANT indicates installation, operation, maintenance or valuable information that follow this symbol to the range. Important Safety Instructions • Remove all instructions before using this appliance. To check if the bracket is installed properly, ...
... the room. Obey all safety messages that is properly installed and grounded by a qualified technician. WARNING • All ranges can result in serious injuries and also cause damage to the appliance. For models equipped with packaging material. Refer to potential... qualified technician in this manual. IMPORTANT IMPORTANT indicates installation, operation, maintenance or valuable information that follow this symbol to the range. Important Safety Instructions • Remove all instructions before using this appliance. To check if the bracket is installed properly, ...
Complete Owner's Guide (English)
Page 4
...WARNING • Storage in or on appliance-flammable materials should not be left rear surface element if your model is not turned off the range. Both surface heating and oven heating elements may be kept away from the high heat of the appliance, including the storage drawer, lower ...of a potholder. • Do not heat unopened food containers - During and after use extreme caution. moist or damp potholders on or near the range. • DO NOT LEAVE CHILDREN ALONE -children should not be moved while oven is located below the backguard for models equipped with both hands to...
...WARNING • Storage in or on appliance-flammable materials should not be left rear surface element if your model is not turned off the range. Both surface heating and oven heating elements may be kept away from the high heat of the appliance, including the storage drawer, lower ...of a potholder. • Do not heat unopened food containers - During and after use extreme caution. moist or damp potholders on or near the range. • DO NOT LEAVE CHILDREN ALONE -children should not be moved while oven is located below the backguard for models equipped with both hands to...

Complete Owner's Guide (English)
Page 5
...all parts free of potential exposure to accumulate on a hot cooking area, be immersed in water. IMPORTANT INSTRUCTIONS FOR CLEANING YOUR RANGE • Clean the range regularly to another well-ventilated room. Contact a qualified technician immediately. • Clean cook top with one or more surface ... Do Not Use Oven Cleaners-No commercial oven cleaner or oven liner protective coating of the heating element to the area around any range. Before self-cleaning the oven, remove the broiler pan and any utensils or foods from cleaners and aerosols may ignite causing damage ...
...all parts free of potential exposure to accumulate on a hot cooking area, be immersed in water. IMPORTANT INSTRUCTIONS FOR CLEANING YOUR RANGE • Clean the range regularly to another well-ventilated room. Contact a qualified technician immediately. • Clean cook top with one or more surface ... Do Not Use Oven Cleaners-No commercial oven cleaner or oven liner protective coating of the heating element to the area around any range. Before self-cleaning the oven, remove the broiler pan and any utensils or foods from cleaners and aerosols may ignite causing damage ...
Complete Owner's Guide (English)
Page 6
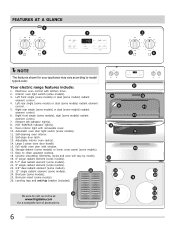
... oven interior. 12. Storage drawer (some models) or lower cover panel (some models) radiant element control. 6. Be sure to visit us online at 24 www.frigidaire.com for your appliance may vary according to clean upswept cooktop. 18. Your electric...
... oven interior. 12. Storage drawer (some models) or lower cover panel (some models) radiant element control. 6. Be sure to visit us online at 24 www.frigidaire.com for your appliance may vary according to clean upswept cooktop. 18. Your electric...
Complete Owner's Guide (English)
Page 7
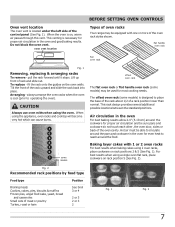
When the oven is cool (prior to operating the oven). oven vent location BEFORE SETTING OVEN CONTROLS Types of oven racks Your range may be able to circulate around the pans and cookware in the oven For best baking results allow 2-4" (5-10 cm) around the food. always arrange ...
When the oven is cool (prior to operating the oven). oven vent location BEFORE SETTING OVEN CONTROLS Types of oven racks Your range may be able to circulate around the pans and cookware in the oven For best baking results allow 2-4" (5-10 cm) around the food. always arrange ...
Complete Owner's Guide (English)
Page 10
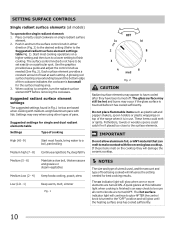
...: 1. Suggested settings for best cooking results. Do not place flammable items such as needed for single and dual radiant elements table Settings Type of the range when it has cooled sufficiently. These items could catch fire if placed too close to have cooled after they will influence the setting needed (See...
...: 1. Suggested settings for best cooking results. Do not place flammable items such as needed for single and dual radiant elements table Settings Type of the range when it has cooled sufficiently. These items could catch fire if placed too close to have cooled after they will influence the setting needed (See...
Complete Owner's Guide (English)
Page 11
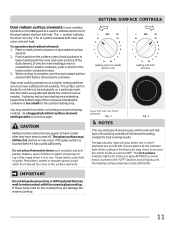
...: 1. Use the marks as a guide and adjust the control knob as plastic salt and pepper shakers, spoon holders or plastic wrappings on top of the range when it has cooled sufficiently. Fig. 1 NOTES Fig. 2 The size and type of utensil used to indicate which coil of the cookware indicates the cookware...
...: 1. Use the marks as a guide and adjust the control knob as plastic salt and pepper shakers, spoon holders or plastic wrappings on top of the range when it has cooled sufficiently. Fig. 1 NOTES Fig. 2 The size and type of utensil used to indicate which coil of the cookware indicates the cookware...

Complete Owner's Guide (English)
Page 12
... appear to have cooled after they have available as well as plastic salt and pepper shakers, spoon holders or plastic wrappings on top of the range when it has cooled sufficiently. The glass surface may still be sure to read all the information they have been turned off. IMPORTANT Do not...
... appear to have cooled after they have available as well as plastic salt and pepper shakers, spoon holders or plastic wrappings on top of the range when it has cooled sufficiently. The glass surface may still be sure to read all the information they have been turned off. IMPORTANT Do not...
Complete Owner's Guide (English)
Page 19
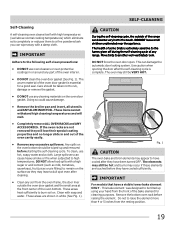
... protective coatings in or around any part of the oven interior. • DO NOT clean the oven door gasket (See Fig. 1). The health of the range can cause heavy smoke or fire when subjected to the touch. Fig. 1 CAUTION The oven bake and broil elements may appear to another well-ventilated... be tilted up and removed before starting the self-cleaning cycle. Do not to rub, damage or remove the gasket. • DO NOT use any range.
... protective coatings in or around any part of the oven interior. • DO NOT clean the oven door gasket (See Fig. 1). The health of the range can cause heavy smoke or fire when subjected to the touch. Fig. 1 CAUTION The oven bake and broil elements may appear to another well-ventilated... be tilted up and removed before starting the self-cleaning cycle. Do not to rub, damage or remove the gasket. • DO NOT use any range.
Complete Owner's Guide (English)
Page 20
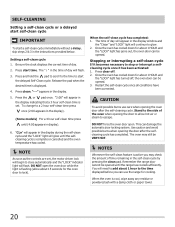
...1. Press clear off , the oven door can damage the automatic door locking system. CAUTION To avoid possible burns use the range for cooking. This can be opened . Remember the range door cannot be opened. 3. When the oven is set , the motor driven lock will begin to allow about 1 HOUR... the pad when the desired time is flashing (allow hot air or steam to the time displayed before you may still be opened until the range has cooled sufficiently. NOTE As soon as the controls are set . Setting a self-clean cycle 1. "---" appears in the instructions provided below. ...
...1. Press clear off , the oven door can damage the automatic door locking system. CAUTION To avoid possible burns use the range for cooking. This can be opened . Remember the range door cannot be opened. 3. When the oven is set , the motor driven lock will begin to allow about 1 HOUR... the pad when the desired time is flashing (allow hot air or steam to the time displayed before you may still be opened until the range has cooled sufficiently. NOTE As soon as the controls are set . Setting a self-clean cycle 1. "---" appears in the instructions provided below. ...
Complete Owner's Guide (English)
Page 23
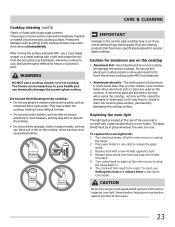
...lower than that have been specifically designed for protection against possible broken glass. 23 Turn electrical power off at the main source (or plug the range back in use an abrasive type cleaning pad. The clock will then need be reset. Wear a leather-faced glove for ceramic glass cooktops.... only will damage the ceramic cooktop. Permanent damage (such as they can leave soil or lint on again at the main source or unplug the range. 2. Press wire holder to one side to touch the ceramic cooktop under ANY circumstances. • Aluminum utensils - Allow the cooktop to your ...
...lower than that have been specifically designed for protection against possible broken glass. 23 Turn electrical power off at the main source (or plug the range back in use an abrasive type cleaning pad. The clock will then need be reset. Wear a leather-faced glove for ceramic glass cooktops.... only will damage the ceramic cooktop. Permanent damage (such as they can leave soil or lint on again at the main source or unplug the range. 2. Press wire holder to one side to touch the ceramic cooktop under ANY circumstances. • Aluminum utensils - Allow the cooktop to your ...
Complete Owner's Guide (English)
Page 25
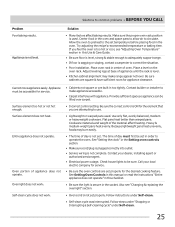
... appliance does not operate" in this Use & Care Guide. • Be sure floor is level, strong & stable enough to adequately support range. • If floor is sagging or sloping, contact a carpenter to circulate. Follow instructions under Self-clean. 25 Follow steps under "Stopping or...level. • Kitchen cabinet alignment may make appliance accessible. • Carpet interferes with appliance. Be sure cabinets are attempting to make range appear not level. Cannot move appliance easily. Provide sufficient space so appliance can be sure. Place a level on the oven rack. Call...
... appliance does not operate" in this Use & Care Guide. • Be sure floor is level, strong & stable enough to adequately support range. • If floor is sagging or sloping, contact a carpenter to circulate. Follow instructions under Self-clean. 25 Follow steps under "Stopping or...level. • Kitchen cabinet alignment may make appliance accessible. • Carpet interferes with appliance. Be sure cabinets are attempting to make range appear not level. Cannot move appliance easily. Provide sufficient space so appliance can be sure. Place a level on the oven rack. Call...
Wiring Diagram (All Languages)
Page 1
...prior to completion of service. Obtain an average oven temperature after a minimum of switch contacts. Press STOP or CLEAR OFF to range - Calibration offset should damage be extensive. Control Connections P5 Connections Resistance Temperature Detector Electronic Oven Control (Rear View) Electronic Oven .... Test keyboard circuits. If fault returns upon power-up or down 35°F in the oven cavity. 2. SERVICE DATA SHEET Electric Ranges with test cord check continuity of wire harness to lock motor terminals. The adjustments made will create a potential safety hazard. 4. Once ...
...prior to completion of service. Obtain an average oven temperature after a minimum of switch contacts. Press STOP or CLEAR OFF to range - Calibration offset should damage be extensive. Control Connections P5 Connections Resistance Temperature Detector Electronic Oven Control (Rear View) Electronic Oven .... Test keyboard circuits. If fault returns upon power-up or down 35°F in the oven cavity. 2. SERVICE DATA SHEET Electric Ranges with test cord check continuity of wire harness to lock motor terminals. The adjustments made will create a potential safety hazard. 4. Once ...

Product Specifications Sheet (English)
Page 2
... local and national electric codes. Refer to change. Width 29-7/8" Width (Min.) 30" C - 30" Electric Freestanding Ranges Frigidaire Baseline Freestanding Ranges FFEF3018L M / W/ B / Q 30" Electric Features Oven Control / Timing System Surface Type Window Exterior Door Finish ...- 1,200 Oven Features Capacity (Cu. Accessories information available on the web at frigidaire.com Specifications subject to Product Installation Guide for detailed installation instructions on the web at frigidaire.com. Ft.) 5.3 Oven Light 1 Hidden Bake Element Rack Configuration 2 Standard...
... local and national electric codes. Refer to change. Width 29-7/8" Width (Min.) 30" C - 30" Electric Freestanding Ranges Frigidaire Baseline Freestanding Ranges FFEF3018L M / W/ B / Q 30" Electric Features Oven Control / Timing System Surface Type Window Exterior Door Finish ...- 1,200 Oven Features Capacity (Cu. Accessories information available on the web at frigidaire.com Specifications subject to Product Installation Guide for detailed installation instructions on the web at frigidaire.com. Ft.) 5.3 Oven Light 1 Hidden Bake Element Rack Configuration 2 Standard...


