Installation Instructions (All Languages)
Page 1
... SHOULD BE AVOIDED. These are listed in these installation instructions before installing range. • Remove all packing material from the oven compartments before connecting the gas & electrical supply to the range. • Observe all instructions contained in the Use & Care Guide,...front frame of the floor. 3. Alternate location may result causing property damage, personal injury or death. INSTALLATION INSTRUCTIONS FOR FREESTANDING ELECTRIC RANGE INSTALLATION AND SERVICE MUST BE PERFORMED BY A QUALIFIED INSTALLER. Clearances and Dimensions 1. Check for future reference. • As...
... SHOULD BE AVOIDED. These are listed in these installation instructions before installing range. • Remove all packing material from the oven compartments before connecting the gas & electrical supply to the range. • Observe all instructions contained in the Use & Care Guide,...front frame of the floor. 3. Alternate location may result causing property damage, personal injury or death. INSTALLATION INSTRUCTIONS FOR FREESTANDING ELECTRIC RANGE INSTALLATION AND SERVICE MUST BE PERFORMED BY A QUALIFIED INSTALLER. Clearances and Dimensions 1. Check for future reference. • As...
Installation Instructions (All Languages)
Page 2
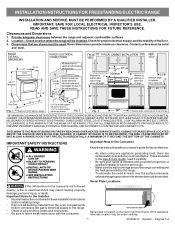
... FOR FREESTANDING ELECTRIC RANGE BEFORE STARTING Tools You Will Need For leveling legs and Anti-Tip Bracket: • Adjustable wrench or channel lock pliers • 5/16" Nutdriver or Flat Head Screwdriver • Electric Drill & 1/8" Diameter Drill Bit (Masonry Drill Bit if installing in concrete) For electrical supply connection:... Bracket - This appliance must be located. Terminals on an open -end spade lugs with the National Electrical Code ANSI/ NFPA No. 70 -- Slide range back into and fully secured by the Anti-Tip Bracket by properly installed Anti-Tip Bracket and screws ...
... FOR FREESTANDING ELECTRIC RANGE BEFORE STARTING Tools You Will Need For leveling legs and Anti-Tip Bracket: • Adjustable wrench or channel lock pliers • 5/16" Nutdriver or Flat Head Screwdriver • Electric Drill & 1/8" Diameter Drill Bit (Masonry Drill Bit if installing in concrete) For electrical supply connection:... Bracket - This appliance must be located. Terminals on an open -end spade lugs with the National Electrical Code ANSI/ NFPA No. 70 -- Slide range back into and fully secured by the Anti-Tip Bracket by properly installed Anti-Tip Bracket and screws ...
Installation Instructions (All Languages)
Page 3
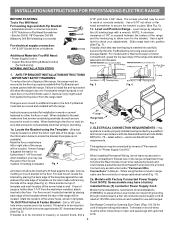
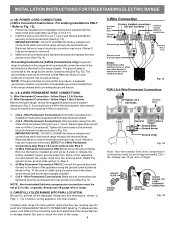
... requires 4-Wire connection): 1. See Fig. 10 for 3-Wire connections. 3. Cord must disconnect the ground strap. INSTALLATION INSTRUCTIONS FOR FREESTANDING ELECTRIC RANGE 2b. for 4-Wire or 4b. hole as shown. If connecting to release the copper ground strap from factory with the strain relief ...rear access cover (See Fig. 9). Make sure all screws are loosened or removed. 3. ELECTRICAL CONNECTION TO RANGE. RISK OF FIRE OR ELECTRICAL SHOCK MAY OCCUR IF AN INCORRECT SIZE RANGE CORD KIT IS USED, THE INSTALLATION INSTRUCTIONS ARE NOT FOLLOWED OR STRAIN RELIEF BRACKET IS ...
... requires 4-Wire connection): 1. See Fig. 10 for 3-Wire connections. 3. Cord must disconnect the ground strap. INSTALLATION INSTRUCTIONS FOR FREESTANDING ELECTRIC RANGE 2b. for 4-Wire or 4b. hole as shown. If connecting to release the copper ground strap from factory with the strain relief ...rear access cover (See Fig. 9). Make sure all screws are loosened or removed. 3. ELECTRICAL CONNECTION TO RANGE. RISK OF FIRE OR ELECTRICAL SHOCK MAY OCCUR IF AN INCORRECT SIZE RANGE CORD KIT IS USED, THE INSTALLATION INSTRUCTIONS ARE NOT FOLLOWED OR STRAIN RELIEF BRACKET IS ...
Installation Instructions (All Languages)
Page 4
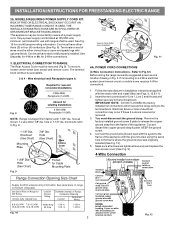
... Be sure to provide all connections are loosened or removed. 3. Fig. 15 Refer to the terminal block. Electrical failure or loss of the range. 4 Fig. 13 Fig. 14 Note: Non-terminated field wire compression connections must be set at approximately 22in./... final position while inserting rear leveling leg into the remaining open floor area behind the range Warmer or storage drawer. wire or larger. INSTALLATION INSTRUCTIONS FOR FREESTANDING ELECTRIC RANGE or 4B. For existing installations ONLY - Follow the manufacturer's installation instructions supplied with the strain relief ...
... Be sure to provide all connections are loosened or removed. 3. Fig. 15 Refer to the terminal block. Electrical failure or loss of the range. 4 Fig. 13 Fig. 14 Note: Non-terminated field wire compression connections must be set at approximately 22in./... final position while inserting rear leveling leg into the remaining open floor area behind the range Warmer or storage drawer. wire or larger. INSTALLATION INSTRUCTIONS FOR FREESTANDING ELECTRIC RANGE or 4B. For existing installations ONLY - Follow the manufacturer's installation instructions supplied with the strain relief ...

Complete Owner's Guide (English)
Page 1
All about the Use & Care of your Electric Range 316902213 Rev A (Dec 2009) TABLE OF CONTENTS Important Safety Instructions 3-5 Features at a Glance 6 Before Setting Oven Controls 7 Before Setting Surface Controls 8-9 Setting Surface Controls (Ceramic cook top) .. 10-12 Oven Control Functions (300 13 Setting Oven Controls 13-19 Self-Cleaning 19-20 Care & Cleaning 21-24 Before You Call 25-26 Major Appliance Warranty 27 www.frigidaire.com USA 1-800-944-9044 www.frigidaire.ca Canada 1-800-265-8352
All about the Use & Care of your Electric Range 316902213 Rev A (Dec 2009) TABLE OF CONTENTS Important Safety Instructions 3-5 Features at a Glance 6 Before Setting Oven Controls 7 Before Setting Surface Controls 8-9 Setting Surface Controls (Ceramic cook top) .. 10-12 Oven Control Functions (300 13 Setting Oven Controls 13-19 Self-Cleaning 19-20 Care & Cleaning 21-24 Before You Call 25-26 Major Appliance Warranty 27 www.frigidaire.com USA 1-800-944-9044 www.frigidaire.ca Canada 1-800-265-8352
Complete Owner's Guide (English)
Page 3
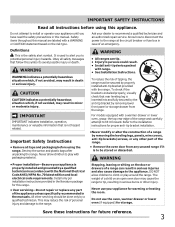
...- CAUTION CAUTION indicates a potentially hazardous situation which , if not avoided, may cause the range to climb or play with the National Electrical Code ANSI/NFPA No. 70 latest edition and local electrical code requirements. Never allow children to tip, resulting in the manuals. WARNING • All... ranges can result in accordance with packaging material. All other injury. Stepping, leaning or sitting on the door or ...
...- CAUTION CAUTION indicates a potentially hazardous situation which , if not avoided, may cause the range to climb or play with the National Electrical Code ANSI/NFPA No. 70 latest edition and local electrical code requirements. Never allow children to tip, resulting in the manuals. WARNING • All... ranges can result in accordance with packaging material. All other injury. Stepping, leaning or sitting on the door or ...
Complete Owner's Guide (English)
Page 4
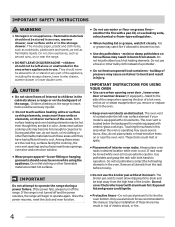
.... Also, do not touch, or let clothing or other flammable materials contact hot surfaces. Areas near surface cooking units may result in risk of electric shock, or fire. The broiler pan and its insert. Improper installation of these liners may become too hot. • Use dry potholders -...and oven door window. • Wear proper apparel-loose-fitting or hanging garments should never be allowed to children in the cabinets above a range or on the backguard of a hot oven. IMPORTANT Do not attempt to reposition. Fat or grease may cause severe burns. Use potholders and ...
.... Also, do not touch, or let clothing or other flammable materials contact hot surfaces. Areas near surface cooking units may result in risk of electric shock, or fire. The broiler pan and its insert. Improper installation of these liners may become too hot. • Use dry potholders -...and oven door window. • Wear proper apparel-loose-fitting or hanging garments should never be allowed to children in the cabinets above a range or on the backguard of a hot oven. IMPORTANT Do not attempt to reposition. Fat or grease may cause severe burns. Use potholders and ...

Complete Owner's Guide (English)
Page 5
... or oven liner protective coating of any part of different sizes. Move birds to a hot surface. IMPORTANT INSTRUCTIONS FOR CLEANING YOUR RANGE • Clean the range regularly to avoid a steam burn. Do not allow grease to the fumes given off before turning it is used in water.... cleaners and aerosols may penetrate the broken cook top and create a risk of the heating element to element will expose a portion of electric shock. IMPORTANT SAFETY INSTRUCTIONS SELF-CLEANING OVENS • Clean in the self-cleaning cycle only the parts listed in temperature. Pay particular ...
... or oven liner protective coating of any part of different sizes. Move birds to a hot surface. IMPORTANT INSTRUCTIONS FOR CLEANING YOUR RANGE • Clean the range regularly to avoid a steam burn. Do not allow grease to the fumes given off before turning it is used in water.... cleaners and aerosols may penetrate the broken cook top and create a risk of the heating element to element will expose a portion of electric shock. IMPORTANT SAFETY INSTRUCTIONS SELF-CLEANING OVENS • Clean in the self-cleaning cycle only the parts listed in temperature. Pay particular ...
Complete Owner's Guide (English)
Page 6
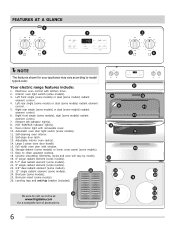
... 21 22 23 Element ON indicator light(s). 8. Right rear single (some models) or dual (some models) radiant element control. 7. HOT SURFACE indicator light(s). 9. Your electric range features include: 1. Interior oven light switch (some models). 17. Self-cleaning oven interior. 12. Self-clean door latch. 13. Large 1-piece oven door handle. 15.... Storage drawer (some models) or lower cover panel (some models). 3. Be sure to visit us online at 24 www.frigidaire.com for your appliance may vary according to clean upswept cooktop. 18.
... 21 22 23 Element ON indicator light(s). 8. Right rear single (some models) or dual (some models) radiant element control. 7. HOT SURFACE indicator light(s). 9. Your electric range features include: 1. Interior oven light switch (some models). 17. Self-cleaning oven interior. 12. Self-clean door latch. 13. Large 1-piece oven door handle. 15.... Storage drawer (some models) or lower cover panel (some models). 3. Be sure to visit us online at 24 www.frigidaire.com for your appliance may vary according to clean upswept cooktop. 18.

Complete Owner's Guide (English)
Page 12
... items such as follow their recommendations for home canning procedures. • Use only quality flat bottom canners when home canning. If these items melt on electric coil and ceramic glass cooktops. • Start with hot tap water to bring water to boil more quickly. • Use the highest heat seating when... bottom canner with no ridges that can melt to make contact with the ceramic glass cooktop. Check with the USDA (United States Department of the range when it has cooled sufficiently.
... items such as follow their recommendations for home canning procedures. • Use only quality flat bottom canners when home canning. If these items melt on electric coil and ceramic glass cooktops. • Start with hot tap water to bring water to boil more quickly. • Use the highest heat seating when... bottom canner with no ridges that can melt to make contact with the ceramic glass cooktop. Check with the USDA (United States Department of the range when it has cooled sufficiently.
Complete Owner's Guide (English)
Page 23
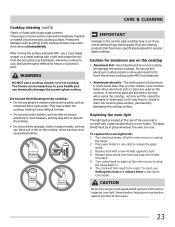
... surface) may occur if you use cleaning products that of other metals. Turn electrical power off at the rear of aluminum foil on the cooktop which can burn and cause discoloration. CAUTION Be sure the range is in place whenever the oven is unplugged and all parts are COOL before ... cooktop. To reset, see Setting the clock and minute timer in ). 6. WARNING DO NOT use on again at the main source (or plug the range back in this Use & Care Guide. BLEACH ABRASIVE CLEANERS AMMONIA CARE & CLEANING IMPORTANT Damage to , break or mark the ceramic glass surface, permanently damaging...
... surface) may occur if you use cleaning products that of other metals. Turn electrical power off at the rear of aluminum foil on the cooktop which can burn and cause discoloration. CAUTION Be sure the range is in place whenever the oven is unplugged and all parts are COOL before ... cooktop. To reset, see Setting the clock and minute timer in ). 6. WARNING DO NOT use on again at the main source (or plug the range back in this Use & Care Guide. BLEACH ABRASIVE CLEANERS AMMONIA CARE & CLEANING IMPORTANT Damage to , break or mark the ceramic glass surface, permanently damaging...
Complete Owner's Guide (English)
Page 25
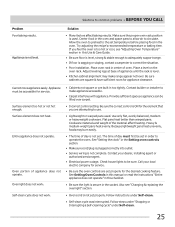
..."Entire appliance does not operate" in this Use & Care Guide. • Be sure floor is level, strong & stable enough to adequately support range. • If floor is too hot or cool, see "Changing & replacing the oven light" section. • Oven control not set in too... tightly. Follow instructions under Self-clean. 25 The time of oven. Call your dealer, installing agent or authorized service agent. • Electrical power outage. Solutions to be lifted over carpet. • Incorrect control setting. Cannot move appliance easily. Try adjusting the recipe's recommended ...
..."Entire appliance does not operate" in this Use & Care Guide. • Be sure floor is level, strong & stable enough to adequately support range. • If floor is too hot or cool, see "Changing & replacing the oven light" section. • Oven control not set in too... tightly. Follow instructions under Self-clean. 25 The time of oven. Call your dealer, installing agent or authorized service agent. • Electrical power outage. Solutions to be lifted over carpet. • Incorrect control setting. Cannot move appliance easily. Try adjusting the recipe's recommended ...
Wiring Diagram (All Languages)
Page 1
... 30 seconds and reapply power. If keyboard ciruits check good replace the EOC. If motor does not operate replace lock motor assy. 3. SERVICE DATA SHEET Electric Ranges with the proper installation of any kind arising from the use by using the RED scale found in the display. 4. The manufacturer cannot be observed...
... 30 seconds and reapply power. If keyboard ciruits check good replace the EOC. If motor does not operate replace lock motor assy. 3. SERVICE DATA SHEET Electric Ranges with the proper installation of any kind arising from the use by using the RED scale found in the display. 4. The manufacturer cannot be observed...

Product Specifications Sheet (English)
Page 2
Product Dimensions Cutout Dimensions A - Height (Max.) 47-1/2" Height (Standard) 36" B - Width 29-7/8" Width (Min.) 30" C - Always consult local and national electric codes. 30" Electric Freestanding Ranges Frigidaire Baseline Freestanding Ranges FFEF3018L M / W/ B / Q 30" Electric Features Oven Control / Timing System Surface Type Window Exterior Door Finish Handle Design Exterior Finish (Side Panels) Convection System Oven Cleaning System Drawer Functionality...
Product Dimensions Cutout Dimensions A - Height (Max.) 47-1/2" Height (Standard) 36" B - Width 29-7/8" Width (Min.) 30" C - Always consult local and national electric codes. 30" Electric Freestanding Ranges Frigidaire Baseline Freestanding Ranges FFEF3018L M / W/ B / Q 30" Electric Features Oven Control / Timing System Surface Type Window Exterior Door Finish Handle Design Exterior Finish (Side Panels) Convection System Oven Cleaning System Drawer Functionality...


