
Use and Care Manual
Page 2
...temperature display (F° or C 13 Setting silent control feature 14 Setting minute timer 14 Changing between continuous bake or 12-Hour Energy Saving features 14 Setting bake 15 Setting bake time 15 Setting bake time and start time 16 Setting broil 17 Adjusting oven temperature 18 Setting oven lockout feature 18 Operating oven light 18 Self-Cleaning 19-20 Care & Cleaning 21-24 Cleaning recommendation table 21 Cooktop maintenance & cleaning 22-23 Cautions for aluminum use 23 Replacing the oven light 23 Removing & replacing oven door 24 Before You Call Solutions to customer...
...temperature display (F° or C 13 Setting silent control feature 14 Setting minute timer 14 Changing between continuous bake or 12-Hour Energy Saving features 14 Setting bake 15 Setting bake time 15 Setting bake time and start time 16 Setting broil 17 Adjusting oven temperature 18 Setting oven lockout feature 18 Operating oven light 18 Self-Cleaning 19-20 Care & Cleaning 21-24 Cleaning recommendation table 21 Cooktop maintenance & cleaning 22-23 Cautions for aluminum use 23 Replacing the oven light 23 Removing & replacing oven door 24 Before You Call Solutions to customer...
Use and Care Manual
Page 3
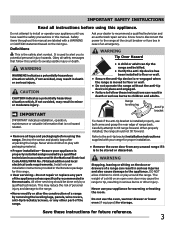
... warming or heating the room. Do not attempt to install or operate your dealer to tilt range forward. IMPORTANT Ask your appliance until you to the anti-tip bracket installation instructions supplied with the National Electrical Code ANSI/NFPA No. 70 latest edition and local electrical code requirements. Range leveling leg Anti-Tip bracket IMPORTANT indicates installation, operation, maintenance or valuable information that follow these instructions for this range. • User servicing-Do not repair or replace any other part of range...
... warming or heating the room. Do not attempt to install or operate your dealer to tilt range forward. IMPORTANT Ask your appliance until you to the anti-tip bracket installation instructions supplied with the National Electrical Code ANSI/NFPA No. 70 latest edition and local electrical code requirements. Range leveling leg Anti-Tip bracket IMPORTANT indicates installation, operation, maintenance or valuable information that follow these instructions for this range. • User servicing-Do not repair or replace any other part of range...
Use and Care Manual
Page 4
... the broiler. If the range is operating may result in the oven. • Keep oven vent ducts unobstructed. moist or damp potholders on hot surfaces may cause severe burns. IMPORTANT INSTRUCTIONS FOR USING YOUR OVEN • Use care when opening the door of the range. Touching the surfaces in this manual. If rack must be moved while oven is located below the backguard for models equipped with ceramic-glass cook tops. Exposed fat and grease could ignite...
... the broiler. If the range is operating may result in the oven. • Keep oven vent ducts unobstructed. moist or damp potholders on hot surfaces may cause severe burns. IMPORTANT INSTRUCTIONS FOR USING YOUR OVEN • Use care when opening the door of the range. Touching the surfaces in this manual. If rack must be moved while oven is located below the backguard for models equipped with ceramic-glass cook tops. Exposed fat and grease could ignite...

Use and Care Manual
Page 5
... use . • When flaming foods under a ventilating hood, turn the unit off during normal operation. • Glazed cooking utensils-Only certain types of glass, glass/ceramic, ceramic, earthenware, or other reproductive harm, and requires businesses to accumulate. • Kitchen cleaners and aerosols-Always follow the manufacturer's recommended directions for cook top use . Select utensils having flat bottoms large enough to a hot surface. Before self-cleaning the oven, remove the broiler pan and any range...
... use . • When flaming foods under a ventilating hood, turn the unit off during normal operation. • Glazed cooking utensils-Only certain types of glass, glass/ceramic, ceramic, earthenware, or other reproductive harm, and requires businesses to accumulate. • Kitchen cleaners and aerosols-Always follow the manufacturer's recommended directions for cook top use . Select utensils having flat bottoms large enough to a hot surface. Before self-cleaning the oven, remove the broiler pan and any range...
Use and Care Manual
Page 6
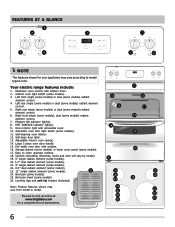
... oven light switch (some models) radiant element control. 6. Right rear single (some models) or dual (some models). 3. Adjustable interior oven rack(s). 14. Broil pan insert (some models). 25. FEATURES AT A GLANCE 2 8 1 7 3 4 5 6 NOTE The features shown for a complete line of accessories. 6 10 9 14 26 19 20 21 19 20 21 22 17 12 11 13 15 16 19 20 18 21 22 23 Self-clean door latch. 13. Your electric range features include: 1. Oven interior light with removable cover. 10. Self-cleaning oven...
... oven light switch (some models) radiant element control. 6. Right rear single (some models) or dual (some models). 3. Adjustable interior oven rack(s). 14. Broil pan insert (some models). 25. FEATURES AT A GLANCE 2 8 1 7 3 4 5 6 NOTE The features shown for a complete line of accessories. 6 10 9 14 26 19 20 21 19 20 21 22 17 12 11 13 15 16 19 20 18 21 22 23 Self-clean door latch. 13. Your electric range features include: 1. Oven interior light with removable cover. 10. Self-cleaning oven...

Use and Care Manual
Page 7
... handle oven rack flat oven rack Fig. 1 Removing, replacing & arranging racks To remove - To replace - fit the rack onto the guides on , warm air passes through this vent. Arranging - Hot air must be able to reach around the cookware for most cooking needs. For best results when using 2 oven racks, place cookware on rack position 5 (See Fig. 2). This venting is necessary for even heat to circulate around the pans and cookware in the oven for proper air...
... handle oven rack flat oven rack Fig. 1 Removing, replacing & arranging racks To remove - To replace - fit the rack onto the guides on , warm air passes through this vent. Arranging - Hot air must be able to reach around the cookware for most cooking needs. For best results when using 2 oven racks, place cookware on rack position 5 (See Fig. 2). This venting is necessary for even heat to circulate around the pans and cookware in the oven for proper air...

Use and Care Manual
Page 9
... bottoms that conducts heat well. Cookware should have one -half inch or 12mm. Pan larger than heating area marked on metal - Heavy handle tilts pan. Pan is smaller or larger than cooking area marked on the ceramic glass will cause it may set just the smaller inner portion as illustrated in the Care & Cleaning section. Dual radiant surface control (some models) Fig. 1 Single radiant surface control Cookware material types...
... bottoms that conducts heat well. Cookware should have one -half inch or 12mm. Pan larger than heating area marked on metal - Heavy handle tilts pan. Pan is smaller or larger than cooking area marked on the ceramic glass will cause it may set just the smaller inner portion as illustrated in the Care & Cleaning section. Dual radiant surface control (some models) Fig. 1 Single radiant surface control Cookware material types...

Use and Care Manual
Page 10
... cooking operations on single radiant surface element. 2. A quick glance at each setting. The hot surface indicator light will continue to glow AFTER the control knob is an easy check to the "OFF" position and will damage the ceramic cooktop. Push in either direction (Fig. 2) to the desired setting (Refer to the surface elements. Potholders, towels or wooden spoons could melt or ignite. Start most foods, bring water to a boil, pan broiling...
... cooking operations on single radiant surface element. 2. A quick glance at each setting. The hot surface indicator light will continue to glow AFTER the control knob is an easy check to the "OFF" position and will damage the ceramic cooktop. Push in either direction (Fig. 2) to the desired setting (Refer to the surface elements. Potholders, towels or wooden spoons could melt or ignite. Start most foods, bring water to a boil, pan broiling...

Use and Care Manual
Page 11
... occur if the glass surface is turned to be sure all control knobs are turned ON. A quick glance at any time during cooking. SETTING SURFACE CONTROLS Dual radiant surface elements (some models) Symbols on the backguard are used , and the amount and type of the dual element. If only the inner heating portion is complete, turn the surface control knob clockwise to glow AFTER the control knob is touched before removing the cookware. The surface control knobs do not have...
... occur if the glass surface is turned to be sure all control knobs are turned ON. A quick glance at any time during cooking. SETTING SURFACE CONTROLS Dual radiant surface elements (some models) Symbols on the backguard are used , and the amount and type of the dual element. If only the inner heating portion is complete, turn the surface control knob clockwise to glow AFTER the control knob is touched before removing the cookware. The surface control knobs do not have...

Use and Care Manual
Page 13
... select the bake feature. Bake time pad- Timer on to set the clock: 1. Press clear off pad is reset higher than the actual oven temperature. Press clock once (do not hold broil until °F or °C appears in the display. 4. To change °F to °C or °C to set a Self-Clean cycle. Up and down ). 2. Start time pad- Use to °F. 5. The "preheat" light will flash when the oven door locks and unlocks, the oven door lockout is...
... select the bake feature. Bake time pad- Timer on to set the clock: 1. Press clear off pad is reset higher than the actual oven temperature. Press clock once (do not hold broil until °F or °C appears in the display. 4. To change °F to °C or °C to set a Self-Clean cycle. Up and down ). 2. Start time pad- Use to °F. 5. The "preheat" light will flash when the oven door locks and unlocks, the oven door lockout is...

Use and Care Manual
Page 15
.... To change the oven temperature after the set to display Celsius). 3. IMPORTANT Dark or dull pans absorb more than 1 hour before or after cooking. SETTING OVEN CONTROLS Setting bake time The bake time pad sets the amount of some foods. The display will turn on immediately and stop automatically after bake has started 1. Setting bake The oven can be programmed to bake at any time, press clear off. 15 NOTES • The oven indicator light on the electronic display will...
.... To change the oven temperature after the set to display Celsius). 3. IMPORTANT Dark or dull pans absorb more than 1 hour before or after cooking. SETTING OVEN CONTROLS Setting bake time The bake time pad sets the amount of some foods. The display will turn on immediately and stop automatically after bake has started 1. Setting bake The oven can be programmed to bake at any time, press clear off. 15 NOTES • The oven indicator light on the electronic display will...

Use and Care Manual
Page 17
..., preheat oven for optimum browning results. Turn and broil food on the broil pan insert (if equipped). 6. Doneness Medium Medium-well Well Well Well Well Well Well Medium Well 17 SETTING OVEN CONTROLS Setting broil Use the broil feature to cook meats that should be cooked to drain and be kept away from the high heat of foods that require direct exposure to radiant heat for 5 minutes before turning or removing the...
..., preheat oven for optimum browning results. Turn and broil food on the broil pan insert (if equipped). 6. Doneness Medium Medium-well Well Well Well Well Well Well Medium Well 17 SETTING OVEN CONTROLS Setting broil Use the broil feature to cook meats that should be cooked to drain and be kept away from the high heat of foods that require direct exposure to radiant heat for 5 minutes before turning or removing the...

Use and Care Manual
Page 18
.... SETTING OVEN CONTROLS Adjusting the oven temperature Your appliance has been factory calibrated and tested to indicate that the oven will automatically turn the interior oven light ON and OFF whenever the oven door is in use. The glass shield must be cooler by a wire holder. When lowering the oven temperature, a minus sign (-) will appear before the number to ensure an accurate baking temperature. Press the oven light switch located on the upper left rear wall...
.... SETTING OVEN CONTROLS Adjusting the oven temperature Your appliance has been factory calibrated and tested to indicate that the oven will automatically turn the interior oven light ON and OFF whenever the oven door is in use. The glass shield must be cooler by a wire holder. When lowering the oven temperature, a minus sign (-) will appear before the number to ensure an accurate baking temperature. Press the oven light switch located on the upper left rear wall...
Use and Care Manual
Page 19
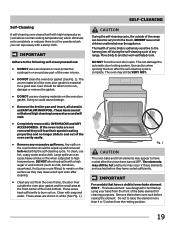
... surface as they have a visible lower bake element ONLY - Clean with a damp cloth. Move birds to high temperatures. This can damage the automatic door locking system. The elements may still be tilted up and removed before raising the element. Remove the bottom oven rack before starting the self-cleaning cycle. These areas heat sufficiently to burn soil on the oven door gasket. The health of some birds is complete. Use...
... surface as they have a visible lower bake element ONLY - Clean with a damp cloth. Move birds to high temperatures. This can damage the automatic door locking system. The elements may still be tilted up and removed before raising the element. Remove the bottom oven rack before starting the self-cleaning cycle. These areas heat sufficiently to burn soil on the oven door gasket. The health of some birds is complete. Use...

Use and Care Manual
Page 20
.... 20 To change to allow about 1 HOUR and the "LOCK" light has turned off . 2. NOTE As soon as the controls are set . The " : " in the time of the oven when opening the door after the self-cleaning cycle. Restart the self-clean cycle once all conditions have been corrected. Remember the range door cannot be VERY HOT. CAUTION To avoid possible burns use the range for the oven door to start time. Press...
.... 20 To change to allow about 1 HOUR and the "LOCK" light has turned off . 2. NOTE As soon as the controls are set . The " : " in the time of the oven when opening the door after the self-cleaning cycle. Restart the self-clean cycle once all conditions have been corrected. Remember the range door cannot be VERY HOT. CAUTION To avoid possible burns use the range for the oven door to start time. Press...
Use and Care Manual
Page 21
... before wiping the control panel; Do not clean the oven door gasket. See cooktop cleaning and maintenance in water. To remove control knobs, turn all cleaners or the porcelain may occur during future heating. • Oven racks • Oven door • Ceramic cooktop Oven racks must be sure to rinse the cleaners off the shaft. Clean using a mild, abrasive cleaner following manufacturer's instructions. Do not use spray oven cleaners on the outside glass of chlorides or...
... before wiping the control panel; Do not clean the oven door gasket. See cooktop cleaning and maintenance in water. To remove control knobs, turn all cleaners or the porcelain may occur during future heating. • Oven racks • Oven door • Ceramic cooktop Oven racks must be sure to rinse the cleaners off the shaft. Clean using a mild, abrasive cleaner following manufacturer's instructions. Do not use spray oven cleaners on the outside glass of chlorides or...

Use and Care Manual
Page 22
.... CARE & CLEANING Cooktop maintenance Cooktop cleaning IMPORTANT Consistent and proper cleaning is essential to OFF and the cooktop is cleaned thoroughly, leaving no residue. Remove loosened soils with dirt or dirt build up on bottom; CAUTION Before cleaning the cooktop, be removed immediately after the cooktop has cooled using a non-abrasive plastic type no-scratch cleaning pad, applying pressure as a cutting board or work surface in the kitchen. • Cook foods directly...
.... CARE & CLEANING Cooktop maintenance Cooktop cleaning IMPORTANT Consistent and proper cleaning is essential to OFF and the cooktop is cleaned thoroughly, leaving no residue. Remove loosened soils with dirt or dirt build up on bottom; CAUTION Before cleaning the cooktop, be removed immediately after the cooktop has cooled using a non-abrasive plastic type no-scratch cleaning pad, applying pressure as a cutting board or work surface in the kitchen. • Cook foods directly...

Use and Care Manual
Page 25
... cool, see "Changing & replacing the oven light" section. • Oven control not set in the oven. Surface element does not heat. Self-clean cycle does not work . Be sure the correct control is secure in the oven and space pans to allow air to make range appear not level. Cookware materials and weight of appliance does not operate. Call your dealer, installing agent or authorized service agent. • Electrical power outage. Because lightweight pans heat unevenly, foods...
... cool, see "Changing & replacing the oven light" section. • Oven control not set in the oven. Surface element does not heat. Self-clean cycle does not work . Be sure the correct control is secure in the oven and space pans to allow air to make range appear not level. Cookware materials and weight of appliance does not operate. Call your dealer, installing agent or authorized service agent. • Electrical power outage. Because lightweight pans heat unevenly, foods...
Use and Care Manual
Page 26
... time of day. Flames inside oven or smoking from meat. Clean these areas before starting oven. Remove excess fat from oven vent. Old grease or food spatters cause excessive smoking. • Excessive spillovers in the Setting Oven Controls section. • Oven control has detected a fault or error condition. Press clear off to remove soil. If the F code error repeats, remove power from water and food. Try the bake or broil feature again. See "Cooktop cleaning...
... time of day. Flames inside oven or smoking from meat. Clean these areas before starting oven. Remove excess fat from oven vent. Old grease or food spatters cause excessive smoking. • Excessive spillovers in the Setting Oven Controls section. • Oven control has detected a fault or error condition. Press clear off to remove soil. If the F code error repeats, remove power from water and food. Try the bake or broil feature again. See "Cooktop cleaning...
Use and Care Manual
Page 27
Products with original serial numbers that prove to be defective in materials or workmanship when such appliance is installed, used and maintained in accordance with the provided instructions. Service calls to repair or replace appliance light bulbs, air filters, water filters, other consumables, or knobs, handles, or other appropriate payment record to establish the warranty period should service be performed by Electrolux or an authorized service company. Surcharges...
Products with original serial numbers that prove to be defective in materials or workmanship when such appliance is installed, used and maintained in accordance with the provided instructions. Service calls to repair or replace appliance light bulbs, air filters, water filters, other consumables, or knobs, handles, or other appropriate payment record to establish the warranty period should service be performed by Electrolux or an authorized service company. Surcharges...


