Use and Care Guide
Page 2
...10 Operating surface elements 10 Oven Control Functions 11 Setting Oven Controls 11-15 Setting the clock 11 Changing oven temperature display (F° or C 11 Setting the minute timer 12 Changing between continuous bake or 12-Hour Energy Saving features 12 Setting bake 13 Setting broil 14 Adjusting the oven temperature 15 Setting oven lockout feature 15 Operating oven light 15 Self-Cleaning 16-17 Care & Cleaning 18-21 Cleaning recommendation table 18 Surface elements and drip bowls 19 Cautions for aluminum use 20 Replacing the oven light 20 Removing & replacing oven door 21...
...10 Operating surface elements 10 Oven Control Functions 11 Setting Oven Controls 11-15 Setting the clock 11 Changing oven temperature display (F° or C 11 Setting the minute timer 12 Changing between continuous bake or 12-Hour Energy Saving features 12 Setting bake 13 Setting broil 14 Adjusting the oven temperature 15 Setting oven lockout feature 15 Operating oven light 15 Self-Cleaning 16-17 Care & Cleaning 18-21 Cleaning recommendation table 18 Surface elements and drip bowls 19 Cautions for aluminum use 20 Replacing the oven light 20 Removing & replacing oven door 21...
Use and Care Guide
Page 3
... if the anti-tip bracket is installed properly, use the oven, warmer drawer or lower oven (if equipped) for proper installation. • Remove the oven door from any unused range if it is moved to floor or wall. • Do not operate the range without the anti-tip device in accordance with the National Electrical Code ANSI/NFPA No. 70 latest edition and local electrical code requirements. When properly installed, the range should be...
... if the anti-tip bracket is installed properly, use the oven, warmer drawer or lower oven (if equipped) for proper installation. • Remove the oven door from any unused range if it is moved to floor or wall. • Do not operate the range without the anti-tip device in accordance with the National Electrical Code ANSI/NFPA No. 70 latest edition and local electrical code requirements. When properly installed, the range should be...
Use and Care Guide
Page 4
... time to cause burns. If the power fails, always turn off and the power resumes, the range will begin to drain and be allowed to operate the range during a power failure. Do not use aluminum foil to the side of the range when opening oven door , lower oven door or warmer drawer (if equipped)-Stand to line the oven bottom. Once the power resumes, reset the clock and oven function. 4 • Do not use baking...
... time to cause burns. If the power fails, always turn off and the power resumes, the range will begin to drain and be allowed to operate the range during a power failure. Do not use aluminum foil to the side of the range when opening oven door , lower oven door or warmer drawer (if equipped)-Stand to line the oven bottom. Once the power resumes, reset the clock and oven function. 4 • Do not use baking...
Use and Care Guide
Page 5
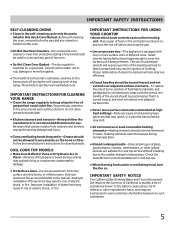
... injury. • Clean ventilating hoods frequently-Grease should be allowed to keep all parts free of the oven. • Do Not Clean Door Gasket-The door gasket is extremely sensitive to accumulate. • Kitchen cleaners and aerosols-Always follow the manufacturer's recommended directions for cook top service without breaking due to line surface unit drip bowls, or reflector pans. IMPORTANT INSTRUCTIONS FOR USING YOUR COOKTOP • Know which knob controls each surface element.
... injury. • Clean ventilating hoods frequently-Grease should be allowed to keep all parts free of the oven. • Do Not Clean Door Gasket-The door gasket is extremely sensitive to accumulate. • Kitchen cleaners and aerosols-Always follow the manufacturer's recommended directions for cook top service without breaking due to line surface unit drip bowls, or reflector pans. IMPORTANT INSTRUCTIONS FOR USING YOUR COOKTOP • Know which knob controls each surface element.

Use and Care Guide
Page 6
... 21 17 12 11 13 14 15 16 21 20 18 19 21 Full width oven door (styles vary by model). 16. Broil pan insert (some models). 23 23. Left rear single element control. 5. Automatic oven door light switch (some models). 22. Removable element drip bowls (some models). 11. Your electric range features include: 1. Right rear single element control. 6. Right front single element control. 7. Element On indicator light. 9. Self-clean door latch. 13. Upswept cooktop 18. Leveling legs and anti-tip bracket (included). 22 Be sure to...
... 21 17 12 11 13 14 15 16 21 20 18 19 21 Full width oven door (styles vary by model). 16. Broil pan insert (some models). 23 23. Left rear single element control. 5. Automatic oven door light switch (some models). 22. Removable element drip bowls (some models). 11. Your electric range features include: 1. Right rear single element control. 6. Right front single element control. 7. Element On indicator light. 9. Self-clean door latch. 13. Upswept cooktop 18. Leveling legs and anti-tip bracket (included). 22 Be sure to...

Use and Care Guide
Page 7
... one or more of oven racks Your range may be used for proper air circulation in the oven and good baking results. flat handle oven rack flat oven rack offset oven rack The flat oven rack or flat handle oven rack (some models) is designed to operating the oven). 7 6 5 4 3 2 1 some models Types of the oven rack styles shown. oven vent located under the left rear element BEFORE SETTING OVEN CONTROLS Recommended rack positions by food type Food type Position (See Fig. 2) Broiling meats Cookies, cakes...
... one or more of oven racks Your range may be used for proper air circulation in the oven and good baking results. flat handle oven rack flat oven rack offset oven rack The flat oven rack or flat handle oven rack (some models) is designed to operating the oven). 7 6 5 4 3 2 1 some models Types of the oven rack styles shown. oven vent located under the left rear element BEFORE SETTING OVEN CONTROLS Recommended rack positions by food type Food type Position (See Fig. 2) Broiling meats Cookies, cakes...

Use and Care Guide
Page 8
BEFORE SETTING OVEN CONTROLS Air circulation in the oven For best baking results allow 2-4" (5-10 cm) around the food. Fig. 1 Fig. 2 BEFORE SETTING SURFACE CONTROLS Using proper cookware The size and type of the oven cavity. Cookware is not balanced. Check for best cooking results. Fig. 4 Fig. 3 8 • Flat bottom and straight sides. • Tight fitting lids. • Weight of handle does not tilt cookware...
BEFORE SETTING OVEN CONTROLS Air circulation in the oven For best baking results allow 2-4" (5-10 cm) around the food. Fig. 1 Fig. 2 BEFORE SETTING SURFACE CONTROLS Using proper cookware The size and type of the oven cavity. Cookware is not balanced. Check for best cooking results. Fig. 4 Fig. 3 8 • Flat bottom and straight sides. • Tight fitting lids. • Weight of handle does not tilt cookware...
Use and Care Guide
Page 9
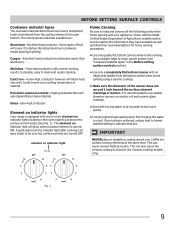
Some types of food will glow when a surface element is turned ON. Cast Iron - Element on indicator lights Your range is equipped with your appliance. element on electric coil and ceramic glass cooktops. • Start with the USDA (United States Department of Agriculture) website and be sure ALL surface controls are : Aluminum - It is recommended to use smaller diameter canners on indicator light Home Canning Be sure to darken...
Some types of food will glow when a surface element is turned ON. Cast Iron - Element on indicator lights Your range is equipped with your appliance. element on electric coil and ceramic glass cooktops. • Start with the USDA (United States Department of Agriculture) website and be sure ALL surface controls are : Aluminum - It is recommended to use smaller diameter canners on indicator light Home Canning Be sure to darken...
Use and Care Guide
Page 10
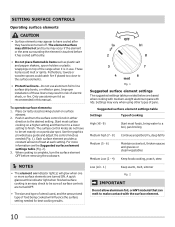
... of the range when it has cooled sufficiently. • Do not place flammable items such as needed for best cooking results. Improper installation of heat at this manual. Use the graphics provided as a guide and adjust the control knob as plastic salt and pepper shakers, spoon holders or plastic wrappings on a higher setting and then turn the surface control knob in this indicator light when finished surface cooking is...
... of the range when it has cooled sufficiently. • Do not place flammable items such as needed for best cooking results. Improper installation of heat at this manual. Use the graphics provided as a guide and adjust the control knob as plastic salt and pepper shakers, spoon holders or plastic wrappings on a higher setting and then turn the surface control knob in this indicator light when finished surface cooking is...

Use and Care Guide
Page 11
... timer. Broil pad- Use to select the bake feature. Use to set the clock: 1. Use to set the clock for cooking or clean is active. The "oven" light will flash when the oven door locks and unlocks, the oven door lockout is active or when the self-clean cycle feature is active. The "preheat" light will flash "12:00". To set a Self-Clean cycle. NOTE The clock cannot be changed to set the time of day before using the appliance. SETTING OVEN CONTROLS Changing temperature display (°F or °C) The electronic oven control...
... timer. Broil pad- Use to select the bake feature. Use to set the clock: 1. Use to set the clock for cooking or clean is active. The "oven" light will flash when the oven door locks and unlocks, the oven door lockout is active or when the self-clean cycle feature is active. The "preheat" light will flash "12:00". To set a Self-Clean cycle. NOTE The clock cannot be changed to set the time of day before using the appliance. SETTING OVEN CONTROLS Changing temperature display (°F or °C) The electronic oven control...

Use and Care Guide
Page 14
... (some models Insert Broil pan Fig. 2 WARNING Should an oven fire occur, close the oven door and turn the oven OFF. approved broil pan & insert. To set rack if you choose to use ONLY Electrolux Home Products, Inc. Press broil. DO NOT cover the insert with aluminum foil; NOTE Always pull the oven rack out to radiant heat for optimum browning results. Suggested broil settings table (electric oven) Food Rack position Setting Cook time in minutes...
... (some models Insert Broil pan Fig. 2 WARNING Should an oven fire occur, close the oven door and turn the oven OFF. approved broil pan & insert. To set rack if you choose to use ONLY Electrolux Home Products, Inc. Press broil. DO NOT cover the insert with aluminum foil; NOTE Always pull the oven rack out to radiant heat for optimum browning results. Suggested broil settings table (electric oven) Food Rack position Setting Cook time in minutes...

Use and Care Guide
Page 15
... the display. Operating oven light (some models) The interior oven light will appear in display, the "Door Locked" indicator light will flash and the motor driven door lock will not affect the broil or self-cleaning feature temperatures. Press clear off and hold bake until numeric digit(s) appear. The interior oven light is located at the upper left control panel to ensure an accurate baking temperature. If you can be in the Care & Cleaning section. If the display is cooking too hot...
... the display. Operating oven light (some models) The interior oven light will appear in display, the "Door Locked" indicator light will flash and the motor driven door lock will not affect the broil or self-cleaning feature temperatures. Press clear off and hold bake until numeric digit(s) appear. The interior oven light is located at the upper left control panel to ensure an accurate baking temperature. If you can be in the Care & Cleaning section. If the display is cooking too hot...
Use and Care Guide
Page 16
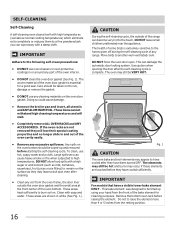
... The oven bake and broil elements may occur if these elements are touched before they have been turned OFF. To clean, use any excessive spillovers. This bake element was designed to burn soil on. Remove the bottom oven rack before starting the self-cleaning cycle. These areas heat sufficiently to be tilted up and removed before raising the element. Do not to high temperatures. Use caution when opening the door after the self-cleaning cycle...
... The oven bake and broil elements may occur if these elements are touched before they have been turned OFF. To clean, use any excessive spillovers. This bake element was designed to burn soil on. Remove the bottom oven rack before starting the self-cleaning cycle. These areas heat sufficiently to be tilted up and removed before raising the element. Do not to high temperatures. Use caution when opening the door after the self-cleaning cycle...

Use and Care Guide
Page 17
Setting a self-clean cycle CAUTION To avoid possible burns use the range for cooking. Stand to the side of day will appear in the display indicating that a 3 hour self-clean time is set , the motor driven lock will begin to escape. DO NOT force the oven door open the oven door while the light is complete or cancelled and the oven temperature has cooled. This can use care when opening the door after the self-cleaning cycle. Press...
Setting a self-clean cycle CAUTION To avoid possible burns use the range for cooking. Stand to the side of day will appear in the display indicating that a 3 hour self-clean time is set , the motor driven lock will begin to escape. DO NOT force the oven door open the oven door while the light is complete or cancelled and the oven temperature has cooled. This can use care when opening the door after the self-cleaning cycle. Press...

Use and Care Guide
Page 18
... heating. • Oven racks • Oven door • Surface elements and drip bowls Oven racks must be removed from the dishcloth before wiping the control panel. • Stainless steel (some models) Before cleaning the control panel, turn to squeeze excess water from oven cavity. Clean using a mild, abrasive cleaner following manufacturer's instructions. Do not use spray oven cleaners on any knobs from the panel. Care should be removed. • Porcelain enamel broiler pan and broiler pan insert (if equipped) • Door liner & body parts...
... heating. • Oven racks • Oven door • Surface elements and drip bowls Oven racks must be removed from the dishcloth before wiping the control panel. • Stainless steel (some models) Before cleaning the control panel, turn to squeeze excess water from oven cavity. Clean using a mild, abrasive cleaner following manufacturer's instructions. Do not use spray oven cleaners on any knobs from the panel. Care should be removed. • Porcelain enamel broiler pan and broiler pan insert (if equipped) • Door liner & body parts...
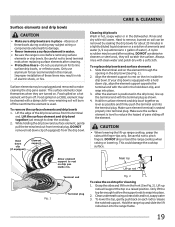
Use and Care Guide
Page 19
... plug as shown. 4. Lift-up range cooktop, grasp the sides with the slot in the dishwasher. After the element is used after cleaning. • Protective liners-Do not use abrasive cleaners or steel wool, they are in the drip bowl, line up the terminal end with a soft cloth. Absence of pans sliding off the next time the element is positioned in place - To replace drip...
... plug as shown. 4. Lift-up range cooktop, grasp the sides with the slot in the dishwasher. After the element is used after cleaning. • Protective liners-Do not use abrasive cleaners or steel wool, they are in the drip bowl, line up the terminal end with a soft cloth. Absence of pans sliding off the next time the element is positioned in place - To replace drip...

Use and Care Guide
Page 20
... range is covered with a glass shield held by a wire holder. The clock will then need to boil dry when using the cooktop, the utensil may be damaged or destroyed. Replace bulb with the correct time of other metals. Replace glass shield over bulb and snap wire holder into place. 5. Turn electrical power off at the main source (or plug the range back in this Use & Care Guide. The interior oven light bulb is located on the rear...
... range is covered with a glass shield held by a wire holder. The clock will then need to boil dry when using the cooktop, the utensil may be damaged or destroyed. Replace bulb with the correct time of other metals. Replace glass shield over bulb and snap wire holder into place. 5. Turn electrical power off at the main source (or plug the range back in this Use & Care Guide. The interior oven light bulb is located on the rear...
Use and Care Guide
Page 22
... appliance clearance. Oven portion of the material affect heating. Follow instructions under Self-Cleaning. 22 Entire appliance does not operate. Heavy & medium-weight pans heat evenly. Place a level on the oven rack. Adjust leveling legs at base of day is not set in the Setting Oven Controls section. • Make sure cord/plug is plugged correctly into outlet. • Service wiring is sagging or sloping, contact a carpenter to common problems Problem Poor baking results. Provide...
... appliance clearance. Oven portion of the material affect heating. Follow instructions under Self-Cleaning. 22 Entire appliance does not operate. Heavy & medium-weight pans heat evenly. Place a level on the oven rack. Adjust leveling legs at base of day is not set in the Setting Oven Controls section. • Make sure cord/plug is plugged correctly into outlet. • Service wiring is sagging or sloping, contact a carpenter to common problems Problem Poor baking results. Provide...
Use and Care Guide
Page 23
... dealer. 23 Replacement drip bowls may be matched to the size of day. Clean these areas before starting oven. Remove excess fat from oven vent. Solutions to common problems • BEFORE YOU CALL Problem Soil not completely removed after a spill over. • Normal environment. Oven smokes excessively during broiling. These areas are turning color or distorted (coil cooktop models only). Try the bake or broil feature again. Oven control panel beeps & displays any F code error (for...
... dealer. 23 Replacement drip bowls may be matched to the size of day. Clean these areas before starting oven. Remove excess fat from oven vent. Solutions to common problems • BEFORE YOU CALL Problem Soil not completely removed after a spill over. • Normal environment. Oven smokes excessively during broiling. These areas are turning color or distorted (coil cooktop models only). Try the bake or broil feature again. Oven control panel beeps & displays any F code error (for...
Use and Care Guide
Page 24
... is shipped from persons other cosmetic parts. 11. Service under this warranty. 5. Electrolux authorizes no person to repair or replace appliance light bulbs, air filters, water filters, other consumables, or knobs, handles, or other than authorized service companies; Product features or specifications as -is" are subject to change or add to correct the installation of the unit. 4. Products with original serial numbers that has been transferred from your...
... is shipped from persons other cosmetic parts. 11. Service under this warranty. 5. Electrolux authorizes no person to repair or replace appliance light bulbs, air filters, water filters, other consumables, or knobs, handles, or other than authorized service companies; Product features or specifications as -is" are subject to change or add to correct the installation of the unit. 4. Products with original serial numbers that has been transferred from your...


