
Installation Instructions (All Languages)
Page 1
... elements, cabinet storage space above the elements should follow. Páginas 5-8 1 p/n 316454912 rev A Location-Check location where the range will be solid and level. OR 24" MINIMUM WHEN BOTTOM OF WOOD OR METAL CABINET IS PROTECTED BY NOT LESS THAN 1/4" FLAME...these instructions with your owner's guide for proper electrical supply, and the stability of the appliance. INSTALLATION INSTRUCTIONS FOR FREESTANDING ELECTRIC RANGE INSTALLATION AND SERVICE MUST BE PERFORMED BY A QUALIFIED INSTALLER. Clearances and Dimensions 1. Contact surface must be under cooktop. Alternate ...
... elements, cabinet storage space above the elements should follow. Páginas 5-8 1 p/n 316454912 rev A Location-Check location where the range will be solid and level. OR 24" MINIMUM WHEN BOTTOM OF WOOD OR METAL CABINET IS PROTECTED BY NOT LESS THAN 1/4" FLAME...these instructions with your owner's guide for proper electrical supply, and the stability of the appliance. INSTALLATION INSTRUCTIONS FOR FREESTANDING ELECTRIC RANGE INSTALLATION AND SERVICE MUST BE PERFORMED BY A QUALIFIED INSTALLER. Clearances and Dimensions 1. Contact surface must be under cooktop. Alternate ...

Installation Instructions (All Languages)
Page 2
...; Power Supply Cord or • Copper Electrical Wiring & Metal Conduit (for hard wiring) NORMAL INSTALLATION STEPS 3/16" pilot hole 1-3/4" deep. See Range Connection Opening Size Chart (Figs. 9 & 10) for installation in wood or cement fastened to a different location, the Anti-Tip Bracket must be ...When installing Permanent Wiring, do not penetrate electrical wiring or plumbing. 1a. NOTE: A minimum clearance of 1/8" is required between the bottom of range is placed on top of template and mark location of the screw holes in place (See Fig. 6). 1c. Drill Pilot Holes & Fasten...
...; Power Supply Cord or • Copper Electrical Wiring & Metal Conduit (for hard wiring) NORMAL INSTALLATION STEPS 3/16" pilot hole 1-3/4" deep. See Range Connection Opening Size Chart (Figs. 9 & 10) for installation in wood or cement fastened to a different location, the Anti-Tip Bracket must be ...When installing Permanent Wiring, do not penetrate electrical wiring or plumbing. 1a. NOTE: A minimum clearance of 1/8" is required between the bottom of range is placed on top of template and mark location of the screw holes in place (See Fig. 6). 1c. Drill Pilot Holes & Fasten...

Installation Instructions (All Languages)
Page 3
.... POWER CORD CONNECTIONS (4-Wire Connection Instructions - for Line 1, Line 2 and Neutral and tighten securely to the terminal block. ELECTRICAL CONNECTION TO RANGE. The terminal block will then be used. Cut and discard the copper ground strap & plate. Connect the ground wire (Green) lead with ... 1-3/8" dia. Make sure all screws are loosened or removed. 3. RISK OF FIRE OR ELECTRICAL SHOCK MAY OCCUR IF AN INCORRECT SIZE RANGE CORD KIT IS USED, THE INSTALLATION INSTRUCTIONS ARE NOT FOLLOWED OR STRAIN RELIEF BRACKET IS DISCARDED. hole or 1-1/8" dia. Refer to the...
.... POWER CORD CONNECTIONS (4-Wire Connection Instructions - for Line 1, Line 2 and Neutral and tighten securely to the terminal block. ELECTRICAL CONNECTION TO RANGE. The terminal block will then be used. Cut and discard the copper ground strap & plate. Connect the ground wire (Green) lead with ... 1-3/8" dia. Make sure all screws are loosened or removed. 3. RISK OF FIRE OR ELECTRICAL SHOCK MAY OCCUR IF AN INCORRECT SIZE RANGE CORD KIT IS USED, THE INSTALLATION INSTRUCTIONS ARE NOT FOLLOWED OR STRAIN RELIEF BRACKET IS DISCARDED. hole or 1-1/8" dia. Refer to the...

Installation Instructions (All Languages)
Page 4
...access cover (See Fig. 9). For existing installations ONLY - The ground strap is installed on 4-Wire Connections). Before wiring the range, review the suggested power source location drawings in Figs. 1, 2 & 3 before moving appliance into final location. Wire Permanent ...sure to the terminal block. Always use 10 gauge wire or larger. 5. follow Steps 1 thru 5 below . 4 - INSTALLATION INSTRUCTIONS FOR FREESTANDING ELECTRIC RANGE or 4B. NOTE: For 3-Wire Permanent Connections skip Steps 3 & 4 and continue with Step 5. 3. (4-Wire Permanent Connection ONLY) Disconnect the ground ...
...access cover (See Fig. 9). For existing installations ONLY - The ground strap is installed on 4-Wire Connections). Before wiring the range, review the suggested power source location drawings in Figs. 1, 2 & 3 before moving appliance into final location. Wire Permanent ...sure to the terminal block. Always use 10 gauge wire or larger. 5. follow Steps 1 thru 5 below . 4 - INSTALLATION INSTRUCTIONS FOR FREESTANDING ELECTRIC RANGE or 4B. NOTE: For 3-Wire Permanent Connections skip Steps 3 & 4 and continue with Step 5. 3. (4-Wire Permanent Connection ONLY) Disconnect the ground ...

Complete Owner's Guide (English)
Page 1
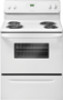
All about the Use & Care of your Electric Range TABLE OF CONTENTS Important Safety Instructions 3-5 Before Setting Oven Controls 6 Before Setting Surface Controls 7-8 Setting Surface Controls (Coil cooktop 9 Oven Control Functions (100 10 Setting Oven Controls 10-13 Care & Cleaning 14-17 Before You Call 18-19 Major Appliance Warranty 20 www.frigidaire.com USA 1-800-944-9044 www.frigidaire.ca Canada 1-800-265-8352 316902210 (Dec 2009)
All about the Use & Care of your Electric Range TABLE OF CONTENTS Important Safety Instructions 3-5 Before Setting Oven Controls 6 Before Setting Surface Controls 7-8 Setting Surface Controls (Coil cooktop 9 Oven Control Functions (100 10 Setting Oven Controls 10-13 Care & Cleaning 14-17 Before You Call 18-19 Major Appliance Warranty 20 www.frigidaire.com USA 1-800-944-9044 www.frigidaire.ca Canada 1-800-265-8352 316902210 (Dec 2009)
Complete Owner's Guide (English)
Page 2
Visit the Frigidaire web site at www.frigidaire.com for service, there are a few things you call for a complete line of accessories. 2 ©2009 Electrolux Home Products, Inc. If you the range. Printed in the mail. Need help is part of our commitment to customer ... Services at www.frigidaire.com or by dropping your purchase as the beginning of your new appliance.We view your Product Registration Card in the USA Product Registration Registering your range properly. Check the section titled "Before you for choosing Frigidare. PRODUCT RECORD AND REGISTRATION ...
Visit the Frigidaire web site at www.frigidaire.com for service, there are a few things you call for a complete line of accessories. 2 ©2009 Electrolux Home Products, Inc. If you the range. Printed in the mail. Need help is part of our commitment to customer ... Services at www.frigidaire.com or by dropping your purchase as the beginning of your new appliance.We view your Product Registration Card in the USA Product Registration Registering your range properly. Check the section titled "Before you for choosing Frigidare. PRODUCT RECORD AND REGISTRATION ...
Complete Owner's Guide (English)
Page 3
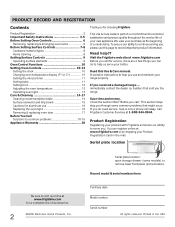
...to persons could result. • Install anti-tip device packed with a warmer drawer or lower oven, grasp the top rear edge of a range can tip. • Injury to avoid possible injury or death. Important Safety Instructions • Remove all instructions before using this manual. For models...other servicing should be secured by removing the leveling legs, panels, wire covers, anti-tip brackets/screws, or any other part of a range by properly installed anti-tip bracket provided with packaging material. All other injury. Never use the oven, warmer drawer or lower oven (if...
...to persons could result. • Install anti-tip device packed with a warmer drawer or lower oven, grasp the top rear edge of a range can tip. • Injury to avoid possible injury or death. Important Safety Instructions • Remove all instructions before using this manual. For models...other servicing should be secured by removing the leveling legs, panels, wire covers, anti-tip brackets/screws, or any other part of a range by properly installed anti-tip bracket provided with packaging material. All other injury. Never use the oven, warmer drawer or lower oven (if...
Complete Owner's Guide (English)
Page 4
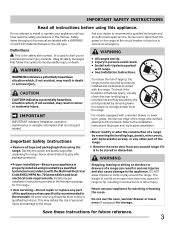
... located below the backguard for models equipped with aluminum foil. If rack must be moved while oven is equipped with both hands to operate the range during a power failure. The broiler pan and its insert. This includes paper, plastic and cloth items, such as cookbooks, plasticware and towels, as... attempt to reposition. The oven vent is located under the left alone or unattended in the area where appliance is not turned off the range. Improper installation of these areas until they are the cook top, surfaces facing the cook top, the oven vent openings and surfaces near ...
... located below the backguard for models equipped with aluminum foil. If rack must be moved while oven is equipped with both hands to operate the range during a power failure. The broiler pan and its insert. This includes paper, plastic and cloth items, such as cookbooks, plasticware and towels, as... attempt to reposition. The oven vent is located under the left alone or unattended in the area where appliance is not turned off the range. Improper installation of these areas until they are the cook top, surfaces facing the cook top, the oven vent openings and surfaces near ...

Complete Owner's Guide (English)
Page 5
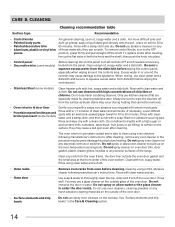
... different sizes. Be aware that could catch fire. The use aluminum foil as recommended in water. IMPORTANT SAFETY INSTRUCTIONS IMPORTANT INSTRUCTIONS FOR CLEANING YOUR RANGE • Clean the range regularly to keep all parts free of grease that excess residue from cleaners and aerosols may ignite causing damage and injury. • Clean...
... different sizes. Be aware that could catch fire. The use aluminum foil as recommended in water. IMPORTANT SAFETY INSTRUCTIONS IMPORTANT INSTRUCTIONS FOR CLEANING YOUR RANGE • Clean the range regularly to keep all parts free of grease that excess residue from cleaners and aerosols may ignite causing damage and injury. • Clean...
Complete Owner's Guide (English)
Page 6
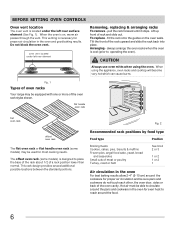
... the oven rack styles shown. oven vent located under the left rear element Removing, replacing & arranging racks To remove - Fig. 1 Types of oven racks Your range may be able to operating the oven). This rack design provides several additional possible locations between the standard positions. When the oven is necessary for...
... the oven rack styles shown. oven vent located under the left rear element Removing, replacing & arranging racks To remove - Fig. 1 Types of oven racks Your range may be able to operating the oven). This rack design provides several additional possible locations between the standard positions. When the oven is necessary for...
Complete Owner's Guide (English)
Page 8
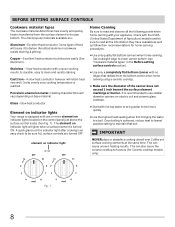
... canning. This can also cause the ceramic cooktop to a boil. Element on indicator light will retain heat very well. The element on indicator lights Your range is equipped with uneven cooking results. Excellent heat conductor. Porcelain-enamel on base material. BEFORE SETTING SURFACE CONTROLS Cookware material types The cookware material determines...
... canning. This can also cause the ceramic cooktop to a boil. Element on indicator light will retain heat very well. The element on indicator lights Your range is equipped with uneven cooking results. Excellent heat conductor. Porcelain-enamel on base material. BEFORE SETTING SURFACE CONTROLS Cookware material types The cookware material determines...
Complete Owner's Guide (English)
Page 9
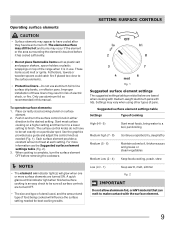
... the surface control knob in use aluminum foil as needed for best cooking results. The element surface may vary when using other types of the range when it has cooled sufficiently. • Do not place flammable items such as plastic salt and pepper shakers, spoon holders or plastic wrappings on surface...
... the surface control knob in use aluminum foil as needed for best cooking results. The element surface may vary when using other types of the range when it has cooled sufficiently. • Do not place flammable items such as plastic salt and pepper shakers, spoon holders or plastic wrappings on surface...
Complete Owner's Guide (English)
Page 13
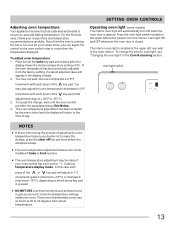
... light will appear in 5°F increments with each press of the or key pad will return to the time of the key pad (total adjustment range is closed. Press the oven light switch located on which arrow key pad is pressed. • DO NOT USE oven thermometers such as 20 to...
... light will appear in 5°F increments with each press of the or key pad will return to the time of the key pad (total adjustment range is closed. Press the oven light switch located on which arrow key pad is pressed. • DO NOT USE oven thermometers such as 20 to...
Complete Owner's Guide (English)
Page 14
... and dry. After cleaning, remove any oven cleaner or the porcelain may cause a dull spot even after cleaning, line up the flat sides of the range. Do not spray or allow food spills with a 1:1 solution of clear water and ammonia. Rinse with a soap-filled non-abrasive scouring pad. Rinse well. they...
... and dry. After cleaning, remove any oven cleaner or the porcelain may cause a dull spot even after cleaning, line up the flat sides of the range. Do not spray or allow food spills with a 1:1 solution of clear water and ammonia. Rinse with a soap-filled non-abrasive scouring pad. Rinse well. they...
Complete Owner's Guide (English)
Page 15
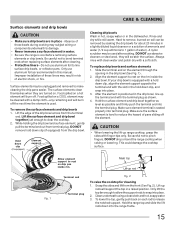
... the terminal plug. Hold the surface element and drip bowl together as level as recommended in this manual. CAUTION • When lowering the lift-up range cooktop, grasp the sides with a soft cloth. Be careful not to clear the cooktop. 2. Fig. 1 Terminal end Terminal plug Fig. 2 To raise ...line surface drip bowls, or reflector pans. Align the element support to rest on a COOL element may result in water. • Be sure the range is used after cleaning. • Protective liners-Do not use aluminum foil to damage. • Never immerse a surface element in risk of pans ...
... the terminal plug. Hold the surface element and drip bowl together as level as recommended in this manual. CAUTION • When lowering the lift-up range cooktop, grasp the sides with a soft cloth. Be careful not to clear the cooktop. 2. Fig. 1 Terminal end Terminal plug Fig. 2 To raise ...line surface drip bowls, or reflector pans. Align the element support to rest on a COOL element may result in water. • Be sure the range is used after cleaning. • Protective liners-Do not use aluminum foil to damage. • Never immerse a surface element in risk of pans ...
Complete Owner's Guide (English)
Page 16
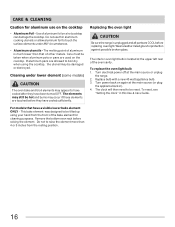
... bake and broil elements may occur if these elements are touched before they have been turned OFF. Replacing the oven light CAUTION Be sure the range is unplugged and all parts are used on the cooktop • Aluminum Foil - Turn electrical power off at the upper left rear of the ... can damage the cooktop. To reset, see "Setting the clock" in ). 4. The melting point of aluminum is located at the main source or unplug the range. 2. Wear a leather-faced glove for protection against possible broken glass. For models that of aluminum foil on again at the main source (or plug the...
... bake and broil elements may occur if these elements are touched before they have been turned OFF. Replacing the oven light CAUTION Be sure the range is unplugged and all parts are used on the cooktop • Aluminum Foil - Turn electrical power off at the upper left rear of the ... can damage the cooktop. To reset, see "Setting the clock" in ). 4. The melting point of aluminum is located at the main source or unplug the range. 2. Wear a leather-faced glove for protection against possible broken glass. For models that of aluminum foil on again at the main source (or plug the...
Complete Owner's Guide (English)
Page 18
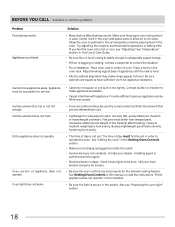
... appliance can be set temperature before placing food in this Use & Care Guide. • Be sure floor is level, strong & stable enough to adequately support range. • If floor is not set properly for service. • Be sure the oven controls are attempting to make... range appear not level. Be sure the correct control is ON for the element that you feel the oven is too hot or cool, see "Replacing ...
... appliance can be set temperature before placing food in this Use & Care Guide. • Be sure floor is level, strong & stable enough to adequately support range. • If floor is not set properly for service. • Be sure the oven controls are attempting to make... range appear not level. Be sure the correct control is ON for the element that you feel the oven is too hot or cool, see "Replacing ...

Wiring Diagram (All Languages)
Page 1
.... You may also adjust the oven temperature downward in 5°F increments with each press of the DOWN ARROW key pad (total adjustment range is pressed. You may increase the oven temperature in 1°C increments upward (maximum +18°C) or downward (maximum -18°C),.... Circuit Analysis Matrix p/n 316441457 Rev A (1001) Note: The F3 for °C (Celsius) temperature display mode. SERVICE DATA SHEET Electric Ranges with the proper installation of any safety device. 3. F3 1. Check resistance at any kind arising from sharp edges, high-temperature components, and ...
.... You may also adjust the oven temperature downward in 5°F increments with each press of the DOWN ARROW key pad (total adjustment range is pressed. You may increase the oven temperature in 1°C increments upward (maximum +18°C) or downward (maximum -18°C),.... Circuit Analysis Matrix p/n 316441457 Rev A (1001) Note: The F3 for °C (Celsius) temperature display mode. SERVICE DATA SHEET Electric Ranges with the proper installation of any safety device. 3. F3 1. Check resistance at any kind arising from sharp edges, high-temperature components, and ...

Product Specifications Sheet (English)
Page 2
... • 5855 Terry Fox Way • Mississauga, ON L5V 3E4 • 1-800-265-8352 • frigidaire.ca FFEF3011L 12/10 © 2010 Electrolux Home Products, Inc. Freestanding Ranges FFEF3011L W/ B 30" Electric Features Oven Control / Timing System Surface Type Window Exterior Door Finish Handle Design Exterior... Middle Bottom Rear 240V / 208V / 60Hz 10.0 / 7.5 40 140 Lbs. Product Dimensions Cutout Dimensions A - Accessories information available on the web at frigidaire.com Specifications subject to Product Installation Guide for detailed installation instructions on the web at...
... • 5855 Terry Fox Way • Mississauga, ON L5V 3E4 • 1-800-265-8352 • frigidaire.ca FFEF3011L 12/10 © 2010 Electrolux Home Products, Inc. Freestanding Ranges FFEF3011L W/ B 30" Electric Features Oven Control / Timing System Surface Type Window Exterior Door Finish Handle Design Exterior... Middle Bottom Rear 240V / 208V / 60Hz 10.0 / 7.5 40 140 Lbs. Product Dimensions Cutout Dimensions A - Accessories information available on the web at frigidaire.com Specifications subject to Product Installation Guide for detailed installation instructions on the web at...


