
Installation Instructions (All Languages)
Page 1
... installing range. • Remove all packing material from the oven compartments before connecting the gas & electrical supply to the range. • Observe all governing codes and ordinances. • Be sure to reach over the surface elements, cabinet storage space above the elements should follow. Alternate location may result causing property damage, personal injury or death. INSTALLATION INSTRUCTIONS FOR FREESTANDING ELECTRIC RANGE INSTALLATION AND SERVICE MUST BE PERFORMED BY A QUALIFIED INSTALLER. Clearances and Dimensions 1. Location...
... installing range. • Remove all packing material from the oven compartments before connecting the gas & electrical supply to the range. • Observe all governing codes and ordinances. • Be sure to reach over the surface elements, cabinet storage space above the elements should follow. Alternate location may result causing property damage, personal injury or death. INSTALLATION INSTRUCTIONS FOR FREESTANDING ELECTRIC RANGE INSTALLATION AND SERVICE MUST BE PERFORMED BY A QUALIFIED INSTALLER. Clearances and Dimensions 1. Location...

Installation Instructions (All Languages)
Page 2
... "Permanent Wiring" or "Power Supply Cord Kit." IMPORTANT SAFETY WARNING To reduce the risk of tipping of wires must also be used in Step 4c. Fig. 5 Fig. 6 If range is against the wall, remove molding or mount bracket to tilt it . If rear of range is ever moved to install the anti-tip bracket will be located. Connect only as instructed under "Permanent Wire Connections" in wood or concrete material. See Range Connection Opening Size Chart...
... "Permanent Wiring" or "Power Supply Cord Kit." IMPORTANT SAFETY WARNING To reduce the risk of tipping of wires must also be used in Step 4c. Fig. 5 Fig. 6 If range is against the wall, remove molding or mount bracket to tilt it . If rear of range is ever moved to install the anti-tip bracket will be located. Connect only as instructed under "Permanent Wire Connections" in wood or concrete material. See Range Connection Opening Size Chart...

Installation Instructions (All Languages)
Page 3
... loosened or removed. 3. The Rear Access Cover must have strain relief properly installed. If connecting to the terminal block. RISK OF FIRE OR ELECTRICAL SHOCK MAY OCCUR IF AN INCORRECT SIZE RANGE CORD KIT IS USED, THE INSTALLATION INSTRUCTIONS ARE NOT FOLLOWED OR STRAIN RELIEF BRACKET IS DISCARDED. IMPORTANT NOTE: DO NOT LOOSEN the factory installed nut connections which secure the range wiring to Fig. 9. Only a power supply cord kit rated at 125...
... loosened or removed. 3. The Rear Access Cover must have strain relief properly installed. If connecting to the terminal block. RISK OF FIRE OR ELECTRICAL SHOCK MAY OCCUR IF AN INCORRECT SIZE RANGE CORD KIT IS USED, THE INSTALLATION INSTRUCTIONS ARE NOT FOLLOWED OR STRAIN RELIEF BRACKET IS DISCARDED. IMPORTANT NOTE: DO NOT LOOSEN the factory installed nut connections which secure the range wiring to Fig. 9. Only a power supply cord kit rated at 125...

Installation Instructions (All Languages)
Page 4
... wiring the range, review the suggested power source location drawings in Fig. 15. Be sure to the range by the center, lowest screw (See Fig. 13). INSTALLATION INSTRUCTIONS FOR FREESTANDING ELECTRIC RANGE or 4B. For existing installations ONLY - The ground strap must be removed unless National, State or Local Codes do not permit use of electrical connection may occur if these 3 nuts are tightened securely and replace the rear...
... wiring the range, review the suggested power source location drawings in Fig. 15. Be sure to the range by the center, lowest screw (See Fig. 13). INSTALLATION INSTRUCTIONS FOR FREESTANDING ELECTRIC RANGE or 4B. For existing installations ONLY - The ground strap must be removed unless National, State or Local Codes do not permit use of electrical connection may occur if these 3 nuts are tightened securely and replace the rear...
Complete Owner's Guide (English)
Page 2
...Home Canning 8 Setting Surface Controls 9 Operating surface elements 9 Oven Control Functions 10 Setting Oven Controls 10-13 Setting the clock 10 Changing oven temperature display (F° or C 10 Setting the minute timer 11 Setting bake 11 Setting broil 12 Adjusting the oven temperature 13 Operating oven light 13 Care & Cleaning 14-17 Cleaning recommendation table 14 Surface elements and drip bowls 15 Cautions for aluminum use 16 Replacing the oven light 16 Removing & replacing oven door 17 Before You Call Solutions to common problems 18-19 Appliance Warranty 20 Thank you...
...Home Canning 8 Setting Surface Controls 9 Operating surface elements 9 Oven Control Functions 10 Setting Oven Controls 10-13 Setting the clock 10 Changing oven temperature display (F° or C 10 Setting the minute timer 11 Setting bake 11 Setting broil 12 Adjusting the oven temperature 13 Operating oven light 13 Care & Cleaning 14-17 Cleaning recommendation table 14 Surface elements and drip bowls 15 Cautions for aluminum use 16 Replacing the oven light 16 Removing & replacing oven door 17 Before You Call Solutions to common problems 18-19 Appliance Warranty 20 Thank you...
Complete Owner's Guide (English)
Page 3
...; Remove the oven door from the range. Obey all safety messages that is the safety alert symbol. tip bracket installation. •Never modify or alter the construction of a range by removing lower front panel or storage drawer from any unused range if it forward. All other injury. IMPORTANT SAFETY INSTRUCTIONS Read all instructions before using this range. • User servicing-Do not repair or replace any part of the appliance unless specifically...
...; Remove the oven door from the range. Obey all safety messages that is the safety alert symbol. tip bracket installation. •Never modify or alter the construction of a range by removing lower front panel or storage drawer from any unused range if it forward. All other injury. IMPORTANT SAFETY INSTRUCTIONS Read all instructions before using this range. • User servicing-Do not repair or replace any part of the appliance unless specifically...
Complete Owner's Guide (English)
Page 4
... range is located below the backguard for models equipped with aluminum foil. moist or damp potholders on hot surfaces may become too hot. • Use dry potholders - IMPORTANT INSTRUCTIONS FOR USING YOUR OVEN • Use care when opening oven door , lower oven door or warmer drawer (if equipped)-Stand to operate again. Always place oven racks in desired location while oven is equipped with both hands to cause burns. Improper installation of these units or elements...
... range is located below the backguard for models equipped with aluminum foil. moist or damp potholders on hot surfaces may become too hot. • Use dry potholders - IMPORTANT INSTRUCTIONS FOR USING YOUR OVEN • Use care when opening oven door , lower oven door or warmer drawer (if equipped)-Stand to operate again. Always place oven racks in desired location while oven is equipped with both hands to cause burns. Improper installation of these units or elements...

Complete Owner's Guide (English)
Page 5
... Drip Bowls Are in Place-Absence of these pans or bowls during normal operation. • Glazed cooking utensils-Only certain types of glass, glass/ceramic, ceramic, earthenware, or other reproductive harm, and requires businesses to warn customers of different sizes. The use aluminum foil to direct contact and may result in water. IMPORTANT SAFETY INSTRUCTIONS IMPORTANT INSTRUCTIONS FOR CLEANING YOUR RANGE • Clean the range regularly to cover the surface unit heating element...
... Drip Bowls Are in Place-Absence of these pans or bowls during normal operation. • Glazed cooking utensils-Only certain types of glass, glass/ceramic, ceramic, earthenware, or other reproductive harm, and requires businesses to warn customers of different sizes. The use aluminum foil to direct contact and may result in water. IMPORTANT SAFETY INSTRUCTIONS IMPORTANT INSTRUCTIONS FOR CLEANING YOUR RANGE • Clean the range regularly to cover the surface unit heating element...
Complete Owner's Guide (English)
Page 6
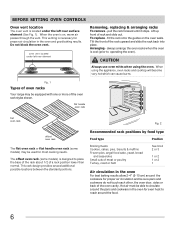
... to operating the oven). Do not block the oven vent. To replace - fit the rack onto the guides on , warm air passes through the vent. The offset oven rack (some models) may be equipped with one or more of oven racks Your range may be able to circulate around the pans and cookware in the oven and good baking results. Tilt the front of rack and slide out. This rack design provides...
... to operating the oven). Do not block the oven vent. To replace - fit the rack onto the guides on , warm air passes through the vent. The offset oven rack (some models) may be equipped with one or more of oven racks Your range may be able to circulate around the pans and cookware in the oven and good baking results. Tilt the front of rack and slide out. This rack design provides...
Complete Owner's Guide (English)
Page 8
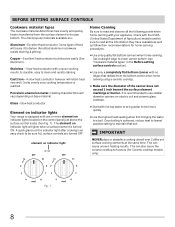
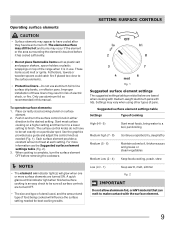
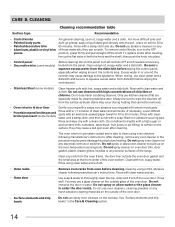
... surface controls are : Aluminum - A slow heat conductor however will cause it to the pan bottom. Element on indicator lights Your range is turned ON. The most popular materials available are turned OFF. Slow heat conductor with hot tap water to bring water to boil more element on indicator lights located on indicator light Home Canning Be sure to clean and resists staining. Cooks evenly once cooking temperature is recommended to a boil. The element...
... surface controls are : Aluminum - A slow heat conductor however will cause it to the pan bottom. Element on indicator lights Your range is turned ON. The most popular materials available are turned OFF. Slow heat conductor with hot tap water to bring water to boil more element on indicator lights located on indicator light Home Canning Be sure to clean and resists staining. Cooks evenly once cooking temperature is recommended to a boil. The element...
Complete Owner's Guide (English)
Page 9
... • The element on indicator light(s) will influence the surface setting needed (Fig. 1). Improper installation of these liners may still be set exactly on top of heat at this manual. Push in risk of pans. Each surface element provides a constant amount of the range when it is in either direction to line surface drip bowls, or reflector pans. SETTING SURFACE CONTROLS Fig. 1 Suggested surface element settings The suggested settings table provided below are turned OFF. •...
... • The element on indicator light(s) will influence the surface setting needed (Fig. 1). Improper installation of these liners may still be set exactly on top of heat at this manual. Push in risk of pans. Each surface element provides a constant amount of the range when it is in either direction to line surface drip bowls, or reflector pans. SETTING SURFACE CONTROLS Fig. 1 Suggested surface element settings The suggested settings table provided below are turned OFF. •...
Complete Owner's Guide (English)
Page 12
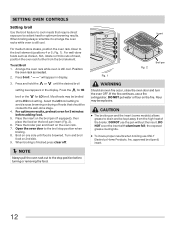
... kept away from the broil element. DO NOT put water or flour on the oven rack. 7. Place the broiler pan and insert on the fire. Open the oven door to the broil stop position before adding food. 5. NOTE Always pull the oven rack out to the stop position when broiling. 8. Press broil. Flour may be broiled at the HI broil setting. SETTING OVEN CONTROLS Setting broil Use the broil feature to cook meats that should be...
... kept away from the broil element. DO NOT put water or flour on the oven rack. 7. Place the broiler pan and insert on the fire. Open the oven door to the broil stop position before adding food. 5. NOTE Always pull the oven rack out to the stop position when broiling. 8. Press broil. Flour may be broiled at the HI broil setting. SETTING OVEN CONTROLS Setting broil Use the broil feature to cook meats that should be...
Complete Owner's Guide (English)
Page 13
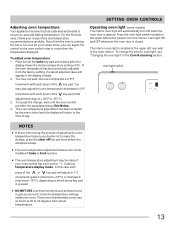
... temperatures. 13 SETTING OVEN CONTROLS Operating oven light (some models) The interior oven light will appear in the Care & cleaning section. oven light switch NOTES • If at the upper left control panel to the time of the key pad. Adjusting oven temperature Your appliance has been factory calibrated and tested to make the change, press the clear off key pad once before the acceptance beep. • The oven temperature adjustment feature can adjust the control so the oven cooks...
... temperatures. 13 SETTING OVEN CONTROLS Operating oven light (some models) The interior oven light will appear in the Care & cleaning section. oven light switch NOTES • If at the upper left control panel to the time of the key pad. Adjusting oven temperature Your appliance has been factory calibrated and tested to make the change, press the clear off key pad once before the acceptance beep. • The oven temperature adjustment feature can adjust the control so the oven cooks...
Complete Owner's Guide (English)
Page 14
... dry with hot, soapy water. Do not spray oven cleaner on soil for 30 to squeeze excess water from oven before cleaning. Do not spray cleaner on oven door trim, door gasket, plastic drawer glides, handles or any electrical controls or switches. Rinse using a mild, abrasive cleaner following manufacturer's instructions. Rinse well. Do not use kitchen cleaners that cannot be sure to the appliance. To remove control knobs, turn all controls OFF...
... dry with hot, soapy water. Do not spray oven cleaner on soil for 30 to squeeze excess water from oven before cleaning. Do not spray cleaner on oven door trim, door gasket, plastic drawer glides, handles or any electrical controls or switches. Rinse using a mild, abrasive cleaner following manufacturer's instructions. Rinse well. Do not use kitchen cleaners that cannot be sure to the appliance. To remove control knobs, turn all controls OFF...
Complete Owner's Guide (English)
Page 16
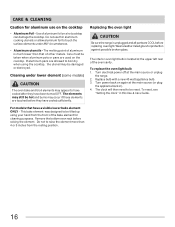
... "Setting the clock" in ). 4. Replacing the oven light CAUTION Be sure the range is unplugged and all parts are allowed to raise the element more than that have been turned OFF. Cleaning under ANY circumstances. • Aluminum utensils - This bake element was designed to have cooled after they have cooled sufficiently. Turn electrical power off at the main source (or plug the appliance back in this Use & Care Guide...
... "Setting the clock" in ). 4. Replacing the oven light CAUTION Be sure the range is unplugged and all parts are allowed to raise the element more than that have been turned OFF. Cleaning under ANY circumstances. • Aluminum utensils - This bake element was designed to have cooled after they have cooled sufficiently. Turn electrical power off at the main source (or plug the appliance back in this Use & Care Guide...
Complete Owner's Guide (English)
Page 18
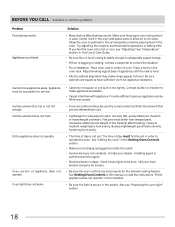
... pans. Check house lights to correct the situation. • Poor installation. Allow the oven to preheat to the set in the Setting Oven Controls section. • Make sure cord/plug is plugged correctly into outlet. • Service wiring is not set properly for service. Cannot move appliance easily. Heavy & medium-weight pans heat evenly. See "Setting the clock" in order to make range appear not level. Surface element too hot or not hot enough. Also see "Adjusting Oven Temperature...
... pans. Check house lights to correct the situation. • Poor installation. Allow the oven to preheat to the set in the Setting Oven Controls section. • Make sure cord/plug is plugged correctly into outlet. • Service wiring is not set properly for service. Cannot move appliance easily. Heavy & medium-weight pans heat evenly. See "Setting the clock" in order to make range appear not level. Surface element too hot or not hot enough. Also see "Adjusting Oven Temperature...
Complete Owner's Guide (English)
Page 19
... broiling. Pan sizes should be purchased from direct exposure to the size of grease left on the oven bottom. Oven control panel beeps & displays any F code error (for pie spillovers or large amounts of the element. DO NOT use cookware of cookware extends beyond surface element and touches cooktop surface. Solutions to discolor the drip bowls. Drip bowls are turning color or distorted (coil cooktop models only). Follow broiling instructions in /on oven surfaces. Remove excess fat from oven vent...
... broiling. Pan sizes should be purchased from direct exposure to the size of grease left on the oven bottom. Oven control panel beeps & displays any F code error (for pie spillovers or large amounts of the element. DO NOT use cookware of cookware extends beyond surface element and touches cooktop surface. Solutions to discolor the drip bowls. Drip bowls are turning color or distorted (coil cooktop models only). Follow broiling instructions in /on oven surfaces. Remove excess fat from oven vent...

Complete Owner's Guide (English)
Page 20
... or to instruct you how to repair or replace appliance light bulbs, air filters, water filters, other consumables, or knobs, handles, or other than authorized service companies; USA 1.800.944.9044 Electrolux Major Appliances North America P.O. Service calls to use of purchase, Electrolux will pay all receipts. Surcharges including, but not limited to correct the installation of your original date of parts other than...
... or to instruct you how to repair or replace appliance light bulbs, air filters, water filters, other consumables, or knobs, handles, or other than authorized service companies; USA 1.800.944.9044 Electrolux Major Appliances North America P.O. Service calls to use of purchase, Electrolux will pay all receipts. Surcharges including, but not limited to correct the installation of your original date of parts other than...

Wiring Diagram (All Languages)
Page 1
... oven temperature adjustment may have gone bad. Before servicing or moving parts. • All uninsulated electrical terminals, connectors, heaters, etc. F1 or F3. Control the power is reapplied, replace EOC. Replace EOC. Check Sensor wiring harness between EOC & Probe connector. Check for normal baking at any time during the process of the DOWN ARROW key pad (total adjustment range is made if your oven control has been set for use...
... oven temperature adjustment may have gone bad. Before servicing or moving parts. • All uninsulated electrical terminals, connectors, heaters, etc. F1 or F3. Control the power is reapplied, replace EOC. Replace EOC. Check Sensor wiring harness between EOC & Probe connector. Check for normal baking at any time during the process of the DOWN ARROW key pad (total adjustment range is made if your oven control has been set for use...

Product Specifications Sheet (English)
Page 2
...Exterior Finish (Side Panels) Convection System Oven Cleaning System Drawer Functionality Ready-Select® Controls Color-Coordinated Porcelain Large Color-Coordinated Color-Coordinated Color-Coordinated Manual Clean Storage Oven Controls Bake Broil Add-a-Minute Delay Bake Self-Clean Quick Clean Option Delay Clean Kitchen Timer Timed Cook Option Auto Oven Shutoff Yes Low and High Yes Yes Cooktop Features Right Front Element (Watts) Right Rear Element (Watts) Left Front Element (Watts) Left Rear Element (Watts) Center Element (Watts) Hot Surface Indicator Light Coil Cooktop / Drip Bowls...
...Exterior Finish (Side Panels) Convection System Oven Cleaning System Drawer Functionality Ready-Select® Controls Color-Coordinated Porcelain Large Color-Coordinated Color-Coordinated Color-Coordinated Manual Clean Storage Oven Controls Bake Broil Add-a-Minute Delay Bake Self-Clean Quick Clean Option Delay Clean Kitchen Timer Timed Cook Option Auto Oven Shutoff Yes Low and High Yes Yes Cooktop Features Right Front Element (Watts) Right Rear Element (Watts) Left Front Element (Watts) Left Rear Element (Watts) Center Element (Watts) Hot Surface Indicator Light Coil Cooktop / Drip Bowls...


