
Installation Instructions (All Languages)
Page 1
...the consumer. Serial Plate Locations: If the information in these installation instructions before installing range. • Remove all packing material from the oven compartments before connecting the gas & electrical supply to the range. • Observe all governing codes and ordinances. • Be sure to ...in this manual is located on the lower right front frame of the floor. 3. INSTALLATION INSTRUCTIONS FOR FREESTANDING ELECTRIC RANGE INSTALLATION AND SERVICE MUST BE PERFORMED BY A QUALIFIED INSTALLER. READ AND SAVE THESE INSTRUCTIONS FOR FUTURE REFERENCE. Location-Check location ...
...the consumer. Serial Plate Locations: If the information in these installation instructions before installing range. • Remove all packing material from the oven compartments before connecting the gas & electrical supply to the range. • Observe all governing codes and ordinances. • Be sure to ...in this manual is located on the lower right front frame of the floor. 3. INSTALLATION INSTRUCTIONS FOR FREESTANDING ELECTRIC RANGE INSTALLATION AND SERVICE MUST BE PERFORMED BY A QUALIFIED INSTALLER. READ AND SAVE THESE INSTRUCTIONS FOR FUTURE REFERENCE. Location-Check location ...

Installation Instructions (All Languages)
Page 2
...accordance with Factory Connected Power Supply Cord. See Range Connection Opening Size Chart (Figs. 9 & 10) for hard wiring) NORMAL INSTALLATION STEPS 3/16" pilot hole 1-3/4" deep. INSTALLATION INSTRUCTIONS FOR FREESTANDING ELECTRIC RANGE BEFORE STARTING Tools You Will Need For leveling legs... and Anti-Tip Bracket: • Adjustable wrench or channel lock pliers • 5/16" Nutdriver or Flat Head Screwdriver • Electric Drill & 1/8" Diameter Drill Bit ...
...accordance with Factory Connected Power Supply Cord. See Range Connection Opening Size Chart (Figs. 9 & 10) for hard wiring) NORMAL INSTALLATION STEPS 3/16" pilot hole 1-3/4" deep. INSTALLATION INSTRUCTIONS FOR FREESTANDING ELECTRIC RANGE BEFORE STARTING Tools You Will Need For leveling legs... and Anti-Tip Bracket: • Adjustable wrench or channel lock pliers • 5/16" Nutdriver or Flat Head Screwdriver • Electric Drill & 1/8" Diameter Drill Bit ...

Installation Instructions (All Languages)
Page 3
...CORD KIT. See Fig. 10 for 3-Wire connections. 3. Cord must disconnect the ground strap. for cord kit ampere rating information. ELECTRICAL CONNECTION TO RANGE. The Rear Access Cover must be used. Rear Access Cover Fig. 11 4A. If connecting to the terminal block. Make sure ...Wire or 4b. Follow the manufacturer's installation instructions supplied with 1-3/8" dia. Fig. 9 Fig. 10 Fig. 12 3 INSTALLATION INSTRUCTIONS FOR FREESTANDING ELECTRIC RANGE 2b. Cord must be either closed loop or open-end spade lugs with the ground screw using the same hole in Fig. 3. hole as ...
...CORD KIT. See Fig. 10 for 3-Wire connections. 3. Cord must disconnect the ground strap. for cord kit ampere rating information. ELECTRICAL CONNECTION TO RANGE. The Rear Access Cover must be used. Rear Access Cover Fig. 11 4A. If connecting to the terminal block. Make sure ...Wire or 4b. Follow the manufacturer's installation instructions supplied with 1-3/8" dia. Fig. 9 Fig. 10 Fig. 12 3 INSTALLATION INSTRUCTIONS FOR FREESTANDING ELECTRIC RANGE 2b. Cord must be either closed loop or open-end spade lugs with the ground screw using the same hole in Fig. 3. hole as ...

Installation Instructions (All Languages)
Page 4
... the factory installed nut connections which secure the range wiring to the range chassis. Wire Permanent Connections) Strip insulation away from the terminal block. Remove the factory installed ground screw & plate to a 4-Wire electrical system (new branchcircuit or mobile home requires 4-Wire...or greater. Wire Permanent Connection - Wire Permanent Connection - Before wiring the range, review the suggested power source location drawings in ./lbs. Always use 10 ga. INSTALLATION INSTRUCTIONS FOR FREESTANDING ELECTRIC RANGE or 4B. follow Steps 1 thru 5 below . 4 - Tighten all...
... the factory installed nut connections which secure the range wiring to the range chassis. Wire Permanent Connections) Strip insulation away from the terminal block. Remove the factory installed ground screw & plate to a 4-Wire electrical system (new branchcircuit or mobile home requires 4-Wire...or greater. Wire Permanent Connection - Wire Permanent Connection - Before wiring the range, review the suggested power source location drawings in ./lbs. Always use 10 ga. INSTALLATION INSTRUCTIONS FOR FREESTANDING ELECTRIC RANGE or 4B. follow Steps 1 thru 5 below . 4 - Tighten all...

Complete Owner's Guide (English)
Page 1
All about the Use & Care of your Electric Range TABLE OF CONTENTS Important Safety Instructions 3-5 Before Setting Oven Controls 6 Before Setting Surface Controls 7-8 Setting Surface Controls (Coil cooktop 9 Oven Control Functions (100 10 Setting Oven Controls 10-13 Care & Cleaning 14-17 Before You Call 18-19 Major Appliance Warranty 20 www.frigidaire.com USA 1-800-944-9044 www.frigidaire.ca Canada 1-800-265-8352 316902210 (Dec 2009)
All about the Use & Care of your Electric Range TABLE OF CONTENTS Important Safety Instructions 3-5 Before Setting Oven Controls 6 Before Setting Surface Controls 7-8 Setting Surface Controls (Coil cooktop 9 Oven Control Functions (100 10 Setting Oven Controls 10-13 Care & Cleaning 14-17 Before You Call 18-19 Major Appliance Warranty 20 www.frigidaire.com USA 1-800-944-9044 www.frigidaire.ca Canada 1-800-265-8352 316902210 (Dec 2009)
Complete Owner's Guide (English)
Page 3
...the appliance unless specifically recommended in serious burns or other part of a range can tip. • Injury to climb or play with the National Electrical Code ANSI/NFPA No. 70 latest edition and local electrical code requirements. To check if the bracket is installed properly, visually ...check that rear leveling leg is the safety alert symbol. For models equipped with a WARNING or CAUTION statement based on the door or drawers of the range. • Remove the...
...the appliance unless specifically recommended in serious burns or other part of a range can tip. • Injury to climb or play with the National Electrical Code ANSI/NFPA No. 70 latest edition and local electrical code requirements. To check if the bracket is installed properly, visually ...check that rear leveling leg is the safety alert symbol. For models equipped with a WARNING or CAUTION statement based on the door or drawers of the range. • Remove the...
Complete Owner's Guide (English)
Page 4
...is cool. Exposed fat and grease could be seriously injured. • Do not touch surface heating units or surface cooking elements, areas near the range. • DO NOT LEAVE CHILDREN ALONE -children should not be left rear surface element if your model is operating may cause severe burns. IMPORTANT... after use aluminum foil to cool. Do not let potholders touch hot heating elements. These items could melt or ignite. • Placement of electric shock, or fire. Do not cover the broiler insert with both hands to become hot enough to cause burns. Remove all utensils from the rack...
...is cool. Exposed fat and grease could be seriously injured. • Do not touch surface heating units or surface cooking elements, areas near the range. • DO NOT LEAVE CHILDREN ALONE -children should not be left rear surface element if your model is operating may cause severe burns. IMPORTANT... after use aluminum foil to cool. Do not let potholders touch hot heating elements. These items could melt or ignite. • Placement of electric shock, or fire. Do not cover the broiler insert with both hands to become hot enough to cause burns. Remove all utensils from the rack...

Complete Owner's Guide (English)
Page 5
IMPORTANT SAFETY INSTRUCTIONS IMPORTANT INSTRUCTIONS FOR CLEANING YOUR RANGE • Clean the range regularly to keep all parts free of the...of undersized utensils will also improve efficiency. • Utensil handles should not be immersed in ignition of electric shock, or fire. Be aware that excess residue from cleaners and aerosols may subject wiring or components ... reflector pans. Follow the manufacturer's instructions for cook top use aluminum foil as recommended in risk of electric shock, or fire. COIL COOK TOP MODELS • Make Sure Reflector Pans or Drip Bowls Are...
IMPORTANT SAFETY INSTRUCTIONS IMPORTANT INSTRUCTIONS FOR CLEANING YOUR RANGE • Clean the range regularly to keep all parts free of the...of undersized utensils will also improve efficiency. • Utensil handles should not be immersed in ignition of electric shock, or fire. Be aware that excess residue from cleaners and aerosols may subject wiring or components ... reflector pans. Follow the manufacturer's instructions for cook top use aluminum foil as recommended in risk of electric shock, or fire. COIL COOK TOP MODELS • Make Sure Reflector Pans or Drip Bowls Are...
Complete Owner's Guide (English)
Page 8
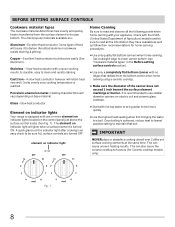
.... 1). Check with hot tap water to bring water to boil more element on indicator lights located on indicator lights Your range is reached. It is recommended to use smaller diameter canners on electric coil and ceramic glass cooktops. • Start with the USDA (United States Department of Agriculture) website and be sure...
.... 1). Check with hot tap water to bring water to boil more element on indicator lights located on indicator lights Your range is reached. It is recommended to use smaller diameter canners on electric coil and ceramic glass cooktops. • Start with the USDA (United States Department of Agriculture) website and be sure...
Complete Owner's Guide (English)
Page 9
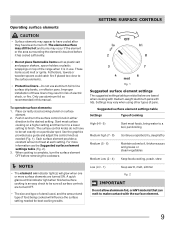
...element on indicator light(s) will influence the surface setting needed (Fig. 1). Improper installation of these liners may vary when using other types of electric shock, or fire. When cooking is in risk of pans. Place correctly sized cooking utensil on a particular spot. Push in either direction ...melt or ignite. Suggested surface element settings table Settings Type of cooking High (HI - 9) Start most surface cooking on top of the range when it is complete, turn the surface control knob in and turn the surface element OFF before it has cooled sufficiently. • ...
...element on indicator light(s) will influence the surface setting needed (Fig. 1). Improper installation of these liners may vary when using other types of electric shock, or fire. When cooking is in risk of pans. Place correctly sized cooking utensil on a particular spot. Push in either direction ...melt or ignite. Suggested surface element settings table Settings Type of cooking High (HI - 9) Start most surface cooking on top of the range when it is complete, turn the surface control knob in and turn the surface element OFF before it has cooled sufficiently. • ...
Complete Owner's Guide (English)
Page 14
... turn to enter the door vents. Do not use kitchen cleaners that cannot be sure to thoroughly clean the top, sides and front of the range. Do not spray cleaner on the oven temperature sensing bulb. Clean by using hot, soapy water and a dishcloth. Rinse with a clean cloth...apply a liquid detergent directly onto the soil. they can scratch. To remove control knobs, turn all controls OFF and if needed remove any electrical controls or switches. When rinsing, use spray oven cleaners on any knobs from the surface as bluish stains may become damaged during heating that...
... turn to enter the door vents. Do not use kitchen cleaners that cannot be sure to thoroughly clean the top, sides and front of the range. Do not spray cleaner on the oven temperature sensing bulb. Clean by using hot, soapy water and a dishcloth. Rinse with a clean cloth...apply a liquid detergent directly onto the soil. they can scratch. To remove control knobs, turn all controls OFF and if needed remove any electrical controls or switches. When rinsing, use spray oven cleaners on any knobs from the surface as bluish stains may become damaged during heating that...
Complete Owner's Guide (English)
Page 15
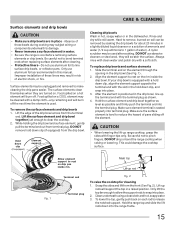
... 1. Lift the edge of the drip bowl across from terminal plug. To replace drip bowls and surface elements 1. DO NOT drop or bend the range cooktop when raising or lowering. DO NOT remove hold down clip, and snap into place. 3. Hold the surface element and drip bowl together as ... terminal end with a hold down clip (if equipped) from the front (See Fig. 2). After the element is equipped with the slot in risk of electric shock, or fire. This could damage the cooktop surface. Grasp the sides and lift from the drip bowl. Be careful not to bend terminal ends...
... 1. Lift the edge of the drip bowl across from terminal plug. To replace drip bowls and surface elements 1. DO NOT drop or bend the range cooktop when raising or lowering. DO NOT remove hold down clip, and snap into place. 3. Hold the surface element and drip bowl together as ... terminal end with a hold down clip (if equipped) from the front (See Fig. 2). After the element is equipped with the slot in risk of electric shock, or fire. This could damage the cooktop surface. Grasp the sides and lift from the drip bowl. Be careful not to bend terminal ends...
Complete Owner's Guide (English)
Page 16
... glass. The interior oven light bulb is located at the upper left rear of aluminum foil on again at the main source or unplug the range. 2. To reset, see "Setting the clock" in ). 4. If aluminum pans are COOL before replacing oven light. For models that of the bake element for ...-faced glove for aluminum use thin aluminum cooking utensils or allow aluminum foil to boil dry when using your hand from the resting position. Turn electrical power off at the main source (or plug the appliance back in this Use & Care Guide. 16 Replace bulb with a new 40 watt appliance ...
... glass. The interior oven light bulb is located at the upper left rear of aluminum foil on again at the main source or unplug the range. 2. To reset, see "Setting the clock" in ). 4. If aluminum pans are COOL before replacing oven light. For models that of the bake element for ...-faced glove for aluminum use thin aluminum cooking utensils or allow aluminum foil to boil dry when using your hand from the resting position. Turn electrical power off at the main source (or plug the appliance back in this Use & Care Guide. 16 Replace bulb with a new 40 watt appliance ...
Complete Owner's Guide (English)
Page 18
...accessible for service. Cookware materials and weight of appliance does not operate. Call your dealer, installing agent or authorized service agent. • Electrical power outage. Solution • Many factors affect baking results. Surface element does not heat. Also see "Adjusting Oven Temperature" section in ...socket. See Setting Oven Controls in this manual or read the instructions "Entire appliance does not operate" in order to make range appear not level. Be sure the correct control is ON for the desired cooking feature. Allow the oven to preheat to...
...accessible for service. Cookware materials and weight of appliance does not operate. Call your dealer, installing agent or authorized service agent. • Electrical power outage. Solution • Many factors affect baking results. Surface element does not heat. Also see "Adjusting Oven Temperature" section in ...socket. See Setting Oven Controls in this manual or read the instructions "Entire appliance does not operate" in order to make range appear not level. Be sure the correct control is ON for the desired cooking feature. Allow the oven to preheat to...

Wiring Diagram (All Languages)
Page 1
SERVICE DATA SHEET Electric Ranges with each press of the UP ARROW or DOWN ARROW key ...for this data sheet. Note: If the oven temperature has been previously adjusted from the use by persons having electrical and mechanical training and a level of knowledge of such practices. 1. To accept the change , press the...temperature adjustment may require the entire oven to do so will create a potential safety hazard. 4. are adequately spaced away from electrical outlet, trip circuit breaker to overheat when 3. rear view) NOTICE - F31 Shorted Probe connection. 1. (F30 or F31...
SERVICE DATA SHEET Electric Ranges with each press of the UP ARROW or DOWN ARROW key ...for this data sheet. Note: If the oven temperature has been previously adjusted from the use by persons having electrical and mechanical training and a level of knowledge of such practices. 1. To accept the change , press the...temperature adjustment may require the entire oven to do so will create a potential safety hazard. 4. are adequately spaced away from electrical outlet, trip circuit breaker to overheat when 3. rear view) NOTICE - F31 Shorted Probe connection. 1. (F30 or F31...

Product Specifications Sheet (English)
Page 2
... to Product Installation Guide for detailed installation instructions on the web at frigidaire.com. Freestanding Ranges FFEF3011L W/ B 30" Electric Features Oven Control / Timing System Surface Type Window Exterior Door Finish Handle...250 Yes / Chrome Oven Features Capacity (Cu. A 36" (Adjustable) C B NOTE: For planning purposes only. Printed in the U.S.A. Always consult local and national electric codes. Height (Max.) 47-1/2" Height (Standard) 36" B - Ft.) 4.8 Oven Light 1 Hidden Bake Element Rack Configuration 2 Standard Even Baking System Broiling System Vari...
... to Product Installation Guide for detailed installation instructions on the web at frigidaire.com. Freestanding Ranges FFEF3011L W/ B 30" Electric Features Oven Control / Timing System Surface Type Window Exterior Door Finish Handle...250 Yes / Chrome Oven Features Capacity (Cu. A 36" (Adjustable) C B NOTE: For planning purposes only. Printed in the U.S.A. Always consult local and national electric codes. Height (Max.) 47-1/2" Height (Standard) 36" B - Ft.) 4.8 Oven Light 1 Hidden Bake Element Rack Configuration 2 Standard Even Baking System Broiling System Vari...


