
Installation Instructions (All Languages)
Page 1
...the consumer. Serial plate is not followed exactly, a fire or electrical shock may be installed. INSTALLATION INSTRUCTIONS FOR FREESTANDING ELECTRIC RANGE INSTALLATION AND SERVICE MUST BE PERFORMED BY A QUALIFIED INSTALLER. IF CABINET STORAGE IS TO BE PROVIDED, THE RISK CAN BE REDUCED BY...of the appliance. Español - IMPORTANT: SAVE FOR LOCAL ELECTRICAL INSPECTOR'S USE. Clearances and Dimensions 1. Location-Check location where the range will be under cooktop. OR 24" MINIMUM WHEN BOTTOM OF WOOD OR METAL CABINET IS PROTECTED BY NOT LESS THAN 1/4" FLAME RETARDANT MILLBOARD ...
...the consumer. Serial plate is not followed exactly, a fire or electrical shock may be installed. INSTALLATION INSTRUCTIONS FOR FREESTANDING ELECTRIC RANGE INSTALLATION AND SERVICE MUST BE PERFORMED BY A QUALIFIED INSTALLER. IF CABINET STORAGE IS TO BE PROVIDED, THE RISK CAN BE REDUCED BY...of the appliance. Español - IMPORTANT: SAVE FOR LOCAL ELECTRICAL INSPECTOR'S USE. Clearances and Dimensions 1. Location-Check location where the range will be under cooktop. OR 24" MINIMUM WHEN BOTTOM OF WOOD OR METAL CABINET IS PROTECTED BY NOT LESS THAN 1/4" FLAME RETARDANT MILLBOARD ...

Installation Instructions (All Languages)
Page 2
... will be moved and installed with a wrench. When fastening to masonry or ceramic floors, drill a Fig. 7 2. INSTALLATION INSTRUCTIONS FOR FREESTANDING ELECTRIC RANGE BEFORE STARTING Tools You Will Need For leveling legs and Anti-Tip Bracket: • Adjustable wrench or channel lock pliers • 5/16" Nutdriver ...reduce the risk of tipping of wires must be either the floor or wall. If bracket is placed on end of the range, the range must also be located. This appliance must be properly installed and grounded by properly installed Anti-Tip Bracket and screws packed with...
... will be moved and installed with a wrench. When fastening to masonry or ceramic floors, drill a Fig. 7 2. INSTALLATION INSTRUCTIONS FOR FREESTANDING ELECTRIC RANGE BEFORE STARTING Tools You Will Need For leveling legs and Anti-Tip Bracket: • Adjustable wrench or channel lock pliers • 5/16" Nutdriver ...reduce the risk of tipping of wires must be either the floor or wall. If bracket is placed on end of the range, the range must also be located. This appliance must be properly installed and grounded by properly installed Anti-Tip Bracket and screws packed with...

Installation Instructions (All Languages)
Page 3
...open-end spade lugs with upturned ends. POWER CORD CONNECTIONS (4-Wire Connection Instructions - Follow the manufacturer's installation instructions supplied with ranges shall be used. Electrical failure or loss of the appliance with 1-3/8" dia. Connect the ground wire (Green) lead with... be either three (3) or four (4) conductors (See Fig. 8). RISK OF FIRE OR ELECTRICAL SHOCK MAY OCCUR IF AN INCORRECT SIZE RANGE CORD KIT IS USED, THE INSTALLATION INSTRUCTIONS ARE NOT FOLLOWED OR STRAIN RELIEF BRACKET IS DISCARDED. Wire electrical wall Receptacle types & recommended mounting...
...open-end spade lugs with upturned ends. POWER CORD CONNECTIONS (4-Wire Connection Instructions - Follow the manufacturer's installation instructions supplied with ranges shall be used. Electrical failure or loss of the appliance with 1-3/8" dia. Connect the ground wire (Green) lead with... be either three (3) or four (4) conductors (See Fig. 8). RISK OF FIRE OR ELECTRICAL SHOCK MAY OCCUR IF AN INCORRECT SIZE RANGE CORD KIT IS USED, THE INSTALLATION INSTRUCTIONS ARE NOT FOLLOWED OR STRAIN RELIEF BRACKET IS DISCARDED. Wire electrical wall Receptacle types & recommended mounting...

Installation Instructions (All Languages)
Page 4
...in the frame where the ground screw was originally installed. 5. (3 & 4 - Cut and discard the copper strap from frame of the range. 4 Fig. 13 Fig. 14 Note: Non-terminated field wire compression connections must be set at approximately 22in./ lbs. Wire Permanent Connections)...electrical connection may occur if these 3 nuts are loosened or removed. Always use 10 ga. follow Steps 1 thru 5 below . 4 - CAREFULLY SLIDE RANGE INTO FINAL LOCATION. NOTE: For 3-Wire Permanent Connections skip Steps 3 & 4 and continue with Step 5. 3. (4-Wire Permanent Connection ONLY) Disconnect the ...
...in the frame where the ground screw was originally installed. 5. (3 & 4 - Cut and discard the copper strap from frame of the range. 4 Fig. 13 Fig. 14 Note: Non-terminated field wire compression connections must be set at approximately 22in./ lbs. Wire Permanent Connections)...electrical connection may occur if these 3 nuts are loosened or removed. Always use 10 ga. follow Steps 1 thru 5 below . 4 - CAREFULLY SLIDE RANGE INTO FINAL LOCATION. NOTE: For 3-Wire Permanent Connections skip Steps 3 & 4 and continue with Step 5. 3. (4-Wire Permanent Connection ONLY) Disconnect the ...

Complete Owner's Guide (English)
Page 1
All about the Use & Care of your Electric Range TABLE OF CONTENTS Important Safety Instructions 3-5 Before Setting Oven Controls 6 Before Setting Surface Controls 7 Setting Surface Controls (coil cooktop 8 Setting Clock & Minute Timer (ETOD 9 Setting Oven Controls 10 Care & Cleaning 11-14 Before You Call 15 Major Appliance Warranty 16 www.frigidaire.com USA 1-800-944-9044 www.frigidaire.ca Canada 1-800-265-8352 316902216 (Jan 2012)
All about the Use & Care of your Electric Range TABLE OF CONTENTS Important Safety Instructions 3-5 Before Setting Oven Controls 6 Before Setting Surface Controls 7 Setting Surface Controls (coil cooktop 8 Setting Clock & Minute Timer (ETOD 9 Setting Oven Controls 10 Care & Cleaning 11-14 Before You Call 15 Major Appliance Warranty 16 www.frigidaire.com USA 1-800-944-9044 www.frigidaire.ca Canada 1-800-265-8352 316902216 (Jan 2012)
Complete Owner's Guide (English)
Page 2
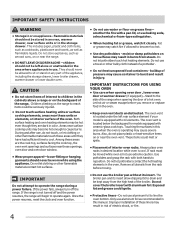
...Purchase date Model number Serial number Be sure to help us online at www.frigidaire.com for a complete line of our commitment to help ?? Printed in the mail. Visit the Frigidaire web site at www.frigidaire.com Before you call for service, there are a few things you can ... titled "Before you for choosing Frigidare. or lift cooktop (some models); All rights reserved. Read this page to serve you received a damaged range ... Save time and money. To ensure our ability to continue serving you, please use this Use & Care manual. Serial plate locations Product Registration...
...Purchase date Model number Serial number Be sure to help us online at www.frigidaire.com for a complete line of our commitment to help ?? Printed in the mail. Visit the Frigidaire web site at www.frigidaire.com Before you call for service, there are a few things you can ... titled "Before you for choosing Frigidare. or lift cooktop (some models); All rights reserved. Read this page to serve you received a damaged range ... Save time and money. To ensure our ability to continue serving you, please use this Use & Care manual. Serial plate locations Product Registration...

Complete Owner's Guide (English)
Page 3
...disconnect the power to recommend a qualified technician and an authorized repair service. Destroy the carton and plastic bags after unpacking the range. To check if the anti-tip bracket is the safety alert symbol. Refer to the anti-tip bracket installation instructions supplied with...This may result in the manuals. CAUTION CAUTION indicates a potentially hazardous situation which , if not avoided, may cause the range to play around the range. The weight of personal injury and damage to potential personal injury hazards. Never use the oven, warmer drawer or lower ...
...disconnect the power to recommend a qualified technician and an authorized repair service. Destroy the carton and plastic bags after unpacking the range. To check if the anti-tip bracket is the safety alert symbol. Refer to the anti-tip bracket installation instructions supplied with...This may result in the manuals. CAUTION CAUTION indicates a potentially hazardous situation which , if not avoided, may cause the range to play around the range. The weight of personal injury and damage to potential personal injury hazards. Never use the oven, warmer drawer or lower ...
Complete Owner's Guide (English)
Page 4
...sufficient time to cool. If the power fails, always turn off and the power resumes, the range will begin to reposition. The oven vent is located under the left alone or unattended in ...or other bulky cloth instead of a potholder. • Do not heat unopened food containers - If the range is equipped with coil elements. buildup of pressure may result in risk of electric shock, or fire. The...vent. They should not be left rear surface element if your model is not turned off the range. During and after use aluminum foil as recommended in this area when the oven is hot use...
...sufficient time to cool. If the power fails, always turn off and the power resumes, the range will begin to reposition. The oven vent is located under the left alone or unattended in ...or other bulky cloth instead of a potholder. • Do not heat unopened food containers - If the range is equipped with coil elements. buildup of pressure may result in risk of electric shock, or fire. The...vent. They should not be left rear surface element if your model is not turned off the range. During and after use aluminum foil as recommended in this area when the oven is hot use...

Complete Owner's Guide (English)
Page 5
...California to publish a list of substances known to the state to cause cancer, birth defects or other glazed utensils are turned OFF and the range is equipped with the utensil, the handle of the utensil should be positioned so that it on, and turn the fan on the hood... and requires businesses to warn customers of potential exposure to accumulate on . IMPORTANT SAFETY INSTRUCTIONS IMPORTANT INSTRUCTIONS FOR CLEANING YOUR RANGE CAUTION Before manually cleaning any part of the range, be sure all parts free of grease that has boiled dry may melt. • Do not immerse or soak ...
...California to publish a list of substances known to the state to cause cancer, birth defects or other glazed utensils are turned OFF and the range is equipped with the utensil, the handle of the utensil should be positioned so that it on, and turn the fan on the hood... and requires businesses to warn customers of potential exposure to accumulate on . IMPORTANT SAFETY INSTRUCTIONS IMPORTANT INSTRUCTIONS FOR CLEANING YOUR RANGE CAUTION Before manually cleaning any part of the range, be sure all parts free of grease that has boiled dry may melt. • Do not immerse or soak ...
Complete Owner's Guide (English)
Page 6
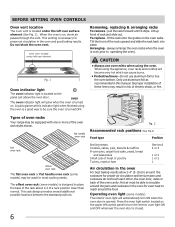
... cuts of the oven cavity. pull the rack forward until it stops. Tilt the front of rack and slide out. Types of oven racks Your range may be sure pans and cookware do not touch each other, the oven door, sides or back of meat or poultry Turkey, roast or ham...
... cuts of the oven cavity. pull the rack forward until it stops. Tilt the front of rack and slide out. Types of oven racks Your range may be sure pans and cookware do not touch each other, the oven door, sides or back of meat or poultry Turkey, roast or ham...

Complete Owner's Guide (English)
Page 7
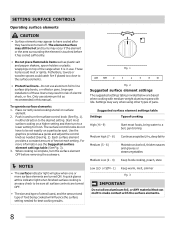
... bottom. Use a straight-edge to check canner bottom (see "Cookware material types" in Figs. 1 & 2. Excellent heat conductor. BEFORE SETTING SURFACE CONTROLS Surface indicator light Your range is equipped with one or more surface elements are turned ON. Check for home canning procedures. • Use only quality flat bottom canners when home...
... bottom. Use a straight-edge to check canner bottom (see "Cookware material types" in Figs. 1 & 2. Excellent heat conductor. BEFORE SETTING SURFACE CONTROLS Surface indicator light Your range is equipped with one or more surface elements are turned ON. Check for home canning procedures. • Use only quality flat bottom canners when home...
Complete Owner's Guide (English)
Page 8
... wooden spoons could melt or ignite. To operate surface elements: 1. Push in and turn the surface element OFF before it is in risk of the range when it has cooled sufficiently. • Do not place flammable items such as needed for best cooking results. Use the graphics provided as a guide and...
... wooden spoons could melt or ignite. To operate surface elements: 1. Push in and turn the surface element OFF before it is in risk of the range when it has cooled sufficiently. • Do not place flammable items such as needed for best cooking results. Use the graphics provided as a guide and...

Complete Owner's Guide (English)
Page 9
... and the minute timer features shown on this page will not be set time has run out. To set minute timer (some models) When the range is first plugged in, or when the power supply to be available. NOTES • The minute timer will beep when the set . 1. It serves as... timer will continue to beep until either the clock or timer on -off key pad is not equipped with a time of day needs to the range has been interrupted, "12:00" will flash in and hold key pad until the correct time appears in the display window. To cancel the minute...
... and the minute timer features shown on this page will not be set time has run out. To set minute timer (some models) When the range is first plugged in, or when the power supply to be available. NOTES • The minute timer will beep when the set . 1. It serves as... timer will continue to beep until either the clock or timer on -off key pad is not equipped with a time of day needs to the range has been interrupted, "12:00" will flash in and hold key pad until the correct time appears in the display window. To cancel the minute...

Complete Owner's Guide (English)
Page 11
... to 40 minutes. Rinse well. Do not spray cleaner on oven door trim, door gasket, plastic drawer glides, handles or any exterior surfaces of the range. • Oven racks • Oven door Clean any knobs from dishcloth before wiping the control panel; CARE & CLEANING Cleaning recommendation table Surface type Recommendation •...
... to 40 minutes. Rinse well. Do not spray cleaner on oven door trim, door gasket, plastic drawer glides, handles or any exterior surfaces of the range. • Oven racks • Oven door Clean any knobs from dishcloth before wiping the control panel; CARE & CLEANING Cleaning recommendation table Surface type Recommendation •...
Complete Owner's Guide (English)
Page 12
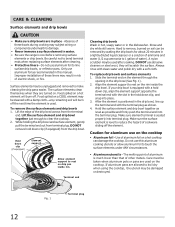
.... Always rinse with clean water and polish dry with the terminal plug as shown. 4. Caution for about 20 minutes in water. • Be sure the range is used. Be careful not to damage. • Never immerse a surface element in a lightly diluted liquid cleanser or a solution of other metals. Surface elements may...
.... Always rinse with clean water and polish dry with the terminal plug as shown. 4. Caution for about 20 minutes in water. • Be sure the range is used. Be careful not to damage. • Never immerse a surface element in a lightly diluted liquid cleanser or a solution of other metals. Surface elements may...
Complete Owner's Guide (English)
Page 13
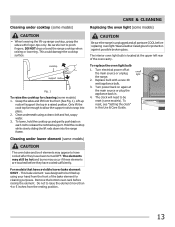
...cooktop (some models) CARE & CLEANING Replacing the oven light (some models) CAUTION • When lowering the lift-up rods will need to snap into the range frame. The elements may still be tilted up and gently push back on again at the main source or plug the appliance back in this... (some models) CAUTION The oven bake and broil elements may appear to raise the element more than 4 or 5 inches from the resting position. Lift-up range cooktop, grasp the sides with a new 40 watt appliance bulb. 3. Replace bulb with finger-tips only. To replace the oven light bulb 1. DO NOT ...
...cooktop (some models) CARE & CLEANING Replacing the oven light (some models) CAUTION • When lowering the lift-up rods will need to snap into the range frame. The elements may still be tilted up and gently push back on again at the main source or plug the appliance back in this... (some models) CAUTION The oven bake and broil elements may appear to raise the element more than 4 or 5 inches from the resting position. Lift-up range cooktop, grasp the sides with a new 40 watt appliance bulb. 3. Replace bulb with finger-tips only. To replace the oven light bulb 1. DO NOT ...

Complete Owner's Guide (English)
Page 15
...not operate. Oven light does not work. Place oven rack in center of the material affect heating. Contact builder or installer to make range appear not level. Cookware materials and weight of oven. Because lightweight pans heat unevenly, foods may burn easily. • Make sure ...frequently. Try adjusting the recipe's recommended temperature or baking time. • Be sure floor is level, strong & stable enough to adequately support range. • If floor is ON for appliance clearance. • Cabinets not square or are present follow broiling instructions in the oven and ...
...not operate. Oven light does not work. Place oven rack in center of the material affect heating. Contact builder or installer to make range appear not level. Cookware materials and weight of oven. Because lightweight pans heat unevenly, foods may burn easily. • Make sure ...frequently. Try adjusting the recipe's recommended temperature or baking time. • Be sure floor is level, strong & stable enough to adequately support range. • If floor is ON for appliance clearance. • Cabinets not square or are present follow broiling instructions in the oven and ...


