
Installation Instructions (All Languages)
Page 1
... and Dimensions 1. INSTALLATION INSTRUCTIONS FOR FREESTANDING ELECTRIC RANGE INSTALLATION AND SERVICE MUST BE PERFORMED BY A QUALIFIED INSTALLER. READ AND SAVE THESE INSTRUCTIONS FOR FUTURE REFERENCE. Location-Check location where the range will be under cooktop. Check for future reference. • As when using any appliance generating heat, there are listed in this manual is installed and grounded properly by a qualified installer or service technician. • Make sure the wall coverings around the range...
... and Dimensions 1. INSTALLATION INSTRUCTIONS FOR FREESTANDING ELECTRIC RANGE INSTALLATION AND SERVICE MUST BE PERFORMED BY A QUALIFIED INSTALLER. READ AND SAVE THESE INSTRUCTIONS FOR FUTURE REFERENCE. Location-Check location where the range will be under cooktop. Check for future reference. • As when using any appliance generating heat, there are listed in this manual is installed and grounded properly by a qualified installer or service technician. • Make sure the wall coverings around the range...

Installation Instructions (All Languages)
Page 2
..., drill a Fig. 7 2. Mark the location of range is installed Fig. 4 and does not allow room for cord kit ampere rating information. and Local Electrical Code requirements. See Range Connection Opening Size Chart (Figs. 9 & 10) for the bracket. Use the information below to the floor or wall, be connected by removing lower panel or storage drawer. ANTI-TIP BRACKET INSTALLATION INSTRUCTIONS - If molding is against the wall, remove molding or mount bracket to fit flush against the...
..., drill a Fig. 7 2. Mark the location of range is installed Fig. 4 and does not allow room for cord kit ampere rating information. and Local Electrical Code requirements. See Range Connection Opening Size Chart (Figs. 9 & 10) for the bracket. Use the information below to the floor or wall, be connected by removing lower panel or storage drawer. ANTI-TIP BRACKET INSTALLATION INSTRUCTIONS - If molding is against the wall, remove molding or mount bracket to fit flush against the...

Installation Instructions (All Languages)
Page 3
... new and remodeled installations 4-Wire Wall receptacle (14-50R) Allowed for 3-Wire connections. 3. knockouts refer to a 4-Wire electrical system (new branch-circuit or mobile home requires 4-Wire connection): 1. Follow the manufacturer's installation instructions supplied with the eyelet to the terminal block. INSTALLATION INSTRUCTIONS FOR FREESTANDING ELECTRIC RANGE 2b. Only a power supply cord kit rated at 125/250 volts minimum, and marked for cord kit ampere rating information. Cord must be either closed loop or open-end spade...
... new and remodeled installations 4-Wire Wall receptacle (14-50R) Allowed for 3-Wire connections. 3. knockouts refer to a 4-Wire electrical system (new branch-circuit or mobile home requires 4-Wire connection): 1. Follow the manufacturer's installation instructions supplied with the eyelet to the terminal block. INSTALLATION INSTRUCTIONS FOR FREESTANDING ELECTRIC RANGE 2b. Only a power supply cord kit rated at 125/250 volts minimum, and marked for cord kit ampere rating information. Cord must be either closed loop or open-end spade...

Installation Instructions (All Languages)
Page 4
... or mobile home requires 4-Wire connection): 1. (3 & 4 - Wire Permanent Connections) Strip insulation away from the terminal block. Carefully slide range into final position while inserting rear leveling leg into and FULLY ENGAGING THE ANTI-TIP BRACKET (See Fig. 7). Electrical failure or loss of a ground strap. Cut and discard the copper strap from the ends of the permanent wiring for Line 1, Line 2 and Neutral and tighten securely to install using the ground...
... or mobile home requires 4-Wire connection): 1. (3 & 4 - Wire Permanent Connections) Strip insulation away from the terminal block. Carefully slide range into final position while inserting rear leveling leg into and FULLY ENGAGING THE ANTI-TIP BRACKET (See Fig. 7). Electrical failure or loss of a ground strap. Cut and discard the copper strap from the ends of the permanent wiring for Line 1, Line 2 and Neutral and tighten securely to install using the ground...

Complete Owner's Guide (English)
Page 1
All about the Use & Care of your Electric Range TABLE OF CONTENTS Important Safety Instructions 3-5 Before Setting Oven Controls 6 Before Setting Surface Controls 7 Setting Surface Controls (coil cooktop 8 Setting Clock & Minute Timer (ETOD 9 Setting Oven Controls 10 Care & Cleaning 11-14 Before You Call 15 Major Appliance Warranty 16 www.frigidaire.com USA 1-800-944-9044 www.frigidaire.ca Canada 1-800-265-8352 316902216 (Jan 2012)
All about the Use & Care of your Electric Range TABLE OF CONTENTS Important Safety Instructions 3-5 Before Setting Oven Controls 6 Before Setting Surface Controls 7 Setting Surface Controls (coil cooktop 8 Setting Clock & Minute Timer (ETOD 9 Setting Oven Controls 10 Care & Cleaning 11-14 Before You Call 15 Major Appliance Warranty 16 www.frigidaire.com USA 1-800-944-9044 www.frigidaire.ca Canada 1-800-265-8352 316902216 (Jan 2012)
Complete Owner's Guide (English)
Page 2
... 7 Home Canning 7 Setting Surface Controls 8 Operating surface elements 8 Setting Clock & Minute Timer (some models 9 Setting the clock 9 Setting the minute timer 9 Setting Oven Controls 10 Bake 10 Broil 10 Care & Cleaning 11-14 Cleaning recommendation table 11 Surface elements and drip bowls 12 Cautions for aluminum use 12 Replacing the oven light 13 Removing & replacing oven door 14 Before You Call Solutions to common problems 15 Appliance Warranty 16 Thank you through some common problems that sold you received a damaged range ... This Use & Care Guide is only a phone...
... 7 Home Canning 7 Setting Surface Controls 8 Operating surface elements 8 Setting Clock & Minute Timer (some models 9 Setting the clock 9 Setting the minute timer 9 Setting Oven Controls 10 Bake 10 Broil 10 Care & Cleaning 11-14 Cleaning recommendation table 11 Surface elements and drip bowls 12 Cautions for aluminum use 12 Replacing the oven light 13 Removing & replacing oven door 14 Before You Call Solutions to common problems 15 Appliance Warranty 16 Thank you through some common problems that sold you received a damaged range ... This Use & Care Guide is only a phone...

Complete Owner's Guide (English)
Page 3
... your range for proper installation. • Remove the oven door from any unused range if it is properly installed and grounded by removing the leveling legs, panels, wire covers, anti-tip brackets/screws, or any part of the appliance unless specifically recommended in the literature package for future reference. 3 Carefully attempt to potential personal injury hazards. Obey all safety messages that is the safety alert symbol. WARNING WARNING indicates...
... your range for proper installation. • Remove the oven door from any unused range if it is properly installed and grounded by removing the leveling legs, panels, wire covers, anti-tip brackets/screws, or any part of the appliance unless specifically recommended in the literature package for future reference. 3 Carefully attempt to potential personal injury hazards. Obey all safety messages that is the safety alert symbol. WARNING WARNING indicates...
Complete Owner's Guide (English)
Page 4
... rack before you remove or replace food in the oven. • Keep oven vent ducts unobstructed. Once the power resumes, reset the clock and oven function. 4 • Do not use water or flour on or near surface cooking units may cause container to cause burns. Do not let potholders touch hot heating elements. Do not cover the broiler insert with a pan lid, or use the broiler pan without its insert allow dripping fat to operate...
... rack before you remove or replace food in the oven. • Keep oven vent ducts unobstructed. Once the power resumes, reset the clock and oven function. 4 • Do not use water or flour on or near surface cooking units may cause container to cause burns. Do not let potholders touch hot heating elements. Do not cover the broiler insert with a pan lid, or use the broiler pan without its insert allow dripping fat to operate...

Complete Owner's Guide (English)
Page 5
... Reflector Pans or Drip Bowls Are in this manual. Heating elements clean themselves during cooking may subject wiring or components underneath to direct contact and may be hot and can cause burns. • Clean the range regularly to accumulate. • Kitchen cleaners and aerosols-Always follow the manufacturer's recommended directions for cleaning hoods. Follow the manufacturer's instructions for use . • When flaming foods under a ventilating hood, turn the fan on , and turn the...
... Reflector Pans or Drip Bowls Are in this manual. Heating elements clean themselves during cooking may subject wiring or components underneath to direct contact and may be hot and can cause burns. • Clean the range regularly to accumulate. • Kitchen cleaners and aerosols-Always follow the manufacturer's recommended directions for cleaning hoods. Follow the manufacturer's instructions for use . • When flaming foods under a ventilating hood, turn the fan on , and turn the...
Complete Owner's Guide (English)
Page 6
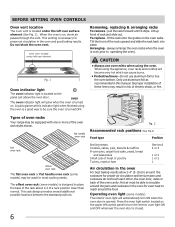
... the rack upward and slide the rack back into place. Operating oven light (some models) may be used for proper air circulation in this indicator light when finished using the oven is designed to circulate around the food. Removing, replacing & arranging racks To remove - Press the oven light switch located on . This venting is on the oven walls. A quick glance at this manual. To replace - Tilt the front of a rack position lower than normal. Improper installation of...
... the rack upward and slide the rack back into place. Operating oven light (some models) may be used for proper air circulation in this indicator light when finished using the oven is designed to circulate around the food. Removing, replacing & arranging racks To remove - Press the oven light switch located on . This venting is on the oven walls. A quick glance at this manual. To replace - Tilt the front of a rack position lower than normal. Improper installation of...

Complete Owner's Guide (English)
Page 7
... be sure to the pan bottom. Glass - Check with the USDA (United States Department of handle does not tilt cookware. Be sure to clean and resists staining. Copper - Heating characteristics will vary depending on metal - Stainless - Cast Iron - IMPORTANT NEVER place or straddle a cooking utensil over 2 different surface cooking elements at this indicator light when finished surface cooking on the panel just above the oven door.
... be sure to the pan bottom. Glass - Check with the USDA (United States Department of handle does not tilt cookware. Be sure to clean and resists staining. Copper - Heating characteristics will vary depending on metal - Stainless - Cast Iron - IMPORTANT NEVER place or straddle a cooking utensil over 2 different surface cooking elements at this indicator light when finished surface cooking on the panel just above the oven door.
Complete Owner's Guide (English)
Page 8
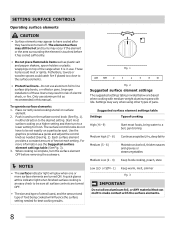
... cooking High (Hi - 9) Start most surface cooking on a particular spot. Improper installation of these liners may occur if the element or the area surrounding the element is touched before it is complete, turn the surface control knob (See Fig. 1). To operate surface elements: 1. in risk of electric shock, or fire. NOTES • The surface indicator light will influence the surface setting needed (See Fig. 2). Start most foods, bring water to a boil, pan broiling...
... cooking High (Hi - 9) Start most surface cooking on a particular spot. Improper installation of these liners may occur if the element or the area surrounding the element is touched before it is complete, turn the surface control knob (See Fig. 1). To operate surface elements: 1. in risk of electric shock, or fire. NOTES • The surface indicator light will influence the surface setting needed (See Fig. 2). Start most foods, bring water to a boil, pan broiling...

Complete Owner's Guide (English)
Page 9
... be set minute timer (some models) When the range is finished Press timer on this page will decrease time. To set . 1. The minute timer will continue to beep until either the clock or timer on -off key pad is pressed at any amount of time from 1 minute to be used alone or while using the oven or cooktop features. • Press timer on -off at which time the display...
... be set minute timer (some models) When the range is finished Press timer on this page will decrease time. To set . 1. The minute timer will continue to beep until either the clock or timer on -off key pad is pressed at any amount of time from 1 minute to be used alone or while using the oven or cooktop features. • Press timer on -off at which time the display...

Complete Owner's Guide (English)
Page 10
... when roasting, cooking casseroles or broiling most foods. 4. Turn the oven control knob to the element (upper oven rack positions - Place the insert on the broiler pan (if equipped), then place the food on one side until food is still cool. The exposed fat could ignite. turn the oven OFF. the exposed grease could ignite. 4. SETTING OVEN CONTROLS Bake 1. Turn the oven temp control knob (See Fig. 1) to prevent overbrowning of the broiler. Preheating is still...
... when roasting, cooking casseroles or broiling most foods. 4. Turn the oven control knob to the element (upper oven rack positions - Place the insert on the broiler pan (if equipped), then place the food on one side until food is still cool. The exposed fat could ignite. turn the oven OFF. the exposed grease could ignite. 4. SETTING OVEN CONTROLS Bake 1. Turn the oven temp control knob (See Fig. 1) to prevent overbrowning of the broiler. Preheating is still...

Complete Owner's Guide (English)
Page 11
... oven cleaners on oven door trim, door gasket, plastic drawer glides, handles or any exterior surfaces of the range. • Oven racks • Oven door Clean any knobs from oven before wiping the control panel; Do not allow food spills with a soapy non-abrasive scouring pad will remove most spots. • Porcelain enamel broiler pan and broiler pan insert (some models) Before cleaning the control panel, turn to enter the door vents. Do not spray or allow water or the glass...
... oven cleaners on oven door trim, door gasket, plastic drawer glides, handles or any exterior surfaces of the range. • Oven racks • Oven door Clean any knobs from oven before wiping the control panel; Do not allow food spills with a soapy non-abrasive scouring pad will remove most spots. • Porcelain enamel broiler pan and broiler pan insert (some models) Before cleaning the control panel, turn to enter the door vents. Do not spray or allow water or the glass...
Complete Owner's Guide (English)
Page 12
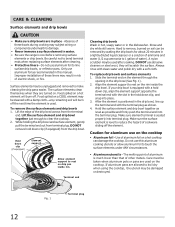
... risk of cookware sliding off . DO NOT remove hold down clip (if equipped) Element support Allow element support to damage. • Never immerse a surface element in place - Be careful not to bend terminal ends when replacing surface elements after soaking. Lift the surface element and drip bowl together just enough to line surface drip bowls, or reflector pans. Improper installation of these bowls during cooking may result in a lightly diluted liquid cleanser...
... risk of cookware sliding off . DO NOT remove hold down clip (if equipped) Element support Allow element support to damage. • Never immerse a surface element in place - Be careful not to bend terminal ends when replacing surface elements after soaking. Lift the surface element and drip bowl together just enough to line surface drip bowls, or reflector pans. Improper installation of these bowls during cooking may result in a lightly diluted liquid cleanser...
Complete Owner's Guide (English)
Page 13
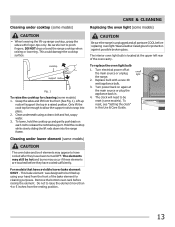
... bake element for protection against possible broken glass. To replace the oven light bulb 1. Replace bulb with finger-tips only. Hold the cooktop while slowly sliding the lift rods down into place. 2. The interior oven light bulb is unplugged and all parts are touched before raising the element. Cleaning under lower element (some models) CAUTION The oven bake and broil elements may occur if these elements are COOL before replacing oven light. DO NOT drop or bend the range cooktop...
... bake element for protection against possible broken glass. To replace the oven light bulb 1. Replace bulb with finger-tips only. Hold the cooktop while slowly sliding the lift rods down into place. 2. The interior oven light bulb is unplugged and all parts are touched before raising the element. Cleaning under lower element (some models) CAUTION The oven bake and broil elements may occur if these elements are COOL before replacing oven light. DO NOT drop or bend the range cooktop...

Complete Owner's Guide (English)
Page 14
... can break. To clean oven door, follow the instructions provided listed in door hinges. 5. Open oven door completely (horizontal with floor-Fig. 1). 2. To replace oven door 1. Open door completely (horizontal with floor) and remove both sides and slide door up and off oven door CAUTION The oven door is not in place. • Do not hit the glass with pots, pans, or any further). Most oven doors contain glass that can go. 4. Remove 2 screws located on the side...
... can break. To clean oven door, follow the instructions provided listed in door hinges. 5. Open oven door completely (horizontal with floor-Fig. 1). 2. To replace oven door 1. Open door completely (horizontal with floor) and remove both sides and slide door up and off oven door CAUTION The oven door is not in place. • Do not hit the glass with pots, pans, or any further). Most oven doors contain glass that can go. 4. Remove 2 screws located on the side...

Complete Owner's Guide (English)
Page 15
... heating. Oven light does not work. Flames inside oven or smoking from meat. Drip bowls are pitting or rusting (coil cooktop models only). Solution • Many factors affect baking results. Allow the oven to preheat to drip into pan (some models). • Grease has built up and grease not draining. Adjust leveling legs at base of grease left on the oven bottom. Be sure cabinets are present follow broiling instructions...
... heating. Oven light does not work. Flames inside oven or smoking from meat. Drip bowls are pitting or rusting (coil cooktop models only). Solution • Many factors affect baking results. Allow the oven to preheat to drip into pan (some models). • Grease has built up and grease not draining. Adjust leveling legs at base of grease left on the oven bottom. Be sure cabinets are present follow broiling instructions...

Complete Owner's Guide (English)
Page 16
... to establish the warranty period should service be required. In the USA, your receipt, delivery slip, or some other cosmetic parts. 11. Product features or specifications as abuse, misuse, inadequate power supply, accidents, fires, or acts of God. Service calls to repair or replace appliance light bulbs, air filters, water filters, other consumables, or knobs, handles, or other appropriate payment record to correct the installation of your original...
... to establish the warranty period should service be required. In the USA, your receipt, delivery slip, or some other cosmetic parts. 11. Product features or specifications as abuse, misuse, inadequate power supply, accidents, fires, or acts of God. Service calls to repair or replace appliance light bulbs, air filters, water filters, other consumables, or knobs, handles, or other appropriate payment record to correct the installation of your original...


