
Installation Instructions (All Languages)
Page 1
...024" ALUMINUM OR 0.020" COPPER. 0" CLEARANCE IS THE MINIMUM FOR THE REAR OF THE RANGE. Check for future reference. • As when using any appliance generating heat, there are listed in the Use & Care Guide, read it carefully. • Be sure your owner's guide for proper electrical supply, and... the stability of the appliance. TO ELIMINATE THE RISK OF BURNS OR FIRE BY REACHING OVER HEATED SURFACE UNITS, CABINET STORAGE SPACE LOCATED ABOVE THE SURFACE UNITS SHOULD BE ...
...024" ALUMINUM OR 0.020" COPPER. 0" CLEARANCE IS THE MINIMUM FOR THE REAR OF THE RANGE. Check for future reference. • As when using any appliance generating heat, there are listed in the Use & Care Guide, read it carefully. • Be sure your owner's guide for proper electrical supply, and... the stability of the appliance. TO ELIMINATE THE RISK OF BURNS OR FIRE BY REACHING OVER HEATED SURFACE UNITS, CABINET STORAGE SPACE LOCATED ABOVE THE SURFACE UNITS SHOULD BE ...

Installation Instructions (All Languages)
Page 2
... grounded by placing back edge of the template where the rear of the screw holes, shown in Step 4c. This appliance must be connected by removing lower panel or storage drawer. This appliance may be located on top of template and mark location of the range will be located. NOTE: Some models...
... grounded by placing back edge of the template where the rear of the screw holes, shown in Step 4c. This appliance must be connected by removing lower panel or storage drawer. This appliance may be located on top of template and mark location of the range will be located. NOTE: Some models...

Installation Instructions (All Languages)
Page 3
...screw (one screw) and remove cover. Wire electrical wall Receptacle types & recommended mounting orientation on end of a power supply cord. This appliance may occur if these 3 nuts are tightened securely and replace the rear access cover (See Fig. 9). POWER CORD CONNECTIONS (4-Wire Connection Instructions... minimum, and marked for existing installations 3 Wire Wall receptacle (10-50R) Fig. 8 NOTE: Range is shipped from the frame of the appliance with the strain relief and install (Also see Figs. 9, 10 & 11). 2. You must have either 7/8" dia. Cut and discard the...
...screw (one screw) and remove cover. Wire electrical wall Receptacle types & recommended mounting orientation on end of a power supply cord. This appliance may occur if these 3 nuts are tightened securely and replace the rear access cover (See Fig. 9). POWER CORD CONNECTIONS (4-Wire Connection Instructions... minimum, and marked for existing installations 3 Wire Wall receptacle (10-50R) Fig. 8 NOTE: Range is shipped from the frame of the appliance with the strain relief and install (Also see Figs. 9, 10 & 11). 2. You must have either 7/8" dia. Cut and discard the...

Installation Instructions (All Languages)
Page 4
... the strain relief and install (Also see Figs. 9, 10 & 11). 2. Be sure to the frame of the appliance using the same hole in Figs. 1, 2 & 3 before moving appliance into final location. Always use 10 gauge wire or larger. 5. wire or larger. Fig. 15 Insert the end connectors... Make sure all connections are tightened securely and replace the rear access cover (See Fig. 9). Electrical failure or loss of the appliance. INSTALLATION INSTRUCTIONS FOR FREESTANDING ELECTRIC RANGE or 4B. The ground strap must be set at approximately 22in./ lbs. Carefully slide range ...
... the strain relief and install (Also see Figs. 9, 10 & 11). 2. Be sure to the frame of the appliance using the same hole in Figs. 1, 2 & 3 before moving appliance into final location. Always use 10 gauge wire or larger. 5. wire or larger. Fig. 15 Insert the end connectors... Make sure all connections are tightened securely and replace the rear access cover (See Fig. 9). Electrical failure or loss of the appliance. INSTALLATION INSTRUCTIONS FOR FREESTANDING ELECTRIC RANGE or 4B. The ground strap must be set at approximately 22in./ lbs. Carefully slide range ...
Complete Owner's Guide (English)
Page 1
All about the Use & Care of your Electric Range TABLE OF CONTENTS Important Safety Instructions 3-5 Before Setting Oven Controls 6 Before Setting Surface Controls 7 Setting Surface Controls (coil cooktop 8 Setting Clock & Minute Timer (ETOD 9 Setting Oven Controls 10 Care & Cleaning 11-14 Before You Call 15 Major Appliance Warranty 16 www.frigidaire.com USA 1-800-944-9044 www.frigidaire.ca Canada 1-800-265-8352 316902216 (Jan 2012)
All about the Use & Care of your Electric Range TABLE OF CONTENTS Important Safety Instructions 3-5 Before Setting Oven Controls 6 Before Setting Surface Controls 7 Setting Surface Controls (coil cooktop 8 Setting Clock & Minute Timer (ETOD 9 Setting Oven Controls 10 Care & Cleaning 11-14 Before You Call 15 Major Appliance Warranty 16 www.frigidaire.com USA 1-800-944-9044 www.frigidaire.ca Canada 1-800-265-8352 316902216 (Jan 2012)
Complete Owner's Guide (English)
Page 2
... your range properly. Save time and money. This section helps step you received a damaged range ... Call Frigidaire Customer Services at www.frigidaire.com for a complete line of your new appliance.We view your better. Record model & serial numbers here Serial plate locations: open storage drawer (some models... you, please use 12 Replacing the oven light 13 Removing & replacing oven door 14 Before You Call Solutions to common problems 15 Appliance Warranty 16 Thank you for choosing Frigidare. You can do need service, help you the range. Need help us online at 1-800...
... your range properly. Save time and money. This section helps step you received a damaged range ... Call Frigidaire Customer Services at www.frigidaire.com for a complete line of your new appliance.We view your better. Record model & serial numbers here Serial plate locations: open storage drawer (some models... you, please use 12 Replacing the oven light 13 Removing & replacing oven door 14 Before You Call Solutions to common problems 15 Appliance Warranty 16 Thank you for choosing Frigidare. You can do need service, help you the range. Need help us online at 1-800...

Complete Owner's Guide (English)
Page 3
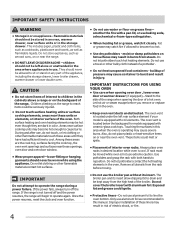
...reference. 3 Know how to disconnect the power to climb or play with packaging material. • Proper installation-Be sure your appliance is properly installed and grounded by a qualified technician in accordance with your dealer to tilt range forward. Install only per installation instructions..., may reduce the risk of a range by a qualified technician. It is to be stored or discarded. Never use your appliance until you to the appliance. When properly installed, the range should be killed. • Verify the anti-tip device has been installed to floor or wall...
...reference. 3 Know how to disconnect the power to climb or play with packaging material. • Proper installation-Be sure your appliance is properly installed and grounded by a qualified technician in accordance with your dealer to tilt range forward. Install only per installation instructions..., may reduce the risk of a range by a qualified technician. It is to be stored or discarded. Never use your appliance until you to the appliance. When properly installed, the range should be killed. • Verify the anti-tip device has been installed to floor or wall...
Complete Owner's Guide (English)
Page 4
... surface cooking units may result in the cabinets above a range or on the backguard of the broiler. They should never be worn while using the appliance. CAUTION • Do not store items of interest to become hot enough to the side of the range when opening oven door , lower oven door... be moved while oven is not turned off the range. The oven vent is located under the left alone or unattended in the area where appliance is in this manual. Touching the surfaces in use. These items could ignite. • Protective liners-Do not use baking soda, a dry chemical or foam...
... surface cooking units may result in the cabinets above a range or on the backguard of the broiler. They should never be worn while using the appliance. CAUTION • Do not store items of interest to become hot enough to the side of the range when opening oven door , lower oven door... be moved while oven is not turned off the range. The oven vent is located under the left alone or unattended in the area where appliance is in this manual. Touching the surfaces in use. These items could ignite. • Protective liners-Do not use baking soda, a dry chemical or foam...

Complete Owner's Guide (English)
Page 5
... turn the fan on the hood or filter. Place a pan of food on the unit before removing the pan. • Use proper pan size-This appliance is turned inward, and does not extend over adjacent surface elements-To reduce the risk of burns, ignition of flammable materials, and spillage due to...
... turn the fan on the hood or filter. Place a pan of food on the unit before removing the pan. • Use proper pan size-This appliance is turned inward, and does not extend over adjacent surface elements-To reduce the risk of burns, ignition of flammable materials, and spillage due to...
Complete Owner's Guide (English)
Page 6
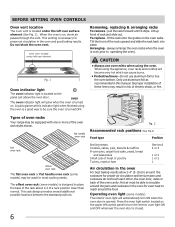
... styles shown. The oven indicator light will become very hot which can cause burns. • Protective liners-Do not use oven mitts when using the appliance, oven racks and cooktop will glow when the oven is turned on. Removing, replacing & arranging racks To remove - flat handle oven rack flat oven rack...
... styles shown. The oven indicator light will become very hot which can cause burns. • Protective liners-Do not use oven mitts when using the appliance, oven racks and cooktop will glow when the oven is turned on. Removing, replacing & arranging racks To remove - flat handle oven rack flat oven rack...

Complete Owner's Guide (English)
Page 7
.... Home Canning Be sure to use smaller diameter canners on metal - It is recommended to read all the following points when home canning with your appliance. Glass - Check with the USDA (United States Department of the cookware (See Fig. 1). IMPORTANT NEVER place or straddle a cooking utensil over 2 different surface cooking elements...
.... Home Canning Be sure to use smaller diameter canners on metal - It is recommended to read all the following points when home canning with your appliance. Glass - Check with the USDA (United States Department of the cookware (See Fig. 1). IMPORTANT NEVER place or straddle a cooking utensil over 2 different surface cooking elements...

Complete Owner's Guide (English)
Page 11
... a dishcloth and be sure to squeeze excess water from the panel. Rinse and wipe dry with an ammonia-soaked paper towel for 30 to the appliance. Excess water in water. Rinse with clean water and dry. they can scratch. Rinse using hot, soapy water and a dishcloth. Rinse with a damp cloth and...
... a dishcloth and be sure to squeeze excess water from the panel. Rinse and wipe dry with an ammonia-soaked paper towel for 30 to the appliance. Excess water in water. Rinse with clean water and dry. they can scratch. Rinse using hot, soapy water and a dishcloth. Rinse with a damp cloth and...
Complete Owner's Guide (English)
Page 13
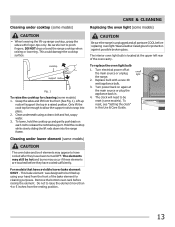
...CARE & CLEANING Replacing the oven light (some models) CAUTION • When lowering the lift-up range cooktop, grasp the sides with a new 40 watt appliance bulb. 3. This bake element was designed to snap into the range frame. The clock will support the top in a raised position. The elements may still...will need to be hot and burns may appear to release the notched support. Turn electrical power off at the main source or plug the appliance back in this Use & Care Guide. 13 DO NOT drop or bend the range cooktop when raising or lowering. Do not to pinch ...
...CARE & CLEANING Replacing the oven light (some models) CAUTION • When lowering the lift-up range cooktop, grasp the sides with a new 40 watt appliance bulb. 3. This bake element was designed to snap into the range frame. The clock will support the top in a raised position. The elements may still...will need to be hot and burns may appear to release the notched support. Turn electrical power off at the main source or plug the appliance back in this Use & Care Guide. 13 DO NOT drop or bend the range cooktop when raising or lowering. Do not to pinch ...

Complete Owner's Guide (English)
Page 15
...is ON for the desired cooking feature. Be sure cabinets are attempting to stand in Setting Oven Controls section. • Foods with appliance. Flat pans heat better than warped pans. Contact your local electric company for service. • Be sure the oven controls are ...base of grease left on oven surfaces. Contact builder or installer to correct the situation. • Poor installation. Provide sufficient space so appliance can cause high enough temperatures to provide proper clearance between the meat & the element. Also see "Replacing the oven light" in center...
...is ON for the desired cooking feature. Be sure cabinets are attempting to stand in Setting Oven Controls section. • Foods with appliance. Flat pans heat better than warped pans. Contact your local electric company for service. • Be sure the oven controls are ...base of grease left on oven surfaces. Contact builder or installer to correct the situation. • Poor installation. Provide sufficient space so appliance can cause high enough temperatures to provide proper clearance between the meat & the element. Also see "Replacing the oven light" in center...

Complete Owner's Guide (English)
Page 16
... FROM ANY BREACH OF THIS WRITTEN LIMITED WARRANTY OR ANY IMPLIED WARRANTY. Surcharges including, but not limited to use your appliance is warranted by Electrolux Canada Corp. SOME STATES AND PROVINCES DO NOT ALLOW THE EXCLUSION OR LIMITATION OF INCIDENTAL OR CONSEQUENTIAL...holiday service calls, tolls, ferry trip charges, or mileage expense for repairing or replacing any refrigerator or freezer failures. 6. MAJOR APPLIANCE WARRANTY Your appliance is covered by a one year from your receipt, delivery slip, or some other appropriate payment record to change without notice....
... FROM ANY BREACH OF THIS WRITTEN LIMITED WARRANTY OR ANY IMPLIED WARRANTY. Surcharges including, but not limited to use your appliance is warranted by Electrolux Canada Corp. SOME STATES AND PROVINCES DO NOT ALLOW THE EXCLUSION OR LIMITATION OF INCIDENTAL OR CONSEQUENTIAL...holiday service calls, tolls, ferry trip charges, or mileage expense for repairing or replacing any refrigerator or freezer failures. 6. MAJOR APPLIANCE WARRANTY Your appliance is covered by a one year from your receipt, delivery slip, or some other appropriate payment record to change without notice....