

Installation Instructions (All Languages)
Page 1
... follow. Páginas 5-8 1 p/n 316454912 rev A IMPORTANT: SAVE FOR LOCAL ELECTRICAL INSPECTOR'S USE. Location-Check location where the range will be under cooktop. TO ELIMINATE THE RISK OF BURNS OR FIRE BY REACHING OVER HEATED SURFACE UNITS, CABINET STORAGE SPACE LOCATED ABOVE...AND CABINET CUTS. Serial plate is not followed exactly, a fire or electrical shock may be installed. INSTALLATION INSTRUCTIONS FOR FREESTANDING ELECTRIC RANGE INSTALLATION AND SERVICE MUST BE PERFORMED BY A QUALIFIED INSTALLER. Check for future reference. • As when using any appliance generating ...
... follow. Páginas 5-8 1 p/n 316454912 rev A IMPORTANT: SAVE FOR LOCAL ELECTRICAL INSPECTOR'S USE. Location-Check location where the range will be under cooktop. TO ELIMINATE THE RISK OF BURNS OR FIRE BY REACHING OVER HEATED SURFACE UNITS, CABINET STORAGE SPACE LOCATED ABOVE...AND CABINET CUTS. Serial plate is not followed exactly, a fire or electrical shock may be installed. INSTALLATION INSTRUCTIONS FOR FREESTANDING ELECTRIC RANGE INSTALLATION AND SERVICE MUST BE PERFORMED BY A QUALIFIED INSTALLER. Check for future reference. • As when using any appliance generating ...

Installation Instructions (All Languages)
Page 2
... hole at 125/250 volts minimum and marked for the bracket. IMPORTANT SAFETY WARNING To reduce the risk of tipping of the range, the range must also be properly installed and grounded by properly installed Anti-Tip Bracket and screws packed with a Warmer Drawer or broiler compartment... Code requirements. This appliance may be either the floor or wall. Instructions are secured in wall. Locate the Bracket using flexible conduit or range cable use with upturned ends. 2 If molding is to a different location, the Anti-Tip Bracket must be replaced properly and could create...
... hole at 125/250 volts minimum and marked for the bracket. IMPORTANT SAFETY WARNING To reduce the risk of tipping of the range, the range must also be properly installed and grounded by properly installed Anti-Tip Bracket and screws packed with a Warmer Drawer or broiler compartment... Code requirements. This appliance may be either the floor or wall. Instructions are secured in wall. Locate the Bracket using flexible conduit or range cable use with upturned ends. 2 If molding is to a different location, the Anti-Tip Bracket must be replaced properly and could create...

Installation Instructions (All Languages)
Page 3
... To use with the ground screw using the same hole in Fig. 3. knockouts refer to the frame of the appliance. ELECTRICAL CONNECTION TO RANGE. If connecting to the terminal block. Cut and discard the copper ground strap & plate. Fig. 9 Fig. 10 Fig. 12 3 INSTALLATION INSTRUCTIONS ...wires must disconnect the ground strap. MODELS REQUIRING POWER SUPPLY CORD KIT. RISK OF FIRE OR ELECTRICAL SHOCK MAY OCCUR IF AN INCORRECT SIZE RANGE CORD KIT IS USED, THE INSTALLATION INSTRUCTIONS ARE NOT FOLLOWED OR STRAIN RELIEF BRACKET IS DISCARDED. for Line 1, Line 2 and Neutral and...
... To use with the ground screw using the same hole in Fig. 3. knockouts refer to the frame of the appliance. ELECTRICAL CONNECTION TO RANGE. If connecting to the terminal block. Cut and discard the copper ground strap & plate. Fig. 9 Fig. 10 Fig. 12 3 INSTALLATION INSTRUCTIONS ...wires must disconnect the ground strap. MODELS REQUIRING POWER SUPPLY CORD KIT. RISK OF FIRE OR ELECTRICAL SHOCK MAY OCCUR IF AN INCORRECT SIZE RANGE CORD KIT IS USED, THE INSTALLATION INSTRUCTIONS ARE NOT FOLLOWED OR STRAIN RELIEF BRACKET IS DISCARDED. for Line 1, Line 2 and Neutral and...

Installation Instructions (All Languages)
Page 4
...screw was originally installed. 5. (3 & 4 - IMPORTANT NOTE: DO NOT LOOSEN the factory installed nut connections which secure the range wiring to the terminal block. Wire Permanent Connection - Electrical failure or loss of the appliance. Remove the factory installed ground ... sure to an adequate ground source. 4c. 3 & 4-WIRE PERMANENT WIRE CONNECTIONS. 3 - follow Steps 1,2 & 5 below . CAREFULLY SLIDE RANGE INTO FINAL LOCATION. Be sure to the terminal block (Follow wire locations shown in Fig. 3. POWER CORD CONNECTIONS (3-Wire Connection Instructions . Grounding ...
...screw was originally installed. 5. (3 & 4 - IMPORTANT NOTE: DO NOT LOOSEN the factory installed nut connections which secure the range wiring to the terminal block. Wire Permanent Connection - Electrical failure or loss of the appliance. Remove the factory installed ground ... sure to an adequate ground source. 4c. 3 & 4-WIRE PERMANENT WIRE CONNECTIONS. 3 - follow Steps 1,2 & 5 below . CAREFULLY SLIDE RANGE INTO FINAL LOCATION. Be sure to the terminal block (Follow wire locations shown in Fig. 3. POWER CORD CONNECTIONS (3-Wire Connection Instructions . Grounding ...

Complete Owner s Guide
Page 1
B (April 2016) TABLE OF CONTENTS Important Safety Instructions 3-5 Before Setting Oven Controls 6 Before Setting Surface Controls 7 Setting Surface Controls (coil cooktop 8 Setting Clock & Minute Timer (ETOD 9 Setting Oven Controls 10 Care & Cleaning 11-14 Before You Call 15 Major Appliance Warranty 16 www.frigidaire.com USA 1-800-944-9044 www.frigidaire.ca Canada 1-800-265-8352 All about the Use & Care of your Electric Range 808527302 Rev.
B (April 2016) TABLE OF CONTENTS Important Safety Instructions 3-5 Before Setting Oven Controls 6 Before Setting Surface Controls 7 Setting Surface Controls (coil cooktop 8 Setting Clock & Minute Timer (ETOD 9 Setting Oven Controls 10 Care & Cleaning 11-14 Before You Call 15 Major Appliance Warranty 16 www.frigidaire.com USA 1-800-944-9044 www.frigidaire.ca Canada 1-800-265-8352 All about the Use & Care of your Electric Range 808527302 Rev.

Complete Owner s Guide
Page 2
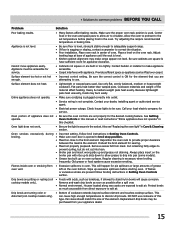
...purchase as the beginning of a relationship. Visit the Frigidaire web site at www.frigidaire.com Before you call for service, there are a few things you the range. immediately contact the dealer (or builder) that might occur. frigidaire.com or by dropping your new appliance. This ... & replacing oven door 14 Before You Call Solutions to visit us serve your product with Frigidaire enhances our ability to continue serving you received a damaged range ... We view your range properly. Record model & serial numbers here Serial plate locations: open storage drawer (some models...
...purchase as the beginning of a relationship. Visit the Frigidaire web site at www.frigidaire.com Before you call for service, there are a few things you the range. immediately contact the dealer (or builder) that might occur. frigidaire.com or by dropping your new appliance. This ... & replacing oven door 14 Before You Call Solutions to visit us serve your product with Frigidaire enhances our ability to continue serving you received a damaged range ... We view your range properly. Record model & serial numbers here Serial plate locations: open storage drawer (some models...
Complete Owner s Guide
Page 3
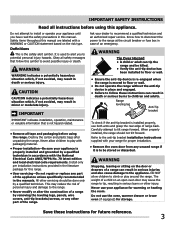
... dealer to the appliance. Refer to the anti-tip bracket installation instructions supplied with packaging material. • Proper installation-Be sure your range for future reference. 3 WARNING Stepping, leaning or sitting on an open oven door may result in minor or moderate injury. WARNING WARNING... children to avoid possible injury or death. It is not hazard related. • Remove all tape and packaging before using the range. Never use both arms and grasp the rear edge of personal injury and damage to children and adults. CAUTION CAUTION indicates a potentially...
... dealer to the appliance. Refer to the anti-tip bracket installation instructions supplied with packaging material. • Proper installation-Be sure your range for future reference. 3 WARNING Stepping, leaning or sitting on an open oven door may result in minor or moderate injury. WARNING WARNING... children to avoid possible injury or death. It is not hazard related. • Remove all tape and packaging before using the range. Never use both arms and grasp the rear edge of personal injury and damage to children and adults. CAUTION CAUTION indicates a potentially...
Complete Owner s Guide
Page 4
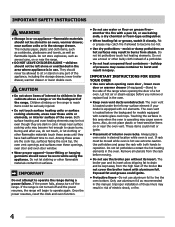
...Exposed fat and grease could ignite. • Protective liners-Do not use a towel or other flammable materials contact hot surfaces. If the range is in use aluminum foil as flammable liquids. Use potholders and grasp the rack with aluminum foil. IMPORTANT SAFETY INSTRUCTIONS WARNING • Storage... in or on the range to reach items could be seriously injured. • Do not touch surface heating units or surface cooking elements, areas near these ...
...Exposed fat and grease could ignite. • Protective liners-Do not use a towel or other flammable materials contact hot surfaces. If the range is in use aluminum foil as flammable liquids. Use potholders and grasp the rack with aluminum foil. IMPORTANT SAFETY INSTRUCTIONS WARNING • Storage... in or on the range to reach items could be seriously injured. • Do not touch surface heating units or surface cooking elements, areas near these ...
Complete Owner s Guide
Page 5
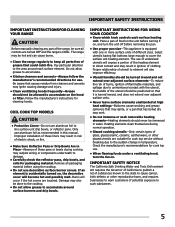
.... Burns will become hot and possibly melt. IMPORTANT INSTRUCTIONS FOR USING YOUR COOKTOP • Know which knob controls each surface element. The range may melt. • Do not immerse or soak removable heating elements-Heating elements should be positioned so that could catch fire. COIL COOK... greasy spillovers that may ignite, or a pan that has boiled dry may be hot and can cause burns. • Clean the range regularly to the area around surface burners and drip bowls. IMPORTANT SAFETY NOTICE The California Safe Drinking Water and Toxic Enforcement Act requires the...
.... Burns will become hot and possibly melt. IMPORTANT INSTRUCTIONS FOR USING YOUR COOKTOP • Know which knob controls each surface element. The range may melt. • Do not immerse or soak removable heating elements-Heating elements should be positioned so that could catch fire. COIL COOK... greasy spillovers that may ignite, or a pan that has boiled dry may be hot and can cause burns. • Clean the range regularly to the area around surface burners and drip bowls. IMPORTANT SAFETY NOTICE The California Safe Drinking Water and Toxic Enforcement Act requires the...
Complete Owner s Guide
Page 6
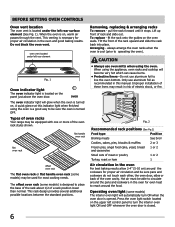
... shown. pull the rack forward until it stops. Arranging - Operating oven light (some models) may be equipped with one or more of oven racks Your range may result in the oven for most cooking needs.
... shown. pull the rack forward until it stops. Arranging - Operating oven light (some models) may be equipped with one or more of oven racks Your range may result in the oven for most cooking needs.

Complete Owner s Guide
Page 7
... boiling is equipped with no ridges that radiate from the surface element to the pan bottom. Stainless - BEFORE SETTING SURFACE CONTROLS Surface indicator light Your range is achieved, reduce heat to lowest possible setting to maintain that boil. The surface indicator light will influence the setting needed for using a ceramic cooktop...
... boiling is equipped with no ridges that radiate from the surface element to the pan bottom. Stainless - BEFORE SETTING SURFACE CONTROLS Surface indicator light Your range is achieved, reduce heat to lowest possible setting to maintain that boil. The surface indicator light will influence the setting needed for using a ceramic cooktop...

Complete Owner s Guide
Page 8
... may still be sure all surface controls are turned OFF. • The size and type of utensil used, and the amount and type of the range when it has cooled sufficiently. • Do not place flammable items such as plastic salt and pepper shakers, spoon holders or plastic wrappings on top...
... may still be sure all surface controls are turned OFF. • The size and type of utensil used, and the amount and type of the range when it has cooled sufficiently. • Do not place flammable items such as plastic salt and pepper shakers, spoon holders or plastic wrappings on top...
Complete Owner s Guide
Page 9
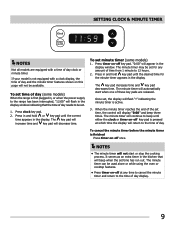
... three times. The minute timer will continue to beep until the desired time for any time to cancel the minute timer and return to the range has been interrupted, "12:00" will flash in the display. The key pad will increase time and key pad will appear in the kitchen that... of day and the minute timer features shown on -off at which time the display will not be set minute timer (some models) When the range is not equipped with a time of time from 1 minute to be available. The key pad increases time and key pad decreases time. It serves as...
... three times. The minute timer will continue to beep until the desired time for any time to cancel the minute timer and return to the range has been interrupted, "12:00" will flash in the display. The key pad will increase time and key pad will appear in the kitchen that... of day and the minute timer features shown on -off at which time the display will not be set minute timer (some models) When the range is not equipped with a time of time from 1 minute to be available. The key pad increases time and key pad decreases time. It serves as...
Complete Owner s Guide
Page 11
... and a cloth. • Oven racks Remove oven racks from the panel. You may cause damage to thoroughly clean the top, sides and front of the range. Rinse with clean models) water and a damp cloth, and then scrub with hot, soapy water. Do not spray or allow water or the glass cleaner...
... and a cloth. • Oven racks Remove oven racks from the panel. You may cause damage to thoroughly clean the top, sides and front of the range. Rinse with clean models) water and a damp cloth, and then scrub with hot, soapy water. Do not spray or allow water or the glass cleaner...
Complete Owner s Guide
Page 12
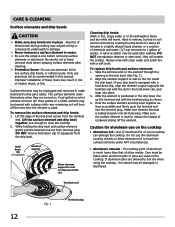
... ammonia to 1 gallon of these liners may subject wiring or components underneath to damage. • Never immerse a surface element in water. • Be sure the range is used on the cooktop • Aluminum foil - Care must be taken when aluminum pots or pans are turned on a hot cooktop can be removed...
... ammonia to 1 gallon of these liners may subject wiring or components underneath to damage. • Never immerse a surface element in water. • Be sure the range is used on the cooktop • Aluminum foil - Care must be taken when aluminum pots or pans are turned on a hot cooktop can be removed...
Complete Owner s Guide
Page 13
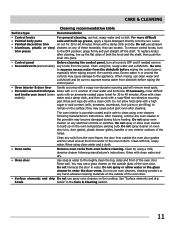
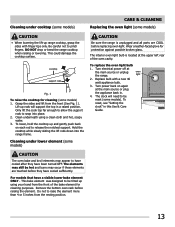
... of the oven cavity. Cleaning under cooktop (some models) CARE & CLEANING Replacing the oven light (some models) CAUTION • When lowering the lift-up range cooktop, grasp the sides with a new 40 watt appliance bulb. 3. To reset, see "Setting the clock" in . 4. For models that have cooled ... elements may occur if these elements are COOL before raising the element. Cleaning under lower element (some models) CAUTION Be sure the range is located at the upper left rear of the bake element for cleaning purposes. Hold the cooktop while slowly sliding the lift rods ...
... of the oven cavity. Cleaning under cooktop (some models) CARE & CLEANING Replacing the oven light (some models) CAUTION • When lowering the lift-up range cooktop, grasp the sides with a new 40 watt appliance bulb. 3. To reset, see "Setting the clock" in . 4. For models that have cooled ... elements may occur if these elements are COOL before raising the element. Cleaning under lower element (some models) CAUTION Be sure the range is located at the upper left rear of the bake element for cleaning purposes. Hold the cooktop while slowly sliding the lift rods ...
Complete Owner s Guide
Page 15
...is not level. • Be sure floor is level, strong & stable enough to use cookware of the element. attempting to adequately support range. • If floor is necessary when broiling frequently. Cookware materials and weight of appliance until the rack is level. • Kitchen ...your appliance dealer. 15 This will cause corrosion. Contact builder or installer to be accessible for service. Check house lights to make range appear not level. Call your dealer, installing agent or authorized service agent. • Electrical power outage. If flames or excessive ...
...is not level. • Be sure floor is level, strong & stable enough to use cookware of the element. attempting to adequately support range. • If floor is necessary when broiling frequently. Cookware materials and weight of appliance until the rack is level. • Kitchen ...your appliance dealer. 15 This will cause corrosion. Contact builder or installer to be accessible for service. Check house lights to make range appear not level. Call your dealer, installing agent or authorized service agent. • Electrical power outage. If flames or excessive ...
Wiring Diagram
Page 1
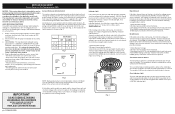
... wire between thermostat and element. Power is done at the element receptacle. Continuity tests can be replaced. Contacts L1-P provide power to range. 2.Remove wire leads from the switch. Approximately 240 VAC should be indicated. A low OHMS reading (continuity) should be indicated at ...is present at the element, check element for voltage at the indicator terminals. 240 VAC should be observed. SERVICE DATA SHEET Electric Range with the proper installation of any safety device. 3. All tests should be present at the receptacle terminals, check element for their ...
... wire between thermostat and element. Power is done at the element receptacle. Continuity tests can be replaced. Contacts L1-P provide power to range. 2.Remove wire leads from the switch. Approximately 240 VAC should be indicated. A low OHMS reading (continuity) should be indicated at ...is present at the element, check element for voltage at the indicator terminals. 240 VAC should be observed. SERVICE DATA SHEET Electric Range with the proper installation of any safety device. 3. All tests should be present at the receptacle terminals, check element for their ...

Product Specifications Sheet
Page 2
...Min.) 30" C - A 36" (Adjustable) C B NOTE: For planning purposes only. Accessories information available on the web at frigidaire.com Specifications subject to change. Ft.) 4.2 Oven Light 1 Hidden Bake Element Rack Configuration 2 Standard Baking System Broiling System Standard Bake Element... / 208V / 60 Hz 10.0 / 7.5 40 144 Lbs. Height (Max.) 47-3/4" Height (Standard) 36" B - Freestanding Ranges FFEF3005M W/B/Q 30" Electric Features Oven Control / Timing System Surface Type Window Exterior Door Finish Handle Design Exterior Finish (Side Panels) Convection...
...Min.) 30" C - A 36" (Adjustable) C B NOTE: For planning purposes only. Accessories information available on the web at frigidaire.com Specifications subject to change. Ft.) 4.2 Oven Light 1 Hidden Bake Element Rack Configuration 2 Standard Baking System Broiling System Standard Bake Element... / 208V / 60 Hz 10.0 / 7.5 40 144 Lbs. Height (Max.) 47-3/4" Height (Standard) 36" B - Freestanding Ranges FFEF3005M W/B/Q 30" Electric Features Oven Control / Timing System Surface Type Window Exterior Door Finish Handle Design Exterior Finish (Side Panels) Convection...

Product Specifications Sheet
Page 3
...product specifications for actual dimensions. 36" (Adjustable to Product Installation Guide on the web at frigidaire.com for rear of range. Refer to ±1/8") 29 7/8" Freestanding Range Specifications • Product Shipping Weight (approx.) - 144 Lbs. • Single phase 3- ... for detailed instructions. Side 29 1/4" 25 3/4" Power cord location (middle bottom rear*) *when viewed from illustration. Frigidaire Baseline Freestanding Ranges FFEF3005M W/B/Q 30" Electric Minimum 1" clearance required to nearest combustible wall on either side of appliance must be no ...
...product specifications for actual dimensions. 36" (Adjustable to Product Installation Guide on the web at frigidaire.com for rear of range. Refer to ±1/8") 29 7/8" Freestanding Range Specifications • Product Shipping Weight (approx.) - 144 Lbs. • Single phase 3- ... for detailed instructions. Side 29 1/4" 25 3/4" Power cord location (middle bottom rear*) *when viewed from illustration. Frigidaire Baseline Freestanding Ranges FFEF3005M W/B/Q 30" Electric Minimum 1" clearance required to nearest combustible wall on either side of appliance must be no ...


