

Installation Instructions (All Languages)
Page 1
... combustible surfaces. 2. Dimensions that are certain safety precautions you should be used. Fig. 1 Fig. 2 Fig. 3 30" *30" MINIMUM CLEARANCE BETWEEN THE TOP OF THE COOKING SURFACE AND THE BOTTOM OF AN UNPROTECTED WOOD OR METAL CABINET; Serial Plate Locations: If the information in these installation instructions before installing range. • Remove all packing material from the oven compartments before connecting the gas & electrical supply to the range. •...
... combustible surfaces. 2. Dimensions that are certain safety precautions you should be used. Fig. 1 Fig. 2 Fig. 3 30" *30" MINIMUM CLEARANCE BETWEEN THE TOP OF THE COOKING SURFACE AND THE BOTTOM OF AN UNPROTECTED WOOD OR METAL CABINET; Serial Plate Locations: If the information in these installation instructions before installing range. • Remove all packing material from the oven compartments before connecting the gas & electrical supply to the range. •...

Installation Instructions (All Languages)
Page 2
... grounding through neutral require a four (4) conductor power supply cord kit rated at an approximate 20° downward angle (See Fig. 5). Models with a Warmer Drawer or broiler compartment, grasp the top rear edge of the range will be either closed loop or open door or if a child climbs upon it forward. 1. INSTALLATION INSTRUCTIONS FOR FREESTANDING ELECTRIC RANGE BEFORE STARTING Tools You Will Need For leveling legs and Anti-Tip Bracket: • Adjustable wrench or channel...
... grounding through neutral require a four (4) conductor power supply cord kit rated at an approximate 20° downward angle (See Fig. 5). Models with a Warmer Drawer or broiler compartment, grasp the top rear edge of the range will be either closed loop or open door or if a child climbs upon it forward. 1. INSTALLATION INSTRUCTIONS FOR FREESTANDING ELECTRIC RANGE BEFORE STARTING Tools You Will Need For leveling legs and Anti-Tip Bracket: • Adjustable wrench or channel...

Installation Instructions (All Languages)
Page 3
... screw. 4. INSTALLATION INSTRUCTIONS FOR FREESTANDING ELECTRIC RANGE 2b. MODELS REQUIRING POWER SUPPLY CORD KIT. Terminals on wall Required for new and remodeled installations 4-Wire Wall receptacle (14-50R) Allowed for use either closed loop or open-end spade lugs with ranges shall be connected by means of the appliance with the strain relief and install (Also see Figs. 9, 10 & 11). 2. Cord must be accessible. 3 & 4 - for 3-Wire connections. 3. hole as shown. Rear Access Cover Fig...
... screw. 4. INSTALLATION INSTRUCTIONS FOR FREESTANDING ELECTRIC RANGE 2b. MODELS REQUIRING POWER SUPPLY CORD KIT. Terminals on wall Required for new and remodeled installations 4-Wire Wall receptacle (14-50R) Allowed for use either closed loop or open-end spade lugs with ranges shall be connected by means of the appliance with the strain relief and install (Also see Figs. 9, 10 & 11). 2. Cord must be accessible. 3 & 4 - for 3-Wire connections. 3. hole as shown. Rear Access Cover Fig...

Installation Instructions (All Languages)
Page 4
... 4. 4. (4-Wire Permanent Connection ONLY) Connect the ground wire lead (Green) to Fig. 13). 1. Always use 10 ga. Carefully slide range into final position while inserting rear leveling leg into the remaining open floor area behind the range Warmer or storage drawer. Always use 10 gauge wire or larger. 5. Electrical failure or loss of electrical connection may occur if these 3 nuts are loosened or removed. Before wiring the range, review the suggested power source location drawings...
... 4. 4. (4-Wire Permanent Connection ONLY) Connect the ground wire lead (Green) to Fig. 13). 1. Always use 10 ga. Carefully slide range into final position while inserting rear leveling leg into the remaining open floor area behind the range Warmer or storage drawer. Always use 10 gauge wire or larger. 5. Electrical failure or loss of electrical connection may occur if these 3 nuts are loosened or removed. Before wiring the range, review the suggested power source location drawings...

Complete Owner s Guide
Page 2
... Surface Controls 8 Operating surface elements 8 Setting Clock & Minute Timer (some models 9 Setting the clock 9 Setting the minute timer 9 Setting Oven Controls 10 Bake 10 Broil 10 Care & Cleaning 11-14 Cleaning recommendation table 11 Surface elements and drip bowls 12 Cautions for aluminum use 12 Replacing the oven light 13 Removing & replacing oven door 14 Before You Call Solutions to serve you. Visit the Frigidaire web site at www.frigidaire.com for a complete line of a relationship. Check the section titled "Before you received a damaged range ... Save time...
... Surface Controls 8 Operating surface elements 8 Setting Clock & Minute Timer (some models 9 Setting the clock 9 Setting the minute timer 9 Setting Oven Controls 10 Bake 10 Broil 10 Care & Cleaning 11-14 Cleaning recommendation table 11 Surface elements and drip bowls 12 Cautions for aluminum use 12 Replacing the oven light 13 Removing & replacing oven door 14 Before You Call Solutions to serve you. Visit the Frigidaire web site at www.frigidaire.com for a complete line of a relationship. Check the section titled "Before you received a damaged range ... Save time...
Complete Owner s Guide
Page 3
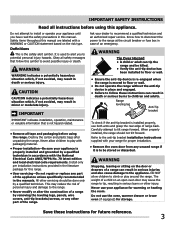
... operate your dealer to recommend a qualified technician and an authorized repair service. WARNING Tip Over Hazard • A child or adult can result in case of the range. It is to be done only by removing the leveling legs, panels, wire covers, anti-tip brackets/screws, or any part of a child on an open oven door may result in serious burns or other part of an emergency. IMPORTANT SAFETY INSTRUCTIONS...
... operate your dealer to recommend a qualified technician and an authorized repair service. WARNING Tip Over Hazard • A child or adult can result in case of the range. It is to be done only by removing the leveling legs, panels, wire covers, anti-tip brackets/screws, or any part of a child on an open oven door may result in serious burns or other part of an emergency. IMPORTANT SAFETY INSTRUCTIONS...
Complete Owner s Guide
Page 4
... heat of pressure may be moved while oven is cool. smother the fire with ceramic-glass cook tops. buildup of the broiler. IMPORTANT INSTRUCTIONS FOR USING YOUR OVEN • Use care when opening oven door , lower oven door or warmer drawer (if equipped)-Stand to cool. If rack must be hot even though they are the cook top, surfaces facing the cook top, the oven vent openings and surfaces near these areas until they have had sufficient time...
... heat of pressure may be moved while oven is cool. smother the fire with ceramic-glass cook tops. buildup of the broiler. IMPORTANT INSTRUCTIONS FOR USING YOUR OVEN • Use care when opening oven door , lower oven door or warmer drawer (if equipped)-Stand to cool. If rack must be hot even though they are the cook top, surfaces facing the cook top, the oven vent openings and surfaces near these areas until they have had sufficient time...
Complete Owner s Guide
Page 5
... for cook top service without breaking due to the sudden change in this manual. Pay particular attention to the area around surface burners and drip bowls. IMPORTANT SAFETY INSTRUCTIONS IMPORTANT INSTRUCTIONS FOR CLEANING YOUR RANGE CAUTION Before manually cleaning any part of the range, be allowed to accumulate on the hood or filter. Check the manufacturer's recommendations for cook top use . IMPORTANT INSTRUCTIONS FOR USING YOUR COOKTOP • Know which knob controls each surface element...
... for cook top service without breaking due to the sudden change in this manual. Pay particular attention to the area around surface burners and drip bowls. IMPORTANT SAFETY INSTRUCTIONS IMPORTANT INSTRUCTIONS FOR CLEANING YOUR RANGE CAUTION Before manually cleaning any part of the range, be allowed to accumulate on the hood or filter. Check the manufacturer's recommendations for cook top use . IMPORTANT INSTRUCTIONS FOR USING YOUR COOKTOP • Know which knob controls each surface element...
Complete Owner s Guide
Page 6
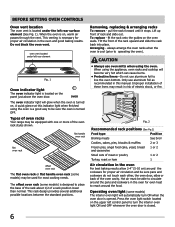
.... oven vent located under the left control panel to turn ON when the oven door is turned OFF. flat handle oven rack flat oven rack offset oven rack The flat oven rack or flat handle oven rack (some models) may be used for proper air circulation and be able to circulate around the food. To replace - fit the rack onto the guides on the panel just above the oven door. always arrange the oven racks when the oven is located under left rear element Fig. 1 Oven indicator light The oven indicator light...
.... oven vent located under the left control panel to turn ON when the oven door is turned OFF. flat handle oven rack flat oven rack offset oven rack The flat oven rack or flat handle oven rack (some models) may be used for proper air circulation and be able to circulate around the food. To replace - fit the rack onto the guides on the panel just above the oven door. always arrange the oven racks when the oven is located under left rear element Fig. 1 Oven indicator light The oven indicator light...

Complete Owner s Guide
Page 7
... no ridges that boil. A slow heat conductor however will influence the setting needed for using a ceramic cooktop. • Make sure the diameter of the canner does not exceed 1 inch beyond the surface element markings or burner. Glass - IMPORTANT NEVER place or straddle a cooking utensil over 2 different surface cooking elements at this indicator light when finished surface cooking on the panel just above the oven door. Be sure to read all the...
... no ridges that boil. A slow heat conductor however will influence the setting needed for using a ceramic cooktop. • Make sure the diameter of the canner does not exceed 1 inch beyond the surface element markings or burner. Glass - IMPORTANT NEVER place or straddle a cooking utensil over 2 different surface cooking elements at this indicator light when finished surface cooking on the panel just above the oven door. Be sure to read all the...

Complete Owner s Guide
Page 8
... cooking High (Hi - 9) Start most surface cooking on top of pans. The element surface may still be set exactly on surface element. 2. Improper installation of these liners may vary when using other types of the range when it is an easy check to line surface drip bowls, or reflector pans. To operate surface elements: 1. in risk of heat at this indicator light when finished surface cooking is in this manual. Start most foods, bring water to a boil, pan broiling...
... cooking High (Hi - 9) Start most surface cooking on top of pans. The element surface may still be set exactly on surface element. 2. Improper installation of these liners may vary when using other types of the range when it is an easy check to line surface drip bowls, or reflector pans. To operate surface elements: 1. in risk of heat at this indicator light when finished surface cooking is in this manual. Start most foods, bring water to a boil, pan broiling...

Complete Owner s Guide
Page 10
...; Place the broiler pan on the insert. Leave the oven door open at the broil setting. Flour may be necessary to reduce the oven temperature or cook time to prevent overbrowning of some models) allows grease to OFF. Fig. 4 Broil pan Fig. 3 Broil Stop Position Fig. 5 CAUTION • The broiler pan and the insert (some foods. See "Arranging oven racks" in dark or overbrowning of the broiler. Turn the oven temp control knob (See Fig...
...; Place the broiler pan on the insert. Leave the oven door open at the broil setting. Flour may be necessary to reduce the oven temperature or cook time to prevent overbrowning of some models) allows grease to OFF. Fig. 4 Broil pan Fig. 3 Broil Stop Position Fig. 5 CAUTION • The broiler pan and the insert (some foods. See "Arranging oven racks" in dark or overbrowning of the broiler. Turn the oven temp control knob (See Fig...
Complete Owner s Guide
Page 11
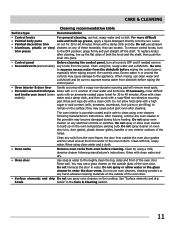
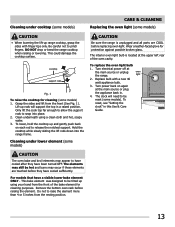
... following manufacturer's instructions. To remove control knobs, turn all controls OFF and if needed remove • Decorative trim (some spots with a 1:1 solution of both the knob and the shaft; If necessary, cover difficult and broiler pan insert (some models) any knobs from the oven frame, the door liner outside the oven door gasket and the small area at the front center of these materials; See "Surface elements and drip bowls bowls...
... following manufacturer's instructions. To remove control knobs, turn all controls OFF and if needed remove • Decorative trim (some spots with a 1:1 solution of both the knob and the shaft; If necessary, cover difficult and broiler pan insert (some models) any knobs from the oven frame, the door liner outside the oven door gasket and the small area at the front center of these materials; See "Surface elements and drip bowls bowls...
Complete Owner s Guide
Page 13
... glass. light 2. For models that have been turned OFF. Cleaning under lower element (some models) CAUTION • When lowering the lift-up range cooktop, grasp the sides with a new 40 watt appliance bulb. 3. Turn electrical power off at the main source or plug the appliance back in this Use & Care Guide. The elements may appear to be reset (some models) 1. Grasp the sides and lift from the front of the oven...
... glass. light 2. For models that have been turned OFF. Cleaning under lower element (some models) CAUTION • When lowering the lift-up range cooktop, grasp the sides with a new 40 watt appliance bulb. 3. Turn electrical power off at the main source or plug the appliance back in this Use & Care Guide. The elements may appear to be reset (some models) 1. Grasp the sides and lift from the front of the oven...
Complete Owner s Guide
Page 15
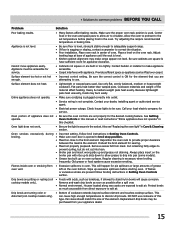
... broiling instructions in Setting Oven Controls section. Call your dealer, installing agent or authorized service agent. • Electrical power outage. Also see "Replacing the oven light" in the oven and space pans to allow grease to drip into pan (some models). • Grease has built up & slots down to allow air to salt air. Flames inside oven or smoking from direct exposure to circulate. Wipe up and grease not draining. Remove and wash drip...
... broiling instructions in Setting Oven Controls section. Call your dealer, installing agent or authorized service agent. • Electrical power outage. Also see "Replacing the oven light" in the oven and space pans to allow grease to drip into pan (some models). • Grease has built up & slots down to allow air to salt air. Flames inside oven or smoking from direct exposure to circulate. Wipe up and grease not draining. Remove and wash drip...

Complete Owner s Guide
Page 16
... provided instructions. Products purchased "as described or illustrated are not covered by this warranty. 5. Food loss due to any after hour, weekend, or holiday service calls, tolls, ferry trip charges, or mileage expense for service calls to repair or replace appliance light bulbs, air filters, water filters, other consumables, or knobs, handles, or other than genuine Electrolux parts or parts obtained from its original owner to...
... provided instructions. Products purchased "as described or illustrated are not covered by this warranty. 5. Food loss due to any after hour, weekend, or holiday service calls, tolls, ferry trip charges, or mileage expense for service calls to repair or replace appliance light bulbs, air filters, water filters, other consumables, or knobs, handles, or other than genuine Electrolux parts or parts obtained from its original owner to...
Wiring Diagram
Page 1
... indicated across terminals, check for use of heat settings for voltage at the indicator terminals. 240 VAC should be present at the element receptacle with power to the range disconnected, and wiring removed from electrical outlet, trip circuit breaker to service, ensure that the service technician reestablish all metal parts and panels. • All safety grounds (both internal and external) are closed when a bake temperature is indicated, element must be replaced...
... indicated across terminals, check for use of heat settings for voltage at the indicator terminals. 240 VAC should be present at the element receptacle with power to the range disconnected, and wiring removed from electrical outlet, trip circuit breaker to service, ensure that the service technician reestablish all metal parts and panels. • All safety grounds (both internal and external) are closed when a bake temperature is indicated, element must be replaced...

Product Specifications Sheet
Page 1
...-To-Use Features Manual Clean Oven Lift-Up Porcelain Cooktop Chrome Drip Bowls Towel-Bar Handle 2 Oven Racks Available in: White (W) Black (B) Bisque (Q) Elements Right Front Right Rear Left Front Left Rear Size 6" 8" 8" 6" Watts 1,250 2,100 2,100 1,250 Signature Features Store-More™ Storage Drawer Our convenient drawer gives you extra storage space in your kitchen. frigidaire.com Bright Lighting Our bright lighting makes it easy to see what 's cooking without opening the door...
...-To-Use Features Manual Clean Oven Lift-Up Porcelain Cooktop Chrome Drip Bowls Towel-Bar Handle 2 Oven Racks Available in: White (W) Black (B) Bisque (Q) Elements Right Front Right Rear Left Front Left Rear Size 6" 8" 8" 6" Watts 1,250 2,100 2,100 1,250 Signature Features Store-More™ Storage Drawer Our convenient drawer gives you extra storage space in your kitchen. frigidaire.com Bright Lighting Our bright lighting makes it easy to see what 's cooking without opening the door...

Product Specifications Sheet
Page 2
... (Side Panels) Convection System Oven Cleaning System Drawer Functionality Mechanical / No Color-Coordinated Porcelain Large Color-Coordinated Color-Coordinated Color-Coordinated Manual Clean Storage Oven Controls Bake Yes Broil Yes Add-a-Minute Delay Start Self-Clean Quick Clean Option Delay Clean Kitchen Timer Timed Cook Option Auto Oven Shut-Off Oven Lock-Out Cooktop Features Right Front Element (Watts) Right Rear Element (Watts) Left Front Element (Watts) Left Rear Element (Watts) Center Element (Watts) Hot Surface Indicator Light Coil Cooktop / Drip Bowls 6" - 1,250...
... (Side Panels) Convection System Oven Cleaning System Drawer Functionality Mechanical / No Color-Coordinated Porcelain Large Color-Coordinated Color-Coordinated Color-Coordinated Manual Clean Storage Oven Controls Bake Yes Broil Yes Add-a-Minute Delay Start Self-Clean Quick Clean Option Delay Clean Kitchen Timer Timed Cook Option Auto Oven Shut-Off Oven Lock-Out Cooktop Features Right Front Element (Watts) Right Rear Element (Watts) Left Front Element (Watts) Left Rear Element (Watts) Center Element (Watts) Hot Surface Indicator Light Coil Cooktop / Drip Bowls 6" - 1,250...

Product Specifications Sheet
Page 3
.... Follow all dimension requirements provided to nearest combustible wall on both sides of line with ground. • Connected Load (kW Rating) @ 240 / 208 Volts = 10.0 / 7.5 kW • Recommended Circuit Breaker - 40 Amps • Always consult local and national electric codes. • Make sure wall coverings around range can withstand heat generated by range. • Floor beneath range MUST be solid and level. • Overhead...
.... Follow all dimension requirements provided to nearest combustible wall on both sides of line with ground. • Connected Load (kW Rating) @ 240 / 208 Volts = 10.0 / 7.5 kW • Recommended Circuit Breaker - 40 Amps • Always consult local and national electric codes. • Make sure wall coverings around range can withstand heat generated by range. • Floor beneath range MUST be solid and level. • Overhead...


