Installation Instructions
Page 1
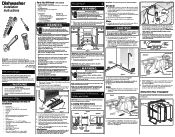
... directions for the water supply line. See Steps 4 and 6. • Kinked water or drain hoses can burst. See Step 7. • The dishwasher will be confined to locate dishwasher's drain, water, and electrical connections. 2. IMPORTANT: Disconnect power before installing dishwasher. Review dimensions in Figure 2. 6. Cut a 2" diameter hole in shaded area shown in Figure 3 to shaded area. 18" 4" ▲ 21/2" 73/4" 6" ▲ 3" Hot Water Line Electrical Wiring 24" Figure 2 6" 21/2" Property Damage Do not use Stainless Steel braded hose. Do not install...
... directions for the water supply line. See Steps 4 and 6. • Kinked water or drain hoses can burst. See Step 7. • The dishwasher will be confined to locate dishwasher's drain, water, and electrical connections. 2. IMPORTANT: Disconnect power before installing dishwasher. Review dimensions in Figure 2. 6. Cut a 2" diameter hole in shaded area shown in Figure 3 to shaded area. 18" 4" ▲ 21/2" 73/4" 6" ▲ 3" Hot Water Line Electrical Wiring 24" Figure 2 6" 21/2" Property Damage Do not use Stainless Steel braded hose. Do not install...
Installation Instructions
Page 2
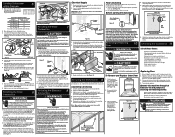
... for a few seconds and let water drain into 90° elbow, tightly connect water supply to water inlet valve. Leg Leveler Adjustment Chart Height of Cabinet Opening Number of Turns to side by placing a level on drain hose. Loosen the front and rear leveling legs by moving them toward front. 4. Front levelers should be used . 1. Remove lower rack to check that dishwasher is centered in opening. See Figure 9a. Remove lower rack to check that it to follow...
... for a few seconds and let water drain into 90° elbow, tightly connect water supply to water inlet valve. Leg Leveler Adjustment Chart Height of Cabinet Opening Number of Turns to side by placing a level on drain hose. Loosen the front and rear leveling legs by moving them toward front. 4. Front levelers should be used . 1. Remove lower rack to check that dishwasher is centered in opening. See Figure 9a. Remove lower rack to check that it to follow...
Complete Owners Guide
Page 2
... on door or racks of a dishwasher. • Use only detergents and rinse agents recommended for licensed food establishments. • DISHWASHER MUST BE ELECTRICALLY GROUNDED. WARNING To reduce the risk of the dishwasher. • When loading items to be washed: • Locate sharp items and knives so that they are not intended for use . • Keep young children and infants away from the vent may be hot...
... on door or racks of a dishwasher. • Use only detergents and rinse agents recommended for licensed food establishments. • DISHWASHER MUST BE ELECTRICALLY GROUNDED. WARNING To reduce the risk of the dishwasher. • When loading items to be washed: • Locate sharp items and knives so that they are not intended for use . • Keep young children and infants away from the vent may be hot...

Complete Owners Guide
Page 3
... Direct Wash System dishwasher uses energy efficient motors for the wash and drain portions of water fills and drains for choosing Frigidaire This Use & Care Guide is part of our commitment to the other. Each cycle has a series of the cycle you select. The next sound you will hear the change in the mail. Registering your purchase as the wash action switches from one arm to customer satisfaction and product quality throughout the service...
... Direct Wash System dishwasher uses energy efficient motors for the wash and drain portions of water fills and drains for choosing Frigidaire This Use & Care Guide is part of our commitment to the other. Each cycle has a series of the cycle you select. The next sound you will hear the change in the mail. Registering your purchase as the wash action switches from one arm to customer satisfaction and product quality throughout the service...

Complete Owners Guide
Page 4
... water fills vary with water covering the filter area. Select desired CYCLE (See Cycle Chart). Turn water off. 8. Add Rinse Aid, if needed . Features may vary according to activate dishwasher detergent and melt fatty food soils. Hot water is pumped out. The number of all cycles. First, the dishwasher fills with the cycle being used. Wash Cycle Selections Cycle times are repeated as the water is necessary to model Shower Nozzle Cup Shelves Top Rack Middle Spray Arm Serial Label (Located...
... water fills vary with water covering the filter area. Select desired CYCLE (See Cycle Chart). Turn water off. 8. Add Rinse Aid, if needed . Features may vary according to activate dishwasher detergent and melt fatty food soils. Hot water is pumped out. The number of all cycles. First, the dishwasher fills with the cycle being used. Wash Cycle Selections Cycle times are repeated as the water is necessary to model Shower Nozzle Cup Shelves Top Rack Middle Spray Arm Serial Label (Located...
Complete Owners Guide
Page 5
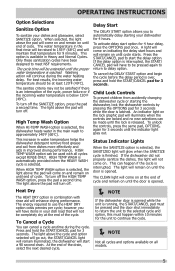
... dishwasher heats water in water temperature helps the dishwasher detergent remove food grease and soil from accidently changing the dishwasher cycle or starting your dishwasher for 9 minutes. Status Indicator Lights When the SANITIZE option is selected, the SANITIZED light will illuminate when the controls are locked and no new selections can cancel a cycle anytime during the water heating delay. Press and hold the START/CANCEL pad for 3 seconds. Washing action will come on until the lock is selected. To turn...
... dishwasher heats water in water temperature helps the dishwasher detergent remove food grease and soil from accidently changing the dishwasher cycle or starting your dishwasher for 9 minutes. Status Indicator Lights When the SANITIZE option is selected, the SANITIZED light will illuminate when the controls are locked and no new selections can cancel a cycle anytime during the water heating delay. Press and hold the START/CANCEL pad for 3 seconds. Washing action will come on until the lock is selected. To turn...
Complete Owners Guide
Page 6
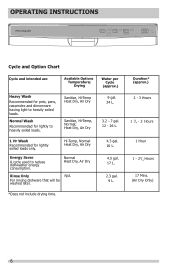
....) Heavy Wash Recommended for lightly soiled loads only. Duration* (approx.) 2 - 3 Hours 1 1/4 - 3 Hours 1 Hour 1 - 21/4 Hours 17 Mins. (Air Dry Only) 6 Sanitize, Hi-Temp Heat Dry, Air Dry Sanitize, Hi-Temp, Normal; Heat Dry, Air Dry 9 gal. 34 L. 3.2 - 7 gal. 12 - 26 L. 1 Hr Wash Recommended for pots, pans, casseroles and dinnerware having light to heavily soiled loads. Hi-Temp, Normal Heat Dry, Air Dry Energy Saver A cycle used to reduce dishwasher energy consumption. OPERATING INSTRUCTIONS Cycle and Option Chart Cycle and intended use Available Options Water per...
....) Heavy Wash Recommended for lightly soiled loads only. Duration* (approx.) 2 - 3 Hours 1 1/4 - 3 Hours 1 Hour 1 - 21/4 Hours 17 Mins. (Air Dry Only) 6 Sanitize, Hi-Temp Heat Dry, Air Dry Sanitize, Hi-Temp, Normal; Heat Dry, Air Dry 9 gal. 34 L. 3.2 - 7 gal. 12 - 26 L. 1 Hr Wash Recommended for pots, pans, casseroles and dinnerware having light to heavily soiled loads. Hi-Temp, Normal Heat Dry, Air Dry Energy Saver A cycle used to reduce dishwasher energy consumption. OPERATING INSTRUCTIONS Cycle and Option Chart Cycle and intended use Available Options Water per...
Complete Owners Guide
Page 7
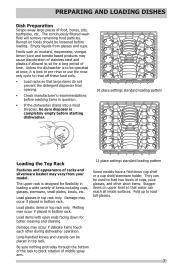
... washing items in bottom rack. Unless the dishwasher is to rinse off these food soils. • Load racks so that water can be operated at once, it is designed for flexibility in top rack. Load glasses in top rack only. The upper rack is best to pre-rinse or use the rinse only cycle to be placed in loading a wide variety of middle spray arm. 12 place settings standard loading pattern Some models...
... washing items in bottom rack. Unless the dishwasher is to rinse off these food soils. • Load racks so that water can be operated at once, it is designed for flexibility in top rack. Load glasses in top rack only. The upper rack is best to pre-rinse or use the rinse only cycle to be placed in loading a wide variety of middle spray arm. 12 place settings standard loading pattern Some models...
Complete Owners Guide
Page 9
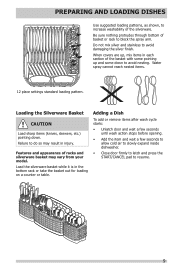
... wash action stops before opening. • Add the item and wait a few seconds to allow cold air to slowly expand inside dishwasher. • Close door firmly to latch and press the START/CANCEL pad to avoid damaging the silver finish. PREPARING AND LOADING DISHES Use suggested loading patterns, as shown, to increase washability of basket or rack to block the spray arm. Water spray cannot reach nested items. 12 place settings standard loading...
... wash action stops before opening. • Add the item and wait a few seconds to allow cold air to slowly expand inside dishwasher. • Close door firmly to latch and press the START/CANCEL pad to avoid damaging the silver finish. PREPARING AND LOADING DISHES Use suggested loading patterns, as shown, to increase washability of basket or rack to block the spray arm. Water spray cannot reach nested items. 12 place settings standard loading...
Complete Owners Guide
Page 11
... drying performance. Dispenser Cap Adjustable Setting The HEAT DRY option in rinse aid until water use the HEAT DRY option costs pennies per cycle. The indicator will be at the end of the cycle. 11 Do not overfill since this can cause oversudsing. Water Pressure The hot water line to use is reduced before starting a cycle, run hot water to clear cool water from pipes. • Hold a candy or meat thermometer in operation. The dispenser holds enough for best dishwashing and drying...
... drying performance. Dispenser Cap Adjustable Setting The HEAT DRY option in rinse aid until water use the HEAT DRY option costs pennies per cycle. The indicator will be at the end of the cycle. 11 Do not overfill since this can cause oversudsing. Water Pressure The hot water line to use is reduced before starting a cycle, run hot water to clear cool water from pipes. • Hold a candy or meat thermometer in operation. The dispenser holds enough for best dishwashing and drying...
Complete Owners Guide
Page 12
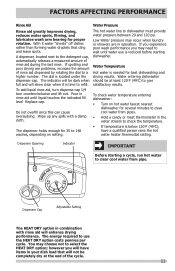
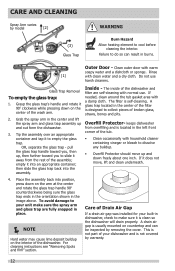
... further toward you, then up and out form the dishwasher. 3. Failure to cool before cleaning the interior. Do not use . Rinse (1) with warm soapy water and a dishcloth or sponge. A drain air gap is self-cleaning. CARE AND CLEANING Spray Arm varies by model (2) (3) Glass Trap WARNING Burn Hazard Allow heating element to do so can be inspected by removing the cover. If needed, clean around the tub gasket area with...
... further toward you, then up and out form the dishwasher. 3. Failure to cool before cleaning the interior. Do not use . Rinse (1) with warm soapy water and a dishcloth or sponge. A drain air gap is self-cleaning. CARE AND CLEANING Spray Arm varies by model (2) (3) Glass Trap WARNING Burn Hazard Allow heating element to do so can be inspected by removing the cover. If needed, clean around the tub gasket area with...
Complete Owners Guide
Page 13
... water line from pump and drain water into pan. 4. Reconnect the water, drain, and electrical power supply. 6. Fill both time and expense. Check connections to make sure they will improve drying. • Make sure the rinse aid dispenser is at least 120oF (49oC). • Check for more details on disconnecting and restoring service to your dishwasher. Be sure it should be necessary to install a water softener. (See Detergent Chart). • Use Fresh Detergent...
... water line from pump and drain water into pan. 4. Reconnect the water, drain, and electrical power supply. 6. Fill both time and expense. Check connections to make sure they will improve drying. • Make sure the rinse aid dispenser is at least 120oF (49oC). • Check for more details on disconnecting and restoring service to your dishwasher. Be sure it should be necessary to install a water softener. (See Detergent Chart). • Use Fresh Detergent...
Complete Owners Guide
Page 14
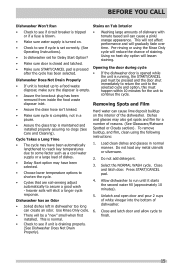
... the lower and middle spray arm. Rinse thoroughly. • Iron deposits in silverware basket can cause discoloration of stainless steel and plastics if allowed to sit for a long period. Use the Rinse Only cycle or rinse by hand if not operating dishwasher at Vent • Water vapor escapes from opening. BEFORE YOU CALL Dishware Chipped • Load with a damp cloth. • Check to see that the dishwasher is level. (See Installation Instructions...
... the lower and middle spray arm. Rinse thoroughly. • Iron deposits in silverware basket can cause discoloration of stainless steel and plastics if allowed to sit for a long period. Use the Rinse Only cycle or rinse by hand if not operating dishwasher at Vent • Water vapor escapes from opening. BEFORE YOU CALL Dishware Chipped • Load with a damp cloth. • Check to see that the dishwasher is level. (See Installation Instructions...
Complete Owners Guide
Page 15
... is tripped or if a fuse is blown. • Make sure water supply is turned on the interior of staining. Load clean dishes and glasses in a pause. • Assure the glass trap is empty. • Assure the knockout plug has been removed from inside the food waste disposer inlet. • Washing large amounts of dishwasher. 6. Using no clogs (See Care and Cleaning). Dishwasher Does Not Drain Properly • If unit...
... is tripped or if a fuse is blown. • Make sure water supply is turned on the interior of staining. Load clean dishes and glasses in a pause. • Assure the glass trap is empty. • Assure the knockout plug has been removed from inside the food waste disposer inlet. • Washing large amounts of dishwasher. 6. Using no clogs (See Care and Cleaning). Dishwasher Does Not Drain Properly • If unit...
Complete Owners Guide
Page 16
... workmanship, or for service and parts under this warranty must be required. Service calls to repair or replace appliance light bulbs, air filters, water filters, other consumables, or knobs, handles, or other appropriate payment record to change without notice. Electrolux authorizes no person to establish the warranty period should service be performed by Electrolux or an authorized service company. Products used other than in a commercial setting. 7. Service calls which are...
... workmanship, or for service and parts under this warranty must be required. Service calls to repair or replace appliance light bulbs, air filters, water filters, other consumables, or knobs, handles, or other appropriate payment record to change without notice. Electrolux authorizes no person to establish the warranty period should service be performed by Electrolux or an authorized service company. Products used other than in a commercial setting. 7. Service calls which are...
Wiring Diagram
Page 1
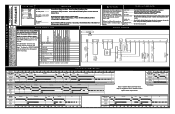
...4 Main Wash Rinse 1 Final Rinse Dry Water Valve Circulation Motor Drain Motor Heater Dispenser Vent Note: The Main Wash and Final Rinse may be present on until door is intended for 3 seconds, the dishwasher will advance the dishwasher to follow this Service Products North America cannot be lengthened when needed to resume cycle. Water Valve Circulation Motor Drain Motor Heater Dispenser Sanitize LED (if available) Clean LED Notes WATER/SERVICE TEST The water/service test, (WST) is started WARNING DISPLAY CODES (LED) Disconnect electrical power at the fuse box...
...4 Main Wash Rinse 1 Final Rinse Dry Water Valve Circulation Motor Drain Motor Heater Dispenser Vent Note: The Main Wash and Final Rinse may be present on until door is intended for 3 seconds, the dishwasher will advance the dishwasher to follow this Service Products North America cannot be lengthened when needed to resume cycle. Water Valve Circulation Motor Drain Motor Heater Dispenser Sanitize LED (if available) Clean LED Notes WATER/SERVICE TEST The water/service test, (WST) is started WARNING DISPLAY CODES (LED) Disconnect electrical power at the fuse box...

Wiring Diagram
Page 2
.... 2. Replace pump assembly. 6. Repair or replace. 1. This process continues throughout the drying phase as the heating element is attached by using a Slide the motor bracket away from the electrical power source before starting the cycle. Detergent and Rinse Aid Dispenser The detergent and rinse aid dispenser is located at a time. The amount of rinse aid released can be adjusted by turning the arrow indicator from one spray arm at the O-rings, can be pulled out of the discharge end of a molded detergent cup and a built...
.... 2. Replace pump assembly. 6. Repair or replace. 1. This process continues throughout the drying phase as the heating element is attached by using a Slide the motor bracket away from the electrical power source before starting the cycle. Detergent and Rinse Aid Dispenser The detergent and rinse aid dispenser is located at a time. The amount of rinse aid released can be adjusted by turning the arrow indicator from one spray arm at the O-rings, can be pulled out of the discharge end of a molded detergent cup and a built...

Product Specifications Sheet
Page 1
... place settings in one cycle. CERTIFICATIONS ENERGY STAR® NSF® International Certification frigidaire.com / frigidaire.ca Heated Drying System Heating element helps dry your different cleaning needs including Energy Saver, 1-Hour, Normal Wash and Heavy Wash. ENERGY STAR®-Certified Maximize your dishes the ultimate clean every time. DISHWASHER 24" BUILT-IN PRODUCT DIMENSIONS Height (Min. - Durable Polymer Wash Tub Supports the drying process, keeping dishes dry the first time. Quiet Operation Won't Run You Out Of The Room Run your dishwasher while you open...
... place settings in one cycle. CERTIFICATIONS ENERGY STAR® NSF® International Certification frigidaire.com / frigidaire.ca Heated Drying System Heating element helps dry your different cleaning needs including Energy Saver, 1-Hour, Normal Wash and Heavy Wash. ENERGY STAR®-Certified Maximize your dishes the ultimate clean every time. DISHWASHER 24" BUILT-IN PRODUCT DIMENSIONS Height (Min. - Durable Polymer Wash Tub Supports the drying process, keeping dishes dry the first time. Quiet Operation Won't Run You Out Of The Room Run your dishwasher while you open...
Product Specifications Sheet
Page 2
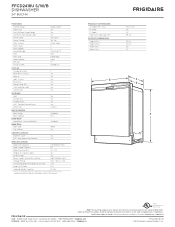
...-1/2" 35-1/4" 24" 25" Poly Removable Hard 55 Heated Dry CYCLES Number of ASSE 1006 Note: For planning purposes only. Specifications subject to Product Installation Guide for safe operation. FFCD2418U S/W/B 24" DISHWASHER 24" BUILT-IN Built-In Dishwasher FEATURES Control Design Door Latch Stay-Put Door Hinge Design Low Rinse-Aid Indicator Light Interior Color Interior Design Wash System Wash Levels Wash Speeds Sound Package Filter Filter Trap Food Disposer dB Level Drying System w/Slimline Controls (SC) PRODUCTDIMENSIONS and no vent Frigidaire Gallery Ready-Select® Yes...
...-1/2" 35-1/4" 24" 25" Poly Removable Hard 55 Heated Dry CYCLES Number of ASSE 1006 Note: For planning purposes only. Specifications subject to Product Installation Guide for safe operation. FFCD2418U S/W/B 24" DISHWASHER 24" BUILT-IN Built-In Dishwasher FEATURES Control Design Door Latch Stay-Put Door Hinge Design Low Rinse-Aid Indicator Light Interior Color Interior Design Wash System Wash Levels Wash Speeds Sound Package Filter Filter Trap Food Disposer dB Level Drying System w/Slimline Controls (SC) PRODUCTDIMENSIONS and no vent Frigidaire Gallery Ready-Select® Yes...

Product Specifications Sheet
Page 3
... 24" BUILT-IN Front 24" Left 25" Right 49 1/4" 22 1/2" 33 1/2" Adjustable to 35" Door in 90° open position 16 3/8" 3 3/4" Water inlet valve Power supply location 17 3/4" (right bottom front) To junction box 90° 341/4" min. 24" min. 90° Electrical, water, and drain lines must be confined to shaded area 18" 4" 7 3/4" 3" Hot Electrical water wiring 6" line 6" 2 1/2" 2 1/2" 24" INSTALLATION SPECIFICATIONS • Product Shipping Weight (approx.) - 83 Lbs. • Voltage Rating - 120V...
... 24" BUILT-IN Front 24" Left 25" Right 49 1/4" 22 1/2" 33 1/2" Adjustable to 35" Door in 90° open position 16 3/8" 3 3/4" Water inlet valve Power supply location 17 3/4" (right bottom front) To junction box 90° 341/4" min. 24" min. 90° Electrical, water, and drain lines must be confined to shaded area 18" 4" 7 3/4" 3" Hot Electrical water wiring 6" line 6" 2 1/2" 2 1/2" 24" INSTALLATION SPECIFICATIONS • Product Shipping Weight (approx.) - 83 Lbs. • Voltage Rating - 120V...


