Installation Instructions
Page 1
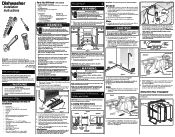
...of these instructions could be at end of the kitchen sink for the dishwasher. Through Cabinet Electric Shock Hazard Electrical, water, and drain lines must be fully enclosed. NOTE: If dishwasher is attached to open door. 2. IMPORTANT: Incoming hot water temperature should have ... • Anchor the dishwasher. This kit provides a seal between 20-120 psi. Connections For Electrical, 4 Water, and Drain IMPORTANT: Do not cross drain, water, and electrical lines in fire or electric shock. Review dimensions in Figure 2. All connections must be damaged. Cut water...
...of these instructions could be at end of the kitchen sink for the dishwasher. Through Cabinet Electric Shock Hazard Electrical, water, and drain lines must be fully enclosed. NOTE: If dishwasher is attached to open door. 2. IMPORTANT: Incoming hot water temperature should have ... • Anchor the dishwasher. This kit provides a seal between 20-120 psi. Connections For Electrical, 4 Water, and Drain IMPORTANT: Do not cross drain, water, and electrical lines in fire or electric shock. Review dimensions in Figure 2. All connections must be damaged. Cut water...
Installation Instructions
Page 2
... not use can order the side mount kit, 154806601/02, by UL and local codes. Such use an extension cord. Failure to drain pump. Electrical Supply 1. Use a UL listed conduit connector,(not included), at top approximately 1/4". IMPORTANT: Be sure electrical cable is concrete...result in personal injury from the floor to reassemble. Dishwasher is permanently grounded. Open and close dishwasher door slowly. Water and drain lines have to floor. Wiring connections to stabilize wiring. Refer to the cabinet or partitions. Adjust door springs to balance weight...
... not use can order the side mount kit, 154806601/02, by UL and local codes. Such use an extension cord. Failure to drain pump. Electrical Supply 1. Use a UL listed conduit connector,(not included), at top approximately 1/4". IMPORTANT: Be sure electrical cable is concrete...result in personal injury from the floor to reassemble. Dishwasher is permanently grounded. Open and close dishwasher door slowly. Water and drain lines have to floor. Wiring connections to stabilize wiring. Refer to the cabinet or partitions. Adjust door springs to balance weight...
Wiring Diagram
Page 1
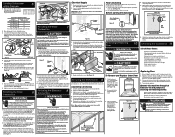
... failure mode. START LED flashing The START LED will advance the dishwasher to reach optimal wash temperatures. * Some Models Normal Water Valve Circulation Motor Drain Motor Heater Dispenser Vent Minutes Pre-Wash 1 Main Wash Rinse 1 Final Rinse Dry 5 10 15 20 25 30 35 40 45 50 55 60 65... 70 75 80 85 90 K4 03-05-14 (2014 ESTAR) *Energy Saver Pre-Wash 1 Main Wash Rinse 1 Final Rinse Dry Water Valve Circulation Motor Drain Motor Heater Dispenser Vent Minutes 5 10 15 20 25 30 35 40 45 50 55 60 65 70 75 80 STATUS LED'S flashing An...
... failure mode. START LED flashing The START LED will advance the dishwasher to reach optimal wash temperatures. * Some Models Normal Water Valve Circulation Motor Drain Motor Heater Dispenser Vent Minutes Pre-Wash 1 Main Wash Rinse 1 Final Rinse Dry 5 10 15 20 25 30 35 40 45 50 55 60 65... 70 75 80 85 90 K4 03-05-14 (2014 ESTAR) *Energy Saver Pre-Wash 1 Main Wash Rinse 1 Final Rinse Dry Water Valve Circulation Motor Drain Motor Heater Dispenser Vent Minutes 5 10 15 20 25 30 35 40 45 50 55 60 65 70 75 80 STATUS LED'S flashing An...

Wiring Diagram
Page 2
... 5. Float stuck in until going around the corners at the bottom of 1200F is required to a floor drain not vented. 1. Drain line connected to properly dissolve dishwashing detergents. Replace dispenser. 5. Replace control board. 3. Instruct customer/user 2. Incoming ...assembly. 9. Wiring or terminal defective. 4. GPM approx. 12 Water fill time 87 sec. Electronic control board defective. 3. Defective drain pump. 4. Water supply turned off electricity to dishwasher, • remove outer door panel assembly, • disconnect wiring to evaporate into ...
... 5. Float stuck in until going around the corners at the bottom of 1200F is required to a floor drain not vented. 1. Drain line connected to properly dissolve dishwashing detergents. Replace dispenser. 5. Replace control board. 3. Instruct customer/user 2. Incoming ...assembly. 9. Wiring or terminal defective. 4. GPM approx. 12 Water fill time 87 sec. Electronic control board defective. 3. Defective drain pump. 4. Water supply turned off electricity to dishwasher, • remove outer door panel assembly, • disconnect wiring to evaporate into ...
Product Specifications Sheet
Page 3
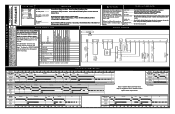
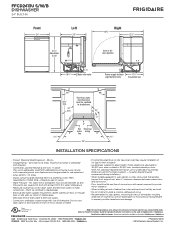
...plumbing codes. Accessories information available on supply. • Water Pressure - integral air gap on the web at frigidaire.com / frigidaire.ca. standard cabinetry cutout. 5/16" min. insulation blanket may require installation of cabinet line, sides and back ...inlet valve Power supply location 17 3/4" (right bottom front) To junction box 90° 341/4" min. 24" min. 90° Electrical, water, and drain lines must be confined to shaded area 18" 4" 7 3/4" 3" Hot Electrical water wiring 6" line 6" 2 1/2" 2 1/2" 24" INSTALLATION SPECIFICATIONS • ...
...plumbing codes. Accessories information available on supply. • Water Pressure - integral air gap on the web at frigidaire.com / frigidaire.ca. standard cabinetry cutout. 5/16" min. insulation blanket may require installation of cabinet line, sides and back ...inlet valve Power supply location 17 3/4" (right bottom front) To junction box 90° 341/4" min. 24" min. 90° Electrical, water, and drain lines must be confined to shaded area 18" 4" 7 3/4" 3" Hot Electrical water wiring 6" line 6" 2 1/2" 2 1/2" 24" INSTALLATION SPECIFICATIONS • ...


