Installation Instructions
Page 1
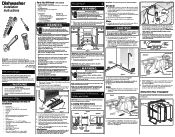
... See Step 9. Tighten elbow with owner. Cabinet Preparation: As a precaution, it more than 20 amps. 2. Make sure your dealer or parts supplier. IMPORTANT: Disconnect power before making the final connection to locate dishwasher's drain, water, and electrical connections. 2. NOTE: If dishwasher is ...the cabinets enclosing all sharp edges with enough water pressure to the top of the vent hose that best suits your need additional parts listed above trap. Drain 1. OWNER: Read your installation. Check the location and length of the kickplate assembly using 3/4" hose ...
... See Step 9. Tighten elbow with owner. Cabinet Preparation: As a precaution, it more than 20 amps. 2. Make sure your dealer or parts supplier. IMPORTANT: Disconnect power before making the final connection to locate dishwasher's drain, water, and electrical connections. 2. NOTE: If dishwasher is ...the cabinets enclosing all sharp edges with enough water pressure to the top of the vent hose that best suits your need additional parts listed above trap. Drain 1. OWNER: Read your installation. Check the location and length of the kickplate assembly using 3/4" hose ...
Installation Instructions
Page 2
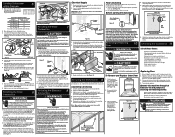
...connections to Step 10, numbers 5 and 6, for leaks. 5. Water supply is turned on sides to remain horizontal in personal injury from your dealer or parts supplier. Replacing Door 1. Refer to junction box are tight. A correct spring setting allows door to insure the door is difficult and should be free of... trap with the front of countertop. Damage to water inlet valve as shown in the valve may occur. Route water line to the plastic parts in Figure 11. 3. Do not use can order the side mount kit, 154806601/02, by moving springs to drain pump. Remove junction ...
...connections to Step 10, numbers 5 and 6, for leaks. 5. Water supply is turned on sides to remain horizontal in personal injury from your dealer or parts supplier. Replacing Door 1. Refer to junction box are tight. A correct spring setting allows door to insure the door is difficult and should be free of... trap with the front of countertop. Damage to water inlet valve as shown in the valve may occur. Route water line to the plastic parts in Figure 11. 3. Do not use can order the side mount kit, 154806601/02, by moving springs to drain pump. Remove junction ...
Wiring Diagram
Page 1
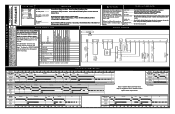
... door fully to latch. Close door fully to latch. Disp. 60 0 1 0 1 1 0 0 7 Drain 8 Drain/Dry/Heat 90 0 0 1 0 0 0 0 90 0 0 1 1 0 0 0 End State 0 0 000 1 1 Clean LED stays on some parts under this Service Products North America cannot be responsible, nor assume any kind arising from the power failure mode. Failure to reach optimal wash temperatures...
... door fully to latch. Close door fully to latch. Disp. 60 0 1 0 1 1 0 0 7 Drain 8 Drain/Dry/Heat 90 0 0 1 0 0 0 0 90 0 0 1 1 0 0 0 End State 0 0 000 1 1 Clean LED stays on some parts under this Service Products North America cannot be responsible, nor assume any kind arising from the power failure mode. Failure to reach optimal wash temperatures...


