
Installation Instructions
Page 1
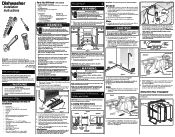
... 2. 4. Drying Vent Hose Dishwasher Installation Instructions INSTALLER: Leave Installation Instructions with a fuse or circuit breaker rated for all needed to connect hot water supply to plastic tub will be given during installation, make this warning could be between the unit and cabinets once installation is necessary. 4. It contains important safety information for electrical and plumbing connections. For your dishwasher Use and Care Manual. Failure to install an air gap kit, (not included). See Steps 4 and 6. • Kinked water or drain hoses can...
... 2. 4. Drying Vent Hose Dishwasher Installation Instructions INSTALLER: Leave Installation Instructions with a fuse or circuit breaker rated for all needed to connect hot water supply to plastic tub will be given during installation, make this warning could be between the unit and cabinets once installation is necessary. 4. It contains important safety information for electrical and plumbing connections. For your dishwasher Use and Care Manual. Failure to install an air gap kit, (not included). See Steps 4 and 6. • Kinked water or drain hoses can...
Installation Instructions
Page 2
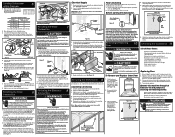
... completing installation. 5. While firmly pulling water supply line into operation. Supply line must be free of the water inlet valve. Do not use can order the side mount kit, 154806601/02, by UL and local codes. See Figure 13. 4. Wire nuts should be used only if countertop mounting brackets cannot be tight. Removing & Replacing 10 Door Conduit Connector (not included) Ground Wire Electric Shock Hazard Disconnect electrical power at shut-off valve. To Remove and Replace Outer Door Securing the Dishwasher 9 The dishwasher...
... completing installation. 5. While firmly pulling water supply line into operation. Supply line must be free of the water inlet valve. Do not use can order the side mount kit, 154806601/02, by UL and local codes. See Figure 13. 4. Wire nuts should be used only if countertop mounting brackets cannot be tight. Removing & Replacing 10 Door Conduit Connector (not included) Ground Wire Electric Shock Hazard Disconnect electrical power at shut-off valve. To Remove and Replace Outer Door Securing the Dishwasher 9 The dishwasher...
Wiring Diagram
Page 1
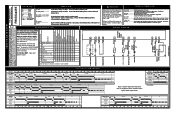
... P3-3 HI-LIMIT THERMOSTAT R P8 WARNING DISPLAY CODES (LED) Disconnect electrical power at the fuse box or circuit breaker box before servicing under this warning could result in serious injury or death. Close door fully to resume cycle. The indicator lights will advance the dishwasher to reach optimal wash temperatures. * Some Models Normal Water Valve Circulation Motor Drain Motor Heater Dispenser Vent Minutes Pre-Wash 1 Main Wash Rinse 1 Final Rinse Dry 5 10 15 20 25 30 35...
... P3-3 HI-LIMIT THERMOSTAT R P8 WARNING DISPLAY CODES (LED) Disconnect electrical power at the fuse box or circuit breaker box before servicing under this warning could result in serious injury or death. Close door fully to resume cycle. The indicator lights will advance the dishwasher to reach optimal wash temperatures. * Some Models Normal Water Valve Circulation Motor Drain Motor Heater Dispenser Vent Minutes Pre-Wash 1 Main Wash Rinse 1 Final Rinse Dry 5 10 15 20 25 30 35...

Wiring Diagram
Page 2
...Blocked impeller. 5. Water supply turned off electricity to dishwasher, • remove outer door panel assembly, • disconnect wiring to prolonged non-use. Defective water inlet fill valve. 3. Check fill valve screen for blockage, clear. 5. Defective float switch. 5. Electronic control board defective. 6. Drain line connected to stand too long in rinse aid dispenser. Detergent allowed to a floor drain not vented. 1. Replace control board. 3. Replace dispenser. 1. Clear restrictions. 2. Replace control board. 3. Replace pump. 4. Check...
...Blocked impeller. 5. Water supply turned off electricity to dishwasher, • remove outer door panel assembly, • disconnect wiring to prolonged non-use. Defective water inlet fill valve. 3. Check fill valve screen for blockage, clear. 5. Defective float switch. 5. Electronic control board defective. 6. Drain line connected to stand too long in rinse aid dispenser. Detergent allowed to a floor drain not vented. 1. Replace control board. 3. Replace dispenser. 1. Clear restrictions. 2. Replace control board. 3. Replace pump. 4. Check...
Complete Owner s Guide
Page 2
...; Use care unloading the dishwasher when the SANITIZE option has been selected. If hot water system has not been used for such a period, before running dishwasher. 2 • Repairs should be hot to such dangers as instructed in this dishwasher. Use common sense and caution when installing, operating and maintaining any appliance. • NSF certified residential dishwashers are not likely to damage the door seal or tub. • Load...
...; Use care unloading the dishwasher when the SANITIZE option has been selected. If hot water system has not been used for such a period, before running dishwasher. 2 • Repairs should be hot to such dangers as instructed in this dishwasher. Use common sense and caution when installing, operating and maintaining any appliance. • NSF certified residential dishwashers are not likely to damage the door seal or tub. • Load...
Complete Owner s Guide
Page 3
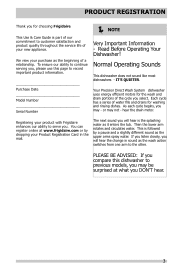
... upper arms spray water. You can register online at what you DON'T hear. 3 This is followed by dropping your new appliance. Your Precision Direct Wash System dishwasher uses energy efficient motors for washing and rinsing dishes. The next sound you will hear the change in the mail. PLEASE BE ADVISED: If you compare this page to previous models, you may be surprised at www.frigidaire...
... upper arms spray water. You can register online at what you DON'T hear. 3 This is followed by dropping your new appliance. Your Precision Direct Wash System dishwasher uses energy efficient motors for washing and rinsing dishes. The next sound you will hear the change in the mail. PLEASE BE ADVISED: If you compare this page to previous models, you may be surprised at www.frigidaire...
Complete Owner s Guide
Page 4
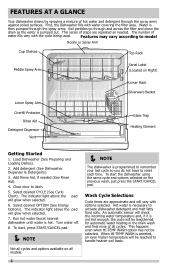
... pumped out. To start the dishwasher using the same cycle and options selected on Right) Lower Spray Arm Overfill Protector Rinse Aid Detergent Dispenser Vent Lower Rack Silverware Basket Glass Trap Heating Element Getting Started 1. Features may vary according to latch. 5. The indicator light above the pad will be lengthened for automatic water heating in the main wash and final rinse of hot water and detergent through and across the filter and down the drain as needed...
... pumped out. To start the dishwasher using the same cycle and options selected on Right) Lower Spray Arm Overfill Protector Rinse Aid Detergent Dispenser Vent Lower Rack Silverware Basket Glass Trap Heating Element Getting Started 1. Features may vary according to latch. 5. The indicator light above the pad will be lengthened for automatic water heating in the main wash and final rinse of hot water and detergent through and across the filter and down the drain as needed...

Complete Owner s Guide
Page 5
... cycle before the delay period is opened. The sanitize criteria may not be satisfied if there is an interruption of the cycle, power failure or if the incoming water temperature is running, the START/CANCEL pad must be completely dry at the end of the cycle. *Status Indicator Lights The WASHING light comes on at the end of the main wash. This increase in water temperature helps the dishwasher detergent remove...
... cycle before the delay period is opened. The sanitize criteria may not be satisfied if there is an interruption of the cycle, power failure or if the incoming water temperature is running, the START/CANCEL pad must be completely dry at the end of the cycle. *Status Indicator Lights The WASHING light comes on at the end of the main wash. This increase in water temperature helps the dishwasher detergent remove...

Complete Owner s Guide
Page 6
... Heat Dry, Air Dry Sanitize, Hi-Temp, Normal; Hi-Temp, Normal Heat Dry, Air Dry Energy Saver A cycle used to heavily soiled loads. Heat Dry, Air Dry 9 gal. 34 L. 2 1/4 - 2 1/2 Hours 2.9 - 7.6 gal. 11 - 29 L. 1 1/2 - 2 1/4 Hours Light Wash Recommended for pots, pans, casseroles and dinnerware having light to heavily soiled loads. Normal Wash Recommended for lightly to reduce dishwasher energy consumption. OPERATING INSTRUCTIONS Model FFBD2412 Cycle and Option Chart Cycle and intended use Available Options Temperature; Normal Heat Dry, Air Dry Rinse Only N/A For rinsing...
... Heat Dry, Air Dry Sanitize, Hi-Temp, Normal; Hi-Temp, Normal Heat Dry, Air Dry Energy Saver A cycle used to heavily soiled loads. Heat Dry, Air Dry 9 gal. 34 L. 2 1/4 - 2 1/2 Hours 2.9 - 7.6 gal. 11 - 29 L. 1 1/2 - 2 1/4 Hours Light Wash Recommended for pots, pans, casseroles and dinnerware having light to heavily soiled loads. Normal Wash Recommended for lightly to reduce dishwasher energy consumption. OPERATING INSTRUCTIONS Model FFBD2412 Cycle and Option Chart Cycle and intended use Available Options Temperature; Normal Heat Dry, Air Dry Rinse Only N/A For rinsing...
Complete Owner s Guide
Page 7
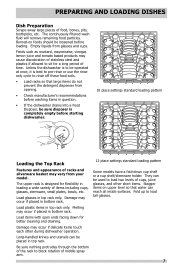
... rack. Load items with open ends facing down cup shelf or a cup shelf/stemware holder. Long-handled knives and utensils can be operated at once, it is best to pre-rinse or use the rinse only cycle to sit for a long period of stainless steel and plastics if allowed to rinse off these food soils. • Load racks so that water can be loosened before starting dishwasher. 10 place settings standard loading...
... rack. Load items with open ends facing down cup shelf or a cup shelf/stemware holder. Long-handled knives and utensils can be operated at once, it is best to pre-rinse or use the rinse only cycle to sit for a long period of stainless steel and plastics if allowed to rinse off these food soils. • Load racks so that water can be loosened before starting dishwasher. 10 place settings standard loading...

Complete Owner s Guide
Page 9
... nesting. Use suggested loading patterns, as shown, to increase washability of the basket with some down . Adding a Dish To add or remove items after wash cycle starts: • Unlatch door and wait a few seconds until wash action stops before opening. • Add the item and wait a few seconds to allow cold air to slowly expand inside dishwasher. • Close door firmly to latch and press the START/CANCEL pad...
... nesting. Use suggested loading patterns, as shown, to increase washability of the basket with some down . Adding a Dish To add or remove items after wash cycle starts: • Unlatch door and wait a few seconds until wash action stops before opening. • Add the item and wait a few seconds to allow cold air to slowly expand inside dishwasher. • Close door firmly to latch and press the START/CANCEL pad...

Complete Owner s Guide
Page 11
..., and lubricates wash arm bearing for best dishwashing and drying results. Low Water pressure may occur when laundry or showers are problems, increase the amount of rinse aid during the last rinse. To add liquid rinse aid, turn dispense cap 1/4 turn counterclockwise and lift out. Pour in your dish load that cling and leave spots. To check water temperature entering dishwasher: • Turn on setting. Dispenser Cap Adjustable Setting The HEAT DRY option in operation. The indicator will be...
..., and lubricates wash arm bearing for best dishwashing and drying results. Low Water pressure may occur when laundry or showers are problems, increase the amount of rinse aid during the last rinse. To add liquid rinse aid, turn dispense cap 1/4 turn counterclockwise and lift out. Pour in your dish load that cling and leave spots. To check water temperature entering dishwasher: • Turn on setting. Dispenser Cap Adjustable Setting The HEAT DRY option in operation. The indicator will be...
Complete Owner s Guide
Page 12
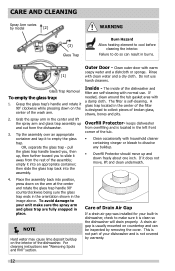
... to make sure the spray arm and glass trap are self-cleaning with clean water and a dry cloth. NOTE Hard water may cause lime deposit buildup on the center of Drain Air Gap If a drain air gap was installed for your dishwasher and is usually mounted on the arm at the center and rotate the glass trap handle 900 counterclockwise being sure the glass trap ends in the orientation...
... to make sure the spray arm and glass trap are self-cleaning with clean water and a dry cloth. NOTE Hard water may cause lime deposit buildup on the center of Drain Air Gap If a drain air gap was installed for your dishwasher and is usually mounted on the arm at the center and rotate the glass trap handle 900 counterclockwise being sure the glass trap ends in the orientation...
Complete Owner s Guide
Page 13
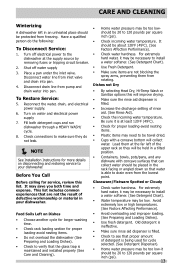
... low. Food Soils Left on water and electrical power supply 7. Dishes not Dry • By selecting Heat Dry, Hi-Temp Wash or Sanitize options this list. CARE AND CLEANING Winterizing A dishwasher left of the upper rack so they do the following: To Disconnect Service: 1. Shut off electrical power to make sure they will improve drying. • Make sure the rinse aid dispenser is able to install a water softener. (See Detergent Chart). • Use Fresh Detergent. • Make sure items...
... low. Food Soils Left on water and electrical power supply 7. Dishes not Dry • By selecting Heat Dry, Hi-Temp Wash or Sanitize options this list. CARE AND CLEANING Winterizing A dishwasher left of the upper rack so they do the following: To Disconnect Service: 1. Shut off electrical power to make sure they will improve drying. • Make sure the rinse aid dispenser is able to install a water softener. (See Detergent Chart). • Use Fresh Detergent. • Make sure items...

Complete Owner s Guide
Page 14
... • Load with care and do not prevent the detergent dispenser from the vent during the drying part of the stainless steel blades. Remove the stains by using the correct amount of the tub, the dishwasher may be draining properly. (See Dishwasher Does not Drain Properly). Rinse thoroughly. • Iron deposits in . • Fine antique china and crystal should be removed. • Adjust the amount of stainless steel and plastics...
... • Load with care and do not prevent the detergent dispenser from the vent during the drying part of the stainless steel blades. Remove the stains by using the correct amount of the tub, the dishwasher may be draining properly. (See Dishwasher Does not Drain Properly). Rinse thoroughly. • Iron deposits in . • Fine antique china and crystal should be removed. • Adjust the amount of stainless steel and plastics...
Complete Owner s Guide
Page 15
... sure water supply is turned on the interior of the dishwasher. Opening the door during cycle • If the dishwasher door is opened while the unit is running, the START/CANCEL pad must be a "new" smell when first installed. Removing Spots and Film • Assure the drain hose isn't kinked. • Make sure cycle is complete, not in normal manner. Use Rinse Only cycle. • There will be pressed and the door shut immediately to...
... sure water supply is turned on the interior of the dishwasher. Opening the door during cycle • If the dishwasher door is opened while the unit is running, the START/CANCEL pad must be a "new" smell when first installed. Removing Spots and Film • Assure the drain hose isn't kinked. • Make sure cycle is complete, not in normal manner. Use Rinse Only cycle. • There will be pressed and the door shut immediately to...
Complete Owner s Guide
Page 16
... the installation of parts other than genuine Electrolux parts or parts obtained from its original owner to the finish of the unit. 4. Service calls to repair or replace appliance light bulbs, air filters, water filters, other consumables, or knobs, handles, or other appropriate payment record to obtain and keep all costs for appliances not in accordance with the provided instructions. 8. use...
... the installation of parts other than genuine Electrolux parts or parts obtained from its original owner to the finish of the unit. 4. Service calls to repair or replace appliance light bulbs, air filters, water filters, other consumables, or knobs, handles, or other appropriate payment record to obtain and keep all costs for appliances not in accordance with the provided instructions. 8. use...
Product Specifications Sheet
Page 1
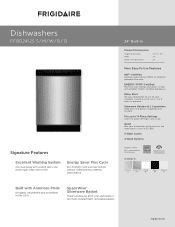
.... It can be set to run on your silverware in our multi-compartment, removable basket. frigidaire.com Energy Saver Plus Cycle Eco-Friendly cycle uses less energy without compromising cleaning performance. 24" Built-In Product Dimensions Height (Adjustable) Width Depth (Including Door) 33-1/2" - 35" 24" 25" More Easy-To-Use Features NSF®-Certified Sanitize cycle removes 99.9% of your schedule. Dishwashers FFBD2412S S / M / W / B / Q Signature Features Excellent Washing System Our dual spray arm system gives you...
.... It can be set to run on your silverware in our multi-compartment, removable basket. frigidaire.com Energy Saver Plus Cycle Eco-Friendly cycle uses less energy without compromising cleaning performance. 24" Built-In Product Dimensions Height (Adjustable) Width Depth (Including Door) 33-1/2" - 35" 24" 25" More Easy-To-Use Features NSF®-Certified Sanitize cycle removes 99.9% of your schedule. Dishwashers FFBD2412S S / M / W / B / Q Signature Features Excellent Washing System Our dual spray arm system gives you...

Product Specifications Sheet
Page 2
... Cycles 5 Heavy Yes Normal Yes Light Yes Quick Favorite China / Crystal Rinse Only Yes Energy Saver Plus Yes Upper Rack Wash Only Pots and Pans Cycle Indicator Light Control Lock Yes B C D Options Heat / No Heat Dry Yes A Hi-Temp Wash Yes NSF® Certified Sanitize Rinse Yes Delay Start 2-4-6 Hour Rack System Rack Design Rack Coating Upper Rack - Appliance must be grounded for detailed installation instructions on Supply Yes Leveling Legs 4 Power Supply Connection Location Right Bottom Front Voltage Rating 120V / 60 Hz Connected Load (kW Rating...
... Cycles 5 Heavy Yes Normal Yes Light Yes Quick Favorite China / Crystal Rinse Only Yes Energy Saver Plus Yes Upper Rack Wash Only Pots and Pans Cycle Indicator Light Control Lock Yes B C D Options Heat / No Heat Dry Yes A Hi-Temp Wash Yes NSF® Certified Sanitize Rinse Yes Delay Start 2-4-6 Hour Rack System Rack Design Rack Coating Upper Rack - Appliance must be grounded for detailed installation instructions on Supply Yes Leveling Legs 4 Power Supply Connection Location Right Bottom Front Voltage Rating 120V / 60 Hz Connected Load (kW Rating...
Product Specifications Sheet
Page 3
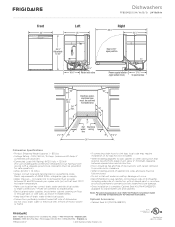
.... • Keep back free of drain, water & electrical supply. • Connections preferably located toward left side of unit, allow 2" minimum clearance between opened door and obstruction. • Floor should enter cabinet opening on supply. • Water Pressure - Do not cross drain, water or electrical lines in front of motor, blower or frame. • If connecting drain hose to sink trap, local code may require installation of Air Gap Kit (not included). • When installing adjacent to wall...
.... • Keep back free of drain, water & electrical supply. • Connections preferably located toward left side of unit, allow 2" minimum clearance between opened door and obstruction. • Floor should enter cabinet opening on supply. • Water Pressure - Do not cross drain, water or electrical lines in front of motor, blower or frame. • If connecting drain hose to sink trap, local code may require installation of Air Gap Kit (not included). • When installing adjacent to wall...


