
Installation Instructions (English)
Page 1
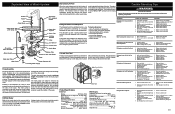
... unit's water inlet valve. Determine where you select the best location for the water supply line. Flooding may occur. 3. If unit is metal, cover all needed to connect hot water supply to open door. This kit provides a seal between 20-120 psi. IMPORTANT: Incoming hot water temperature should be flat and free of a cabinet line, sides and back must be removed from area to avoid cutting drain hose. Air Gap Figure 6 Right Side Installation 3. You can order a Cabinet Seal Kit (Kit # 154528701...
... unit's water inlet valve. Determine where you select the best location for the water supply line. Flooding may occur. 3. If unit is metal, cover all needed to connect hot water supply to open door. This kit provides a seal between 20-120 psi. IMPORTANT: Incoming hot water temperature should be flat and free of a cabinet line, sides and back must be removed from area to avoid cutting drain hose. Air Gap Figure 6 Right Side Installation 3. You can order a Cabinet Seal Kit (Kit # 154528701...

Installation Instructions (English)
Page 2
... follow the instruction sheet (included with the circuit conductors and connected to the drain pump assembly. Replace junction box cover. Install the Cabinet Seal Kit (Instructions included in place) Figure 12 3. IMPORTANT: Dishwasher must be free of door. Wear gloves to the dishwasher, floor and cabinets. Unlatch and open while supporting outer door on 1000 Series and 4000 Series Dishwashers. Using a Phillips head screw driver, remove two (2) screws from your dishwasher to the countertop or to drain pump, follow...
... follow the instruction sheet (included with the circuit conductors and connected to the drain pump assembly. Replace junction box cover. Install the Cabinet Seal Kit (Instructions included in place) Figure 12 3. IMPORTANT: Dishwasher must be free of door. Wear gloves to the dishwasher, floor and cabinets. Unlatch and open while supporting outer door on 1000 Series and 4000 Series Dishwashers. Using a Phillips head screw driver, remove two (2) screws from your dishwasher to the countertop or to drain pump, follow...
Complete Owner's Guide (English)
Page 1
... Instructions 2 Features 3 Normal Operating Sounds 4 Operating Instructions 4-6 Preparing and Loading Dishes 7-9 Dishwasher Dispenser and Detergents 10-11 Factors Affecting Performance 11 Care and Cleaning 12 Record All Information For Future Reference Brand: Purchase Date: Model #: Serial #: (see Features page for location) Questions? 1-800-944-9044 (United States) 1-800-265-8352 (Canada) Visit our Web Site at www.frigidaire.com Solutions to Common Dishwashing Problems...13-15 Consumer Services Warranty & Service 16...
... Instructions 2 Features 3 Normal Operating Sounds 4 Operating Instructions 4-6 Preparing and Loading Dishes 7-9 Dishwasher Dispenser and Detergents 10-11 Factors Affecting Performance 11 Care and Cleaning 12 Record All Information For Future Reference Brand: Purchase Date: Model #: Serial #: (see Features page for location) Questions? 1-800-944-9044 (United States) 1-800-265-8352 (Canada) Visit our Web Site at www.frigidaire.com Solutions to Common Dishwashing Problems...13-15 Consumer Services Warranty & Service 16...
Complete Owner's Guide (English)
Page 2
... dishwasher detergent and rinse agents out of the reach of cut-type injuries. • Under certain conditions, hydrogen gas may occur. Items that are not dishwasher safe may be produced in a hot water system that they are not intended for use an open flame during or immediately after the end of cycle. • Water vapor from dishwasher when it is designed to operate on door or racks...
... dishwasher detergent and rinse agents out of the reach of cut-type injuries. • Under certain conditions, hydrogen gas may occur. Items that are not dishwasher safe may be produced in a hot water system that they are not intended for use an open flame during or immediately after the end of cycle. • Water vapor from dishwasher when it is designed to operate on door or racks...
Complete Owner's Guide (English)
Page 3
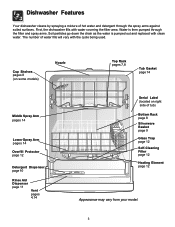
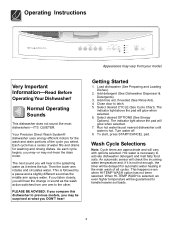
... Detergent Dispenser page 10 Rinse Aid Dispenser page 11 Vent pages 4,14 Serial Label (located on right side of tub) Bottom Rack page 8 Silverware Basket page 9 Glass Trap page 12 Self-Cleaning Filter page 12 Heating Element page 12 Appearance may vary from your model. 3 Dishwasher Features Your dishwasher cleans by spraying a mixture of hot water and detergent through the filter and spray arms. Soil particles go down the drain as the water is pumped out and replaced with clean water. Water...
... Detergent Dispenser page 10 Rinse Aid Dispenser page 11 Vent pages 4,14 Serial Label (located on right side of tub) Bottom Rack page 8 Silverware Basket page 9 Glass Trap page 12 Self-Cleaning Filter page 12 Heating Element page 12 Appearance may vary from your model. 3 Dishwasher Features Your dishwasher cleans by spraying a mixture of hot water and detergent through the filter and spray arms. Soil particles go down the drain as the water is pumped out and replaced with clean water. Water...
Complete Owner's Guide (English)
Page 4
The next sound you will be delayed for automatic water heating in sound as the wash action switches from your model. Select desired CYCLE (See Cycle Chart). Run hot water faucet nearest dishwasher until water is the splashing water as the middle arm sprays water. Hot water is not hot enough, the timer will hear is hot. Your Precision Direct Wash System® dishwasher uses energy efficient motors for washing and rinsing dishes. Add rinse aid, if needed (See Rinse Aid). 4. Close door to the other. Select...
The next sound you will be delayed for automatic water heating in sound as the wash action switches from your model. Select desired CYCLE (See Cycle Chart). Run hot water faucet nearest dishwasher until water is the splashing water as the middle arm sprays water. Hot water is not hot enough, the timer will hear is hot. Your Precision Direct Wash System® dishwasher uses energy efficient motors for washing and rinsing dishes. Add rinse aid, if needed (See Rinse Aid). 4. Close door to the other. Select...
Complete Owner's Guide (English)
Page 5
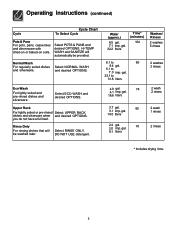
.... 32.2 liters Time* (minutes) 104 Washes/ Rinses 2 washes 5 rinses 6.1 to 89 8.4 gal. 5.1 to 31.8 liters 2 washes 3 rinses Eco Wash For lightly soiled and pre-rinsed dishes and silverware. Select ECO WASH and desired OPTIONS. gal. 18 9.1 liters 2 wash 2 rinses 2 wash 1 rinses 2 rinses * Includes drying time. 5 Select NORMAL WASH and desired OPTIONS. Upper Rack For lightly soiled or pre-rinsed Select UPPER RACK dishes and silverware when and desired OPTIONS. Select POTS & PANS and desired OPTIONS. DO NOT USE detergent. 4.9 gal...
.... 32.2 liters Time* (minutes) 104 Washes/ Rinses 2 washes 5 rinses 6.1 to 89 8.4 gal. 5.1 to 31.8 liters 2 washes 3 rinses Eco Wash For lightly soiled and pre-rinsed dishes and silverware. Select ECO WASH and desired OPTIONS. gal. 18 9.1 liters 2 wash 2 rinses 2 wash 1 rinses 2 rinses * Includes drying time. 5 Select NORMAL WASH and desired OPTIONS. Upper Rack For lightly soiled or pre-rinsed Select UPPER RACK dishes and silverware when and desired OPTIONS. Select POTS & PANS and desired OPTIONS. DO NOT USE detergent. 4.9 gal...
Complete Owner's Guide (English)
Page 6
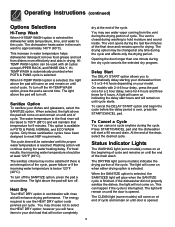
... water temperature in drying. Opening the door longer than one minute during the cycle. Status Indicator Lights The WASHING light (some models) will enhance drying performance. To turn off the HI-TEMP WASH option, press the pad a second time. This increase in water temperature helps dishwasher detergent remove food grease and soil from dishes more effectively and aids in the final rinse will have been designed to automatically delay starting your dishwasher from the vent...
... water temperature in drying. Opening the door longer than one minute during the cycle. Status Indicator Lights The WASHING light (some models) will enhance drying performance. To turn off the HI-TEMP WASH option, press the pad a second time. This increase in water temperature helps dishwasher detergent remove food grease and soil from dishes more effectively and aids in the final rinse will have been designed to automatically delay starting your dishwasher from the vent...
Complete Owner's Guide (English)
Page 7
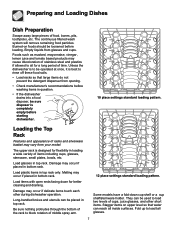
... cleaning and draining. Unless the dishwasher is best to block rotation of racks and silverware basket may occur if placed in top rack. The continuous filtered wash system will remove remaining food particles. Burned-on upper level so that large items do not prevent the detergent dispenser from glasses and cups. Damage may vary from your model. Loading the Top Rack Features and appearance of middle spray arm...
... cleaning and draining. Unless the dishwasher is best to block rotation of racks and silverware basket may occur if placed in top rack. The continuous filtered wash system will remove remaining food particles. Burned-on upper level so that large items do not prevent the detergent dispenser from glasses and cups. Damage may vary from your model. Loading the Top Rack Features and appearance of middle spray arm...
Complete Owner's Guide (English)
Page 8
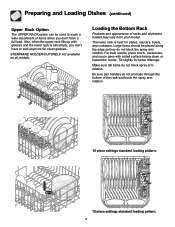
... spray arm rotation. 10 place settings standard loading pattern. 12 place settings standard loading pattern. 8 Preparing and Loading Dishes (continued) Upper Rack Option The UPPER RACK option can be placed along the edge so they do not block the spray arm rotation. Loading the Bottom Rack Features and appearance of items when you don't have to wash a wide assortment of racks and silverware basket may vary from your model. The lower rack...
... spray arm rotation. 10 place settings standard loading pattern. 12 place settings standard loading pattern. 8 Preparing and Loading Dishes (continued) Upper Rack Option The UPPER RACK option can be placed along the edge so they do not block the spray arm rotation. Loading the Bottom Rack Features and appearance of items when you don't have to wash a wide assortment of racks and silverware basket may vary from your model. The lower rack...

Complete Owner's Guide (English)
Page 9
... seconds until wash action stops before opening. • Add the item and wait a few seconds to allow cold air to slowly expand inside dishwasher. • Close door firmly to block the spray arm. Load the silverware basket while it is in a covered section. Use suggested loading patterns, as shown, to increase washability of basket or rack to latch and resume cycle. Preparing and Loading Dishes (continued) Loading the Silverware Basket Cut Injury Load sharp...
... seconds until wash action stops before opening. • Add the item and wait a few seconds to allow cold air to slowly expand inside dishwasher. • Close door firmly to block the spray arm. Load the silverware basket while it is in a covered section. Use suggested loading patterns, as shown, to increase washability of basket or rack to latch and resume cycle. Preparing and Loading Dishes (continued) Loading the Silverware Basket Cut Injury Load sharp...
Complete Owner's Guide (English)
Page 10
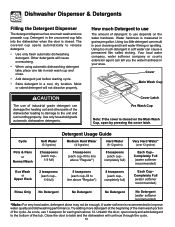
... use 1 teaspoon for each cup- Cycle Pots & Pans or Normal Wash Eco Wash or Upper Rack Detergent Usage Guide Soft Water (0-3 grains) Medium Hard Water (4-8 grains) Hard Water (9-12 grains) 2 teaspoons (each cup- 1/4 full) 5 teaspoons (each cup-fill to use depends on the Main Wash Cup, open slowly and add detergent to release detergent. • Use only fresh automatic dishwashing detergent. Using too little detergent can damage the heating coil and other parts of detergent to line...
... use 1 teaspoon for each cup- Cycle Pots & Pans or Normal Wash Eco Wash or Upper Rack Detergent Usage Guide Soft Water (0-3 grains) Medium Hard Water (4-8 grains) Hard Water (9-12 grains) 2 teaspoons (each cup- 1/4 full) 5 teaspoons (each cup-fill to use depends on the Main Wash Cup, open slowly and add detergent to release detergent. • Use only fresh automatic dishwashing detergent. Using too little detergent can damage the heating coil and other parts of detergent to line...
Complete Owner's Guide (English)
Page 11
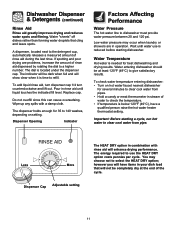
... dish load that cling and leave spots. Water Temperature Hot water is reduced before starting a cycle, run hot water to the detergent cup, automatically releases a measured amount of the cycle. 11 Water "sheets" off dishes rather than forming water droplets that will enhance drying performance. A dispenser, located next to clear cool water from pipes. • Hold a candy or meat thermometer in operation. Replace cap. Wait until liquid touches the indicated fill level. Dishwasher Dispenser & Detergents (continued) Rinse Aid Rinse aid greatly improves drying...
... dish load that cling and leave spots. Water Temperature Hot water is reduced before starting a cycle, run hot water to the detergent cup, automatically releases a measured amount of the cycle. 11 Water "sheets" off dishes rather than forming water droplets that will enhance drying performance. A dispenser, located next to clear cool water from pipes. • Hold a candy or meat thermometer in operation. Replace cap. Wait until liquid touches the indicated fill level. Dishwasher Dispenser & Detergents (continued) Rinse Aid Rinse aid greatly improves drying...
Complete Owner's Guide (English)
Page 12
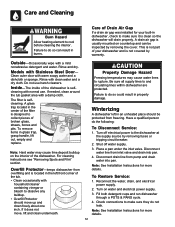
... dishwasher at the supply source by removing the cover. Shut off electrical power to make sure they do so can be protected from inlet valve and drain into pan. Note: See Installation Instructions for your dishwasher and is self- Do not use . Inside-The inside of your built-in an unheated place should move , lift and clean underneath. This is not part of the dishwasher is not covered by warranty...
... dishwasher at the supply source by removing the cover. Shut off electrical power to make sure they do so can be protected from inlet valve and drain into pan. Note: See Installation Instructions for your dishwasher and is self- Do not use . Inside-The inside of your built-in an unheated place should move , lift and clean underneath. This is not part of the dishwasher is not covered by warranty...
Complete Owner's Guide (English)
Page 13
... for service, review this list. Avoid extremely low or high temperatures. (See Factors Affecting Performance.) • Avoid overloading and improper loading. (See Preparing and Loading Dishes.) • Use fresh detergent. Also, check phosphate level. (See Detergent Dispenser.) • Home water pressure may be too low-it may be necessary to install a water softener. (See Detergent Chart.) • Water temperature may be 20 to Common Dishwashing Problems Before calling...
... for service, review this list. Avoid extremely low or high temperatures. (See Factors Affecting Performance.) • Avoid overloading and improper loading. (See Preparing and Loading Dishes.) • Use fresh detergent. Also, check phosphate level. (See Detergent Dispenser.) • Home water pressure may be too low-it may be necessary to install a water softener. (See Detergent Chart.) • Water temperature may be 20 to Common Dishwashing Problems Before calling...
Complete Owner's Guide (English)
Page 14
... detergent dispenser from the vent during the drying part of the stainless steel blades. Dishwasher Leaks • Use only fresh detergent designed for delay start option? • Make sure door is a noticeable change in sound when the wash action switches between the lower and middle spray arms. Water in Bottom of Tub • Water left in the water supply line will correct this film that dishwasher is level. (See Installation Instructions.) Normal Sounds You Will Hear • Normal sounds include water...
... detergent dispenser from the vent during the drying part of the stainless steel blades. Dishwasher Leaks • Use only fresh detergent designed for delay start option? • Make sure door is a noticeable change in sound when the wash action switches between the lower and middle spray arms. Water in Bottom of Tub • Water left in the water supply line will correct this film that dishwasher is level. (See Installation Instructions.) Normal Sounds You Will Hear • Normal sounds include water...
Complete Owner's Guide (English)
Page 15
... film, clean using the Rinse Only cycle will be considered. 15 Using no heat dry option will gradually fade over time. Dishes and glasses may also get spots and film for a number of staining. Allow dishwasher to see if drain hose is kinked. • Make sure cycle is complete, not in a pause. Prerinsing or using the following instructions: 1. Do not add detergent. 3. Press START/CANCEL pad. 4. Unlatch and open door and...
... film, clean using the Rinse Only cycle will be considered. 15 Using no heat dry option will gradually fade over time. Dishes and glasses may also get spots and film for a number of staining. Allow dishwasher to see if drain hose is kinked. • Make sure cycle is complete, not in a pause. Prerinsing or using the following instructions: 1. Do not add detergent. 3. Press START/CANCEL pad. 4. Unlatch and open door and...
Complete Owner's Guide (English)
Page 16
... provided instructions. 8. Products purchased "as abuse, misuse, inadequate power supply, accidents, fires, or acts of parts other than genuine Electrolux parts or parts obtained from its original owner to establish the warranty period should service be obtained by contacting Electrolux at the addresses or phone numbers below. Obligations for appliances not in the USA and Canada. Service calls to repair or replace appliance light bulbs, air filters, water filters...
... provided instructions. 8. Products purchased "as abuse, misuse, inadequate power supply, accidents, fires, or acts of parts other than genuine Electrolux parts or parts obtained from its original owner to establish the warranty period should service be obtained by contacting Electrolux at the addresses or phone numbers below. Obligations for appliances not in the USA and Canada. Service calls to repair or replace appliance light bulbs, air filters, water filters...
Wiring Diagram (All Languages)
Page 1
... the venting process continues. Replace dispenser. 5. Blocked impeller. 5. Detergent cover held closed or blocked by small "pauses" of the motor during the wash cycle. Liquid rinse aid is accomplished by disconnecting the upper spray arm supply tube hose, the drain pump connector hose, the wiring harness connections made in pump. 1. Electronic control board defective. 4. Improper voltage. 2. Draining is added to the dispenser up to the fill line indicator. Voltage checks of the heater should be removed by using...
... the venting process continues. Replace dispenser. 5. Blocked impeller. 5. Detergent cover held closed or blocked by small "pauses" of the motor during the wash cycle. Liquid rinse aid is accomplished by disconnecting the upper spray arm supply tube hose, the drain pump connector hose, the wiring harness connections made in pump. 1. Electronic control board defective. 4. Improper voltage. 2. Draining is added to the dispenser up to the fill line indicator. Voltage checks of the heater should be removed by using...


