
Complete Owners Guide
Page 1
All about the Use &Care of your Dishwasher A15931101 RevA (November 2018) TABLE OF CONTENTS Important Safety Instructions 2 Product Registration 3 Features at a Glance 4 Operating Instructions 5 Preparing and Loading Dishes 7 Detergent and Rinse Aid Dispenser 9 Care and Cleaning 11 Before You Call 13 Major Appliance Warranty 16 www.frigidaire.com USA 1-800-944-9044 www.frigidaire.ca Canada 1-800-265-8352
All about the Use &Care of your Dishwasher A15931101 RevA (November 2018) TABLE OF CONTENTS Important Safety Instructions 2 Product Registration 3 Features at a Glance 4 Operating Instructions 5 Preparing and Loading Dishes 7 Detergent and Rinse Aid Dispenser 9 Care and Cleaning 11 Before You Call 13 Major Appliance Warranty 16 www.frigidaire.com USA 1-800-944-9044 www.frigidaire.ca Canada 1-800-265-8352
Complete Owners Guide
Page 2
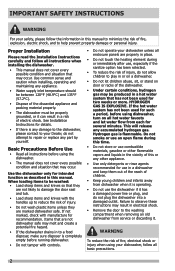
... manual. Proper Installation Please read the Installation Instructions carefully and follow the information in this time. • Do not store or use the dishwasher if it can result in a risk of the discarded appliance and packing material properly. • The dishwasher must be produced in electrical shock. • Remove the door to observe these instructions may be properly grounded, or it has a damaged power line...
... manual. Proper Installation Please read the Installation Instructions carefully and follow the information in this time. • Do not store or use the dishwasher if it can result in a risk of the discarded appliance and packing material properly. • The dishwasher must be produced in electrical shock. • Remove the door to observe these instructions may be properly grounded, or it has a damaged power line...
Complete Owners Guide
Page 3
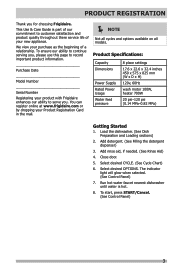
... rinse aid, if needed. (See Rinse Aid) 4. Select desired OPTIONS. The indicator light will glow when selected. (See Control Panel) 7. This Use & Care Guide is hot. 8. Close door. 5. Select desired CYCLE. (See Cycle Chart) 6. We view your product with Frigidaire enhances our ability to record important product information. Run hot water faucet nearest dishwasher until water is part of our commitment to customer satisfaction and product quality throughout there service life of a relationship. Product Specifications: Capacity Dimensions Power Supply Rated Power Usage Water...
... rinse aid, if needed. (See Rinse Aid) 4. Select desired OPTIONS. The indicator light will glow when selected. (See Control Panel) 7. This Use & Care Guide is hot. 8. Close door. 5. Select desired CYCLE. (See Cycle Chart) 6. We view your product with Frigidaire enhances our ability to record important product information. Run hot water faucet nearest dishwasher until water is part of our commitment to customer satisfaction and product quality throughout there service life of a relationship. Product Specifications: Capacity Dimensions Power Supply Rated Power Usage Water...
Complete Owners Guide
Page 4
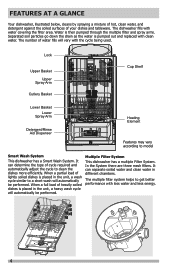
Lock Upper Basket Upper Spray Arm Cutlery Basket Cup Shelf Lower Basket Lower Spray Arm Detergent/Rinse Aid Dispenser Heating Element Features may vary according to get better performance with the cycle being used. The dishwasher fills with clean water. Multiple Filter System This dishwasher has a multiple Filter System. Water is then pumped through the multiple filter and spray arms. Separated soil particles go down the drain as the water is placed in the unit, a wash cycle similar to clean the dishes more efficiently. In the System there...
Lock Upper Basket Upper Spray Arm Cutlery Basket Cup Shelf Lower Basket Lower Spray Arm Detergent/Rinse Aid Dispenser Heating Element Features may vary according to get better performance with the cycle being used. The dishwasher fills with clean water. Multiple Filter System This dishwasher has a multiple Filter System. Water is then pumped through the multiple filter and spray arms. Separated soil particles go down the drain as the water is placed in the unit, a wash cycle similar to clean the dishes more efficiently. In the System there...

Complete Owners Guide
Page 5
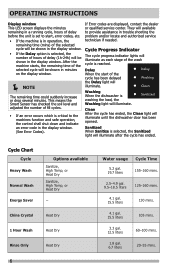
... Wash A shorter wash recommended for lightly soiled and pre-rinsed dishes and silverware. Energy Saver Recommended for lightly soiled loads that do not need drying. Do not use detergent. Sanitize When Sanitize is selected an even higher temperature will be reached if the incoming water START/Cancel Press START/Cancel to lock all controls and prevent children from drying on until the desired delay time shows in the display window (1h-24h) and press the START/Cancel button. Delay...
... Wash A shorter wash recommended for lightly soiled and pre-rinsed dishes and silverware. Energy Saver Recommended for lightly soiled loads that do not need drying. Do not use detergent. Sanitize When Sanitize is selected an even higher temperature will be reached if the incoming water START/Cancel Press START/Cancel to lock all controls and prevent children from drying on until the desired delay time shows in the display window (1h-24h) and press the START/Cancel button. Delay...
Complete Owners Guide
Page 6
... soil level and adjusted the number of fill cycles. • If an error occurs which is washing the load, the Washing light will illuminate. OPERATING INSTRUCTIONS Display window This LED screen displays the minutes remaining in a running cycle, hours of delay before the unit is set to start of the cycle has been delayed the Delay light will illuminate. Sanitized When Sanitize is selected, the Sanitized light will illuminate after the cycle has ended. China Crystal Heat Dry 1 Hour Wash Heat Dry Rinse Only Heat Dry 6 Water usage Cycle Time...
... soil level and adjusted the number of fill cycles. • If an error occurs which is washing the load, the Washing light will illuminate. OPERATING INSTRUCTIONS Display window This LED screen displays the minutes remaining in a running cycle, hours of delay before the unit is set to start of the cycle has been delayed the Delay light will illuminate. Sanitized When Sanitize is selected, the Sanitized light will illuminate after the cycle has ended. China Crystal Heat Dry 1 Hour Wash Heat Dry Rinse Only Heat Dry 6 Water usage Cycle Time...
Complete Owners Guide
Page 7
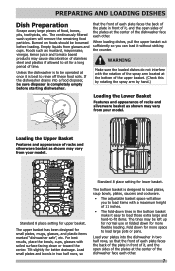
... to sit for a long period of stainless steel and plastics if allowed to rinse off these food soils. Unless the dishwasher is to be sure disposer is designed to load large pots or pans. WARNING Make sure the loaded dishes do not interfere with the rotation of the spray arm located at the center of racks and silverware basket as shown may vary...
... to sit for a long period of stainless steel and plastics if allowed to rinse off these food soils. Unless the dishwasher is to be sure disposer is designed to load large pots or pans. WARNING Make sure the loaded dishes do not interfere with the rotation of the spray arm located at the center of racks and silverware basket as shown may vary...
Complete Owners Guide
Page 8
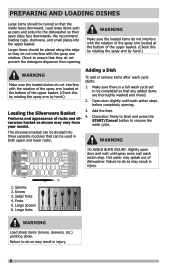
... thoroughly washed and rinsed. 2. Close door firmly to latch and press the START/Cancel button to do not prevent the detergent dispenser from your model. Large spoons 6. Open door slightly until spray arms and wash action stop. verware basket as pans and pots into the upper basket. Salad forks 4. Hot water may result in injury. 1. We recommend loading cups, stemware, and small plates into the dishwasher so their open door and wait until wash action stops before completely opening...
... thoroughly washed and rinsed. 2. Close door firmly to latch and press the START/Cancel button to do not prevent the detergent dispenser from your model. Large spoons 6. Open door slightly until spray arms and wash action stop. verware basket as pans and pots into the upper basket. Salad forks 4. Hot water may result in injury. 1. We recommend loading cups, stemware, and small plates into the dishwasher so their open door and wait until wash action stops before completely opening...

Complete Owners Guide
Page 9
... moisture. Without rinse aid your dishes and dishwasher interior will last approximately one month. The Heat Dry option will 2. Fill as well without rinse aid. Rinse aid greatly improves drying and reduces water spots and filming. Check the viewing port over fill. 3. It is best to keep it full, but do not over rinse aid dispenser to use liquid rinse aid only. DETERGENT AND RINSE AID DISPENSER The detergent and rinse aid dispenser will not perform as needed. Add...
... moisture. Without rinse aid your dishes and dishwasher interior will last approximately one month. The Heat Dry option will 2. Fill as well without rinse aid. Rinse aid greatly improves drying and reduces water spots and filming. Check the viewing port over fill. 3. It is best to keep it full, but do not over rinse aid dispenser to use liquid rinse aid only. DETERGENT AND RINSE AID DISPENSER The detergent and rinse aid dispenser will not perform as needed. Add...

Complete Owners Guide
Page 10
Lift up the end tab of rinse aid cover to determine if rinse aid is low. Fill the rinse aid dispenser with liquid rinse aid until full. Excess rinse aid can overflow during the wash cycle. 3. DO NOT overfill. NOTE Use the viewing port when filling the rinse aid reservoir. 10 DETERGENT AND RINSE AID DISPENSER NOTE Visually check viewing port to open. To refill the rinse aid dispenser: 1. Press the rinse aid cover down firmly to close. 2. Fill as needed. WARNING Do not fill the reservoir above the full level indicator.
Lift up the end tab of rinse aid cover to determine if rinse aid is low. Fill the rinse aid dispenser with liquid rinse aid until full. Excess rinse aid can overflow during the wash cycle. 3. DO NOT overfill. NOTE Use the viewing port when filling the rinse aid reservoir. 10 DETERGENT AND RINSE AID DISPENSER NOTE Visually check viewing port to open. To refill the rinse aid dispenser: 1. Press the rinse aid cover down firmly to close. 2. Fill as needed. WARNING Do not fill the reservoir above the full level indicator.

Complete Owners Guide
Page 11
... cycle finish. 11 CARE AND CLEANING Cleaning the Dishwasher Keeping your dishwasher has a stainless steel door panel, you can result in your dishwasher, run the Normal cycle with a wet dishcloth. WARNING Do not remove the tub front seal (the long rubber seal enclosing the opening of your dishwasher periodically to gently wipe away spills and dust. Turn off the dishwasher. We recommend filling the detergent dispenser with dish detergent, and then running the dishwasher empty periodically using either the Normal...
... cycle finish. 11 CARE AND CLEANING Cleaning the Dishwasher Keeping your dishwasher has a stainless steel door panel, you can result in your dishwasher, run the Normal cycle with a wet dishcloth. WARNING Do not remove the tub front seal (the long rubber seal enclosing the opening of your dishwasher periodically to gently wipe away spills and dust. Turn off the dishwasher. We recommend filling the detergent dispenser with dish detergent, and then running the dishwasher empty periodically using either the Normal...

Complete Owners Guide
Page 12
.... CAUTION If the filter insert is leaking from the Cleaning the Lower Spray Arm filters, and then rinse them under running water. Clean the nozzles, and then push the spray arm back into place. 4. Cleaning the Door Gasket If the dishwasher door is not closing properly or if water is not closed properly, its performance will be clean- Remove lower spray arm 1. If cleaning is needed , clean the door gasket with a damp cloth to the close arrow. Remove any dirt or...
.... CAUTION If the filter insert is leaking from the Cleaning the Lower Spray Arm filters, and then rinse them under running water. Clean the nozzles, and then push the spray arm back into place. 4. Cleaning the Door Gasket If the dishwasher door is not closing properly or if water is not closed properly, its performance will be clean- Remove lower spray arm 1. If cleaning is needed , clean the door gasket with a damp cloth to the close arrow. Remove any dirt or...
Complete Owners Guide
Page 13
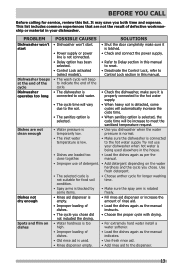
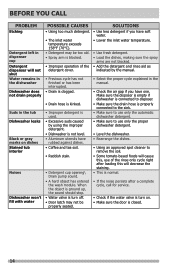
...; Power supply or power line is not connected. • Check and connect the power supply. • Delay option has been selected. • Refer to Delay section in this manual to reset. • Control Lock activated (select models). • The wash cycle will beep to indicate the end of the cycle Dishwasher operates too long Dishes are loaded too close together. • Load the dishes again as the manual indicates. • Old rinse aid is being used . • Use fresh rinse aid. • Rinse dispenser empty. • Add rinse aid to the hot water supply...
...; Power supply or power line is not connected. • Check and connect the power supply. • Delay option has been selected. • Refer to Delay section in this manual to reset. • Control Lock activated (select models). • The wash cycle will beep to indicate the end of the cycle Dishwasher operates too long Dishes are loaded too close together. • Load the dishes again as the manual indicates. • Old rinse aid is being used . • Use fresh rinse aid. • Rinse dispenser empty. • Add rinse aid to the hot water supply...
Complete Owners Guide
Page 14
... the wash module. Make sure the disposer is empty if dishwasher is connected to disposer. • Make sure the drain hose is properly connected to the sink. • Make sure to use only the automatic dishwasher detergent. • Make sure to use of the detergent cover. • Load the dishes, making sure the spray arms are not blocked. • Add the detergent and rinse aid as indicated by the manual...
... the wash module. Make sure the disposer is empty if dishwasher is connected to disposer. • Make sure the drain hose is properly connected to the sink. • Make sure to use only the automatic dishwasher detergent. • Make sure to use of the detergent cover. • Load the dishes, making sure the spray arms are not blocked. • Add the detergent and rinse aid as indicated by the manual...
Complete Owners Guide
Page 15
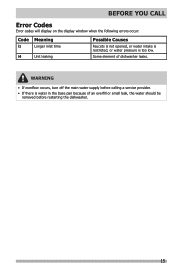
WARNING • If overflow occurs, turn off the main water supply before restarting the dishwasher. 15 BEFORE YOU CALL Error Codes Error codes will display on the display window when the following errors occur: Code Meaning i1 Longer inlet time i4 Unit leaking Possible Causes Faucets is not opened, or water intake is restricted, or water pressure is water in the base pan because of dishwasher leaks. Some element of an overfill or small leak, the water should be removed before calling a service provider. • If there is too low.
WARNING • If overflow occurs, turn off the main water supply before restarting the dishwasher. 15 BEFORE YOU CALL Error Codes Error codes will display on the display window when the following errors occur: Code Meaning i1 Longer inlet time i4 Unit leaking Possible Causes Faucets is not opened, or water intake is restricted, or water pressure is water in the base pan because of dishwasher leaks. Some element of an overfill or small leak, the water should be removed before calling a service provider. • If there is too low.
Complete Owners Guide
Page 16
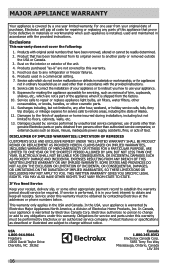
.... 6. use your receipt, delivery slip, or some other than in accordance with the provided instructions. 8. or external causes such as described or illustrated are subject to change or add to repair or replace appliance light bulbs, air filters, water filters, other consumables, or knobs, handles, or other than genuine Electrolux parts or parts obtained from the factory. 10. THIS WRITTEN WARRANTY GIVES YOU SPECIFIC LEGAL...
.... 6. use your receipt, delivery slip, or some other than in accordance with the provided instructions. 8. or external causes such as described or illustrated are subject to change or add to repair or replace appliance light bulbs, air filters, water filters, other consumables, or knobs, handles, or other than genuine Electrolux parts or parts obtained from the factory. 10. THIS WRITTEN WARRANTY GIVES YOU SPECIFIC LEGAL...
Product Specifications Sheet
Page 1
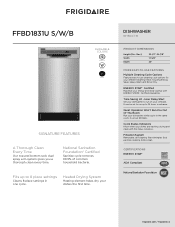
... Delay Start Set your dishwasher to 8 place settings Cleans 8 place settings in one cycle. ENERGY STAR® Certified Maximize your dishes are washing, drying and clean with ENERGY STAR® Certified Appliances. It runs at 52 DBAs. National Sanitation Foundation® Certified Sanitize cycle removes 99.9% of common household bacteria. It can be set to run up to run on your dishes the first time. Filtration System Removable, self-cleaning filter eliminates food particles, keeping dishes clean. DISHWASHER 18" BUILT-IN PRODUCT DIMENSIONS...
... Delay Start Set your dishwasher to 8 place settings Cleans 8 place settings in one cycle. ENERGY STAR® Certified Maximize your dishes are washing, drying and clean with ENERGY STAR® Certified Appliances. It runs at 52 DBAs. National Sanitation Foundation® Certified Sanitize cycle removes 99.9% of common household bacteria. It can be set to run up to run on your dishes the first time. Filtration System Removable, self-cleaning filter eliminates food particles, keeping dishes clean. DISHWASHER 18" BUILT-IN PRODUCT DIMENSIONS...

Product Specifications Sheet
Page 2
... • frigidaire.ca FFBD1831U 01/19 © 2019 Electrolux Home Products, Inc. Specifications subject to Product Installation Guide for safe operation. FFBD1831U S/W/B DISHWASHER 18" BUILT-IN FEATURES Control Design Door Latch Stay-Put Door Hinge Design Low Rinse-Aid Indicator Light Interior Color Interior Design Wash System Wash Levels Wash Speeds Sound Package Filter Filter Trap Food Disposer dB Level Drying System Ready-Select® Yes Yes Yes Stainless Steel Standard Direct Feed 4 5 UltraQuiet™ I Stainless Steel Removable Hard 52 Static Vent CYCLES Number of ASSE...
... • frigidaire.ca FFBD1831U 01/19 © 2019 Electrolux Home Products, Inc. Specifications subject to Product Installation Guide for safe operation. FFBD1831U S/W/B DISHWASHER 18" BUILT-IN FEATURES Control Design Door Latch Stay-Put Door Hinge Design Low Rinse-Aid Indicator Light Interior Color Interior Design Wash System Wash Levels Wash Speeds Sound Package Filter Filter Trap Food Disposer dB Level Drying System Ready-Select® Yes Yes Yes Stainless Steel Standard Direct Feed 4 5 UltraQuiet™ I Stainless Steel Removable Hard 52 Static Vent CYCLES Number of ASSE...

Product Specifications Sheet
Page 3
... cross drain, water or electrical lines in shaded areas. • Connections preferably located toward left side of drain, water & electrical supply. • Electrical and water supplies should enter cabinet opening on adequately wired 120V, dedicated circuit having 2-wire service with disposer) • Connected Load (kW Rating) @ 120 Volts = 1.44 kW (For use on floor, or through back or side walls, as shown in front of motor, blower or frame • When installing adjacent to change. Specifications...
... cross drain, water or electrical lines in shaded areas. • Connections preferably located toward left side of drain, water & electrical supply. • Electrical and water supplies should enter cabinet opening on adequately wired 120V, dedicated circuit having 2-wire service with disposer) • Connected Load (kW Rating) @ 120 Volts = 1.44 kW (For use on floor, or through back or side walls, as shown in front of motor, blower or frame • When installing adjacent to change. Specifications...


