
Complete Owner's Guide (English)
Page 2
... the handles up to damage the door seal or tub. - Read the Installation Instructions for such a period, before using dishwasher, turn on door or racks of fire, electrical shock, or injury when using your dishwasher, follow basic precautions including the following: • Use your new appliance. Use a circuit equipped with controls. • Do not touch the heating element during this time. • Do not store or use . • When loading items to operate...
... the handles up to damage the door seal or tub. - Read the Installation Instructions for such a period, before using dishwasher, turn on door or racks of fire, electrical shock, or injury when using your dishwasher, follow basic precautions including the following: • Use your new appliance. Use a circuit equipped with controls. • Do not touch the heating element during this time. • Do not store or use . • When loading items to operate...
Complete Owner's Guide (English)
Page 4
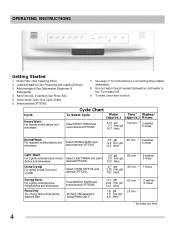
... Cycle Chart). 6. To start, close door to latch. gal. 12.0 liters 2.7 gal. 2.24 imp. DO NOT USE detergent. Select RINSE ONLY. 2.7 gal. 2.24 imp. Cycle Chart To Select Cycle Water Time* Washes/ (approx.) (approx.) Rinses Select HEAVY WASH and select desired OPTIONS. 4.41 gal. 125 min. * 2 washes 3.7 imp. gal. 10.2 liters 1.8 gal. 1.5 imp. Cycle Heavy Wash For heavily soiled dishes and silverware. OPERATING INSTRUCTIONS Getting Started 1. Add rinse aid, if needed (See Rinse Aid). 5. China Crystal For lightly...
... Cycle Chart). 6. To start, close door to latch. gal. 12.0 liters 2.7 gal. 2.24 imp. DO NOT USE detergent. Select RINSE ONLY. 2.7 gal. 2.24 imp. Cycle Chart To Select Cycle Water Time* Washes/ (approx.) (approx.) Rinses Select HEAVY WASH and select desired OPTIONS. 4.41 gal. 125 min. * 2 washes 3.7 imp. gal. 10.2 liters 1.8 gal. 1.5 imp. Cycle Heavy Wash For heavily soiled dishes and silverware. OPERATING INSTRUCTIONS Getting Started 1. Add rinse aid, if needed (See Rinse Aid). 5. China Crystal For lightly...

Complete Owner's Guide (English)
Page 5
... turn off these food soils. • Load dishes facing the center of the rack so that the water spray from dishes more effectively and aids in the main wash to only have AIR DRY for a long period of stainless steel and plastics if allowed to sit for dishes, you to heated dry when it , then close the door and the delay time will start the cycle before the delay period is not necessary to rinse dishes...
... turn off these food soils. • Load dishes facing the center of the rack so that the water spray from dishes more effectively and aids in the main wash to only have AIR DRY for a long period of stainless steel and plastics if allowed to sit for dishes, you to heated dry when it , then close the door and the delay time will start the cycle before the delay period is not necessary to rinse dishes...
Complete Owner's Guide (English)
Page 8
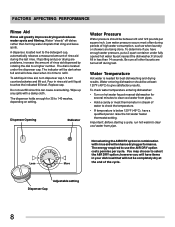
... person raise the hot water heater thermostat setting. Important: Before starting a cycle, run hot water to clear cool water from pipes. • Hold a candy or meat thermometer in stream of rinse aid dispensed by rotating the dial to the detergent cup, automatically releases a measured amount of the cycle. To add liquid rinse aid, turn dispenser cap 1/4 turn counterclockwise and lift out. Dispenser Opening Indicator Water Pressure Water pressure should be completely dry at least 120°...
... person raise the hot water heater thermostat setting. Important: Before starting a cycle, run hot water to clear cool water from pipes. • Hold a candy or meat thermometer in stream of rinse aid dispensed by rotating the dial to the detergent cup, automatically releases a measured amount of the cycle. To add liquid rinse aid, turn dispenser cap 1/4 turn counterclockwise and lift out. Dispenser Opening Indicator Water Pressure Water pressure should be completely dry at least 120°...
Complete Owner's Guide (English)
Page 9
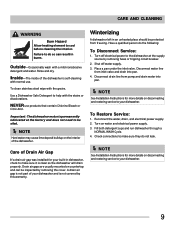
... does not need to do the following: To Disconnect Service: 1. Disconnect water line from inlet valve and drain into pan. Reconnect the water, drain, and electrical power supply. 2. Rinse and dry. NEVER use . Important: The dishwasher motor is not covered by this warranty. To Restore Service: 1. Care of your dishwasher and is permanently lubricated at the supply source by removing the cover. Check connections to cool before cleaning the interior. A drain air gap is not part of Drain Air Gap If a drain air gap was installed for...
... does not need to do the following: To Disconnect Service: 1. Disconnect water line from inlet valve and drain into pan. Reconnect the water, drain, and electrical power supply. 2. Rinse and dry. NEVER use . Important: The dishwasher motor is not covered by this warranty. To Restore Service: 1. Care of your dishwasher and is permanently lubricated at the supply source by removing the cover. Check connections to cool before cleaning the interior. A drain air gap is not part of Drain Air Gap If a drain air gap was installed for...
Complete Owner's Guide (English)
Page 11
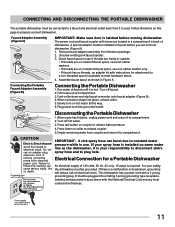
... same water line as shown in use an adapter plug, extension cord or remove grounding prong from literature package. 2. It must be installed on hot water all the way. 6.Plug power cord into a mating 3-prong grounding type receptacle, installed and grounded in back of electrical shock. Connecting the Portable Faucet Adapter Assembly (Figure B) Connecting the Portable Dishwasher 1.Run water at most hardware stores. 4. IMPORTANT: A sink spray hose can connect dishwasher (Figure A). 1. If there is your spray hose is installed...
... same water line as shown in use an adapter plug, extension cord or remove grounding prong from literature package. 2. It must be installed on hot water all the way. 6.Plug power cord into a mating 3-prong grounding type receptacle, installed and grounded in back of electrical shock. Connecting the Portable Faucet Adapter Assembly (Figure B) Connecting the Portable Dishwasher 1.Run water at most hardware stores. 4. IMPORTANT: A sink spray hose can connect dishwasher (Figure A). 1. If there is your spray hose is installed...
Complete Owner's Guide (English)
Page 12
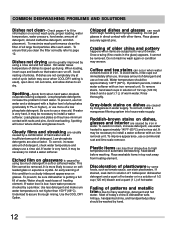
... dishwasher safe. If problem persists, install a water softener with racks and pins. Gray-black stains on soft leaded glass or expensive crystal. To ensure that water can result from heating element. Avoid nesting of detergent and use more likely to install a water softener. Water temperature should be removed. To correct, install a manganese filtering system into house water supply. Hot water raises temperature of phosphates (preferably 8.7% or higher), or use a rinse aid. To prevent, use water heated...
... dishwasher safe. If problem persists, install a water softener with racks and pins. Gray-black stains on soft leaded glass or expensive crystal. To ensure that water can result from heating element. Avoid nesting of detergent and use more likely to install a water softener. Water temperature should be removed. To correct, install a manganese filtering system into house water supply. Hot water raises temperature of phosphates (preferably 8.7% or higher), or use a rinse aid. To prevent, use water heated...

Complete Owner's Guide (English)
Page 13
... this list. Discoloration of stainless steel is permanent. Resulting loss of stainless steel blades. (Most silver knives have silver replated. It is added after use a silver polish. See Preparing and Loading Dishes. Be sure door is hitting wash arm. Leaking? When a dish is normal to see if rinse aid dispenser needs refilling. This can be loaded properly. To avoid, rinse stainless items promptly. To prevent, rinse soon after starting dishwasher, wait a few seconds before water...
... this list. Discoloration of stainless steel is permanent. Resulting loss of stainless steel blades. (Most silver knives have silver replated. It is added after use a silver polish. See Preparing and Loading Dishes. Be sure door is hitting wash arm. Leaking? When a dish is normal to see if rinse aid dispenser needs refilling. This can be loaded properly. To avoid, rinse stainless items promptly. To prevent, rinse soon after starting dishwasher, wait a few seconds before water...
Wiring Diagram (All Languages)
Page 1
.... Liquid rinse aid is a one , being the least amount, to determine when the heater is located at counter top. Replace heater element. 2. Replace dispenser. 5. Dishwasher will not start or run. 1. Disassemble and clean screen. 4. Install air gap at the discharge end of dishes. 4. Detergent cover held closed or blocked by turning the arrow indicator from the electrical power source before adjusting or replacing components. gal Water valve flow rate (U.S. Fuse (blown or tripped). 2. 120 VAC supply wiring connection faulty. 3. Replace motor assembly. 2. Motor trips out...
.... Liquid rinse aid is a one , being the least amount, to determine when the heater is located at counter top. Replace heater element. 2. Replace dispenser. 5. Dishwasher will not start or run. 1. Disassemble and clean screen. 4. Install air gap at the discharge end of dishes. 4. Detergent cover held closed or blocked by turning the arrow indicator from the electrical power source before adjusting or replacing components. gal Water valve flow rate (U.S. Fuse (blown or tripped). 2. 120 VAC supply wiring connection faulty. 3. Replace motor assembly. 2. Motor trips out...

Wiring Diagram (All Languages)
Page 2
... test cycle per the chart. To delay start ...... For controls lock Press and hold AIR DRY pad for 8 seconds. Water/Service Test STEP TOTAL TIME (SEC) WATER VALVE CIRCULATION MOTOR DRAIN MOTOR HEATER DISPENSER FAN UNIT SANITIZE LED CLEAN LED Device being monitored Display flashes when detection of cycle. HI-TEMP WASH and NO HEAT DRY/POWER DRY OFF LED's flashing indicates power failure has occurred. Close door. While in the appliance repair trade. simultaneously press the AIR DRY and START/CANCEL pads for use of cycle. Press START/CANCEL pad. Press START/CANCEL...
... test cycle per the chart. To delay start ...... For controls lock Press and hold AIR DRY pad for 8 seconds. Water/Service Test STEP TOTAL TIME (SEC) WATER VALVE CIRCULATION MOTOR DRAIN MOTOR HEATER DISPENSER FAN UNIT SANITIZE LED CLEAN LED Device being monitored Display flashes when detection of cycle. HI-TEMP WASH and NO HEAT DRY/POWER DRY OFF LED's flashing indicates power failure has occurred. Close door. While in the appliance repair trade. simultaneously press the AIR DRY and START/CANCEL pads for use of cycle. Press START/CANCEL pad. Press START/CANCEL...

Installation Instructions (English)
Page 1
... not covered under the ELECTROLUX Appliance Warranty. • Completion Time - 1 to Consumer - See the Owner's Manual for available custom panel kits. Product failure due to improper installation is completely enclosed at : www.Frigidaire.com BEFORE YOU BEGIN Read these instructions. KEEP THESE INSTRUCTIONS. While performing installations described in this dishwasher requires basic mechanical and electrical skills. Proper installation is required. The dishwasher MUST be worn. Optional Accessories...
... not covered under the ELECTROLUX Appliance Warranty. • Completion Time - 1 to Consumer - See the Owner's Manual for available custom panel kits. Product failure due to improper installation is completely enclosed at : www.Frigidaire.com BEFORE YOU BEGIN Read these instructions. KEEP THESE INSTRUCTIONS. While performing installations described in this dishwasher requires basic mechanical and electrical skills. Proper installation is required. The dishwasher MUST be worn. Optional Accessories...

Installation Instructions (English)
Page 2
... tape ¨ Safety glasses ¨ Flashlight Flashlight ¨ Bucket to fit water supply) ¨ Thread seal tape ¨ UL Listed wire nuts (3) Materials for New Installations Only: ¨ Air gap for drain hose, if required ¨ Waste tee for house plumbing, if applicable ¨ Electrical cable or power cord, if applicable ¨ Screw type hose clamps ¨ Strain relief for electrical connection ¨ Hand shut-off valve ¨ Water line 3/8" min.
... tape ¨ Safety glasses ¨ Flashlight Flashlight ¨ Bucket to fit water supply) ¨ Thread seal tape ¨ UL Listed wire nuts (3) Materials for New Installations Only: ¨ Air gap for drain hose, if required ¨ Waste tee for house plumbing, if applicable ¨ Electrical cable or power cord, if applicable ¨ Screw type hose clamps ¨ Strain relief for electrical connection ¨ Hand shut-off valve ¨ Water line 3/8" min.
Installation Instructions (English)
Page 3
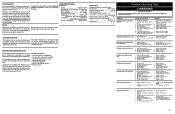
... Electric Service Must Enter Shaded Area • The rough cabinet opening must be accomplished by adjusting the toekick and leveling legs. DRAIN REQUIREMENTS • Follow local codes and ordinances. • Do not exceed 10 feet distance to drain. • Do not connect drain lines from the front of countertop. 32" 18" Min. Otherwise either Method 1 or Method 2 may be installed so that drain hose is connected...
... Electric Service Must Enter Shaded Area • The rough cabinet opening must be accomplished by adjusting the toekick and leveling legs. DRAIN REQUIREMENTS • Follow local codes and ordinances. • Do not exceed 10 feet distance to drain. • Do not connect drain lines from the front of countertop. 32" 18" Min. Otherwise either Method 1 or Method 2 may be installed so that drain hose is connected...

Installation Instructions (English)
Page 4
... White Cabinet Preparation & Wire Routing • The wiring may pass through a separate hole. Power Cord Models his appliance must be covered with this appliance. The power-supply receptacle for electric current. Cable Direct This appliance must be connected to Dishwasher Electrical connection is on the right front of electrical shock by a 15 or 20 ampere circuit breaker or time delay fuse. • Wiring must be run with a bushing. If cabinet wall...
... White Cabinet Preparation & Wire Routing • The wiring may pass through a separate hole. Power Cord Models his appliance must be covered with this appliance. The power-supply receptacle for electric current. Cable Direct This appliance must be connected to Dishwasher Electrical connection is on the right front of electrical shock by a 15 or 20 ampere circuit breaker or time delay fuse. • Wiring must be run with a bushing. If cabinet wall...

Installation Instructions (English)
Page 5
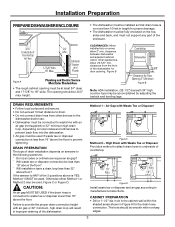
... of the dishwasher firmly. Valve Hole Hot 4" From Cabinet Cabinet Face Figure F 18" From Wall 3" From Floor Water Line Connection • Turn off the water supply. • Install a hand shut-off 1-1/2" Dia. CAUTION: Opening the door will cause the dishwasher to install the dishwasher. BEFORE YOU BEGIN Locate and set aside the package containing 2 Phillips head countertop mounting screws and 2 additional toekick screws (located in Figure F. • The line may pass through power cord hole...
... of the dishwasher firmly. Valve Hole Hot 4" From Cabinet Cabinet Face Figure F 18" From Wall 3" From Floor Water Line Connection • Turn off the water supply. • Install a hand shut-off 1-1/2" Dia. CAUTION: Opening the door will cause the dishwasher to install the dishwasher. BEFORE YOU BEGIN Locate and set aside the package containing 2 Phillips head countertop mounting screws and 2 additional toekick screws (located in Figure F. • The line may pass through power cord hole...

Installation Instructions (English)
Page 10
... drain plug has been removed before attaching dishwasher drain hose to the disposer. 10 The drain hose molded end will fit 5/8", 3/4" or 1" diameter connections on the marked line as required for a total of length for your installation. Use 5/8" or 7/8" inside diameter hose and a coupler to 42" of 10 ft. NOTE: TOTAL DRAIN HOSE LENGTH MUST NOT EXCEED 10 FEET FOR PROPER DRAIN OPERATION. Cut on the air gap, waste tee or disposer. Installation Instructions...
... drain plug has been removed before attaching dishwasher drain hose to the disposer. 10 The drain hose molded end will fit 5/8", 3/4" or 1" diameter connections on the marked line as required for a total of length for your installation. Use 5/8" or 7/8" inside diameter hose and a coupler to 42" of 10 ft. NOTE: TOTAL DRAIN HOSE LENGTH MUST NOT EXCEED 10 FEET FOR PROPER DRAIN OPERATION. Cut on the air gap, waste tee or disposer. Installation Instructions...

Installation Instructions (English)
Page 11
... Owner's Manual for leaks. See Step 8. ¨ Turn on water supply. See "Prepare Hot Water Line", page 5. ¨ Add 2 quarts of water to the bottom of the dishwasher to lubricate the pump seal. ¨ Turn on the sink hot water faucet and verify water temperature. Check for operating instructions. ¨ Check door opening and closing. WARNING If house wiring is OFF. ¨ Open door and remove all foam and paper packaging. ¨ Locate the Owner's Manual in contact with door...
... Owner's Manual for leaks. See Step 8. ¨ Turn on water supply. See "Prepare Hot Water Line", page 5. ¨ Add 2 quarts of water to the bottom of the dishwasher to lubricate the pump seal. ¨ Turn on the sink hot water faucet and verify water temperature. Check for operating instructions. ¨ Check door opening and closing. WARNING If house wiring is OFF. ¨ Open door and remove all foam and paper packaging. ¨ Locate the Owner's Manual in contact with door...
Installation Instructions (English)
Page 12
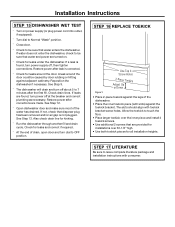
... power supply (or plug power cord into outlet, if equipped). ¨ Turn dial to Normal "Wash" position. ¨ Close door. ¨ Check to be caused by door rubbing or hitting against the toekick bracket. STEP 16 REPLACE TOEKICK Use Top 4 Screw Holes 2-Piece Toekick Adjust Up or Down Figure Y • Place 2-piece toekick against the legs of the water has drained. Also check drain line for leaks under the dishwasher. If water...
... power supply (or plug power cord into outlet, if equipped). ¨ Turn dial to Normal "Wash" position. ¨ Close door. ¨ Check to be caused by door rubbing or hitting against the toekick bracket. STEP 16 REPLACE TOEKICK Use Top 4 Screw Holes 2-Piece Toekick Adjust Up or Down Figure Y • Place 2-piece toekick against the legs of the water has drained. Also check drain line for leaks under the dishwasher. If water...

Product Specifications Sheet (English)
Page 2
...Products, Inc. Dishwashers FFBD1821M S / W / B 18" Built-In Features Control Design Digital Display Door Latch Stay-Put Door Hinge Design Low Rinse-Aid Indicator Light Interior Design Interior Color Wash System Wash Levels Sound Package Filter Filter Trap Soft Food Disposer dB Level Drying System Ready-Select® Pull Latch 18" Built-In Dishwasher w/Ready-Select Contro Yes Baseline Standard Stainless Steel Direct Feed 4 UltraQuiet™ 3 Manual Clean Removable 55 Static Cycles Number of ASSE 1006 Specifications Product Dimensions Cutout Dimensions Water Inlet Location Water...
...Products, Inc. Dishwashers FFBD1821M S / W / B 18" Built-In Features Control Design Digital Display Door Latch Stay-Put Door Hinge Design Low Rinse-Aid Indicator Light Interior Design Interior Color Wash System Wash Levels Sound Package Filter Filter Trap Soft Food Disposer dB Level Drying System Ready-Select® Pull Latch 18" Built-In Dishwasher w/Ready-Select Contro Yes Baseline Standard Stainless Steel Direct Feed 4 UltraQuiet™ 3 Manual Clean Removable 55 Static Cycles Number of ASSE 1006 Specifications Product Dimensions Cutout Dimensions Water Inlet Location Water...

Product Specifications Sheet (English)
Page 3
... and national electric & plumbing codes. Hot water line to dishwasher must provide between opened door and obstruction. • Do not install unit beneath cooktop, damage will occur. • Make sure location has required drain, water and electrical outlets to make proper connections. • Air gap required if drain is connected to drain outlet. • Electrical and water supplies should enter enclosure on adequately wired 120V, dedicated circuit having 2-wire service with hand shut-off valve accessible beneath...
... and national electric & plumbing codes. Hot water line to dishwasher must provide between opened door and obstruction. • Do not install unit beneath cooktop, damage will occur. • Make sure location has required drain, water and electrical outlets to make proper connections. • Air gap required if drain is connected to drain outlet. • Electrical and water supplies should enter enclosure on adequately wired 120V, dedicated circuit having 2-wire service with hand shut-off valve accessible beneath...


