
Product Specifications Sheet
Page 1
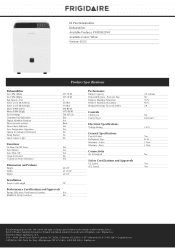
... Timer Yes Auto Restart Yes Auto Shut-Off Yes Clean Air Ionizer No Continuous Drain Operation Yes Dimensions and Volume Height Width Depth 24 5/8" 18 13/16" 14 3/4" Installation Power Cord Length 78" Performance Certifications and Approvals Energy Efficiency Verification (Canada) Yes ENERGY STAR Certified No Performance Bucket Capacity Dehumidification - Refer to change specifications or discontinue models without notice. 60 Pint Dehumidifier Dehumidifier Available Products: FFAD6023W1 Available Colors: White Version: 05/23 Product Specifications Dehumidifier Air CFM...
... Timer Yes Auto Restart Yes Auto Shut-Off Yes Clean Air Ionizer No Continuous Drain Operation Yes Dimensions and Volume Height Width Depth 24 5/8" 18 13/16" 14 3/4" Installation Power Cord Length 78" Performance Certifications and Approvals Energy Efficiency Verification (Canada) Yes ENERGY STAR Certified No Performance Bucket Capacity Dehumidification - Refer to change specifications or discontinue models without notice. 60 Pint Dehumidifier Dehumidifier Available Products: FFAD6023W1 Available Colors: White Version: 05/23 Product Specifications Dehumidifier Air CFM...

Complete Owners Guide
Page 1
use care Dehumidifier & Introduction 2 Important Safety Instructions 3 Location 11 How It Works 11 Dehumidifier Features 12 Operating Instructions 12 Frigidaire.com USA 1-800-944-9044 Care And Cleaning 17 Storage 18 Normal Sounds 18 Before You Call 19 Major Appliance Limited Warranty...... 20 Model: FFAD6023W1 Frigidaire.ca Canada 1-800-265-8352
use care Dehumidifier & Introduction 2 Important Safety Instructions 3 Location 11 How It Works 11 Dehumidifier Features 12 Operating Instructions 12 Frigidaire.com USA 1-800-944-9044 Care And Cleaning 17 Storage 18 Normal Sounds 18 Before You Call 19 Major Appliance Limited Warranty...... 20 Model: FFAD6023W1 Frigidaire.ca Canada 1-800-265-8352
Complete Owners Guide
Page 2
... purchase as the beginning of your home! FAQs, helpful tips and videos, cleaning products, and kitchen and home accessories are here for you for the use and care of a long relationship together. If you . If something doesn't seem right, the troubleshooting section will help . Model Number Serial Number Purchase Date We are available at www.frigidaire.com. We see your appliance...
... purchase as the beginning of your home! FAQs, helpful tips and videos, cleaning products, and kitchen and home accessories are here for you for the use and care of a long relationship together. If you . If something doesn't seem right, the troubleshooting section will help . Model Number Serial Number Purchase Date We are available at www.frigidaire.com. We see your appliance...
Complete Owners Guide
Page 3
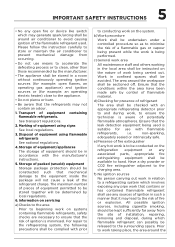
... plugged directly into the air discharge area or back grille of the unit. • Do not start or stop the operation, disconnect the power cord, and call an authorized Electrolux servicer for repairs. • Do not insert or place fingers or objects into a properly grounded and polarized three-prong receptacle. Always call an authorized Electrolux servicer. • Do not operate the dehumidifier with national wiring...
... plugged directly into the air discharge area or back grille of the unit. • Do not start or stop the operation, disconnect the power cord, and call an authorized Electrolux servicer for repairs. • Do not insert or place fingers or objects into a properly grounded and polarized three-prong receptacle. Always call an authorized Electrolux servicer. • Do not operate the dehumidifier with national wiring...

Complete Owners Guide
Page 4
... gases near the unit. Maintenance and repair requiring the assistance of the power cord or use an extension cord to avoid any prong from the unit. • Do not use an extension cord or an adaptor plug. Improper power supply can cause fire or electrical shock. • Please follow the instruction carefully to handle, install, clear, service the air conditioner to power the unit. • DO...
... gases near the unit. Maintenance and repair requiring the assistance of the power cord or use an extension cord to avoid any prong from the unit. • Do not use an extension cord or an adaptor plug. Improper power supply can cause fire or electrical shock. • Please follow the instruction carefully to handle, install, clear, service the air conditioner to power the unit. • DO...
Complete Owners Guide
Page 5
... the instruction carefully to store or maintain the air conditioner to prevent mechanical damage from the site of equipment using flammable refrigerants See national regulations. 4. Work in confined spaces shall be constructed such that mechanical damage to the equipment inside the package will be available to hand. Prior to the charging area. Marking of installation, repairing, removing and disposal, during work on...
... the instruction carefully to store or maintain the air conditioner to prevent mechanical damage from the site of equipment using flammable refrigerants See national regulations. 4. Work in confined spaces shall be constructed such that mechanical damage to the equipment inside the package will be available to hand. Prior to the charging area. Marking of installation, repairing, removing and disposal, during work on...

Complete Owners Guide
Page 6
... continue operation, an adequate temporary solution shall be used , the secondary circuit shall be checked for the presence of refrigerant; Refrigerating pipe or components are installed in a position where they are unlikely to be exposed to any hot work is carried out. i) Checks to electrical devices Repair and maintenance to seals, incorrect fitting of glands, etc. This shall be reported to the owner...
... continue operation, an adequate temporary solution shall be used , the secondary circuit shall be checked for the presence of refrigerant; Refrigerating pipe or components are installed in a position where they are unlikely to be exposed to any hot work is carried out. i) Checks to electrical devices Repair and maintenance to seals, incorrect fitting of glands, etc. This shall be reported to the owner...

Complete Owners Guide
Page 7
... may need to Removal and evacuation. 11. or for any potential ignition sources and that best practice be calibrated in use of detergents containing chlorine shall be adequate, or may not be avoided as compressors or fans. 10.Detection of flammable refrigerants Under no refrigerant is suitable for the refrigerant used. c) evacuate (optional for A2L); When the final oxygen-free nitrogen...
... may need to Removal and evacuation. 11. or for any potential ignition sources and that best practice be calibrated in use of detergents containing chlorine shall be adequate, or may not be avoided as compressors or fans. 10.Detection of flammable refrigerants Under no refrigerant is suitable for the refrigerant used. c) evacuate (optional for A2L); When the final oxygen-free nitrogen...

Complete Owners Guide
Page 8
... working order. k) Recovered refrigerant shall not be as short as possible to the task being used are closed off valves in accordance with refrigerant. special cylinders for servicing or decommissioning, it shall be carried out prior to charging the system with instructions. Ensure that all its operation. Hoses or lines shall be charged into cylinders, ensure that electrical power...
... working order. k) Recovered refrigerant shall not be as short as possible to the task being used are closed off valves in accordance with refrigerant. special cylinders for servicing or decommissioning, it shall be carried out prior to charging the system with instructions. Ensure that all its operation. Hoses or lines shall be charged into cylinders, ensure that electrical power...
Complete Owners Guide
Page 9
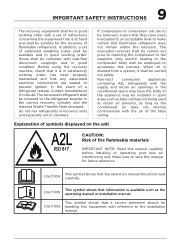
... instructions concerning the equipment that a service personnel should be handling this manual carefully before installing or operating your new air conditioning unit. CAUTION This symbol shows that is at hand and shall be carried out safely. In addition, a set of a refrigerant release. The recovered refrigerant shall be available and in good condition. If compressors or compressor oils are sealed to be removed...
... instructions concerning the equipment that a service personnel should be handling this manual carefully before installing or operating your new air conditioning unit. CAUTION This symbol shows that is at hand and shall be carried out safely. In addition, a set of a refrigerant release. The recovered refrigerant shall be available and in good condition. If compressors or compressor oils are sealed to be removed...

Complete Owners Guide
Page 11
... water. 5. There should not be necessary to the room. The "Compressor" circuit has an automatic 3 minute time delayed start if the unit is adequate circulation of air in an enclosed small space like a closet. lt may be operated in and out of the unit will not turn on the rate at least 24" 12" 12" Make sure the tank is collected...
... water. 5. There should not be necessary to the room. The "Compressor" circuit has an automatic 3 minute time delayed start if the unit is adequate circulation of air in an enclosed small space like a closet. lt may be operated in and out of the unit will not turn on the rate at least 24" 12" 12" Make sure the tank is collected...

Complete Owners Guide
Page 12
...;er Features ELECTRONIC CONTROL Before you begin operating the dehumidifier, follow these steps: NOTE NOTE If the "BUCKET FULL" light is on, remove the bucket and re-install to reset the float switch. To begin , thoroughly familiarize yourself with the control panel and all its functions (as shown below). C D E F B G H A A Auto Mode Button B Continue Drain Button C Sets Timer D Defrost Indicator E Bucket Full Indicator J I F Displays Humidity G Turns Unit On Or O H Adjusts Humidity I Turbo Fan Button J Check Filter Reset Button Operating Instructions Allow...
...;er Features ELECTRONIC CONTROL Before you begin operating the dehumidifier, follow these steps: NOTE NOTE If the "BUCKET FULL" light is on, remove the bucket and re-install to reset the float switch. To begin , thoroughly familiarize yourself with the control panel and all its functions (as shown below). C D E F B G H A A Auto Mode Button B Continue Drain Button C Sets Timer D Defrost Indicator E Bucket Full Indicator J I F Displays Humidity G Turns Unit On Or O H Adjusts Humidity I Turbo Fan Button J Check Filter Reset Button Operating Instructions Allow...
Complete Owners Guide
Page 13
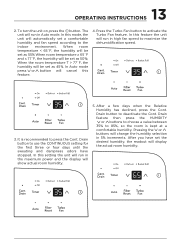
The unit will run in high fan speed to maximize the dehumidification speed. 3. When room temperature < 65˚F, the humidity will be set as 55% When room temperature ≥ 65˚F and ≤ 77˚F, the humidity will change the humidity selection in Auto mode. Press the Turbo Fan button to deactivate the Cont. Drain button to use the CONTINUOUS setting for the first three or...
The unit will run in high fan speed to maximize the dehumidification speed. 3. When room temperature < 65˚F, the humidity will be set as 55% When room temperature ≥ 65˚F and ≤ 77˚F, the humidity will change the humidity selection in Auto mode. Press the Turbo Fan button to deactivate the Cont. Drain button to use the CONTINUOUS setting for the first three or...
Complete Owners Guide
Page 14
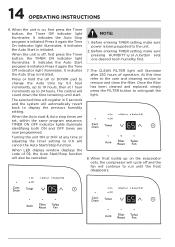
... the Auto Start is o , first press the Timer button, the TIMER ON indicator light illuminates. When the unit is initiated. NOTE: 1. Before entering TIMER setting, make sure pressing HUMIDITY or button sets one desired room humidity first. 7. When LED display window displays the code of P2, the Auto Start/Stop function will illuminate after 250 hours of operation. Before entering TIMER setting, make sure power is being supplied to remove and clean the...
... the Auto Start is o , first press the Timer button, the TIMER ON indicator light illuminates. When the unit is initiated. NOTE: 1. Before entering TIMER setting, make sure pressing HUMIDITY or button sets one desired room humidity first. 7. When LED display window displays the code of P2, the Auto Start/Stop function will illuminate after 250 hours of operation. Before entering TIMER setting, make sure power is being supplied to remove and clean the...

Complete Owners Guide
Page 15
... and the BUCKET FULL indicator will memorize the last setting and return the unit to unclip the bucket from the unit. Press sides of bucket gently to the same setting once power is full, the unit will shut down , press the ON/OFF button. Emptying the Bucket: a. d. Removing Collected Water Note: After a power outage, the unit will illuminate. 2. Fault Codes 1. When the bucket is restored. 15 OPERATING INSTRUCTIONS 9.
... and the BUCKET FULL indicator will memorize the last setting and return the unit to unclip the bucket from the unit. Press sides of bucket gently to the same setting once power is full, the unit will shut down , press the ON/OFF button. Emptying the Bucket: a. d. Removing Collected Water Note: After a power outage, the unit will illuminate. 2. Fault Codes 1. When the bucket is restored. 15 OPERATING INSTRUCTIONS 9.

Complete Owners Guide
Page 16
... the drain cap on the back side of the unit. (fig.2) WARNING Discard water from bucket. f. Water is in the correct position. 2. 16 OPERATING INSTRUCTIONS e. Continuous Drainage: a. Replace the empty bucket back into the unit and once seated correctly, the unit will need a garden hose and a drain nearby to discharge the water into. You should hear a click when the bucket is not potable and cannot be used...
... the drain cap on the back side of the unit. (fig.2) WARNING Discard water from bucket. f. Water is in the correct position. 2. 16 OPERATING INSTRUCTIONS e. Continuous Drainage: a. Replace the empty bucket back into the unit and once seated correctly, the unit will need a garden hose and a drain nearby to discharge the water into. You should hear a click when the bucket is not potable and cannot be used...

Complete Owners Guide
Page 17
... with an oil-free cloth, or using brush attachment. 3. Cabinet a. Water Bucket a. Check the seal between the hose and the drain connector. It is screwed securely to the connector to start. fig.3 e. Remove the back grille every two weeks based on normal operating conditions. Re-install the back grille. 2. Clean bucket with warm water and detergent. f. To remove the filter: a. Select the desired humidity setting and fan speed on the...
... with an oil-free cloth, or using brush attachment. 3. Cabinet a. Water Bucket a. Check the seal between the hose and the drain connector. It is screwed securely to the connector to start. fig.3 e. Remove the back grille every two weeks based on normal operating conditions. Re-install the back grille. 2. Clean bucket with warm water and detergent. f. To remove the filter: a. Select the desired humidity setting and fan speed on the...
Complete Owners Guide
Page 18
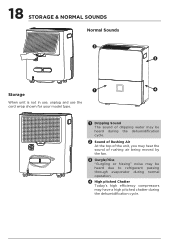
... and use the cord wrap shown for your model type. 1 Dripping Sound The sound of dripping water may be heard during the dehumidification cycle. 2 Sound of Rushing Air At the top of the unit, you may hear the sound of rushing air being moved by the fan. 3 Gurgle/Hiss "Gurgling or hissing" noise may be heard due to refrigerant...
... and use the cord wrap shown for your model type. 1 Dripping Sound The sound of dripping water may be heard during the dehumidification cycle. 2 Sound of Rushing Air At the top of the unit, you may hear the sound of rushing air being moved by the fan. 3 Gurgle/Hiss "Gurgling or hissing" noise may be heard due to refrigerant...
Complete Owners Guide
Page 19
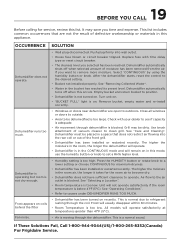
... models will usually disappear within 60 minutes. • Room Temperature is blocked. This is below 41°F(5°C). This is not turned on recently. See "Care and Cleaning". It may be placed in this list. After the dehumidifier starts, reset the control to causes under DEHUMlDIFIER RUNS TOO MUCH. Empty bucket and return bucket to remove more moisture, Select 'CONTINUOUS' by using the humidity button or...
... models will usually disappear within 60 minutes. • Room Temperature is blocked. This is below 41°F(5°C). This is not turned on recently. See "Care and Cleaning". It may be placed in this list. After the dehumidifier starts, reset the control to causes under DEHUMlDIFIER RUNS TOO MUCH. Empty bucket and return bucket to remove more moisture, Select 'CONTINUOUS' by using the humidity button or...
Complete Owners Guide
Page 20
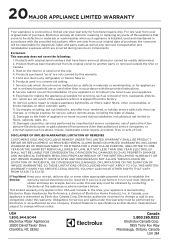
... for service and parts under this appliance that have been removed, altered or cannot be obtained by Electrolux or an authorized service company. Service calls to correct the installation of purchase, Electrolux will be responsible for repairing or replacing any refrigerator or freezer failures. 6. In the USA, your original date of your appliance or to instruct you how to use your best interest to...
... for service and parts under this appliance that have been removed, altered or cannot be obtained by Electrolux or an authorized service company. Service calls to correct the installation of purchase, Electrolux will be responsible for repairing or replacing any refrigerator or freezer failures. 6. In the USA, your original date of your appliance or to instruct you how to use your best interest to...

