
Complete Owners Guide
Page 1
All about the Use & Care of your Dehumidifier TABLE OF CONTENTS Important Safety Instructions 2 Location 3 How It Works 3 Dehumidifier Features 4 Operating Instructions 4-9 Care And Cleaning 10 Storage 10 Normal Sounds 10 Before You Call 11 Major Appliance Limited Warranty 12 www.frigidaire.com USA 1-800-944-9044 www.frigidaire.ca Canada 1-800-265-8352 16120100A12916
All about the Use & Care of your Dehumidifier TABLE OF CONTENTS Important Safety Instructions 2 Location 3 How It Works 3 Dehumidifier Features 4 Operating Instructions 4-9 Care And Cleaning 10 Storage 10 Normal Sounds 10 Before You Call 11 Major Appliance Limited Warranty 12 www.frigidaire.com USA 1-800-944-9044 www.frigidaire.ca Canada 1-800-265-8352 16120100A12916

Complete Owners Guide
Page 2
... avoid a hazard. Do not start or stop the operation, disconnect the power cord, and call an authorized Electrolux servicer for repairs. Do not remove any prong from bucket. Water is damaged, it should never use or store flammable gases near the unit. 2 2019 Electrolux Home Products, Inc. Never unplug the dehumidifier by unplugging the power cord or turning off the unit. Always call an authorized Electrolux servicer. Do not insert or...
... avoid a hazard. Do not start or stop the operation, disconnect the power cord, and call an authorized Electrolux servicer for repairs. Do not remove any prong from bucket. Water is damaged, it should never use or store flammable gases near the unit. 2 2019 Electrolux Home Products, Inc. Never unplug the dehumidifier by unplugging the power cord or turning off the unit. Always call an authorized Electrolux servicer. Do not insert or...
Complete Owners Guide
Page 3
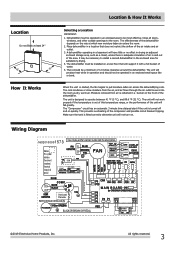
... the dehumidifier. All rights reserved. 3 The dehumidifier must be installed on the rate at least 24" 12" 12" How It Works Location & How It Works Selecting a Location IMPORTANT: 1. The "Compressor" circuit has an automatic 3 minute time delayed start if the unit is out of this temperature range, or the performance of water. 5. The unit will fall greatly. Moisture removed from the air, and air flows...
... the dehumidifier. All rights reserved. 3 The dehumidifier must be installed on the rate at least 24" 12" 12" How It Works Location & How It Works Selecting a Location IMPORTANT: 1. The "Compressor" circuit has an automatic 3 minute time delayed start if the unit is out of this temperature range, or the performance of water. 5. The unit will fall greatly. Moisture removed from the air, and air flows...
Complete Owners Guide
Page 4
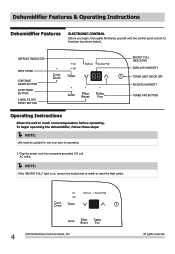
...the power cord into a properly grounded 115 volt AC outlet. NOTE: If the "BUCKET FULL" light is on, remove the bucket and re-install to reach room temperature before operating. DEFROST INDICATOR SETS TIMER CONTINUE DRAIN BUTTON AUTO MODE BUTTON CHECK FILTER RESET BUTTON BUCKET FULL INDICATOR DISPLAYS HUMIDITY TURNS UNIT ON OR OFF ADJUSTS HUMIDITY TURBO FAN BUTTON Operating Instructions Allow the unit to reset the float switch. 4 2019 Electrolux Home Products, Inc. All rights reserved. Dehumidifier Features & Operating Instructions Dehumidifier Features ELECTRONIC CONTROL Before...
...the power cord into a properly grounded 115 volt AC outlet. NOTE: If the "BUCKET FULL" light is on, remove the bucket and re-install to reach room temperature before operating. DEFROST INDICATOR SETS TIMER CONTINUE DRAIN BUTTON AUTO MODE BUTTON CHECK FILTER RESET BUTTON BUCKET FULL INDICATOR DISPLAYS HUMIDITY TURNS UNIT ON OR OFF ADJUSTS HUMIDITY TURBO FAN BUTTON Operating Instructions Allow the unit to reset the float switch. 4 2019 Electrolux Home Products, Inc. All rights reserved. Dehumidifier Features & Operating Instructions Dehumidifier Features ELECTRONIC CONTROL Before...
Complete Owners Guide
Page 5
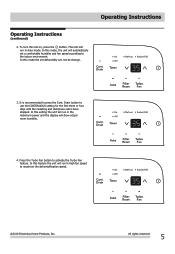
... stopped. Drain button to press the Cont. Press the Turbo Fan button to maximize the dehumidification speed. 2019 Electrolux Home Products, Inc. The unit will run in the maximum power and the display will automatically set dehumidity can not be change. 3. In this mode the set a comfortable humidity and fan speed according to the indoor environment. In this mode, the unit will show actual room humidity. 4. All rights reserved. 5 Operating Instructions Operating Instructions (continued...
... stopped. Drain button to press the Cont. Press the Turbo Fan button to maximize the dehumidification speed. 2019 Electrolux Home Products, Inc. The unit will run in the maximum power and the display will automatically set dehumidity can not be change. 3. In this mode the set a comfortable humidity and fan speed according to the indoor environment. In this mode, the unit will show actual room humidity. 4. All rights reserved. 5 Operating Instructions Operating Instructions (continued...
Complete Owners Guide
Page 6
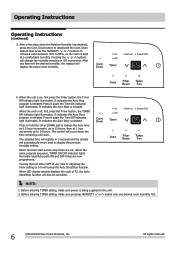
Operating Instructions Operating Instructions (continued) 5. It indicates the Auto Start program is off, first press the Timer button, the TIMER ON indicator light illuminates. Press it again the Time On indecator light illuminates. The control will cancel the Auto Start/Stop function. Turning the unit ON or OFF at any time or adjusting the timer setting to 0.0 will count down the time remaining until start & Auto stop times are set the desired humidity, the readout...
Operating Instructions Operating Instructions (continued) 5. It indicates the Auto Start program is off, first press the Timer button, the TIMER ON indicator light illuminates. Press it again the Time On indecator light illuminates. The control will cancel the Auto Start/Stop function. Turning the unit ON or OFF at any time or adjusting the timer setting to 0.0 will count down the time remaining until start & Auto stop times are set the desired humidity, the readout...
Complete Owners Guide
Page 7
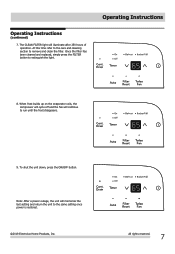
... on the evaporator coils, the compressor will cycle off and the fan will memorize the last setting and return the unit to run until the frost disappears. 9. Once the filter has been cleaned and replaced, simply press the FILTER button to remove and clean the filter. All rights reserved. 7 At this time refer to the care and cleaning section to extinguish the light. Operating Instructions (continued) 7. The CLEAN FILTER light will illuminate...
... on the evaporator coils, the compressor will cycle off and the fan will memorize the last setting and return the unit to run until the frost disappears. 9. Once the filter has been cleaned and replaced, simply press the FILTER button to remove and clean the filter. All rights reserved. 7 At this time refer to the care and cleaning section to extinguish the light. Operating Instructions (continued) 7. The CLEAN FILTER light will illuminate...
Complete Owners Guide
Page 8
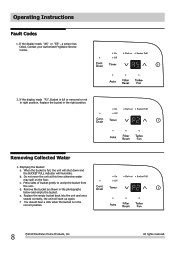
..., the unit will illuminate. If the display reads "AS" or "ES" , a sensor has failed. Emptying the Bucket: a. d. f. Replace the bucket in the correct position. 8 2019 Electrolux Home Products, Inc. Operating Instructions Fault Codes 1. All rights reserved. Removing Collected Water 1. You should hear a click when the bucket is full or removed or not in the photographs below and empty the bucket. Remove the bucket as shown in right position. If the...
..., the unit will illuminate. If the display reads "AS" or "ES" , a sensor has failed. Emptying the Bucket: a. d. f. Replace the bucket in the correct position. 8 2019 Electrolux Home Products, Inc. Operating Instructions Fault Codes 1. All rights reserved. Removing Collected Water 1. You should hear a click when the bucket is full or removed or not in the photographs below and empty the bucket. Remove the bucket as shown in right position. If the...
Complete Owners Guide
Page 9
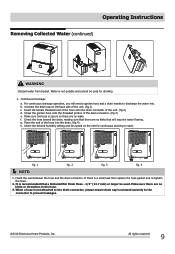
... be used . Insert the female threaded end of the hose onto the drain connector of the drain connector. (fig.3) e. Make sure the hose is screwed securely to the connector to start. Check the seal between the hose and the drain connector. When a hose is not attached to discharge the water into the drain. (fig.4) h. Make sure there are no leaks. For continuous drainage operation, you will stop the water flowing. g. Operating Instructions Removing Collected Water (continued) WARNING Discard water from bucket...
... be used . Insert the female threaded end of the hose onto the drain connector of the drain connector. (fig.3) e. Make sure the hose is screwed securely to the connector to start. Check the seal between the hose and the drain connector. When a hose is not attached to discharge the water into the drain. (fig.4) h. Make sure there are no leaks. For continuous drainage operation, you will stop the water flowing. g. Operating Instructions Removing Collected Water (continued) WARNING Discard water from bucket...
Complete Owners Guide
Page 10
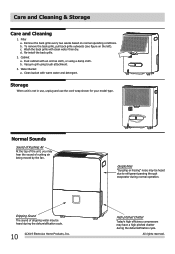
..." noise may be heard due to refrigerant passing through evaporator during the dehumidification cycle. Remove the back grille every two weeks based on the left). Re-install the back grille. 2. Clean bucket with an oil-free cloth, or using brush attachment. 3. Dripping Sound The sound of rushing air being moved by the fan. c. Storage When unit is not in use, unplug and use the cord wrap...
..." noise may be heard due to refrigerant passing through evaporator during the dehumidification cycle. Remove the back grille every two weeks based on the left). Re-install the back grille. 2. Clean bucket with an oil-free cloth, or using brush attachment. 3. Dripping Sound The sound of rushing air being moved by the fan. c. Storage When unit is not in use, unplug and use the cord wrap...
Complete Owners Guide
Page 11
... dehumidifier starts, reset the control to outside. Bucket not installed properly. DEHUMIDIFIER RUNS TOO MUCH. Check with time delay type or reset circuit breaker. Grill may save you time and expense. Dehumidifier has been installed or restarted recently. Press the HUMIDITY button or rotate knob to a lower setting or choose CONTINUOUS for the room air to see if capacity is too low. The higher the moisture in this appliance. Dehumidifier has been turned...
... dehumidifier starts, reset the control to outside. Bucket not installed properly. DEHUMIDIFIER RUNS TOO MUCH. Check with time delay type or reset circuit breaker. Grill may save you time and expense. Dehumidifier has been installed or restarted recently. Press the HUMIDITY button or rotate knob to a lower setting or choose CONTINUOUS for the room air to see if capacity is too low. The higher the moisture in this appliance. Dehumidifier has been turned...
Complete Owners Guide
Page 12
... original owner to repair or replace appliance light bulbs, air filters, water filters, other consumables, or knobs, handles, or other than genuine Electrolux parts or parts obtained from your best interest to any removal, transportation and reinstallation expenses which are not a part of trim, cupboards, shelves, etc., which do not involve malfunction or defects in materials or workmanship, or for diagnostic, labor and parts costs as...
... original owner to repair or replace appliance light bulbs, air filters, water filters, other consumables, or knobs, handles, or other than genuine Electrolux parts or parts obtained from your best interest to any removal, transportation and reinstallation expenses which are not a part of trim, cupboards, shelves, etc., which do not involve malfunction or defects in materials or workmanship, or for diagnostic, labor and parts costs as...

