Product Specifications Sheet
Page 1
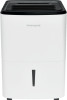
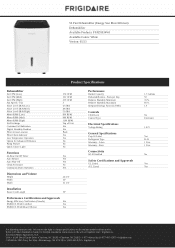
...24-Hour On/Off Timer Yes Auto Restart Yes Auto Shut-Off Yes Clean Air Ionizer No Continuous Drain Operation Yes Dimensions and Volume Height Width Depth 24 3/4" 16" 12 1/4" Installation Power Cord Length 78" Performance Certifications and Approvals Energy Efficiency Verification (Canada) Yes ENERGY STAR Certified Yes ENERGY STAR Most Efficient Yes Performance Bucket Capacity Dehumidification - Refer to change specifications or discontinue models without notice. 50 Pint Dehumidifier (Energy Star Most Efficient) Dehumidifier Available Products: FFAD5034W1 Available Colors...
...24-Hour On/Off Timer Yes Auto Restart Yes Auto Shut-Off Yes Clean Air Ionizer No Continuous Drain Operation Yes Dimensions and Volume Height Width Depth 24 3/4" 16" 12 1/4" Installation Power Cord Length 78" Performance Certifications and Approvals Energy Efficiency Verification (Canada) Yes ENERGY STAR Certified Yes ENERGY STAR Most Efficient Yes Performance Bucket Capacity Dehumidification - Refer to change specifications or discontinue models without notice. 50 Pint Dehumidifier (Energy Star Most Efficient) Dehumidifier Available Products: FFAD5034W1 Available Colors...

Complete Owners Guide
Page 1
use care Dehumidifier & Introduction 2 Important Safety Instructions 3 Location 11 How It Works 11 Dehumidifier Features 12 Operating Instructions 12 Frigidaire.com USA 1-800-944-9044 Care And Cleaning 16 Storage 17 Normal Sounds 17 Before You Call 18 Major Appliance Limited Warranty....... 19 Model: FFAD5034W1 Frigidaire.ca Canada 1-800-265-8352
use care Dehumidifier & Introduction 2 Important Safety Instructions 3 Location 11 How It Works 11 Dehumidifier Features 12 Operating Instructions 12 Frigidaire.com USA 1-800-944-9044 Care And Cleaning 16 Storage 17 Normal Sounds 17 Before You Call 18 Major Appliance Limited Warranty....... 19 Model: FFAD5034W1 Frigidaire.ca Canada 1-800-265-8352

Complete Owners Guide
Page 2
...'s make it before using your appliance. We are available at www.frigidaire.com. Be sure to register your product. FAQs, helpful tips and videos, cleaning products, and kitchen and home accessories are here for you. We may be able to help you with an agent, or call us if you need service, we can get that started for you! If...
...'s make it before using your appliance. We are available at www.frigidaire.com. Be sure to register your product. FAQs, helpful tips and videos, cleaning products, and kitchen and home accessories are here for you. We may be able to help you with an agent, or call us if you need service, we can get that started for you! If...
Complete Owners Guide
Page 3
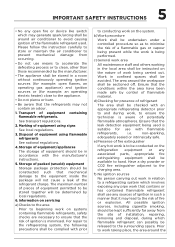
... sure the outlet is adequately grounded or protected by a time delay fuse or circuit breaker, have been given supervision or instruction concerning use of a malfunction (sparks, burning smell, etc.), immediately stop the dehumidifier by unplugging the power cord or turning off the power at the electrical box. • Do not cut or remove the round ground prong from the receptacle. • Do not...
... sure the outlet is adequately grounded or protected by a time delay fuse or circuit breaker, have been given supervision or instruction concerning use of a malfunction (sparks, burning smell, etc.), immediately stop the dehumidifier by unplugging the power cord or turning off the power at the electrical box. • Do not cut or remove the round ground prong from the receptacle. • Do not...
Complete Owners Guide
Page 4
... assessment specification. Examples for operation. • Any person who is one yard away from the power cord. When maintaining or disposing the air conditioner, the refrigerant (R32) shall be recovered properly, shall not discharge to handle refrigerants safely in the use of flammable refrigerants. • DO NOT modify the length of the power cord or use an extension cord or an adaptor plug. 4 IMPORTANT SAFETY INSTRUCTIONS SAFETY...
... assessment specification. Examples for operation. • Any person who is one yard away from the power cord. When maintaining or disposing the air conditioner, the refrigerant (R32) shall be recovered properly, shall not discharge to handle refrigerants safely in the use of flammable refrigerants. • DO NOT modify the length of the power cord or use an extension cord or an adaptor plug. 4 IMPORTANT SAFETY INSTRUCTIONS SAFETY...
Complete Owners Guide
Page 5
... the area have been made safe by local regulations. 6. The area around air conditioner to ensure that the risk of ignition is minimised. Please follow the instruction carefully to store or maintain the air conditioner to prevent mechanical damage from the site of installation, repairing, removing and disposal, during work, to conducting work on the nature of the flammable refrigerant used is being...
... the area have been made safe by local regulations. 6. The area around air conditioner to ensure that the risk of ignition is minimised. Please follow the instruction carefully to store or maintain the air conditioner to prevent mechanical damage from the site of installation, repairing, removing and disposal, during work, to conducting work on the nature of the flammable refrigerant used is being...

Complete Owners Guide
Page 6
... the following checks shall be used , the secondary circuit shall be displayed. Replacement parts shall be followed. The ventilation machinery and outlets are operating adequately and are being changed, they no flammable hazards or ignition risks. Repair to intrinsically safe components Do not apply any permanent inductive or capacitance loads to avoid possibility of sparking; 6 IMPORTANT SAFETY INSTRUCTIONS equipment is...
... the following checks shall be used , the secondary circuit shall be displayed. Replacement parts shall be followed. The ventilation machinery and outlets are operating adequately and are being changed, they no flammable hazards or ignition risks. Repair to intrinsically safe components Do not apply any permanent inductive or capacitance loads to avoid possibility of sparking; 6 IMPORTANT SAFETY INSTRUCTIONS equipment is...

Complete Owners Guide
Page 7
... avoided as compressors or fans. 10.Detection of flammable refrigerants Under no refrigerant is confirmed. c) evacuate (optional for the vacuum pump is not close to make repairs - This process might need re-calibration. (Detection equipment shall be calibrated in a refrigerant-free area). Compressed air or oxygen shall not be used in the searching for or detection of refrigerant leaks. IMPORTANT SAFETY INSTRUCTIONS 7 ensuring...
... avoided as compressors or fans. 10.Detection of flammable refrigerants Under no refrigerant is confirmed. c) evacuate (optional for the vacuum pump is not close to make repairs - This process might need re-calibration. (Detection equipment shall be calibrated in a refrigerant-free area). Compressed air or oxygen shall not be used in the searching for or detection of refrigerant leaks. IMPORTANT SAFETY INSTRUCTIONS 7 ensuring...

Complete Owners Guide
Page 8
... promptly and all its operation. Cylinders shall be as short as possible to minimise the amount of refrigerant contained in an appropriate position according to the instructions. Empty recovery cylinders are removed safely. Ensure that only appropriate refrigerant recovery cylinders are recovered safely. Hoses or lines shall be complete with OFN. A follow up leak test shall be...
... promptly and all its operation. Cylinders shall be as short as possible to minimise the amount of refrigerant contained in an appropriate position according to the instructions. Empty recovery cylinders are removed safely. Ensure that only appropriate refrigerant recovery cylinders are recovered safely. Hoses or lines shall be complete with OFN. A follow up leak test shall be...

Complete Owners Guide
Page 9
... as false ceilings not being used as return air plenums, as long as the operating manual or installation manual. CAUTION This symbol shows that a service personnel should be read carefully. Hoses shall be complete with leak-free disconnect couplings and in doubt. The evacuation process shall be carried out prior to returning the compressor to the refrigerant supplier in the correct recovery...
... as false ceilings not being used as return air plenums, as long as the operating manual or installation manual. CAUTION This symbol shows that a service personnel should be read carefully. Hoses shall be complete with leak-free disconnect couplings and in doubt. The evacuation process shall be carried out prior to returning the compressor to the refrigerant supplier in the correct recovery...

Complete Owners Guide
Page 10
... optional, CAPACITOR BROWN Y/G PUMP RED BLACK(or BLUE) OPTIONAL CN2 CN1 DC POWER BOARD FAN TOUCH/LIGHT PANEL WIFI WATER PIPE HUMI. SWITCHTEMP. 10 IMPORTANT SAFETY INSTRUCTIONS Wiring Diagram 16020100001654 Notes: Display and Fan's conntors must be match the actual indicates. SENSOR CN5 DISPLAY BOARD CN11 CN10 (or CN13) CN12 WIFI SWITCH SWITCH RED BLACK(or BLUE) WHITE the actual shape shall prevail BLUE Y/G ION...
... optional, CAPACITOR BROWN Y/G PUMP RED BLACK(or BLUE) OPTIONAL CN2 CN1 DC POWER BOARD FAN TOUCH/LIGHT PANEL WIFI WATER PIPE HUMI. SWITCHTEMP. 10 IMPORTANT SAFETY INSTRUCTIONS Wiring Diagram 16020100001654 Notes: Display and Fan's conntors must be match the actual indicates. SENSOR CN5 DISPLAY BOARD CN11 CN10 (or CN13) CN12 WIFI SWITCH SWITCH RED BLACK(or BLUE) WHITE the actual shape shall prevail BLUE Y/G ION...

Complete Owners Guide
Page 11
... install a second dehumidifier in and out of the area. lt may be operated in a bucket on quickly. Moisture removed from the air, and air flows through the air outlet louvers into the room as a closet, unless there is fitted correctly otherwise unit will not turn on. The "Compressor" circuit has an automatic 3 minute time delayed start if the unit is collected...
... install a second dehumidifier in and out of the area. lt may be operated in a bucket on quickly. Moisture removed from the air, and air flows through the air outlet louvers into the room as a closet, unless there is fitted correctly otherwise unit will not turn on. The "Compressor" circuit has an automatic 3 minute time delayed start if the unit is collected...
Complete Owners Guide
Page 12
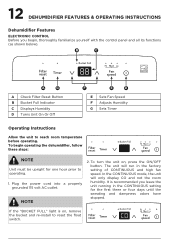
..., press the ON/OFF button. In the CONTINUOUS mode, the unit will run in the CONTINUOUS setting for one hour prior to operating. 1. NOTE 2. B C A G A Check Filter Reset Button B Bucket Full Indicator C Displays Humidity D Turns Unit On Or O F E D E Sets Fan Speed F Adjusts Humidity G Sets Timer Operating Instructions Allow the unit to reach room temperature before operating. 12 DEHUMIDIFIER FEATURES & OPERATING INSTRUCTIONS Dehumidifier Features ELECTRONIC CONTROL Before you leave the unit running in the factory setting of CONTINUOUS and high fan speed.
..., press the ON/OFF button. In the CONTINUOUS mode, the unit will run in the CONTINUOUS setting for one hour prior to operating. 1. NOTE 2. B C A G A Check Filter Reset Button B Bucket Full Indicator C Displays Humidity D Turns Unit On Or O F E D E Sets Fan Speed F Adjusts Humidity G Sets Timer Operating Instructions Allow the unit to reach room temperature before operating. 12 DEHUMIDIFIER FEATURES & OPERATING INSTRUCTIONS Dehumidifier Features ELECTRONIC CONTROL Before you leave the unit running in the factory setting of CONTINUOUS and high fan speed.
Complete Owners Guide
Page 13
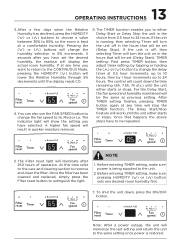
...;lter has been cleaned and replaced, simply press the Filter reset button to remove and clean the filter. To shut the unit down the time remaining (8h, 7.5h, 7h etc.) until the unit either Delay Start or Delay Stop the unit in the hours that happens the above steps have to the same setting once power is running, then selecting Timer will turn the unit on...
...;lter has been cleaned and replaced, simply press the Filter reset button to remove and clean the filter. To shut the unit down the time remaining (8h, 7.5h, 7h etc.) until the unit either Delay Start or Delay Stop the unit in the hours that happens the above steps have to the same setting once power is running, then selecting Timer will turn the unit on...
Complete Owners Guide
Page 14
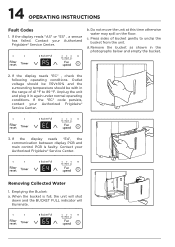
... below and empty the bucket. 2. If the "EC" code persists, contact your Authorized Frigidaire® Service Center. 14 OPERATING INSTRUCTIONS Fault Codes 1. Contact your Authorized Frigidaire® Service Center. 3. Outlet voltage should be 115V±10% and the surrounding temperature should be with in the range of bucket gently to 89 °F. b. c. Removing Collected Water 1. If the display reads "AS" or "ES" , a sensor has failed. Do not...
... below and empty the bucket. 2. If the "EC" code persists, contact your Authorized Frigidaire® Service Center. 14 OPERATING INSTRUCTIONS Fault Codes 1. Contact your Authorized Frigidaire® Service Center. 3. Outlet voltage should be 115V±10% and the surrounding temperature should be with in the range of bucket gently to 89 °F. b. c. Removing Collected Water 1. If the display reads "AS" or "ES" , a sensor has failed. Do not...

Complete Owners Guide
Page 15
You should hear a click when the bucket is correctly snapped in the correct position. Continuous Drainage: a. Unscrew the drain cap on the back side of the drain connector. (fig.3) f. If the bucket full light does not extinguish, check that the float is in place. For continuous drainage operation, you will need a garden hose and a drain nearby to discharge the water into the unit and once seated correctly...
You should hear a click when the bucket is correctly snapped in the correct position. Continuous Drainage: a. Unscrew the drain cap on the back side of the drain connector. (fig.3) f. If the bucket full light does not extinguish, check that the float is in place. For continuous drainage operation, you will need a garden hose and a drain nearby to discharge the water into the unit and once seated correctly...
Complete Owners Guide
Page 16
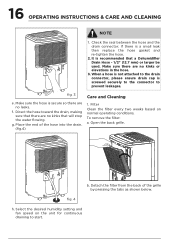
... a Dehumidifier Drain Hose - 1/2" (12.7 mm) or larger be used. Select the desired humidity setting and fan speed on normal operating conditions. When a hose is not attached to prevent leakages. fig. 3 e. To remove the filter: a. If there is screwed securely to the connector to the drain connector, please ensure drain cap is a small leak then replace the hose gasket and re-tighten the hose. 2. 16 OPERATING INSTRUCTIONS & CARE AND CLEANING NOTE...
... a Dehumidifier Drain Hose - 1/2" (12.7 mm) or larger be used. Select the desired humidity setting and fan speed on normal operating conditions. When a hose is not attached to prevent leakages. fig. 3 e. To remove the filter: a. If there is screwed securely to the connector to the drain connector, please ensure drain cap is a small leak then replace the hose gasket and re-tighten the hose. 2. 16 OPERATING INSTRUCTIONS & CARE AND CLEANING NOTE...

Complete Owners Guide
Page 17
d. Water Bucket Clean the Water Bucket every two weeks based on normal operating conditions. b. Clean bucket with clean water then dry. Wash the filter with warm water and detergent. Dust cabinet with an oil-free cloth, or using brush attachment. 3. Cabinet a. Re-install the filter. 2. Vacuum grill using a damp cloth. a. Storage When unit is not in use, unplug and use the cord wrap shown for your model type. 1 4 1 Dripping...
d. Water Bucket Clean the Water Bucket every two weeks based on normal operating conditions. b. Clean bucket with clean water then dry. Wash the filter with warm water and detergent. Dust cabinet with an oil-free cloth, or using brush attachment. 3. Cabinet a. Re-install the filter. 2. Vacuum grill using a damp cloth. a. Storage When unit is not in use, unplug and use the cord wrap shown for your model type. 1 4 1 Dripping...
Complete Owners Guide
Page 18
... to set a RH% higher level. Check with time delay type or reset circuit breaker. • The dryness level you selected has been reached. Frost will usually disappear within 60 minutes. • Room Temperature is too high. Fan noise. • Air is normal due to remove more moisture, Select 'CONTINUOUS' by using the humidity button or knob. See "Removing Collected Water". • Water in this appliance. Grill may save you want to refrigerant...
... to set a RH% higher level. Check with time delay type or reset circuit breaker. • The dryness level you selected has been reached. Frost will usually disappear within 60 minutes. • Room Temperature is too high. Fan noise. • Air is normal due to remove more moisture, Select 'CONTINUOUS' by using the humidity button or knob. See "Removing Collected Water". • Water in this appliance. Grill may save you want to refrigerant...
Complete Owners Guide
Page 19
... cover the following: 1. Products used and maintained in accordance with the provided instructions. Expenses for making the appliance accessible for servicing, such as removal of Alaska. 12. Service calls to repair or replace appliance light bulbs, air filters, water filters, other consumables, or knobs, handles, or other appropriate payment record to establish the Service warranty period should service be required. DISCLAIMER OF IMPLIED WARRANTIES; ELECTROLUX...
... cover the following: 1. Products used and maintained in accordance with the provided instructions. Expenses for making the appliance accessible for servicing, such as removal of Alaska. 12. Service calls to repair or replace appliance light bulbs, air filters, water filters, other consumables, or knobs, handles, or other appropriate payment record to establish the Service warranty period should service be required. DISCLAIMER OF IMPLIED WARRANTIES; ELECTROLUX...

