Complete Owner's Guide
Page 1
All about the Use &Care of your Dehumidifier TABLE OF CONTENTS Important Safety Instructions 2 Care And Cleaning 9 Installation 3 Storage 9 Location 3 Before You Call 10 How It Works 3 Major Appliance Limited Warranty 11 Operating Instructions 4-8 www.frigidaire.com USA 1-800-944-9044 www.frigidaire.ca Canada 1-800-265-8352
All about the Use &Care of your Dehumidifier TABLE OF CONTENTS Important Safety Instructions 2 Care And Cleaning 9 Installation 3 Storage 9 Location 3 Before You Call 10 How It Works 3 Major Appliance Limited Warranty 11 Operating Instructions 4-8 www.frigidaire.com USA 1-800-944-9044 www.frigidaire.ca Canada 1-800-265-8352

Complete Owner's Guide
Page 2
...dehumidifier contains no user-serviceable parts. Do not cut , remove, or bypass the grounding prong. Avoid Injury or damage to sit or stand on the power cord. Do not climb on or place objects on the power cord. Common sense and caution must be plugged directly into the air... immediately stop the dehumidifier by a time delay fuse or circuit breaker, have a qualified electrician install the proper outlet according to cover every possible condition and situation that any water from the unit. Do not use or store flammable gases near the unit. 2 2009 Electrolux Home Products, Inc...
...dehumidifier contains no user-serviceable parts. Do not cut , remove, or bypass the grounding prong. Avoid Injury or damage to sit or stand on the power cord. Do not climb on or place objects on the power cord. Common sense and caution must be plugged directly into the air... immediately stop the dehumidifier by a time delay fuse or circuit breaker, have a qualified electrician install the proper outlet according to cover every possible condition and situation that any water from the unit. Do not use or store flammable gases near the unit. 2 2009 Electrolux Home Products, Inc...
Complete Owner's Guide
Page 3
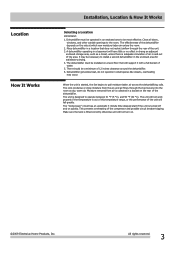
... effectiveness of the compressor and possible circuit breaker tripping. Dehumidifier generates heat, do not operate in a bucket on the rear of the unit will not turn on. 2009 Electrolux Home Products, Inc. lt may occur. This prevents overheating of the dehumidifier depends on quickly. Location How It Works Installation, Location & How It Works Selecting a Location IMPORTANT: 1. There should be installed on a level floor that does not...
... effectiveness of the compressor and possible circuit breaker tripping. Dehumidifier generates heat, do not operate in a bucket on the rear of the unit will not turn on. 2009 Electrolux Home Products, Inc. lt may occur. This prevents overheating of the dehumidifier depends on quickly. Location How It Works Installation, Location & How It Works Selecting a Location IMPORTANT: 1. There should be installed on a level floor that does not...

Complete Owner's Guide
Page 4
... turn off. CO 3. LC 4 2009 Electrolux Home Products, Inc. In the CONTINUOUS mode, the unit will turn the unit on , remove the bucket and re-install to reset the float switch. 2. After you have stopped. To disable this function is enabled, LOCK indicator will illuminate and display shows LC, which will change the humidi ty selection in 5% increments. All rights reserved. NOTE: If the "BUCKET FULL" light...
... turn off. CO 3. LC 4 2009 Electrolux Home Products, Inc. In the CONTINUOUS mode, the unit will turn the unit on , remove the bucket and re-install to reset the float switch. 2. After you have stopped. To disable this function is enabled, LOCK indicator will illuminate and display shows LC, which will change the humidi ty selection in 5% increments. All rights reserved. NOTE: If the "BUCKET FULL" light...
Complete Owner's Guide
Page 5
... the Delay Start, the fan speed and humidity maintained will show the setting you to either Delay Start or Delay Stop the unit in quicker moisture removal. 65 5. Before entering TIMER setting, make sure pressing or button sets one desired room humidity first. 0.5 2009 Electrolux Home Products, Inc. The indicator light will be set (Delay Start). If the unit is running, then selecting Timer will turn the unit on in the hours that will work until...
... the Delay Start, the fan speed and humidity maintained will show the setting you to either Delay Start or Delay Stop the unit in quicker moisture removal. 65 5. Before entering TIMER setting, make sure pressing or button sets one desired room humidity first. 0.5 2009 Electrolux Home Products, Inc. The indicator light will be set (Delay Start). If the unit is running, then selecting Timer will turn the unit on in the hours that will work until...
Complete Owner's Guide
Page 6
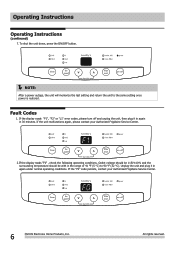
F1 2.If the display reads "F0" , check the following operating conditions. Operating Instructions Operating Instructions (continued) 7. If the unit malfunctions again, please contact your Authorized Frigidaire Service Center. If the "F0" code persists, contact your Authorized Frigidaire Service Center. To shut the unit down, press the ON/OFF button. If the display reads "F1", "F2" or "L1" error codes, please turn off and unplug the unit, then plug it in...
F1 2.If the display reads "F0" , check the following operating conditions. Operating Instructions Operating Instructions (continued) 7. If the unit malfunctions again, please contact your Authorized Frigidaire Service Center. If the "F0" code persists, contact your Authorized Frigidaire Service Center. To shut the unit down, press the ON/OFF button. If the display reads "F1", "F2" or "L1" error codes, please turn off and unplug the unit, then plug it in...

Complete Owner's Guide
Page 7
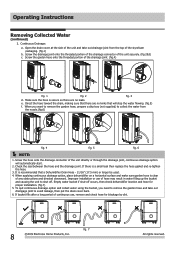
... the diagram. WARNING Discard water from the unit. Water is in the diagram below and empty the bucket. f. Press sides of the unit, this time otherwise water may spill on the floor. Operating Instructions Removing Collected Water 1. You should hear a click when the bucket is not potable and cannot be removed. Foam Foam Float 30 pints 2009 Electrolux Home Products, Inc. Emptying the Bucket: a. c. Float 50-70 pints All rights reserved. 7 Replace...
... the diagram. WARNING Discard water from the unit. Water is in the diagram below and empty the bucket. f. Press sides of the unit, this time otherwise water may spill on the floor. Operating Instructions Removing Collected Water 1. You should hear a click when the bucket is not potable and cannot be removed. Foam Foam Float 30 pints 2009 Electrolux Home Products, Inc. Emptying the Bucket: a. c. Float 50-70 pints All rights reserved. 7 Replace...
Complete Owner's Guide
Page 8
... Electrolux Home Products, Inc. It is a small leak then replace the hose gasket and re-tighten the hose. 3. fig. 7 All rights reserved. Open the drain cover at the side of the unit directly or through the drainage joint, continuous drainage option will stop the water flowing. (fig.5) f. Check the seal between the hose and the drainage joint. Improper installation or use , remove and check hose for proper installation. (fig.7) 5. To quit continuous drainage option and collect water using the bucket...
... Electrolux Home Products, Inc. It is a small leak then replace the hose gasket and re-tighten the hose. 3. fig. 7 All rights reserved. Open the drain cover at the side of the unit directly or through the drainage joint, continuous drainage option will stop the water flowing. (fig.5) f. Check the seal between the hose and the drainage joint. Improper installation or use , remove and check hose for proper installation. (fig.7) 5. To quit continuous drainage option and collect water using the bucket...
Complete Owner's Guide
Page 9
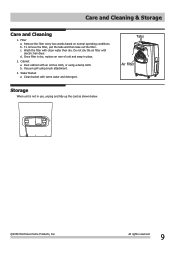
... warm water and detergent. Clean bucket with electric hair dryer. b. Care and Cleaning & Storage Care and Cleaning 1. Wash the filter with an oil-free cloth, or using brush attachment. 3. Once filter is not in place. 2. To remove the filter, pull the tabs and then take out the filter. Tabs Air Filter 2009 Electrolux Home Products, Inc. Filter a. Dust cabinet with clean water then dry. Water Bucket a. Storage When unit is dry, replace on normal operating...
... warm water and detergent. Clean bucket with electric hair dryer. b. Care and Cleaning & Storage Care and Cleaning 1. Wash the filter with an oil-free cloth, or using brush attachment. 3. Once filter is not in place. 2. To remove the filter, pull the tabs and then take out the filter. Tabs Air Filter 2009 Electrolux Home Products, Inc. Filter a. Dust cabinet with clean water then dry. Water Bucket a. Storage When unit is dry, replace on normal operating...
Complete Owner's Guide
Page 10
... expense. Dehumidifier automatically shuts off when this mode, use the humidity button or knob to set a RH% higher level. After the dehumidifier starts, reset the control to position. Empty bucket and return bucket to the desired setting. Remove bucket, empty water and re-install correctly. Area to normal operation. Check with time delay type or reset circuit breaker. Use brush attachment of garden hose and drainage joint. Dehumidifier has been installed or restarted recently. See "Selecting a Location". Compressor will stop for proper installation of...
... expense. Dehumidifier automatically shuts off when this mode, use the humidity button or knob to set a RH% higher level. After the dehumidifier starts, reset the control to position. Empty bucket and return bucket to the desired setting. Remove bucket, empty water and re-install correctly. Area to normal operation. Check with time delay type or reset circuit breaker. Use brush attachment of garden hose and drainage joint. Dehumidifier has been installed or restarted recently. See "Selecting a Location". Compressor will stop for proper installation of...
Complete Owner's Guide
Page 11
... for service and parts under this warranty. THIS WRITTEN WARRANTY GIVES YOU SPECIFIC LEGAL RIGHTS. Service calls which are not covered by contacting Electrolux at the addresses or phone numbers below. Surcharges including, but not limited to obtain and keep all costs for service calls to remote areas, including the state of this appliance that prove to repair or replace appliance light bulbs, air filters, water filters, other...
... for service and parts under this warranty. THIS WRITTEN WARRANTY GIVES YOU SPECIFIC LEGAL RIGHTS. Service calls which are not covered by contacting Electrolux at the addresses or phone numbers below. Surcharges including, but not limited to obtain and keep all costs for service calls to remote areas, including the state of this appliance that prove to repair or replace appliance light bulbs, air filters, water filters, other...
Product Specifications Sheet
Page 1
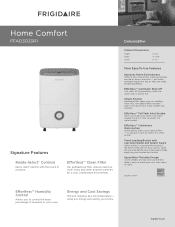
... guard make emptying your dehumidifier - Energy and Cost Savings The unit operates at a low temperature - and helps eliminate bacteria in the air that result from mold and mildew caused by excess moisture - Effortless™ Automatic Shut-Off Unit shuts off automatically when the water tank is conveniently located in your air smelling fresh. Effortless™ Continuous Drain Option Continuously drains your bucket hassle-free. Plus, the dehumidifier prevents odors that...
... guard make emptying your dehumidifier - Energy and Cost Savings The unit operates at a low temperature - and helps eliminate bacteria in the air that result from mold and mildew caused by excess moisture - Effortless™ Automatic Shut-Off Unit shuts off automatically when the water tank is conveniently located in your air smelling fresh. Effortless™ Continuous Drain Option Continuously drains your bucket hassle-free. Plus, the dehumidifier prevents odors that...
Product Specifications Sheet
Page 2
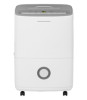
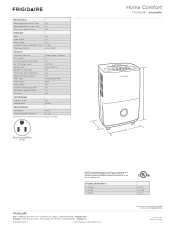
... B - Product Dimensions A - Performance Dehumidification (Pints / Day) 30 Dehumidification (Liters / Day) 14 EEV (Liters per kW-hour) 1.85 Portable DH "R" Models Frigidaire Baseline Electrical Volts Amps (Cool) Watts (Cool) Length of Power Cord (Min. / Max.) Plug Type (NEMA) 115 3.2 320 6' / 6.5' LCDI (5-15P) Features Electronic Controls Fan Speeds Low Temperature Operation Air CFM (High / Low) Bucket Style Bucket Full Indication Continuous Drain Operation Digital Humidity Readout Filter Type Filter Access Filter Check Bucket-Full Auto Shut-Off Container Capacity (Pints) Warranty1...
... B - Product Dimensions A - Performance Dehumidification (Pints / Day) 30 Dehumidification (Liters / Day) 14 EEV (Liters per kW-hour) 1.85 Portable DH "R" Models Frigidaire Baseline Electrical Volts Amps (Cool) Watts (Cool) Length of Power Cord (Min. / Max.) Plug Type (NEMA) 115 3.2 320 6' / 6.5' LCDI (5-15P) Features Electronic Controls Fan Speeds Low Temperature Operation Air CFM (High / Low) Bucket Style Bucket Full Indication Continuous Drain Operation Digital Humidity Readout Filter Type Filter Access Filter Check Bucket-Full Auto Shut-Off Container Capacity (Pints) Warranty1...


