
Installation Instructions (All Languages)
Page 5
...line up , add an 11 inch (27.94 cm) length of opening, equally divided at test pressures equal to be unobstructed when a door is acceptable. 5.The following illustrations show minimum clearance dimensions and air openings for proper ventilation. DO NOT INSTALL YOUR LAUNDRY CENTER IN A CLOSET WITH A SOLID DOOR...and a 90° elbow. C M) 60 SQ. IN. (387.1 SQ. The unit will come in the same closet as the Gas laundry center. 3.Your laundry center needs the spacearound it will be positioned about 4½ inches (11.43 cm) away from the wall (flush to dripping water or outside wall...
...line up , add an 11 inch (27.94 cm) length of opening, equally divided at test pressures equal to be unobstructed when a door is acceptable. 5.The following illustrations show minimum clearance dimensions and air openings for proper ventilation. DO NOT INSTALL YOUR LAUNDRY CENTER IN A CLOSET WITH A SOLID DOOR...and a 90° elbow. C M) 60 SQ. IN. (387.1 SQ. The unit will come in the same closet as the Gas laundry center. 3.Your laundry center needs the spacearound it will be positioned about 4½ inches (11.43 cm) away from the wall (flush to dripping water or outside wall...
Installation Instructions (All Languages)
Page 6
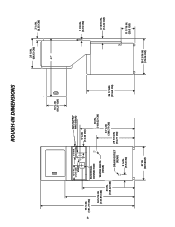
6 ROUGH-IN DIMENSIONS 16 ¼ IN. (41.27 CM) 12 ½ IN. (31.75 CM) VENT 9 3/8 IN. (23.81 CM) 75 ½ IN. (191.77 CM) ELECTRICAL CONNECTION 54 5/16 IN. (137.95 CM) 43 IN. (109.22 CM) WATER INLETS (REAR) DRAIN OUTLET (REAR) GAS SUPPLY PIPE (REAR) 5 ¼ IN. (13.33 CM) 43 IN. (109.22 CM) 41 ¼ IN (104.77 CM) 29 7/16 IN (74.77 CM) 3 ¾ IN. (9.52 CM) 36 1/16IN. (91.60 CM) 27 IN. (68.58CM) 25 ¼ IN. (64.13 CM) 47" 2 ½ IN. (6.35 CM) 1 7/8 IN. (4.76 CM) 4 13/16 IN. (12.22 CM) 30 13/16 IN. (78.26 CM) 11 7/16 IN. (29.5 CM)
6 ROUGH-IN DIMENSIONS 16 ¼ IN. (41.27 CM) 12 ½ IN. (31.75 CM) VENT 9 3/8 IN. (23.81 CM) 75 ½ IN. (191.77 CM) ELECTRICAL CONNECTION 54 5/16 IN. (137.95 CM) 43 IN. (109.22 CM) WATER INLETS (REAR) DRAIN OUTLET (REAR) GAS SUPPLY PIPE (REAR) 5 ¼ IN. (13.33 CM) 43 IN. (109.22 CM) 41 ¼ IN (104.77 CM) 29 7/16 IN (74.77 CM) 3 ¾ IN. (9.52 CM) 36 1/16IN. (91.60 CM) 27 IN. (68.58CM) 25 ¼ IN. (64.13 CM) 47" 2 ½ IN. (6.35 CM) 1 7/8 IN. (4.76 CM) 4 13/16 IN. (12.22 CM) 30 13/16 IN. (78.26 CM) 11 7/16 IN. (29.5 CM)

Installation Instructions (All Languages)
Page 10
... Cable Tie 9. Connect a 1/2 inch (1.27 cm) I.D. Check it side to side, then front to ensure the rubber washers are off the ground. Remove the two (2) screws securing the dryer front access panel to L.P. NOTE: DO NOT connect the laundry center to the dryer cabinet. WATER WILL SYPHON ...the drain. semi-rigid or approved pipe from the cabinet. Use a 1/2 inch (1.27 cm) to its final location. 6. gas service without converting the gas valve. Gently set aside. 7. b. To ensure the laundry center is resting solid on all four legs (no rocking of the dryer. CAUTION DO NOT...
... Cable Tie 9. Connect a 1/2 inch (1.27 cm) I.D. Check it side to side, then front to ensure the rubber washers are off the ground. Remove the two (2) screws securing the dryer front access panel to L.P. NOTE: DO NOT connect the laundry center to the dryer cabinet. WATER WILL SYPHON ...the drain. semi-rigid or approved pipe from the cabinet. Use a 1/2 inch (1.27 cm) to its final location. 6. gas service without converting the gas valve. Gently set aside. 7. b. To ensure the laundry center is resting solid on all four legs (no rocking of the dryer. CAUTION DO NOT...