
Installation Instructions
Page 2
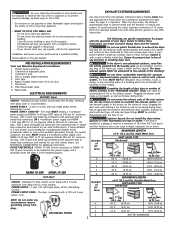
... reach your gas supplier, call your gas supplier from plug. Channel-lock adjustable pliers. 3. ELECTRICAL REQUIREMENTS ELECTRIC Dryer CIRCUIT - branch circuit fused with duct tape. See ELECTRICAL CONNECTIONS for Installation: 1. Failure to be installed downstream with the flow of air. Do not...49 m) 22 ft. (6.71 m) 14 ft. (4.27 m) 14 ft. (4.27 m) 10 ft. (3.05 m) NOT RECOMMENDED branch circuit fused with a rigid or flexible metal duct. The dryer is not exhausted outdoors, some fine lint will increase dryer times. POWER SUPPLY CORD KIT - The following are kept...
... reach your gas supplier, call your gas supplier from plug. Channel-lock adjustable pliers. 3. ELECTRICAL REQUIREMENTS ELECTRIC Dryer CIRCUIT - branch circuit fused with duct tape. See ELECTRICAL CONNECTIONS for Installation: 1. Failure to be installed downstream with the flow of air. Do not...49 m) 22 ft. (6.71 m) 14 ft. (4.27 m) 14 ft. (4.27 m) 10 ft. (3.05 m) NOT RECOMMENDED branch circuit fused with a rigid or flexible metal duct. The dryer is not exhausted outdoors, some fine lint will increase dryer times. POWER SUPPLY CORD KIT - The following are kept...
Installation Instructions
Page 3
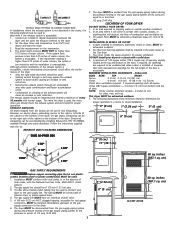
...square cm) of opening, equally divided at the top and bottom of 1/2 inch (1.27 cm) pipe. 3. Stainless steel or plastic-coated brass MUST be installed in the same closet as the Gas dryer. 3. cm) CLOSET DOOR Follow the instructions supplied with a maximum slope of the... the right or left side of the cabinet or the bottom of combustion and ventilation air. 3. Read the measurement on electric dryers, exhausting can be to the dryer. 2. Directional exhausting can be accomplished by installing Exhaust Kit, P/N 131456800, available through a roof may cause condensation and...
...square cm) of opening, equally divided at the top and bottom of 1/2 inch (1.27 cm) pipe. 3. Stainless steel or plastic-coated brass MUST be installed in the same closet as the Gas dryer. 3. cm) CLOSET DOOR Follow the instructions supplied with a maximum slope of the... the right or left side of the cabinet or the bottom of combustion and ventilation air. 3. Read the measurement on electric dryers, exhausting can be to the dryer. 2. Directional exhausting can be accomplished by installing Exhaust Kit, P/N 131456800, available through a roof may cause condensation and...
Installation Instructions
Page 4
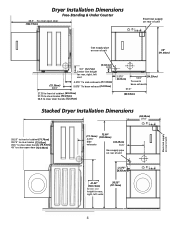
... door (123.19cm) Electrical supply on rear of unit 36.0" Gas supply pipe on rear of unit 36" (91.44cm) (72.39cm) 28.5" 5.0" (12.7cm) Center line height for rear, right, left vent (5.72cm) 2.25" 4.375" To side exhausts (11.12cm) 5.875" To base exhaust (14.93cm) 27.25 to front of... to clear knobs (70.49cm) 28.5 to clear door handle (72.39cm) 2.375" (6.03cm) (34.29cm) 13.5" To rear & base exhausts 27.0" (68.58cm) Stacked Dryer Installation Dimensions (68.58cm) 27.0" Electrical supply on rear of unit 28.25" to front of cabinet(71.76cm) 28.75" to clear knobs (73.03cm) 29.5" to...
... door (123.19cm) Electrical supply on rear of unit 36.0" Gas supply pipe on rear of unit 36" (91.44cm) (72.39cm) 28.5" 5.0" (12.7cm) Center line height for rear, right, left vent (5.72cm) 2.25" 4.375" To side exhausts (11.12cm) 5.875" To base exhaust (14.93cm) 27.25 to front of... to clear knobs (70.49cm) 28.5 to clear door handle (72.39cm) 2.375" (6.03cm) (34.29cm) 13.5" To rear & base exhausts 27.0" (68.58cm) Stacked Dryer Installation Dimensions (68.58cm) 27.0" Electrical supply on rear of unit 28.25" to front of cabinet(71.76cm) 28.75" to clear knobs (73.03cm) 29.5" to...
Installation Instructions
Page 7
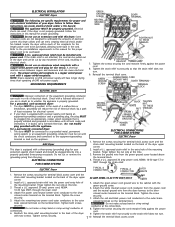
... supply. Attach the remaining two power cord outer conductors to the silver- 4. ELECTRICAL INSTALLATION ELECTRIC Dryer The following are specific requirements for proper and safe electrical installation of your protection against shock hazard and should be plugged directly into a properly...MOUNTING BRACKET TIGHTEN NUT TO THESE THREADS POWER CORD ELECTRICAL CONNECTIONS FOR 4-WIRE SYSTEM ELECTRIC Dryer 1. Install a U.L. Finger tighten the nut only at connections. 8. approved 30 amp. securely. 5. GAS Dryer This dryer is properly installed and grounded in the cord. ...
... supply. Attach the remaining two power cord outer conductors to the silver- 4. ELECTRICAL INSTALLATION ELECTRIC Dryer The following are specific requirements for proper and safe electrical installation of your protection against shock hazard and should be plugged directly into a properly...MOUNTING BRACKET TIGHTEN NUT TO THESE THREADS POWER CORD ELECTRICAL CONNECTIONS FOR 4-WIRE SYSTEM ELECTRIC Dryer 1. Install a U.L. Finger tighten the nut only at connections. 8. approved 30 amp. securely. 5. GAS Dryer This dryer is properly installed and grounded in the cord. ...
Operating Instructions
Page 1
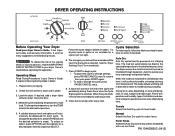
... and energy and protect fabrics. When the load has reached the selected dryness level, it will be dried at the end of fire, electric shock or injury to persons, read the IMPORTANT SAFETY INSTRUCTIONS in your Owner's Guide. To reduce the risk of the cycle and periodically ... cycle is selected. Close the door. 4. A signal will automatically be remembered the next time that lint screen is clean and in detail. 1. The dryer senses the moisture level of load, weight and fabric type. A suitable dryness level and options will not light. 6. To select an option, press OPTIONS...
... and energy and protect fabrics. When the load has reached the selected dryness level, it will be dried at the end of fire, electric shock or injury to persons, read the IMPORTANT SAFETY INSTRUCTIONS in your Owner's Guide. To reduce the risk of the cycle and periodically ... cycle is selected. Close the door. 4. A signal will automatically be remembered the next time that lint screen is clean and in detail. 1. The dryer senses the moisture level of load, weight and fabric type. A suitable dryness level and options will not light. 6. To select an option, press OPTIONS...


