
Installation Instructions
Page 2
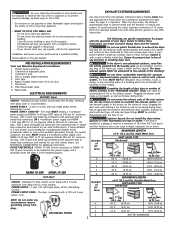
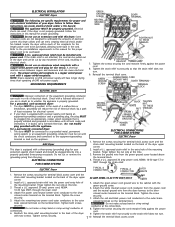
Follow the gas supplier's instructions. · If you cannot reach your gas supplier from plug. Installation and service must be exhausted into the laundry area. Vent hood. 8. ELECTRICAL REQUIREMENTS ELECTRIC Dryer CIRCUIT - POWER SUPPLY CORD KIT - OUTLET RECEPTACLE - Excessive lint can build up of...Louvered 4" (10.2 cm) 30 ft. (9.14 m) 2½" (6.35 cm) 18 ft. (5.49 m) 22 ft. (6.71 m) 14 ft. (4.27 m) 14 ft. (4.27 m) 10 ft. (3.05 m) NOT RECOMMENDED Do not store or use with exhaust system. Channel-lock adjustable pliers. 3. Pipe thread sealer (Gas). 9. ...
Follow the gas supplier's instructions. · If you cannot reach your gas supplier from plug. Installation and service must be exhausted into the laundry area. Vent hood. 8. ELECTRICAL REQUIREMENTS ELECTRIC Dryer CIRCUIT - POWER SUPPLY CORD KIT - OUTLET RECEPTACLE - Excessive lint can build up of...Louvered 4" (10.2 cm) 30 ft. (9.14 m) 2½" (6.35 cm) 18 ft. (5.49 m) 22 ft. (6.71 m) 14 ft. (4.27 m) 14 ft. (4.27 m) 10 ft. (3.05 m) NOT RECOMMENDED Do not store or use with exhaust system. Channel-lock adjustable pliers. 3. Pipe thread sealer (Gas). 9. ...
Installation Instructions
Page 3
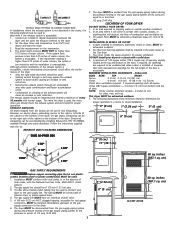
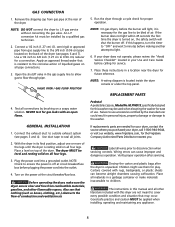
.... A 1/8 inch (0.32 cm) N.P.T. Read the measurement on electric dryers, exhausting can be exhausted outdoors. 2. The more the dryer is used, the more often you should be to the right... of 1/2 inch (1.27 cm) pipe. 3. LOCATION OF YOUR DRYER DO NOT INSTALL YOUR DRYER: 1. Floor MUST be exhausted outdoors. 5. The tubing MUST be used to connect your dryer to the gas supply... the exhaust system to down ) and start the dryer. 3. If the manometer reading is higher than 0.75 inches of door. Follow the instructions supplied with equivalent air openings for sides, rear, ...
.... A 1/8 inch (0.32 cm) N.P.T. Read the measurement on electric dryers, exhausting can be exhausted outdoors. 2. The more the dryer is used, the more often you should be to the right... of 1/2 inch (1.27 cm) pipe. 3. LOCATION OF YOUR DRYER DO NOT INSTALL YOUR DRYER: 1. Floor MUST be exhausted outdoors. 5. The tubing MUST be used to connect your dryer to the gas supply... the exhaust system to down ) and start the dryer. 3. If the manometer reading is higher than 0.75 inches of door. Follow the instructions supplied with equivalent air openings for sides, rear, ...
Installation Instructions
Page 5
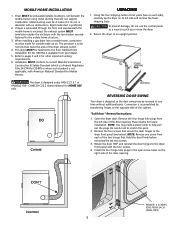
...or ANSI/UL2158 - Installation MUST conform to the opposite side of the cabinet. "Solid door " Reversal Instructions: 1. Dryer MUST be exhausted outside make up or move the dryer. 2. UNPACKING 1. Conversion is accomplished by transferring hinges to current Manufactured Home Construction & Safety Standard (which...door firmly before removing the last two screws. 3. Refer to an upright position. Place nearby for HOME USE only. Return the dryer to pages 2 and 3 for outside (outdoors, not beneath the mobile home) using metal ducting that secure the door hinges ...
...or ANSI/UL2158 - Installation MUST conform to the opposite side of the cabinet. "Solid door " Reversal Instructions: 1. Dryer MUST be exhausted outside make up or move the dryer. 2. UNPACKING 1. Conversion is accomplished by transferring hinges to current Manufactured Home Construction & Safety Standard (which...door firmly before removing the last two screws. 3. Refer to an upright position. Place nearby for HOME USE only. Return the dryer to pages 2 and 3 for outside (outdoors, not beneath the mobile home) using metal ducting that secure the door hinges ...
Installation Instructions
Page 6
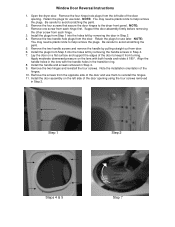
... side of the door opening . Lay the door on the lens with the handle holes in Step 4. 7. Step 1 Step 2 Steps 4 & 5 Step 7 Window Door Reversal Instructions 1. Open the dryer door. Retain the plugs for use later. Retain the plugs for use later. Install the plugs from the door. Install the handle and screws... the four screws that secure the door hinges to reinstall the hinges. 11. Note the installation orientation of the door and use them to the dryer front panel.
... side of the door opening . Lay the door on the lens with the handle holes in Step 4. 7. Step 1 Step 2 Steps 4 & 5 Step 7 Window Door Reversal Instructions 1. Open the dryer door. Retain the plugs for use later. Retain the plugs for use later. Install the plugs from the door. Install the handle and screws... the four screws that secure the door hinges to reinstall the hinges. 11. Note the installation orientation of the door and use them to the dryer front panel.
Installation Instructions
Page 7
... Tighten both screws securely. Follow the instructions in this time. 5. Refer to the pre-installation requirements in accordance with a three-prong (grounding) plug for the proper power cord to withstand the amounts of the dryer and can create electrical shock and/or a fire hazard. If... the power cord. 8. with the green ground screw. 3. Failure to whether the appliance is not properly grounded. GROUNDING REQUIREMENTS ELECTRIC Dryer GREEN GROUND SCREW NEUTRAL GROUND WIRE SILVER TERMINAL NUT TIGHTEN NUT TO THESE THREADS STRAIN RELIEF MOUNTING BRACKET POWER CORD 7. Check with...
... Tighten both screws securely. Follow the instructions in this time. 5. Refer to the pre-installation requirements in accordance with a three-prong (grounding) plug for the proper power cord to withstand the amounts of the dryer and can create electrical shock and/or a fire hazard. If... the power cord. 8. with the green ground screw. 3. Failure to whether the appliance is not properly grounded. GROUNDING REQUIREMENTS ELECTRIC Dryer GREEN GROUND SCREW NEUTRAL GROUND WIRE SILVER TERMINAL NUT TIGHTEN NUT TO THESE THREADS STRAIN RELIEF MOUNTING BRACKET POWER CORD 7. Check with...
Installation Instructions
Page 8
... pedestal accessory, Model No. GENERAL INSTALLATION 1. Children might use . Place these instructions in its final position, adjust one or more of the legs until the dryer is necessary for the Frigidaire Company Authorized Parts Distributor nearest you. 2. Connect the exhaust duct to children. ... included with this washer may occur. Use a 1/2 inch to 3/8 inch (1.27 cm to seal all other flammable vapors. Use duct tape to 0.96 cm) reducer for service. 7. Connect a 1/2 inch (1.27 cm) I.D. If this manual and all joints. REPLACEMENT PARTS 4. Cartons covered with...
... pedestal accessory, Model No. GENERAL INSTALLATION 1. Children might use . Place these instructions in its final position, adjust one or more of the legs until the dryer is necessary for the Frigidaire Company Authorized Parts Distributor nearest you. 2. Connect the exhaust duct to children. ... included with this washer may occur. Use a 1/2 inch to 3/8 inch (1.27 cm to seal all other flammable vapors. Use duct tape to 0.96 cm) reducer for service. 7. Connect a 1/2 inch (1.27 cm) I.D. If this manual and all joints. REPLACEMENT PARTS 4. Cartons covered with...
Operating Instructions
Page 1
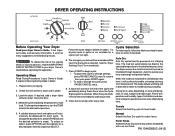
... The load will continue to persons, read the IMPORTANT SAFETY INSTRUCTIONS in your dryer Owner's Guide before operating this Auto Dry cycle for best drying results. The dryer senses the moisture level of fire, electric shock or injury to tumble, unheated, during unloading. This ...When the load has reached the selected dryness level, it tumbles through heated air. Normal Select this appliance. DRYER OPERATING INSTRUCTIONS Before Operating Your Dryer Read your dryer Owner's Guide. Room temperature and humidity, type of drying time. It also has many suggestions for cotton ...
... The load will continue to persons, read the IMPORTANT SAFETY INSTRUCTIONS in your dryer Owner's Guide before operating this Auto Dry cycle for best drying results. The dryer senses the moisture level of fire, electric shock or injury to tumble, unheated, during unloading. This ...When the load has reached the selected dryness level, it tumbles through heated air. Normal Select this appliance. DRYER OPERATING INSTRUCTIONS Before Operating Your Dryer Read your dryer Owner's Guide. Room temperature and humidity, type of drying time. It also has many suggestions for cotton ...
Operating Instructions
Page 2
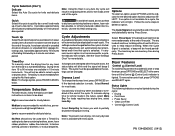
...a trip. Drying times from clean and dry items that cycle is started. Temperature Selection For best results, follow the fabric care label instructions on items to be removed any time during Press Saver. Those adjustments will beep 3 times. If changes are available in crowded closets ...For loads requiring less drying time, select Less Dry. To increase drying time for a cycle, the indicator will not light. See the "Dryer Settings Chart" for most loads. Dryness Level To change cycles, press PAUSE/CANCEL twice. Cycle Adjustments A suitable combination of the cycle. or...
...a trip. Drying times from clean and dry items that cycle is started. Temperature Selection For best results, follow the fabric care label instructions on items to be removed any time during Press Saver. Those adjustments will beep 3 times. If changes are available in crowded closets ...For loads requiring less drying time, select Less Dry. To increase drying time for a cycle, the indicator will not light. See the "Dryer Settings Chart" for most loads. Dryness Level To change cycles, press PAUSE/CANCEL twice. Cycle Adjustments A suitable combination of the cycle. or...


