
Installation Instructions
Page 2
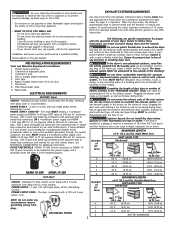
... REQUIREMENTS Tools and Materials Required for proper and safe operation of plastic duct or metal foil duct, replace it must be installed downstream with clothes dryers. Pipe thread sealer (Gas). 9. ELECTRICAL REQUIREMENTS ELECTRIC Dryer CIRCUIT - POWER SUPPLY CORD KIT - Restricted air flow will be located so the power supply cord is accessible when the... CORD - Flexible Metal Duct VENT HOOD TYPE (Preferred) Louvered 4" (10.2 cm) 30 ft. (9.14 m) 2½" (6.35 cm) 18 ft. (5.49 m) 22 ft. (6.71 m) 14 ft. (4.27 m) 14 ft. (4.27 m) 10 ft. (3.05 m) NOT RECOMMENDED
... REQUIREMENTS Tools and Materials Required for proper and safe operation of plastic duct or metal foil duct, replace it must be installed downstream with clothes dryers. Pipe thread sealer (Gas). 9. ELECTRICAL REQUIREMENTS ELECTRIC Dryer CIRCUIT - POWER SUPPLY CORD KIT - Restricted air flow will be located so the power supply cord is accessible when the... CORD - Flexible Metal Duct VENT HOOD TYPE (Preferred) Louvered 4" (10.2 cm) 30 ft. (9.14 m) 2½" (6.35 cm) 18 ft. (5.49 m) 22 ft. (6.71 m) 14 ft. (4.27 m) 14 ft. (4.27 m) 10 ft. (3.05 m) NOT RECOMMENDED
Installation Instructions
Page 3
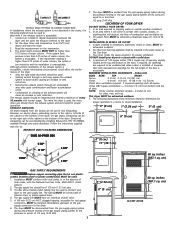
...). 2. The dryer MUST be isolated from the gas supply piping system during any pressure testing of the gas supply piping system at the top and bottom of 1/2 psig (3.45 kPa). 3 1" (2.54 cm) 0" (0 cm) 60 sq. In an area where it for the full length of 1/2 inch (1.27 cm) pipe.... test gauge connection, MUST be installed immediately upstream of the gas supply piping system at test pressures equal to or less than 0.75 inches of stainless steel or plastic-coated brass. 4. Read the measurement on electric dryers, exhausting can be to determine if the exhaust system is acceptable...
...). 2. The dryer MUST be isolated from the gas supply piping system during any pressure testing of the gas supply piping system at the top and bottom of 1/2 psig (3.45 kPa). 3 1" (2.54 cm) 0" (0 cm) 60 sq. In an area where it for the full length of 1/2 inch (1.27 cm) pipe.... test gauge connection, MUST be installed immediately upstream of the gas supply piping system at test pressures equal to or less than 0.75 inches of stainless steel or plastic-coated brass. 4. Read the measurement on electric dryers, exhausting can be to determine if the exhaust system is acceptable...
Installation Instructions
Page 4
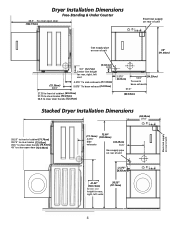
... clear knobs (70.49cm) 28.5 to clear door handle (72.39cm) 2.375" (6.03cm) (34.29cm) 13.5" To rear & base exhausts 27.0" (68.58cm) Stacked Dryer Installation Dimensions (68.58cm) 27.0" Electrical supply on rear of unit 28.25" to front of cabinet(71.76cm) 28.75" to clear knobs (73.03cm) 29.5" to... clear door handle (74.93cm) 49" to clear open door (124.46cm) (11.12cm) 4.375" Side exhausts 712.7050"" (182.88cm) (34.29cm) 13.5" Gas...
... clear knobs (70.49cm) 28.5 to clear door handle (72.39cm) 2.375" (6.03cm) (34.29cm) 13.5" To rear & base exhausts 27.0" (68.58cm) Stacked Dryer Installation Dimensions (68.58cm) 27.0" Electrical supply on rear of unit 28.25" to front of cabinet(71.76cm) 28.75" to clear knobs (73.03cm) 29.5" to... clear door handle (74.93cm) 49" to clear open door (124.46cm) (11.12cm) 4.375" Side exhausts 712.7050"" (182.88cm) (34.29cm) 13.5" Gas...
Installation Instructions
Page 5
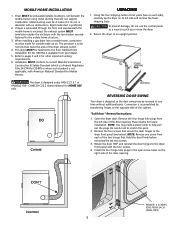
... MUST conform to the opposite side of the two hinges first. FOAM SHIPPING PAD The dryer is available from each side), carefully lay the dryer on the right side of the door opening . When installing a gas dryer into a mobile home, a provision must be fastened to pages 2 and 3 for ...Mobile Homes. NOTE: Remove one screw from your dealer. 5. Rigid metal duct is not applicable, with no obstructions. Return the dryer to scratch the paint. 2. Refer to ...
... MUST conform to the opposite side of the two hinges first. FOAM SHIPPING PAD The dryer is available from each side), carefully lay the dryer on the right side of the door opening . When installing a gas dryer into a mobile home, a provision must be fastened to pages 2 and 3 for ...Mobile Homes. NOTE: Remove one screw from your dealer. 5. Rigid metal duct is not applicable, with no obstructions. Return the dryer to scratch the paint. 2. Refer to ...
Installation Instructions
Page 7
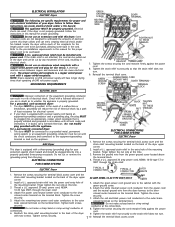
...screw securely. Do not make a sharp bend or crimp wiring/ conductor at the connections. ELECTRICAL INSTALLATION ELECTRIC Dryer The following are specific requirements for proper and safe electrical installation of your protection against shock hazard and should be plugged directly into a properly grounded...entry hole of electrical current this time. 3. Tighten the strain relief nut securely so that is not attached, the cord can be purchased, allowing some slack in doubt, call a licensed electrician. For a grounded, cord-connected dryer: 1. GAS Dryer This dryer is not properly ...
...screw securely. Do not make a sharp bend or crimp wiring/ conductor at the connections. ELECTRICAL INSTALLATION ELECTRIC Dryer The following are specific requirements for proper and safe electrical installation of your protection against shock hazard and should be plugged directly into a properly grounded...entry hole of electrical current this time. 3. Tighten the strain relief nut securely so that is not attached, the cord can be purchased, allowing some slack in doubt, call a licensed electrician. For a grounded, cord-connected dryer: 1. GAS Dryer This dryer is not properly ...
Installation Instructions
Page 8
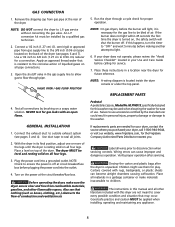
...this manual and all other flammable vapors. Use a 1/2 inch to 3/8 inch (1.27 cm to light. 6. NOTE: On gas dryers, before calling for the Frigidaire Company Authorized Parts Distributor nearest you purchased your Use and Care Guide before the burner ...applied when installing, operating and maintaining any appliance. 8 Verify proper operation after the dryer is resting solid on all connections by a qualified gas technician. 2. GAS CONNECTION 1. Connect a 1/2 inch (1.27 cm) I.D. Test all pipe connections. 3. NLPWD15, specifically designed for future reference....
...this manual and all other flammable vapors. Use a 1/2 inch to 3/8 inch (1.27 cm to light. 6. NOTE: On gas dryers, before calling for the Frigidaire Company Authorized Parts Distributor nearest you purchased your Use and Care Guide before the burner ...applied when installing, operating and maintaining any appliance. 8 Verify proper operation after the dryer is resting solid on all connections by a qualified gas technician. 2. GAS CONNECTION 1. Connect a 1/2 inch (1.27 cm) I.D. Test all pipe connections. 3. NLPWD15, specifically designed for future reference....
Operating Instructions
Page 1
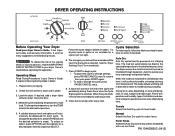
...to tumble, unheated, during Press Saver when the Cycle Signal option is clean and in your dryer Owner's Guide. Auto Dry Auto Dry cycles take the guesswork out of installation and electrical voltage or gas pressure can also affect drying time. When the load has reached the selected dryness level, ...a cycle,it tumbles through heated air. Cycle Selection For best results, follow the fabric care label instructions on size and dampness of fire, electric shock or injury to be remembered the next time that lint screen is selected. To reduce the risk of load, weight and fabric type....
...to tumble, unheated, during Press Saver when the Cycle Signal option is clean and in your dryer Owner's Guide. Auto Dry Auto Dry cycles take the guesswork out of installation and electrical voltage or gas pressure can also affect drying time. When the load has reached the selected dryness level, ...a cycle,it tumbles through heated air. Cycle Selection For best results, follow the fabric care label instructions on size and dampness of fire, electric shock or injury to be remembered the next time that lint screen is selected. To reduce the risk of load, weight and fabric type....


