Installation Instructions (All Languages)
Page 1
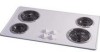
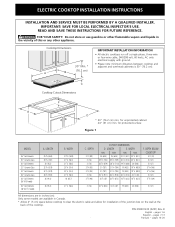
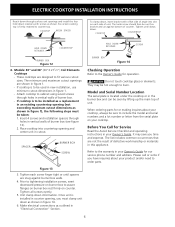
...unprotected cabinet 24" (61 cm) min. ELECTRIC COOKTOP INSTALLATION INSTRUCTIONS INSTALLATION AND SERVICE MUST BE PERFORMED BY A QUALIFIED INSTALLER. LENGTH 25 3/4 (65.4) 30 3/4 (78.1) 30 (76.2) 32 1/4 (81.9) 32 1/4 (81.9) 36 3/4 (93.3) 36 (91.4) 36 (91.4) B. P/N 318201410 (0201) Rev.... Elements 30" Ceramic-Glass 30" Coil Elements 32" Ceramic-Glass 32" Coil Elements 36" Ceramic-Glass 36" Coil Elements (36"X18"model) 36" Coil Elelments (36"X211/2"model) A. IMPORTANT: SAVE FOR LOCAL ELECTRICAL INSPECTOR'S USE. C Cooktop Cutout Dimensions F E D * 30" (76.2 cm) min. WIDTH MIN. ...
...unprotected cabinet 24" (61 cm) min. ELECTRIC COOKTOP INSTALLATION INSTRUCTIONS INSTALLATION AND SERVICE MUST BE PERFORMED BY A QUALIFIED INSTALLER. LENGTH 25 3/4 (65.4) 30 3/4 (78.1) 30 (76.2) 32 1/4 (81.9) 32 1/4 (81.9) 36 3/4 (93.3) 36 (91.4) 36 (91.4) B. P/N 318201410 (0201) Rev.... Elements 30" Ceramic-Glass 30" Coil Elements 32" Ceramic-Glass 32" Coil Elements 36" Ceramic-Glass 36" Coil Elements (36"X18"model) 36" Coil Elelments (36"X211/2"model) A. IMPORTANT: SAVE FOR LOCAL ELECTRICAL INSPECTOR'S USE. C Cooktop Cutout Dimensions F E D * 30" (76.2 cm) min. WIDTH MIN. ...
Installation Instructions (All Languages)
Page 2
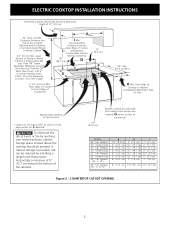
...36" X 211/2") G H J 31/2" (8.9 cm) 3" (7.6 cm) 2" (5.1 cm) 4" (10.2 cm) 71/2" (19.1 cm) 2" (5.1 cm) 6" (15.2 cm) 71/2" (19.1 cm) 21/4" (5.7 cm) 4" (10.2 cm) 71/2" (19.1 cm) 2" (5.1 cm) 6" (15.2 cm) 71/2" (19.1 cm) 21/4" (5.7 cm) 4" (10.2 cm) 71/2" (19.1 cm) 2" (5.1 cm) 6" (15.2 cm) 3" (7.6 cm) 3" (7.6 cm) 6" (15.2 cm) 71/2"(19.1 cm) 21/4" (5.7 cm) Figure 2 - ELECTRIC COOKTOP... INSTALLATION INSTRUCTIONS Overhead Cabinet Should Not Exceed a Maximum Depth of burns or fire by reaching over heated surfaces, cabinet storage space located above the cooktop should be ...
...36" X 211/2") G H J 31/2" (8.9 cm) 3" (7.6 cm) 2" (5.1 cm) 4" (10.2 cm) 71/2" (19.1 cm) 2" (5.1 cm) 6" (15.2 cm) 71/2" (19.1 cm) 21/4" (5.7 cm) 4" (10.2 cm) 71/2" (19.1 cm) 2" (5.1 cm) 6" (15.2 cm) 71/2" (19.1 cm) 21/4" (5.7 cm) 4" (10.2 cm) 71/2" (19.1 cm) 2" (5.1 cm) 6" (15.2 cm) 3" (7.6 cm) 3" (7.6 cm) 6" (15.2 cm) 71/2"(19.1 cm) 21/4" (5.7 cm) Figure 2 - ELECTRIC COOKTOP... INSTALLATION INSTRUCTIONS Overhead Cabinet Should Not Exceed a Maximum Depth of burns or fire by reaching over heated surfaces, cabinet storage space located above the cooktop should be ...

Installation Instructions (All Languages)
Page 4
ELECTRIC COOKTOP INSTALLATION INSTRUCTIONS This appliance is equipped with a frame connected green (or bare... Ground Wire (Bare or Green Wire) U.L.-Listed Conduit Cable from appliance Figure 5 - U.S.A. Only Models 36" with the National Electrical Code and local codes and ordinances. Connect the appliance white wire (if a 4-wire appliance cable is ...the white wire for model with warmer zone) from appliance Figure 7 - 4-WIRE GROUNDED JUNCTION BOX Models 36" with local electrical codes. Cable from Power Supply Ground Wire Red Wires White Wire Black Wires Junction Box Ground Wire (...
ELECTRIC COOKTOP INSTALLATION INSTRUCTIONS This appliance is equipped with a frame connected green (or bare... Ground Wire (Bare or Green Wire) U.L.-Listed Conduit Cable from appliance Figure 5 - U.S.A. Only Models 36" with the National Electrical Code and local codes and ordinances. Connect the appliance white wire (if a 4-wire appliance cable is ...the white wire for model with warmer zone) from appliance Figure 7 - 4-WIRE GROUNDED JUNCTION BOX Models 36" with local electrical codes. Cable from Power Supply Ground Wire Red Wires White Wire Black Wires Junction Box Ground Wire (...
Installation Instructions (All Languages)
Page 5
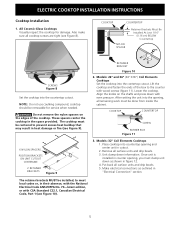
...: 26" and 36" (36"X18") Coil Elements Cooktops Set the cooktop into the countertop cutout. Place cooktop into the opening, all surface units and drip bowls. 5. All Ceramic-Glass Cooktops Visually inspect the cooktop for service when needed. cooktop should be centered to prevent excess heat buildup that may result in their absence, with the National Electrical Code ANSI...
...: 26" and 36" (36"X18") Coil Elements Cooktops Set the cooktop into the countertop cutout. Place cooktop into the opening, all surface units and drip bowls. 5. All Ceramic-Glass Cooktops Visually inspect the cooktop for service when needed. cooktop should be centered to prevent excess heat buildup that may result in their absence, with the National Electrical Code ANSI...
Installation Instructions (All Languages)
Page 6
... into countertop opening , you have inquiries about your product and/or need to burn. COOKTOP NYLON SPACER To clamp down . Models: 30" and 36" (36"X 211/2") Coil Elements Cooktops - The minimum and maximum cutout openings are designed to be used in new installation,...tight or until draws down , insert bracket with screws as shown. Tighten all screws evenly. 5. Make electrical connections as shown in figure 1. - ELECTRIC COOKTOP INSTALLATION INSTRUCTIONS Reach down through surface unit openings and install the four hold down information. Prior to tightening installation...
... into countertop opening , you have inquiries about your product and/or need to burn. COOKTOP NYLON SPACER To clamp down . Models: 30" and 36" (36"X 211/2") Coil Elements Cooktops - The minimum and maximum cutout openings are designed to be used in new installation,...tight or until draws down , insert bracket with screws as shown. Tighten all screws evenly. 5. Make electrical connections as shown in figure 1. - ELECTRIC COOKTOP INSTALLATION INSTRUCTIONS Reach down through surface unit openings and install the four hold down information. Prior to tightening installation...
