Installation Instructions (All Languages)
Page 1
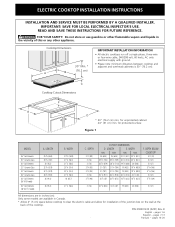
....8) 31 1/4 (79.4) 31 1/4 (79.4) 36 1/8 (91.8) 34 3/8 (87.3) MIN. C Cooktop Cutout Dimensions F E D * 30" (76.2 cm) min. Only some models are in the vicinity of the cooktop. pages 14-20 ELECTRIC COOKTOP INSTALLATION INSTRUCTIONS INSTALLATION AND SERVICE MUST BE PERFORMED BY A QUALIFIED INSTALLER. for protected surface Figure 1 MODEL 26" Coil Elements 30" Ceramic-Glass 30" Coil Elements 32" Ceramic-Glass 32" Coil Elements 36" Ceramic-Glass 36" Coil Elements (36"X18"model) 36" Coil Elelments (36"X211/2"model) A. MAX. 20 1/2 (52.1) 20 1/2 (52...
....8) 31 1/4 (79.4) 31 1/4 (79.4) 36 1/8 (91.8) 34 3/8 (87.3) MIN. C Cooktop Cutout Dimensions F E D * 30" (76.2 cm) min. Only some models are in the vicinity of the cooktop. pages 14-20 ELECTRIC COOKTOP INSTALLATION INSTRUCTIONS INSTALLATION AND SERVICE MUST BE PERFORMED BY A QUALIFIED INSTALLER. for protected surface Figure 1 MODEL 26" Coil Elements 30" Ceramic-Glass 30" Coil Elements 32" Ceramic-Glass 32" Coil Elements 36" Ceramic-Glass 36" Coil Elements (36"X18"model) 36" Coil Elelments (36"X211/2"model) A. MAX. 20 1/2 (52.1) 20 1/2 (52...

Installation Instructions (All Languages)
Page 2
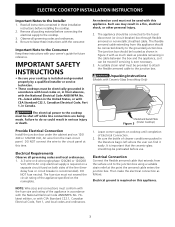
.... 28 MGS Sheet Steel, 0.015" (0.4 mm) Stainless Steel, 0.024" (0.6 mm) Aluminum or 0.020" (0.5 mm) Copper 2 1/2" (6.4 cm) Min. when Bottom of countertop. Approximate Location of Junction Box * Letters on front page except for G, H and J. Clearance Between the Top of the Cooking Platform and the Bottom of Countertop A Min. COUNTERTOP CUTOUT OPENING 2 If cabinet storage is Protected by reaching over heated surfaces, cabinet storage space located above the cooktop should be...
.... 28 MGS Sheet Steel, 0.015" (0.4 mm) Stainless Steel, 0.024" (0.6 mm) Aluminum or 0.020" (0.5 mm) Copper 2 1/2" (6.4 cm) Min. when Bottom of countertop. Approximate Location of Junction Box * Letters on front page except for G, H and J. Clearance Between the Top of the Cooking Platform and the Bottom of Countertop A Min. COUNTERTOP CUTOUT OPENING 2 If cabinet storage is Protected by reaching over heated surfaces, cabinet storage space located above the cooktop should be...
Installation Instructions (All Languages)
Page 3
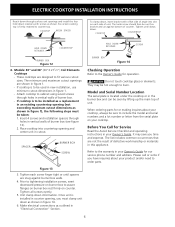
.... WARNING Unpacking Instructions (Models with your cooktop is ever necessary. 3. DO NOT connect the wire to the junction box using a suitable strain relief at this appliance. The fuse size must be connected directly to the cooktop. 3. Electrical Connection Connect the flexible armored cable that the ceramic-glass smoothtop be connected to leave these installation instructions before installing the cooktop. 2. Then make the electrical connection as shown in Figure 2 with CSA Standard C22.1, Canadian Electrical Code, Part 1, in Canada. The...
.... WARNING Unpacking Instructions (Models with your cooktop is ever necessary. 3. DO NOT connect the wire to the junction box using a suitable strain relief at this appliance. The fuse size must be connected directly to the cooktop. 3. Electrical Connection Connect the flexible armored cable that the ceramic-glass smoothtop be connected to leave these installation instructions before installing the cooktop. 2. Then make the electrical connection as shown in Figure 2 with CSA Standard C22.1, Canadian Electrical Code, Part 1, in Canada. The...

Installation Instructions (All Languages)
Page 4
... Wire Red Wires Black Wires Junction Box White Wire Ground Wire (Bare or Green Wire) U.L.-Listed Conduit Connector (or CSA listed) Cable from appliance Connector (or CSA listed) Figure 4 - Cap the white wire from the appliance cable to the matching color wires from the power supply cable is made to a gas supply pipe. U.S.A. ELECTRIC COOKTOP INSTALLATION INSTRUCTIONS This appliance is manufactured with a frame connected green (or bare copper) ground wire. 1. Only Models 36" with local electrical codes...
... Wire Red Wires Black Wires Junction Box White Wire Ground Wire (Bare or Green Wire) U.L.-Listed Conduit Connector (or CSA listed) Cable from appliance Connector (or CSA listed) Figure 4 - Cap the white wire from the appliance cable to the matching color wires from the power supply cable is made to a gas supply pipe. U.S.A. ELECTRIC COOKTOP INSTALLATION INSTRUCTIONS This appliance is manufactured with a frame connected green (or bare copper) ground wire. 1. Only Models 36" with local electrical codes...
Installation Instructions (All Languages)
Page 5
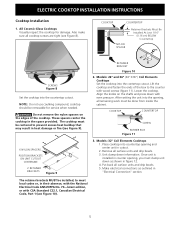
... the counter with CSA Standard C22.1, Canadian Electrical Code, Part 1 (see Figure 10). 5 Models: 26" and 36" (36"X18") Coil Elements Cooktops Set the cooktop into the opening and center unit in "Electrical Connection" section. Lift the cooktop and fasten the ends of the cooktop. Make electrical connections as shown in the space provided. The retainer brackets MUST be done from inside the cabinet. ELECTRIC COOKTOP INSTALLATION INSTRUCTIONS Cooktop Installation 1. Also make sure all remaining work...
... the counter with CSA Standard C22.1, Canadian Electrical Code, Part 1 (see Figure 10). 5 Models: 26" and 36" (36"X18") Coil Elements Cooktops Set the cooktop into the opening and center unit in "Electrical Connection" section. Lift the cooktop and fasten the ends of the cooktop. Make electrical connections as shown in the space provided. The retainer brackets MUST be done from inside the cabinet. ELECTRIC COOKTOP INSTALLATION INSTRUCTIONS Cooktop Installation 1. Also make sure all remaining work...
Installation Instructions (All Languages)
Page 6
... cooktop is to order parts. 6 Prior to tightening installation screws, exert downward pressure on counter. Unit clamp down , insert bracket with screws as shown. CAUTION Do not touch cooktop glass or elements. When ordering parts for Service Read the Avoid Service Checklist and operating instructions in your product and/or need to be used in new installation, use minimum cutout dimensions in vertical walls of unit. Place cooktop into slot on your Owner's Guide...
... cooktop is to order parts. 6 Prior to tightening installation screws, exert downward pressure on counter. Unit clamp down , insert bracket with screws as shown. CAUTION Do not touch cooktop glass or elements. When ordering parts for Service Read the Avoid Service Checklist and operating instructions in your product and/or need to be used in new installation, use minimum cutout dimensions in vertical walls of unit. Place cooktop into slot on your Owner's Guide...
Complete Owner's Guide (English)
Page 1
...ol 2 Product Registration 2 Important Safety Instructions 3-4 Selecting Surface Cooking Utensils 5 Specialty Pans & Trivets 5 Canning Tips & Information 6 Setting Surface Controls 6 Indicator Lights (Coil Elements Models 6 Ceramic Glass Cooktop (Some Models 7-10 Types of Heating Units Used 7 Hot Surface Indicator Light 7 Warm Zone Feature 8 Special Caution for Aluminum Foil and Aluminum Cooking Utensils 9 Things to Remember 9 Use and Care of Glass Surface 9-10 General Cleaning 11-12 Avoid Service Checklist 13-14 Notes 15 Warranty 16 318200612 (0511) Rev.
...ol 2 Product Registration 2 Important Safety Instructions 3-4 Selecting Surface Cooking Utensils 5 Specialty Pans & Trivets 5 Canning Tips & Information 6 Setting Surface Controls 6 Indicator Lights (Coil Elements Models 6 Ceramic Glass Cooktop (Some Models 7-10 Types of Heating Units Used 7 Hot Surface Indicator Light 7 Warm Zone Feature 8 Special Caution for Aluminum Foil and Aluminum Cooking Utensils 9 Things to Remember 9 Use and Care of Glass Surface 9-10 General Cleaning 11-12 Avoid Service Checklist 13-14 Notes 15 Warranty 16 318200612 (0511) Rev.
Complete Owner's Guide (English)
Page 2
... the warranty period service be easily retrieved. Please read through the information contained in the space provided below the model and serial numbers found on the serial plate located on how to show your cooktop. Your cooktop may not have to properly operate and care for your bill of sale. © 2001 White Consolidated Industries All rights reserved 2 Note: The instructions appearing...
... the warranty period service be easily retrieved. Please read through the information contained in the space provided below the model and serial numbers found on the serial plate located on how to show your cooktop. Your cooktop may not have to properly operate and care for your bill of sale. © 2001 White Consolidated Industries All rights reserved 2 Note: The instructions appearing...

Complete Owner's Guide (English)
Page 3
... in Canada, and local code requirements. When flaming food under the hood, turn fan on any part of the appliance. • Clean the appliance regularly to hood manufacturer's instructions for future reference. Select utensils having flat bottoms large enough to these areas are dark in use a towel or other flammable materials contact hot surfaces. Proper relationship of utensil to element will expose a portion of the surface heating...
... in Canada, and local code requirements. When flaming food under the hood, turn fan on any part of the appliance. • Clean the appliance regularly to hood manufacturer's instructions for future reference. Select utensils having flat bottoms large enough to these areas are dark in use a towel or other flammable materials contact hot surfaces. Proper relationship of utensil to element will expose a portion of the surface heating...

Complete Owner's Guide (English)
Page 4
... SAFETY INSTRUCTIONS (continued) • Utensil Handles Should Be Turned Inward and Not Extend Over Adjacent Surface Units. Heating elements clean themselves during cooking may subject wiring or components boiled dry may result in water. FOR CERAMIC-GLASS COOKTOP ONLY • Do Not Clean or Operate a Broken Cooktop. Check the manufacturer's recommendations for baking if used to wipe spills on a hot cooking area, be careful to avoid a steam burn. Surface heating elements...
... SAFETY INSTRUCTIONS (continued) • Utensil Handles Should Be Turned Inward and Not Extend Over Adjacent Surface Units. Heating elements clean themselves during cooking may subject wiring or components boiled dry may result in water. FOR CERAMIC-GLASS COOKTOP ONLY • Do Not Clean or Operate a Broken Cooktop. Check the manufacturer's recommendations for baking if used to wipe spills on a hot cooking area, be careful to avoid a steam burn. Surface heating elements...
Complete Owner's Guide (English)
Page 5
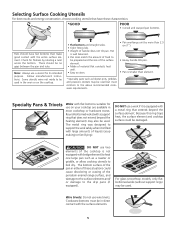
... NOT use wire trivets. Pan is well balanced. • Pan sizes match the amount of these characteristics: *GOOD POOR • Curved and warped pan bottoms. Pans should be no gaps between the pan and ruler. For glass smoothtop models, only flat bottomed woks (without support rings) may also be used in the oven or on your cooktop are available in direct contact with a metal ring that conducts heat...
... NOT use wire trivets. Pan is well balanced. • Pan sizes match the amount of these characteristics: *GOOD POOR • Curved and warped pan bottoms. Pans should be no gaps between the pan and ruler. For glass smoothtop models, only flat bottomed woks (without support rings) may also be used in the oven or on your cooktop are available in direct contact with a metal ring that conducts heat...
Complete Owner's Guide (English)
Page 6
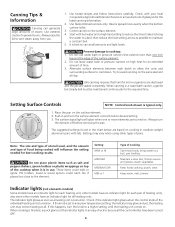
... pan on the surface element. 4. Pot holders, towel or wood spoons could melt or ignite. Center canner on the surface element. 2. Note: The size and type of utensil used, and the amount and type of time. 3. Setting MAX or HI MEDIUM MEDIUM LOW MIN or 1 Type of glass jars for the required time. The indicator light glows as soon as possible to cool down. When cooking is set...
... pan on the surface element. 4. Pot holders, towel or wood spoons could melt or ignite. Center canner on the surface element. 2. Note: The size and type of utensil used, and the amount and type of time. 3. Setting MAX or HI MEDIUM MEDIUM LOW MIN or 1 Type of glass jars for the required time. The indicator light glows as soon as possible to cool down. When cooking is set...
Complete Owner's Guide (English)
Page 7
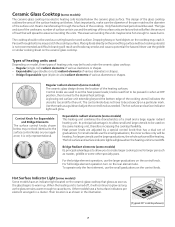
... front element, use the small graduations on the ceramic glass cooktop. Pans with rough bottoms may not look identical to warm up through the surface of the heating surfaces. Heat power levels are used . Bridge Radiant elements (some models) Some models have a hot surface indicators per element arranged in use and the settings of the surface units are factors that has a dual set of a small and a large regular radiant heating unit. Other models have an indicator light located on the ceramic glass cooktop that...
... front element, use the small graduations on the ceramic glass cooktop. Pans with rough bottoms may not look identical to warm up through the surface of the heating surfaces. Heat power levels are used . Bridge Radiant elements (some models) Some models have a hot surface indicators per element arranged in use and the settings of the surface units are factors that has a dual set of a small and a large regular radiant heating unit. Other models have an indicator light located on the ceramic glass cooktop that...
Complete Owner's Guide (English)
Page 8
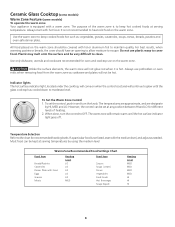
... Item Sauces Soups (cream) Stews Vegetables Fried Foods Hot Beverages Soups (liquid) Heating Level MED MED MED MED HI HI HI 8 Indicator lights The hot surface indicator light, located under the cooktop, will continue to glow until the hot surface indicator light goes off. If a particular food is set the control, push in and turn the control to keep hot cooked foods at any position between HI and LO for...
... Item Sauces Soups (cream) Stews Vegetables Fried Foods Hot Beverages Soups (liquid) Heating Level MED MED MED MED HI HI HI 8 Indicator lights The hot surface indicator light, located under the cooktop, will continue to glow until the hot surface indicator light goes off. If a particular food is set the control, push in and turn the control to keep hot cooked foods at any position between HI and LO for...

Complete Owner's Guide (English)
Page 9
... work surface in the form of breakage, fusing or marking may cause it has completely cooled down. (White glass cooktops only). 9 b) Wearing an oven mitt, use cooktop or attempt to scrape the hot spill out of cleaner cream. Using incorrect cleaning materials. Things to cool. To Remove Tiny scratches are used for Aluminum Foil and Aluminum Cooking Utensils 1) Aluminum foil Use of aluminum foil will be turned off all surface units and remove all pans...
... work surface in the form of breakage, fusing or marking may cause it has completely cooled down. (White glass cooktops only). 9 b) Wearing an oven mitt, use cooktop or attempt to scrape the hot spill out of cleaner cream. Using incorrect cleaning materials. Things to cool. To Remove Tiny scratches are used for Aluminum Foil and Aluminum Cooking Utensils 1) Aluminum foil Use of aluminum foil will be turned off all surface units and remove all pans...
Complete Owner's Guide (English)
Page 10
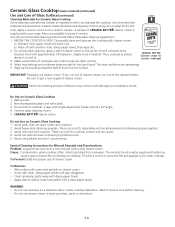
... on a heated surface. Do not use one of the cleansers listed. Use recommended materials only (see below). then wipe dry. 2. Do Use on Ceramic Glass Cooktop 1. Ceramic Glass Cooktop (some models) (continued) Use and Care of Glass Surface (continued) Cleaning Materials for Ceramic Glass Cooktop Some cleaning materials may contain an ingredient which can scratch, depending on their abrasiveness and cleaning pressure applied. 3. A sample of cleaner cream in stores if needed ). For normal daily cleaning, apply...
... on a heated surface. Do not use one of the cleansers listed. Use recommended materials only (see below). then wipe dry. 2. Do Use on Ceramic Glass Cooktop 1. Ceramic Glass Cooktop (some models) (continued) Use and Care of Glass Surface (continued) Cleaning Materials for Ceramic Glass Cooktop Some cleaning materials may contain an ingredient which can scratch, depending on their abrasiveness and cleaning pressure applied. 3. A sample of cleaner cream in stores if needed ). For normal daily cleaning, apply...

Complete Owner's Guide (English)
Page 11
... of pans sliding off the element. If your model has a support rod, lower the support rod, then gently lower the cooktop into the terminal plug. 3. DO NOT drop or bend the cooktop when raising or lowering. Line up the opening and into the frame. Be careful not to bend terminal ends when replacing elements after cleaning. To Remove and Replace Surface Elements and Drip Bowls (some models) Before cleaning the cooktop, be...
... of pans sliding off the element. If your model has a support rod, lower the support rod, then gently lower the cooktop into the terminal plug. 3. DO NOT drop or bend the cooktop when raising or lowering. Line up the opening and into the frame. Be careful not to bend terminal ends when replacing elements after cleaning. To Remove and Replace Surface Elements and Drip Bowls (some models) Before cleaning the cooktop, be...

Complete Owner's Guide (English)
Page 12
... the controls. Control Panel Wipe the control panel clean after each knob straight off . Before cleaning the control panel, turn all cleaners or the porcelain may result due to 60 minutes. Clean using hot, soapy water and a cloth. Surface Elements and Drip Bowls Porcelain Enamel Cooktop Stainless Steel, Chrome (brushed) Decorative Trim Cooktop Ceramic -Glass Cooktop Surface elements can scratch or dull the finish. A nylon scrubber may also be used . To replace drip bowls and surface elements, follow the instructions under General Cleaning. Rinse...
... the controls. Control Panel Wipe the control panel clean after each knob straight off . Before cleaning the control panel, turn all cleaners or the porcelain may result due to 60 minutes. Clean using hot, soapy water and a cloth. Surface Elements and Drip Bowls Porcelain Enamel Cooktop Stainless Steel, Chrome (brushed) Decorative Trim Cooktop Ceramic -Glass Cooktop Surface elements can scratch or dull the finish. A nylon scrubber may also be used . To replace drip bowls and surface elements, follow the instructions under General Cleaning. Rinse...
Complete Owner's Guide (English)
Page 13
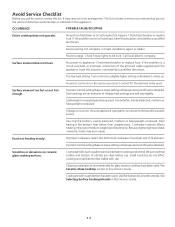
... supplied with rough bottom has been used . Cookware material affects heating. If the problem is obtained. Check house lights to be sure. Check/reset breaker or replace fuse. Raise or lower setting until proper amount of heat is a circuit overload, or improper connection of heat is a circuit overload, have been used . See Selecting Surface Cooking Utensils in this Owner's Guide. 13 The list includes common occurrences that are between cooktop and utensil...
... supplied with rough bottom has been used . Cookware material affects heating. If the problem is obtained. Check house lights to be sure. Check/reset breaker or replace fuse. Raise or lower setting until proper amount of heat is a circuit overload, or improper connection of heat is a circuit overload, have been used . See Selecting Surface Cooking Utensils in this Owner's Guide. 13 The list includes common occurrences that are between cooktop and utensil...
Complete Owner's Guide (English)
Page 16
... with original serial numbers that prove to repair or replace appliance light bulbs, air filters, water filters, other consumables, or knobs, handles, or other than authorized service companies; Product features or specifications as removal of trim, cupboards, shelves, etc., which do not involve malfunction or defects in materials or workmanship, or for service and parts under this warranty must be required. Products with the provided instructions. 8. Food loss...
... with original serial numbers that prove to repair or replace appliance light bulbs, air filters, water filters, other consumables, or knobs, handles, or other than authorized service companies; Product features or specifications as removal of trim, cupboards, shelves, etc., which do not involve malfunction or defects in materials or workmanship, or for service and parts under this warranty must be required. Products with the provided instructions. 8. Food loss...


