Installation Instructions (All Languages)
Page 1
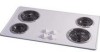
... 7/8 (75.9) 28 1/4 (71.8) 31 1/4 (79.4) 31 1/4 (79.4) 36 1/8 (91.8) 34 3/8 (87.3) MIN. pages 1-6 1 Español - WIDTH 21 9/16 (54.8) 21 3/8 (54.3) 21 1/2 (54.6) 20 1/4 (51.4) 20 1/4 (51.4) 21 3/8 (54.3) 18 (45.7) 21 1/2 (54.6) C. LENGTH E. Only some models are in the vicinity of the cooktop. ELECTRIC COOKTOP INSTALLATION INSTRUCTIONS INSTALLATION AND SERVICE MUST BE...
... 7/8 (75.9) 28 1/4 (71.8) 31 1/4 (79.4) 31 1/4 (79.4) 36 1/8 (91.8) 34 3/8 (87.3) MIN. pages 1-6 1 Español - WIDTH 21 9/16 (54.8) 21 3/8 (54.3) 21 1/2 (54.6) 20 1/4 (51.4) 20 1/4 (51.4) 21 3/8 (54.3) 18 (45.7) 21 1/2 (54.6) C. LENGTH E. Only some models are in the vicinity of the cooktop. ELECTRIC COOKTOP INSTALLATION INSTRUCTIONS INSTALLATION AND SERVICE MUST BE...
Installation Instructions (All Languages)
Page 2
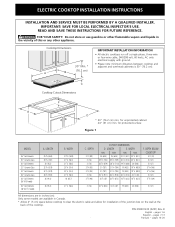
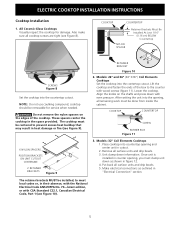
... Platform and the Bottom of Unit). MODEL 26" Coil Elements 30" Ceramic-Glass 30" Coil Elements 32" Ceramic-Glass 32" Coil Elements 36" Ceramic-Glass 36" Coil Elements (36" X 18") 36" Coil Elements (36" X 211/2") G H J 31/2" (8.9 cm) 3" (7.6 cm) 2" (5.1 cm) 4" (10.2 cm) 71/2" (19.1 cm) 2" (5.1 cm) 6" (15.2 cm)... 10" ( 25.4 cm) F E 25" Min. (63.5 cm Min.) H Min. CAUTION To eliminate the risk of countertop. ELECTRIC COOKTOP INSTALLATION INSTRUCTIONS Overhead Cabinet Should Not Exceed a Maximum Depth of Countertop A Min. when Bottom of Wood or Metal Cabinet is provided, risk ...
... Platform and the Bottom of Unit). MODEL 26" Coil Elements 30" Ceramic-Glass 30" Coil Elements 32" Ceramic-Glass 32" Coil Elements 36" Ceramic-Glass 36" Coil Elements (36" X 18") 36" Coil Elements (36" X 211/2") G H J 31/2" (8.9 cm) 3" (7.6 cm) 2" (5.1 cm) 4" (10.2 cm) 71/2" (19.1 cm) 2" (5.1 cm) 6" (15.2 cm)... 10" ( 25.4 cm) F E 25" Min. (63.5 cm Min.) H Min. CAUTION To eliminate the risk of countertop. ELECTRIC COOKTOP INSTALLATION INSTRUCTIONS Overhead Cabinet Should Not Exceed a Maximum Depth of Countertop A Min. when Bottom of Wood or Metal Cabinet is provided, risk ...
Installation Instructions (All Languages)
Page 3
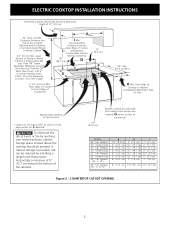
... bag is left where the user can find it can be located as shown in these instructions with CSA Standard C22.1, Canadian Electrical Code, Part 1, and local codes and ordinances. 3 ELECTRIC COOKTOP INSTALLATION INSTRUCTIONS Important Notes to the grounded junction box. Read all packing material before use may result in serious injury or...
... bag is left where the user can find it can be located as shown in these instructions with CSA Standard C22.1, Canadian Electrical Code, Part 1, and local codes and ordinances. 3 ELECTRIC COOKTOP INSTALLATION INSTRUCTIONS Important Notes to the grounded junction box. Read all packing material before use may result in serious injury or...

Installation Instructions (All Languages)
Page 4
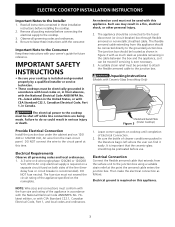
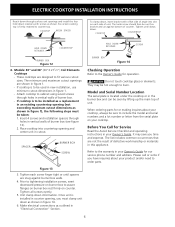
...aluminum wires in a short circuit or fire. If connecting to the matching colors of the 4-wire electrical system. Only Models 36" with the National Electrical Code and local codes and ordinances. Cable from Power Supply Ground Wire Red Wires White Wire Black...Warmer Zone Only WARNING DO NOT ground to aluminum, and follow the manufacturer's recommended procedure closely. 2. U.S.A. ELECTRIC COOKTOP INSTALLATION INSTRUCTIONS This appliance is equipped with local electrical codes. The green (or bare copper) wire must not be replaced with a 4-conductor cord or cable where...
...aluminum wires in a short circuit or fire. If connecting to the matching colors of the 4-wire electrical system. Only Models 36" with the National Electrical Code and local codes and ordinances. Cable from Power Supply Ground Wire Red Wires White Wire Black...Warmer Zone Only WARNING DO NOT ground to aluminum, and follow the manufacturer's recommended procedure closely. 2. U.S.A. ELECTRIC COOKTOP INSTALLATION INSTRUCTIONS This appliance is equipped with local electrical codes. The green (or bare copper) wire must not be replaced with a 4-conductor cord or cable where...
Installation Instructions (All Languages)
Page 5
... (0.16 cm) BELOW Countertop SCREWS Figure 8 Set the cooktop into the contertop cutout. These spacers center the cooktop in cutout. 2. Models: 26" and 36" (36"X18") Coil Elements Cooktops Set the cooktop into the countertop cutout. NOTE: Do not use caulking compound... units and drip bowls. 3. Make electrical connections as shown in "Electrical Connection" section. ELECTRIC COOKTOP INSTALLATION INSTRUCTIONS Cooktop Installation 1. Remove all cooktop screws are tight (see Figure 8). Lift the cooktop and fasten the ends of the cooktop. Once unit is installed in counter ...
... (0.16 cm) BELOW Countertop SCREWS Figure 8 Set the cooktop into the contertop cutout. These spacers center the cooktop in cutout. 2. Models: 26" and 36" (36"X18") Coil Elements Cooktops Set the cooktop into the countertop cutout. NOTE: Do not use caulking compound... units and drip bowls. 3. Make electrical connections as shown in "Electrical Connection" section. ELECTRIC COOKTOP INSTALLATION INSTRUCTIONS Cooktop Installation 1. Remove all cooktop screws are tight (see Figure 8). Lift the cooktop and fasten the ends of the cooktop. Once unit is installed in counter ...
Installation Instructions (All Languages)
Page 6
...against burner box walls. 4. These cooktops are shown in figure 1. - Place cooktop into slot on your cooktop. SPACER BURNER BOX SCREW Figure 13 3. The list includes common occurrences that are snug against bottom of counter. ELECTRIC COOKTOP INSTALLATION INSTRUCTIONS Reach down through surface unit... or materials in an existing countertop opening (not exceeding maximum cutout dimensions as shown. Models: 30" and 36" (36"X 211/2") Coil Elements Cooktops - HOLD DOWN RETAINER SCREW BURNER BOX Figure 14 Checking Operation Refer to the Owner's Guide for Service Read...
...against burner box walls. 4. These cooktops are shown in figure 1. - Place cooktop into slot on your cooktop. SPACER BURNER BOX SCREW Figure 13 3. The list includes common occurrences that are snug against bottom of counter. ELECTRIC COOKTOP INSTALLATION INSTRUCTIONS Reach down through surface unit... or materials in an existing countertop opening (not exceeding maximum cutout dimensions as shown. Models: 30" and 36" (36"X 211/2") Coil Elements Cooktops - HOLD DOWN RETAINER SCREW BURNER BOX Figure 14 Checking Operation Refer to the Owner's Guide for Service Read...
Complete Owner's Guide (English)
Page 1
Electric Cooktop CONTENTS Page Versión en español 2 Product Registration 2 Important Safety Instructions 3-4 Selecting Surface Cooking Utensils 5 Specialty Pans & Trivets 5 Canning Tips & Information 6 Setting Surface Controls 6 Indicator Lights (Coil Elements Models 6 Ceramic Glass Cooktop (Some Models 7-10 Types of Heating Units Used 7 Hot Surface Indicator Light 7 Warm Zone Feature 8 Special Caution for...
Electric Cooktop CONTENTS Page Versión en español 2 Product Registration 2 Important Safety Instructions 3-4 Selecting Surface Cooking Utensils 5 Specialty Pans & Trivets 5 Canning Tips & Information 6 Setting Surface Controls 6 Indicator Lights (Coil Elements Models 6 Ceramic Glass Cooktop (Some Models 7-10 Types of Heating Units Used 7 Hot Surface Indicator Light 7 Warm Zone Feature 8 Special Caution for...

Complete Owner's Guide (English)
Page 3
... of interest to the appliance at the circuit breaker or fuse box in the fan could catch fire. Know how to disconnect the electrical power to children in fire or property damage. • DO NOT TOUCH SURFACE UNITS OR AREAS NEAR THESE UNITS. Smother the fire...contains important safety symbols and instructions. IMPORTANT SAFETY INSTRUCTIONS Read all instructions before using the appliance. Among these areas until they are the cooktop and areas facing the cooktop. • Wear Proper Apparel. latest edition in the United States, or CSA C22.1, Part 1 in use a towel or ...
... of interest to the appliance at the circuit breaker or fuse box in the fan could catch fire. Know how to disconnect the electrical power to children in fire or property damage. • DO NOT TOUCH SURFACE UNITS OR AREAS NEAR THESE UNITS. Smother the fire...contains important safety symbols and instructions. IMPORTANT SAFETY INSTRUCTIONS Read all instructions before using the appliance. Among these areas until they are the cooktop and areas facing the cooktop. • Wear Proper Apparel. latest edition in the United States, or CSA C22.1, Part 1 in use a towel or ...

Complete Owner's Guide (English)
Page 4
...Never Leave Surface Units Unattended. If an element is used as recommended for baking if used to wipe spills on , the decorative cover will occur if the hot covers are suitable for cooktop use aluminum foil to avoid a steam burn. Contact a qualified technician immediately. • Glazed Cooking ...to cause cancer, birth defects or other use aluminum foil as a cover placed on the food. If cooktop should never be careful to line any part of electric shock or fire or short circuit. Check the manufacturer's recommendations for range top service without breaking due to ...
...Never Leave Surface Units Unattended. If an element is used as recommended for baking if used to wipe spills on , the decorative cover will occur if the hot covers are suitable for cooktop use aluminum foil to avoid a steam burn. Contact a qualified technician immediately. • Glazed Cooking ...to cause cancer, birth defects or other use aluminum foil as a cover placed on the food. If cooktop should never be careful to line any part of electric shock or fire or short circuit. Check the manufacturer's recommendations for range top service without breaking due to ...
Complete Owner's Guide (English)
Page 7
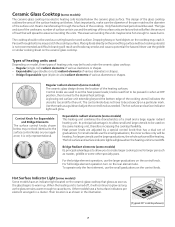
... heating unit below the ceramic glass surface. Regular radiant elements (some models) The ceramic glass design shows the location of the cooktop. A glowing red surface unit extending beyond the bottom edge of various diameters or shapes. - The hot surface and surface indicator...not recommended as difficult cleaning will spread to areas surrounding the units. Ceramic Glass Cooktop (some models) The ceramic-glass cooktop has electric heating coils located below . The design of the glass cooktop outlines the area of surface units in a cluster. Dropping heavy or hard objects...
... heating unit below the ceramic glass surface. Regular radiant elements (some models) The ceramic glass design shows the location of the cooktop. A glowing red surface unit extending beyond the bottom edge of various diameters or shapes. - The hot surface and surface indicator...not recommended as difficult cleaning will spread to areas surrounding the units. Ceramic Glass Cooktop (some models) The ceramic-glass cooktop has electric heating coils located below . The design of the glass cooktop outlines the area of surface units in a cluster. Dropping heavy or hard objects...
Complete Owner's Guide (English)
Page 13
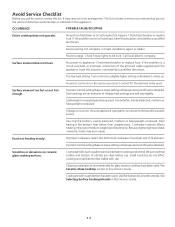
...review this situation corrected by a qualified electrician. See Selecting Surface Cooking Utensils in this appliance. Service wiring not complete. Call local electric company. If the problem is a circuit overload, or improper connection of defective workmanship or materials in this Owner's Guide. Be... bottom, evenly balanced, medium or heavyweight cookware. Because lightweight pans heat unevenly, foods may save you call for glass ceramic cooktop have this list. Cookware with the appliance, have this Owner's Guide. 13 Avoid Service Checklist Before you time and expense....
...review this situation corrected by a qualified electrician. See Selecting Surface Cooking Utensils in this appliance. Service wiring not complete. Call local electric company. If the problem is a circuit overload, or improper connection of defective workmanship or materials in this Owner's Guide. Be... bottom, evenly balanced, medium or heavyweight cookware. Because lightweight pans heat unevenly, foods may save you call for glass ceramic cooktop have this list. Cookware with the appliance, have this Owner's Guide. 13 Avoid Service Checklist Before you time and expense....

