Installation Instructions (All Languages)
Page 1
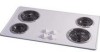
...29 7/8 (75.9) 28 1/4 (71.8) 31 1/4 (79.4) 31 1/4 (79.4) 36 1/8 (91.8) 34 3/8 (87.3) MIN. Only some models are in Canada. * Allow 2" (5 cm) space below cooktop to clear the electric cable and allow for installation of the junction box on the wall at the back of... 32" Ceramic-Glass 32" Coil Elements 36" Ceramic-Glass 36" Coil Elements (36"X18"model) 36" Coil Elelments (36"X211/2"model) A. LENGTH 25 3/4 (65.4) 30 3/4 (78.1) 30 (76.2) 32 1/4 (81.9) 32 1/4 (81.9) 36 3/4 (93.3) 36 (91.4) 36 (91.4) B. ELECTRIC COOKTOP INSTALLATION INSTRUCTIONS INSTALLATION AND SERVICE MUST BE ...
...29 7/8 (75.9) 28 1/4 (71.8) 31 1/4 (79.4) 31 1/4 (79.4) 36 1/8 (91.8) 34 3/8 (87.3) MIN. Only some models are in Canada. * Allow 2" (5 cm) space below cooktop to clear the electric cable and allow for installation of the junction box on the wall at the back of... 32" Ceramic-Glass 32" Coil Elements 36" Ceramic-Glass 36" Coil Elements (36"X18"model) 36" Coil Elelments (36"X211/2"model) A. LENGTH 25 3/4 (65.4) 30 3/4 (78.1) 30 (76.2) 32 1/4 (81.9) 32 1/4 (81.9) 36 3/4 (93.3) 36 (91.4) 36 (91.4) B. ELECTRIC COOKTOP INSTALLATION INSTRUCTIONS INSTALLATION AND SERVICE MUST BE ...
Installation Instructions (All Languages)
Page 2
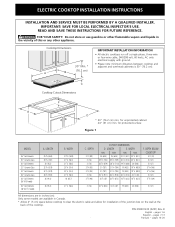
ELECTRIC COOKTOP INSTALLATION INSTRUCTIONS Overhead Cabinet Should Not Exceed a Maximum Depth of countertop. If cabinet storage is Protected by reaching over heated surfaces, cabinet storage space located above the cooktop should be used with this figure refer to Front Edge of Unit). From Edge of Cooktop...chart on this cooktop since burner box extends G below surface of 13" (33 cm) 30" (76.2 cm) Min. J Min. MODEL 26" Coil Elements 30" Ceramic-Glass 30" Coil Elements 32" Ceramic-Glass 32" Coil Elements 36" Ceramic-Glass 36" Coil Elements (36" X 18") 36" Coil Elements (36" X 211...
ELECTRIC COOKTOP INSTALLATION INSTRUCTIONS Overhead Cabinet Should Not Exceed a Maximum Depth of countertop. If cabinet storage is Protected by reaching over heated surfaces, cabinet storage space located above the cooktop should be used with this figure refer to Front Edge of Unit). From Edge of Cooktop...chart on this cooktop since burner box extends G below surface of 13" (33 cm) 30" (76.2 cm) Min. J Min. MODEL 26" Coil Elements 30" Ceramic-Glass 30" Coil Elements 32" Ceramic-Glass 32" Coil Elements 36" Ceramic-Glass 36" Coil Elements (36" X 18") 36" Coil Elements (36" X 211...

Installation Instructions (All Languages)
Page 4
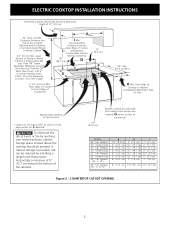
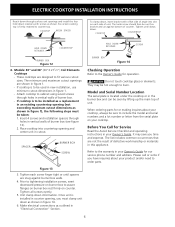
...supplied. Connect the remaining wires inside the junction box (see Figure 6 or 7). U.S.A. Only Models 36" with warmer zone) from appliance Figure 7 - 4-WIRE GROUNDED JUNCTION BOX Models 36" with a copper conductor flexible cable. Cable from Power Supply Ground Wire Red Wires Black Wires Junction... CSA listed) Cable from the appliance cable to the supply cable ground wire (white or bare) inside the house service panel. ELECTRIC COOKTOP INSTALLATION INSTRUCTIONS This appliance is equipped with Warmer Zone Only WARNING DO NOT ground to a gas supply pipe. If connection is supplied...
...supplied. Connect the remaining wires inside the junction box (see Figure 6 or 7). U.S.A. Only Models 36" with warmer zone) from appliance Figure 7 - 4-WIRE GROUNDED JUNCTION BOX Models 36" with a copper conductor flexible cable. Cable from Power Supply Ground Wire Red Wires Black Wires Junction... CSA listed) Cable from the appliance cable to the supply cable ground wire (white or bare) inside the house service panel. ELECTRIC COOKTOP INSTALLATION INSTRUCTIONS This appliance is equipped with Warmer Zone Only WARNING DO NOT ground to a gas supply pipe. If connection is supplied...
Installation Instructions (All Languages)
Page 5
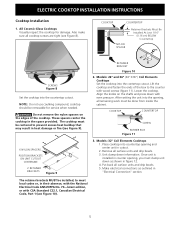
... brackets MUST be removable for damage. ELECTRIC COOKTOP INSTALLATION INSTRUCTIONS Cooktop Installation 1. Align the knobs on the edges of the box to the counter with CSA Standard C22.1, Canadian Electrical Code, Part 1 (see Figure 8). Place cooktop into the opening, all surface units ...36" (36"X18") Coil Elements Cooktops Set the cooktop into the countertop cutout. Lower the cooktop. NOTE: Do not use caulking compound; WARNING Do not remove the nylon spacers on the shafts and press down information. The cooktop must be centered to meet local codes or, in "Electrical...
... brackets MUST be removable for damage. ELECTRIC COOKTOP INSTALLATION INSTRUCTIONS Cooktop Installation 1. Align the knobs on the edges of the box to the counter with CSA Standard C22.1, Canadian Electrical Code, Part 1 (see Figure 8). Place cooktop into the opening, all surface units ...36" (36"X18") Coil Elements Cooktops Set the cooktop into the countertop cutout. Lower the cooktop. NOTE: Do not use caulking compound; WARNING Do not remove the nylon spacers on the shafts and press down information. The cooktop must be centered to meet local codes or, in "Electrical...
Installation Instructions (All Languages)
Page 6
... of angle into countertop opening (not exceeding maximum cutout dimensions as shown in figure 14. 6. Models: 30" and 36" (36"X 211/2") Coil Elements Cooktops - If cooktop is to include the model and serial numbers and a lot number or letter from the serial plate on your product...this appliance. Unit clamp down retainers with offset side of defective workmanship or materials in counter opening, you time and expense. ELECTRIC COOKTOP INSTALLATION INSTRUCTIONS Reach down through surface unit openings and install the four hold down information. Once unit is firmly retained to ...
... of angle into countertop opening (not exceeding maximum cutout dimensions as shown in figure 14. 6. Models: 30" and 36" (36"X 211/2") Coil Elements Cooktops - If cooktop is to include the model and serial numbers and a lot number or letter from the serial plate on your product...this appliance. Unit clamp down retainers with offset side of defective workmanship or materials in counter opening, you time and expense. ELECTRIC COOKTOP INSTALLATION INSTRUCTIONS Reach down through surface unit openings and install the four hold down information. Once unit is firmly retained to ...

