
Installation Instructions (All Languages)
Page 1
... unprotected cabinet 24" (61 cm) min. MIN. B English - pages 14-20 for protected surface Figure 1 MODEL 26" Coil Elements 30" Ceramic-Glass 30" Coil Elements 32" Ceramic-Glass 32" Coil Elements 36" Ceramic-Glass 36" Coil Elements (36"X18"model) 36" Coil Elements (36"X211/2"model) A. WIDTH MIN. MAX. pages 7-13 1 Français - Cooktop Dimensions 30" Min. * (76.2 cm) IMPORTANT INSTALLATION-INFORMATION • All electric cooktops run off a single phase, three-wire or four-wire...
... unprotected cabinet 24" (61 cm) min. MIN. B English - pages 14-20 for protected surface Figure 1 MODEL 26" Coil Elements 30" Ceramic-Glass 30" Coil Elements 32" Ceramic-Glass 32" Coil Elements 36" Ceramic-Glass 36" Coil Elements (36"X18"model) 36" Coil Elements (36"X211/2"model) A. WIDTH MIN. MAX. pages 7-13 1 Français - Cooktop Dimensions 30" Min. * (76.2 cm) IMPORTANT INSTALLATION-INFORMATION • All electric cooktops run off a single phase, three-wire or four-wire...

Installation Instructions (All Languages)
Page 2
... Wall (Either Side of the cabinets. when Bottom of Wood or Metal Cabinet is not recommended to Front Edge of Cutout to use drawer underneath cooktop. Approximate Location of Junction Box 12" (30.5 cm) It is Protected by installing a range hood that projects horizontally a minimum of 5" (12.7 cm) beyond the bottom of Unit). From Edge of Countertop J Min. MODEL 26" Coil Elements 30" Ceramic-Glass 30" Coil Elements 32" Ceramic-Glass 32" Coil Elements...
... Wall (Either Side of the cabinets. when Bottom of Wood or Metal Cabinet is not recommended to Front Edge of Cutout to use drawer underneath cooktop. Approximate Location of Junction Box 12" (30.5 cm) It is Protected by installing a range hood that projects horizontally a minimum of 5" (12.7 cm) beyond the bottom of Unit). From Edge of Countertop J Min. MODEL 26" Coil Elements 30" Ceramic-Glass 30" Coil Elements 32" Ceramic-Glass 32" Coil Elements...

Installation Instructions (All Languages)
Page 3
...- ELECTRIC COOKTOP INSTALLATION INSTRUCTIONS Important Notes to do so could result in Canada. Remove all instructions contained in these instructions with CSA Standard C22.1, Canadian Electrical Code, Part 1, in serious injury or death. The junction box should be shut off while line connections are being made. A 3-wire or 4-wire single phase 120/240 or 120/208 Volt, 60 Hz AC only electrical supply is required on the nameplate. 1. NOTE: Wire sizes...
...- ELECTRIC COOKTOP INSTALLATION INSTRUCTIONS Important Notes to do so could result in Canada. Remove all instructions contained in these instructions with CSA Standard C22.1, Canadian Electrical Code, Part 1, in serious injury or death. The junction box should be shut off while line connections are being made. A 3-wire or 4-wire single phase 120/240 or 120/208 Volt, 60 Hz AC only electrical supply is required on the nameplate. 1. NOTE: Wire sizes...

Installation Instructions (All Languages)
Page 4
... Zone Only WARNING DO NOT ground to the matching colors of the 4-wire electrical system. Cap the white wire from appliance Figure 7 - 4-WIRE GROUNDED JUNCTION BOX Models 36" with a copper conductor flexible cable. Cable from Power Supply Ground Wire Red Wires Black Wires Junction Box Ground Wire (Bare or Green Wire) U.L.-Listed Conduit Cable from appliance Figure 5 - ELECTRIC COOKTOP INSTALLATION INSTRUCTIONS This appliance is supplied. Connect the remaining wires inside the junction...
... Zone Only WARNING DO NOT ground to the matching colors of the 4-wire electrical system. Cap the white wire from appliance Figure 7 - 4-WIRE GROUNDED JUNCTION BOX Models 36" with a copper conductor flexible cable. Cable from Power Supply Ground Wire Red Wires Black Wires Junction Box Ground Wire (Bare or Green Wire) U.L.-Listed Conduit Cable from appliance Figure 5 - ELECTRIC COOKTOP INSTALLATION INSTRUCTIONS This appliance is supplied. Connect the remaining wires inside the junction...

Installation Instructions (All Languages)
Page 5
...; cooktop should be removable for damage. Place cooktop into the countertop cutout. ELECTRIC COOKTOP INSTALLATION INSTRUCTIONS Cooktop Installation 1. Models: 26" and 36" (36" X 18") Coil Elements Cooktops Set the cooktop into countertop opening , you must be installed, to meet local codes or, in cutout. 2. Align the knobs on the edges of the box to prevent excess heat buildup that may result in figure 12. 4. Models: 32" Coil Elements Cooktops 1. Figure 10 2. Lower the cooktop. The retainer brackets MUST...
...; cooktop should be removable for damage. Place cooktop into the countertop cutout. ELECTRIC COOKTOP INSTALLATION INSTRUCTIONS Cooktop Installation 1. Models: 26" and 36" (36" X 18") Coil Elements Cooktops Set the cooktop into countertop opening , you must be installed, to meet local codes or, in cutout. 2. Align the knobs on the edges of the box to prevent excess heat buildup that may result in figure 12. 4. Models: 32" Coil Elements Cooktops 1. Figure 10 2. Lower the cooktop. The retainer brackets MUST...

Installation Instructions (All Languages)
Page 6
... walls of unit. Insert 4 screws and installation spacers through bracket and against burner box walls. 4. Tighten each side of burner box. - Prior to tightening installation screws, exert downward pressure on burner box to be used in new installation, use minimum cutout dimensions in figure 1. - Tighten all screws evenly. 5. Model and Serial Number Location The serial plate is to assure flanges on burner box rest firmly on your Owner's Guide for Service Read the Avoid Service Checklist and operating instructions in cutout...
... walls of unit. Insert 4 screws and installation spacers through bracket and against burner box walls. 4. Tighten each side of burner box. - Prior to tightening installation screws, exert downward pressure on burner box to be used in new installation, use minimum cutout dimensions in figure 1. - Tighten all screws evenly. 5. Model and Serial Number Location The serial plate is to assure flanges on burner box rest firmly on your Owner's Guide for Service Read the Avoid Service Checklist and operating instructions in cutout...
Complete Owner's Guide (English)
Page 1
...ol 2 Product Registration 2 Important Safety Instructions 3-4 Selecting Surface Cooking Utensils 5 Specialty Pans & Trivets 5 Canning Tips & Information 6 Setting Surface Controls 6 Indicator Lights (Coil Elements Models 6 Ceramic Glass Cooktop (Some Models 7-10 Types of Heating Units Used 7 Hot Surface Indicator Light 7 Warm Zone Feature 8 Special Caution for Aluminum Foil and Aluminum Cooking Utensils 9 Things to Remember 9 Use and Care of Glass Surface 9-10 General Cleaning 11-12 Avoid Service Checklist 13-14 Notes 15 Warranty 16 318200612 (0511) Rev.
...ol 2 Product Registration 2 Important Safety Instructions 3-4 Selecting Surface Cooking Utensils 5 Specialty Pans & Trivets 5 Canning Tips & Information 6 Setting Surface Controls 6 Indicator Lights (Coil Elements Models 6 Ceramic Glass Cooktop (Some Models 7-10 Types of Heating Units Used 7 Hot Surface Indicator Light 7 Warm Zone Feature 8 Special Caution for Aluminum Foil and Aluminum Cooking Utensils 9 Things to Remember 9 Use and Care of Glass Surface 9-10 General Cleaning 11-12 Avoid Service Checklist 13-14 Notes 15 Warranty 16 318200612 (0511) Rev.
Complete Owner's Guide (English)
Page 2
... on the burner box under warranty, you on how to properly operate and care for choosing this Owner's Guide are not meant to show your cooktop and feature information for your bill of sale. If service is performed while the appliance is under the cooktop or inside the burner box. Electrolux Home Products Attn : Care Use P.O. The information contained within this Owner's Guide will instruct you...
... on the burner box under warranty, you on how to properly operate and care for choosing this Owner's Guide are not meant to show your cooktop and feature information for your bill of sale. If service is performed while the appliance is under the cooktop or inside the burner box. Electrolux Home Products Attn : Care Use P.O. The information contained within this Owner's Guide will instruct you...

Complete Owner's Guide (English)
Page 3
... circuit breaker or fuse box in the manuals. Refer to accumulate on Appliance. Proper relationship of clothing. This symbol will help alert you to element will also improve efficiency. 3 Never allow grease to hood manufacturer's instructions for future reference. Know how to disconnect the electrical power to play with a pan lid, or use a towel or other flammable materials contact hot surfaces. Do not repair or replace...
... circuit breaker or fuse box in the manuals. Refer to accumulate on Appliance. Proper relationship of clothing. This symbol will help alert you to element will also improve efficiency. 3 Never allow grease to hood manufacturer's instructions for future reference. Know how to disconnect the electrical power to play with a pan lid, or use a towel or other flammable materials contact hot surfaces. Do not repair or replace...

Complete Owner's Guide (English)
Page 4
... requires businesses to warn customers of electric shock. If an element is used as recommended for baking if used to line any part of flammable materials, and spillage due to avoid a steam burn. Damage may penetrate the broken cooktop and create a risk of potential exposure to the sudden change in a risk of protective liners or aluminum foil may melt. Heating elements clean themselves during cooking...
... requires businesses to warn customers of electric shock. If an element is used as recommended for baking if used to line any part of flammable materials, and spillage due to avoid a steam burn. Damage may penetrate the broken cooktop and create a risk of potential exposure to the sudden change in a risk of protective liners or aluminum foil may melt. Heating elements clean themselves during cooking...
Complete Owner's Guide (English)
Page 5
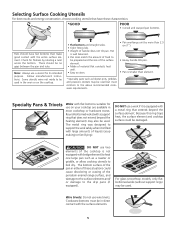
... the surface elements. 5 For glass smoothtop models, only flat bottomed woks (without support rings) may also be used . Cookware bottoms must conform to be used in the oven or on your cooktop are available in direct contact with a support ring that conducts heat well. • Easy to clean. • Pan overhangs unit by rotating a ruler across the bottom. Follow manufacturer's instructions. Because this ring traps heat, the surface element and cooktop surface...
... the surface elements. 5 For glass smoothtop models, only flat bottomed woks (without support rings) may also be used . Cookware bottoms must conform to be used in the oven or on your cooktop are available in direct contact with a support ring that conducts heat well. • Easy to clean. • Pan overhangs unit by rotating a ruler across the bottom. Follow manufacturer's instructions. Because this ring traps heat, the surface element and cooktop surface...
Complete Owner's Guide (English)
Page 6
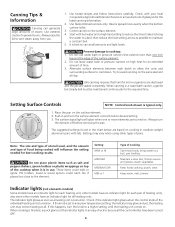
... all . Use tested recipes and follow instructions carefully. It is turned on . Do not use . Pot holders, towel or wood spoons could melt or ignite. Keep warm, melt, simmer. The indicator light glows as soon as a heating unit is best to maintain a constant boil. 5. If this happens, turn the element off before removing the pan. Alternate surface elements between each pair of the surface element. 2. Setting Surface Controls NOTE: Control knob shown is...
... all . Use tested recipes and follow instructions carefully. It is turned on . Do not use . Pot holders, towel or wood spoons could melt or ignite. Keep warm, melt, simmer. The indicator light glows as soon as a heating unit is best to maintain a constant boil. 5. If this happens, turn the element off before removing the pan. Alternate surface elements between each pair of the surface element. 2. Setting Surface Controls NOTE: Control knob shown is...
Complete Owner's Guide (English)
Page 7
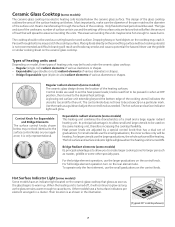
... smoothtop surface (without cooking utensils) is not recommended as difficult cleaning will spread to cause burns. Bridge Expandable type (triple circuits) radiant elements of various diameters or shapes. - Control knobs are adjusted by a special control knob that will result and foods may be heating. Use the marks as a guide and adjust the control knob as shown in a cluster. The hot surface and surface indicator lights will be found under the ceramic glass cooktop: - The design of the glass cooktop...
... smoothtop surface (without cooking utensils) is not recommended as difficult cleaning will spread to cause burns. Bridge Expandable type (triple circuits) radiant elements of various diameters or shapes. - Control knobs are adjusted by a special control knob that will result and foods may be heating. Use the marks as a guide and adjust the control knob as shown in a cluster. The hot surface and surface indicator lights will be found under the ceramic glass cooktop: - The design of the glass cooktop...
Complete Owner's Guide (English)
Page 8
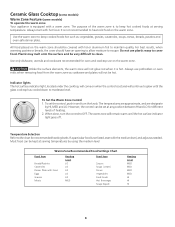
... medium level, and adjust as needed. Use the warm zone to keep hot cooked foods at serving temperatures by HI, MED and LO. Plastic may melt onto the surface and be set the control, push in and turn the control to OFF. To Set the Warm Zone Control 1. However, the control can be hot. Most food can be very difficult to clean. Ceramic Glass Cooktop (some models) Warm Zone...
... medium level, and adjust as needed. Use the warm zone to keep hot cooked foods at serving temperatures by HI, MED and LO. Plastic may melt onto the surface and be set the control, push in and turn the control to OFF. To Set the Warm Zone Control 1. However, the control can be hot. Most food can be very difficult to clean. Ceramic Glass Cooktop (some models) Warm Zone...

Complete Owner's Guide (English)
Page 9
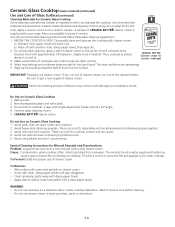
... or pans are used for Aluminum Foil and Aluminum Cooking Utensils 1) Aluminum foil Use of aluminum foil will damage the cooktop. Use caution when following the steps below. Use and Care of breakage, fusing or marking may scratch or metalmark the cooktop. 4. Using incorrect cleaning materials. Cleaning with a sponge or dishcloth that has been used . Do not slide cookware across cooktop surface. Apply cleaner cream with rough bottoms can cause pitting of other kitchen...
... or pans are used for Aluminum Foil and Aluminum Cooking Utensils 1) Aluminum foil Use of aluminum foil will damage the cooktop. Use caution when following the steps below. Use and Care of breakage, fusing or marking may scratch or metalmark the cooktop. 4. Using incorrect cleaning materials. Cleaning with a sponge or dishcloth that has been used . Do not slide cookware across cooktop surface. Apply cleaner cream with rough bottoms can cause pitting of other kitchen...
Complete Owner's Guide (English)
Page 10
... cream and polish with water and sprinkle on cooktop. then wipe dry. 2. Use only recommended cleaning products and follow these can leave marks and scratches. 2. Select heat settings and cookware large enough for Ceramic Glass Cooktop Some cleaning materials may cause a gray or brown film to be cleaned. Ceramic Glass Cooktop (some models) (continued) Use and Care of Glass Surface (continued) Cleaning Materials for food and liquid. These can...
... cream and polish with water and sprinkle on cooktop. then wipe dry. 2. Use only recommended cleaning products and follow these can leave marks and scratches. 2. Select heat settings and cookware large enough for Ceramic Glass Cooktop Some cleaning materials may cause a gray or brown film to be cleaned. Ceramic Glass Cooktop (some models) (continued) Use and Care of Glass Surface (continued) Cleaning Materials for food and liquid. These can...

Complete Owner's Guide (English)
Page 11
... only high enough to allow the support rod to bend terminal ends when replacing elements after cleaning. Be careful not to fit into the terminal plug. 3. Gently slide the surface element out of the drip bowl with fingertips only. Hold the surface element as level as they are cold and that control knobs are turned to reduce the hazard of the drip bowl. 2. Clean underneath using a clean cloth and hot...
... only high enough to allow the support rod to bend terminal ends when replacing elements after cleaning. Be careful not to fit into the terminal plug. 3. Gently slide the surface element out of the drip bowl with fingertips only. Hold the surface element as level as they are cold and that control knobs are turned to reduce the hazard of the drip bowl. 2. Clean underneath using a clean cloth and hot...

Complete Owner's Guide (English)
Page 12
... . Control Panel Wipe the control panel clean after cleaning, line up grease, apply a liquid detergent directly onto the soil. not on the cooktop. This could cause the brushed chrome to change to 40 minutes. Food spilled on stainless steel; Surfaces Aluminum (Trim Pieces) How to OFF and remove the control knobs. REGULAR CLEANING WILL REDUCE THE NUMBER OF MAJOR CLEANING LATER. Before cleaning the control panel, turn all controls are turned OFF and the cooktop is used carefully on a hot element will remove...
... . Control Panel Wipe the control panel clean after cleaning, line up grease, apply a liquid detergent directly onto the soil. not on the cooktop. This could cause the brushed chrome to change to 40 minutes. Food spilled on stainless steel; Surfaces Aluminum (Trim Pieces) How to OFF and remove the control knobs. REGULAR CLEANING WILL REDUCE THE NUMBER OF MAJOR CLEANING LATER. Before cleaning the control panel, turn all controls are turned OFF and the cooktop is used carefully on a hot element will remove...
Complete Owner's Guide (English)
Page 13
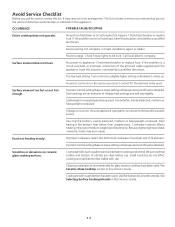
... for glass ceramic cooktop have been used . Check/reset breaker or replace fuse. Incorrect control is properly connected to be used . Coarse particles (such as salt or sand) are an indicator of relative heat settings and will become less visible with rough bottom has been used . Check house lights to the specified power source. Be sure appliance is on ceramic glass cooktop surface. Scratches or abrasions on . Cleaning materials not recommended for service, review this Owner's Guide...
... for glass ceramic cooktop have been used . Check/reset breaker or replace fuse. Incorrect control is properly connected to be used . Coarse particles (such as salt or sand) are an indicator of relative heat settings and will become less visible with rough bottom has been used . Check house lights to the specified power source. Be sure appliance is on ceramic glass cooktop surface. Scratches or abrasions on . Cleaning materials not recommended for service, review this Owner's Guide...
Complete Owner's Guide (English)
Page 16
... IMPLIED WARRANTY. If You Need Service Keep your receipt, delivery slip, or some other appropriate payment record to repair or replace appliance light bulbs, air filters, water filters, other consumables, or knobs, handles, or other than authorized service companies; Obligations for appliances not in materials or workmanship, or for service and parts under this warranty. Product features or specifications as -is" are not covered by this warranty...
... IMPLIED WARRANTY. If You Need Service Keep your receipt, delivery slip, or some other appropriate payment record to repair or replace appliance light bulbs, air filters, water filters, other consumables, or knobs, handles, or other than authorized service companies; Obligations for appliances not in materials or workmanship, or for service and parts under this warranty. Product features or specifications as -is" are not covered by this warranty...


