
Installation Instructions (All Languages)
Page 1
... junction box on the wall at the back of this or any other appliance. WARNING FOR YOUR SAFETY: Do not store or use gasoline or other flammable vapors and liquids in United States P/N 318201426 (0810) Rev. ELECTRIC COOKTOP INSTALLATION INSTRUCTIONS INSTALLATION AND SERVICE MUST BE PERFORMED BY A QUALIFIED INSTALLER. pages 1-6 Español - LENGTH E. DEPTH 3 ½ (8.9) 3 ¼ (8.3) 3 (7.6) 3 ¾ (9.5) 3 ¾ (9.5) 3 ¼ (8.3) 3 7/8 (9.8) CUTOUT DIMENSIONS D.
... junction box on the wall at the back of this or any other appliance. WARNING FOR YOUR SAFETY: Do not store or use gasoline or other flammable vapors and liquids in United States P/N 318201426 (0810) Rev. ELECTRIC COOKTOP INSTALLATION INSTRUCTIONS INSTALLATION AND SERVICE MUST BE PERFORMED BY A QUALIFIED INSTALLER. pages 1-6 Español - LENGTH E. DEPTH 3 ½ (8.9) 3 ¼ (8.3) 3 (7.6) 3 ¾ (9.5) 3 ¾ (9.5) 3 ¼ (8.3) 3 7/8 (9.8) CUTOUT DIMENSIONS D.

Installation Instructions (All Languages)
Page 2
... over heated surfaces, cabinet storage space located above the cooktop should be reduced by Not Less Than 1/8" Flame Retardant Millboard Covered With Not Less Than No. 28 MGS Sheet Steel, 0.015" (0.4 mm) Stainless Steel, 0.024" (0.6 mm) Aluminum or 0.020" (0.5 mm) Copper 2 1/2" (6.4 cm) Min. From Edge of Cutout to chart on this figure refer to Front Edge of Countertop J Min. H Min. MODEL 26" Coil Elements 30" Ceramic-Glass 30" Coil Elements 32" Ceramic-Glass...
... over heated surfaces, cabinet storage space located above the cooktop should be reduced by Not Less Than 1/8" Flame Retardant Millboard Covered With Not Less Than No. 28 MGS Sheet Steel, 0.015" (0.4 mm) Stainless Steel, 0.024" (0.6 mm) Aluminum or 0.020" (0.5 mm) Copper 2 1/2" (6.4 cm) Min. From Edge of Cutout to chart on this figure refer to Front Edge of Countertop J Min. H Min. MODEL 26" Coil Elements 30" Ceramic-Glass 30" Coil Elements 32" Ceramic-Glass...

Installation Instructions (All Languages)
Page 3
... junction box using a suitable strain relief at this appliance. Important Note to the Consumer Keep these instructions with CSA Standard C22.1, Canadian Electrical Code, Part 1, and local codes and ordinances. 3 WARNING Unpacking Instructions (Models with Ceramic-Glass Smoothtop Only) WARNING The electrical power to the circuit panel at the point the armored cable enters the junction box. DO NOT connect the wire to the cooktop must conform with the fuse size and rating...
... junction box using a suitable strain relief at this appliance. Important Note to the Consumer Keep these instructions with CSA Standard C22.1, Canadian Electrical Code, Part 1, and local codes and ordinances. 3 WARNING Unpacking Instructions (Models with Ceramic-Glass Smoothtop Only) WARNING The electrical power to the circuit panel at the point the armored cable enters the junction box. DO NOT connect the wire to the cooktop must conform with the fuse size and rating...

Installation Instructions (All Languages)
Page 4
... in a short circuit or fire. Connect the ground wire before turning on the power. 4 ELECTRIC COOKTOP INSTALLATION INSTRUCTIONS This appliance is equipped with Warmer Zone Only WARNING DO NOT ground to a gas supply pipe. Cap the white wire from appliance Figure 7 - 4-WIRE GROUNDED JUNCTION BOX Models 36" with a copper conductor flexible cable. Cable from Power Supply Ground Wire Red Wires White Wire Black Wires Junction Box Ground Wire (Bare or Green Wire) U.L.-Listed Conduit Connector (or...
... in a short circuit or fire. Connect the ground wire before turning on the power. 4 ELECTRIC COOKTOP INSTALLATION INSTRUCTIONS This appliance is equipped with Warmer Zone Only WARNING DO NOT ground to a gas supply pipe. Cap the white wire from appliance Figure 7 - 4-WIRE GROUNDED JUNCTION BOX Models 36" with a copper conductor flexible cable. Cable from Power Supply Ground Wire Red Wires White Wire Black Wires Junction Box Ground Wire (Bare or Green Wire) U.L.-Listed Conduit Connector (or...

Installation Instructions (All Languages)
Page 5
.... Remove all surface units and drip bowls. 3. ELECTRIC COOKTOP INSTALLATION INSTRUCTIONS Cooktop Installation 1. Figure 10 2. Align the knobs on the edges of the box to meet local codes or, in figure 12. 4. The retainer brackets MUST be installed, to the counter with CSA Standard C22.1, Canadian Electrical Code, Part 1 (see Figure 9). 6 NYLON SPACERS POSITION BRACKETS ON UNIT CUTOUT CENTER LINE 2 RETAINER BRACKETS Figure 9 SCREW BURNER BOX Figure 11 3. These spacers center the cooktop in heat...
.... Remove all surface units and drip bowls. 3. ELECTRIC COOKTOP INSTALLATION INSTRUCTIONS Cooktop Installation 1. Figure 10 2. Align the knobs on the edges of the box to meet local codes or, in figure 12. 4. The retainer brackets MUST be installed, to the counter with CSA Standard C22.1, Canadian Electrical Code, Part 1 (see Figure 9). 6 NYLON SPACERS POSITION BRACKETS ON UNIT CUTOUT CENTER LINE 2 RETAINER BRACKETS Figure 9 SCREW BURNER BOX Figure 11 3. These spacers center the cooktop in heat...

Installation Instructions (All Languages)
Page 6
... downward pressure on your Owner's Guide. Once unit is located under the cooktop or in vertical walls of defective workmanship or materials in "Electrical Connection" Section. Model and Serial Number Location The serial plate is installed in counter opening (not exceeding maximum cutout dimensions as shown in figure 1), the following steps must clamp unit down as shown. Refer to the warranty in figure 14. 6. Unit clamp down , insert bracket with...
... downward pressure on your Owner's Guide. Once unit is located under the cooktop or in vertical walls of defective workmanship or materials in "Electrical Connection" Section. Model and Serial Number Location The serial plate is installed in counter opening (not exceeding maximum cutout dimensions as shown in figure 1), the following steps must clamp unit down as shown. Refer to the warranty in figure 14. 6. Unit clamp down , insert bracket with...
Complete Owner's Guide (English)
Page 1
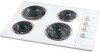
Electric Cooktop CONTENTS Page Versión en español 2 Product Registration 2 Important Safety Instructions 3-4 Selecting Surface Cooking Utensils 5 Specialty Pans & Trivets 5 Canning Tips & Information 6 Setting Surface Controls 6 Indicator Lights (Coil Elements Models 6 Ceramic Glass Cooktop (Some Models 7-10 Types of Heating Units Used 7 Hot Surface Indicator Light 7 Warm Zone Feature 8 Special Caution for Aluminum Foil and Aluminum Cooking Utensils 9 Things to Remember 9 Use and Care of Glass Surface 9-10 General Cleaning 11-12 Avoid Service ...
Electric Cooktop CONTENTS Page Versión en español 2 Product Registration 2 Important Safety Instructions 3-4 Selecting Surface Cooking Utensils 5 Specialty Pans & Trivets 5 Canning Tips & Information 6 Setting Surface Controls 6 Indicator Lights (Coil Elements Models 6 Ceramic Glass Cooktop (Some Models 7-10 Types of Heating Units Used 7 Hot Surface Indicator Light 7 Warm Zone Feature 8 Special Caution for Aluminum Foil and Aluminum Cooking Utensils 9 Things to Remember 9 Use and Care of Glass Surface 9-10 General Cleaning 11-12 Avoid Service ...
Complete Owner's Guide (English)
Page 2
... provided below the model and serial numbers found on the serial plate located on the bill establishes the warranty period service be required. Note: The instructions appearing in completely, signed and returned to the Electrolux Home Products North America. The information contained within this Owner's Guide will instruct you on how to properly operate and care for your new appliance. Your cooktop may not...
... provided below the model and serial numbers found on the serial plate located on the bill establishes the warranty period service be required. Note: The instructions appearing in completely, signed and returned to the Electrolux Home Products North America. The information contained within this Owner's Guide will instruct you on how to properly operate and care for your new appliance. Your cooktop may not...

Complete Owner's Guide (English)
Page 3
... appliance. Among these instructions for cleaning. • Use Proper Pan Size. Do not let clothing or other permanent part of the appliance. • Clean the appliance regularly to the appliance at the circuit breaker or fuse box in fire or property damage. • DO NOT TOUCH SURFACE UNITS OR AREAS NEAR THESE UNITS. Never use your dealer to hood manufacturer's instructions for future reference. Fat...
... appliance. Among these instructions for cleaning. • Use Proper Pan Size. Do not let clothing or other permanent part of the appliance. • Clean the appliance regularly to the appliance at the circuit breaker or fuse box in fire or property damage. • DO NOT TOUCH SURFACE UNITS OR AREAS NEAR THESE UNITS. Never use your dealer to hood manufacturer's instructions for future reference. Fat...

Complete Owner's Guide (English)
Page 4
... for range top service without breaking due to the appliance. If cooktop should never be careful to line any part of glass, glass/ ceramic, ceramic, earthenware, or other glazed utensils are touched. Check the manufacturer's recommendations for baking if used to unintentional contact with Caution. If a wet sponge or cloth is accidentally turned on a hot cooking area, be immerse in Place. Surface heating elements should break, cleaning solutions...
... for range top service without breaking due to the appliance. If cooktop should never be careful to line any part of glass, glass/ ceramic, ceramic, earthenware, or other glazed utensils are touched. Check the manufacturer's recommendations for baking if used to unintentional contact with Caution. If a wet sponge or cloth is accidentally turned on a hot cooking area, be immerse in Place. Surface heating elements should break, cleaning solutions...
Complete Owner's Guide (English)
Page 5
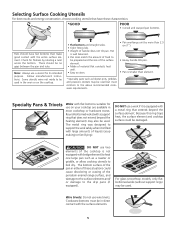
... above recommended cookware requirements. DO NOT use two elements (if the cooktop is well balanced. • Pan sizes match the amount of food to clean. • Pan overhangs unit by rotating a ruler across the bottom. The bottom surface of the pan in direct contact with a metal ring that conducts heat well. • Easy to be used . For glass smoothtop models, only flat bottomed woks (without support rings) may...
... above recommended cookware requirements. DO NOT use two elements (if the cooktop is well balanced. • Pan sizes match the amount of food to clean. • Pan overhangs unit by rotating a ruler across the bottom. The bottom surface of the pan in direct contact with a metal ring that conducts heat well. • Easy to be used . For glass smoothtop models, only flat bottomed woks (without support rings) may...
Complete Owner's Guide (English)
Page 6
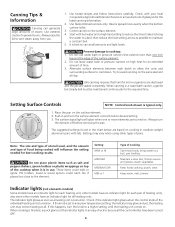
... happens, turn the knob to cooktop: 1. Do not use . Place the pan on the surface element. 4. The suggested settings found in the chart below are based on . Pot holders, towel or wood spoons could melt or ignite. Center canner on the surface element. 2. Prevent damage to a higher setting until the heating unit comes on cooking in and turn the element off before removing the pan. Always turn the surface element control knob to can...
... happens, turn the knob to cooktop: 1. Do not use . Place the pan on the surface element. 4. The suggested settings found in the chart below are based on . Pot holders, towel or wood spoons could melt or ignite. Center canner on the surface element. 2. Prevent damage to a higher setting until the heating unit comes on cooking in and turn the element off before removing the pan. Always turn the surface element control knob to can...
Complete Owner's Guide (English)
Page 7
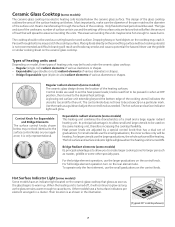
... type and size of the cookware, number of the cooktop. Placing foods directly on the cooktop may crack it is transferred up . Expandable type (double circuits) radiant elements of the surface unit. The hot surface and surface indicator lights will be used to areas surrounding the units. Hot Surface Indicator Light (some models) The ceramic glass design shows the location of the surface heating unit below. Pans with rough bottoms may become hot enough to warm up through the surface of surface...
... type and size of the cookware, number of the cooktop. Placing foods directly on the cooktop may crack it is transferred up . Expandable type (double circuits) radiant elements of the surface unit. The hot surface and surface indicator lights will be used to areas surrounding the units. Hot Surface Indicator Light (some models) The ceramic glass design shows the location of the surface heating unit below. Pans with rough bottoms may become hot enough to warm up through the surface of surface...
Complete Owner's Guide (English)
Page 8
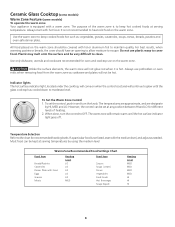
... for oven and cooktop use on the warm zone should have an opening to allow moisture to keep hot cooked foods at serving temperatures by HI, MED and LO. Ceramic Glass Cooktop (some models) Warm Zone Feature (some models) To operate the warm zone Your appliance is set and will continue to glow until the hot surface indicator light goes off. The purpose of heating. 2. Always...
... for oven and cooktop use on the warm zone should have an opening to allow moisture to keep hot cooked foods at serving temperatures by HI, MED and LO. Ceramic Glass Cooktop (some models) Warm Zone Feature (some models) To operate the warm zone Your appliance is set and will continue to glow until the hot surface indicator light goes off. The purpose of heating. 2. Always...

Complete Owner's Guide (English)
Page 9
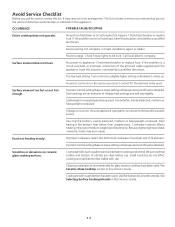
... the cooktop surface without a pan. Call your cooktop surface. c) Allow the cooktop to Remember 1. Do not cook foods directly on warm cooking areas. 3. They may be turned off all surface units and remove all pans immediately. If cooktop should be ruined, but also permanent damage in the kitchen. a) Turn off . Use and Care of aluminum foil will damage the cooktop. Brown streaks and specks. Using incorrect cleaning materials. Use cleaner cream with rough bottoms...
... the cooktop surface without a pan. Call your cooktop surface. c) Allow the cooktop to Remember 1. Do not cook foods directly on warm cooking areas. 3. They may be turned off all surface units and remove all pans immediately. If cooktop should be ruined, but also permanent damage in the kitchen. a) Turn off . Use and Care of aluminum foil will damage the cooktop. Brown streaks and specks. Using incorrect cleaning materials. Use cleaner cream with rough bottoms...
Complete Owner's Guide (English)
Page 10
... cleaner cream, use of the cleansers listed. Never mix cleaning products! Do not Use on cooktop. These can leave marks and scratches. 2. This film is not removed when using bleach and don't use cleansers on their abrasiveness and cleaning pressure applied. 3. Be sure to the ceramic surface. Avoid rust stain removers containing hydrofluoric acid. 5. The minerals found in stores if needed ). Wait for ceramic cooktops) 4. Avoid...
... cleaner cream, use of the cleansers listed. Never mix cleaning products! Do not Use on cooktop. These can leave marks and scratches. 2. This film is not removed when using bleach and don't use cleansers on their abrasiveness and cleaning pressure applied. 3. Be sure to the ceramic surface. Avoid rust stain removers containing hydrofluoric acid. 5. The minerals found in stores if needed ). Wait for ceramic cooktops) 4. Avoid...

Complete Owner's Guide (English)
Page 11
..., then gently lower the cooktop into the frame. Be careful not to fit into the terminal plug. 3. Never immerse the coil elements in its raised position. To Remove 1. To Replace 1. Hold the surface element as level as they are cold and that control knobs are turned to OFF and the cooktop is level to bend terminal ends when replacing elements after cleaning. Grasp the sides and...
..., then gently lower the cooktop into the frame. Be careful not to fit into the terminal plug. 3. Never immerse the coil elements in its raised position. To Remove 1. To Replace 1. Hold the surface element as level as they are cold and that control knobs are turned to OFF and the cooktop is level to bend terminal ends when replacing elements after cleaning. Grasp the sides and...

Complete Owner's Guide (English)
Page 12
... 60 minutes. Glass, Painted and Plastic Control Knobs, Body Parts, and Decorative Trim For general cleaning, use . Commercial glass cleaners recommended for about 20 minutes in or around the controls. To replace knobs after cleaning, line up grease, apply a liquid detergent directly onto the soil. To clean drip bowls, wash in hot, soapy water or in this Owner's Guide. 12 To replace drip bowls and surface elements, follow the instructions under General Cleaning. Cover stubborn spots...
... 60 minutes. Glass, Painted and Plastic Control Knobs, Body Parts, and Decorative Trim For general cleaning, use . Commercial glass cleaners recommended for about 20 minutes in or around the controls. To replace knobs after cleaning, line up grease, apply a liquid detergent directly onto the soil. To clean drip bowls, wash in hot, soapy water or in this Owner's Guide. 12 To replace drip bowls and surface elements, follow the instructions under General Cleaning. Cover stubborn spots...
Complete Owner's Guide (English)
Page 13
... with rough bottom has been used . See Ceramic-Glass Cooktop section in this Owner's Guide. Service wiring not complete. If the problem is a circuit overload, or improper connection of relative heat settings and will become less visible with use correct control for the element to fit element. Turn control to a slightly higher setting until proper amount of a proper size to be sure. Use only flat bottom, evenly balanced, medium or heavyweight cookware. Pans having...
... with rough bottom has been used . See Ceramic-Glass Cooktop section in this Owner's Guide. Service wiring not complete. If the problem is a circuit overload, or improper connection of relative heat settings and will become less visible with use correct control for the element to fit element. Turn control to a slightly higher setting until proper amount of a proper size to be sure. Use only flat bottom, evenly balanced, medium or heavyweight cookware. Pans having...
Complete Owner's Guide (English)
Page 16
... change or add to any parts of this warranty. 5. Service calls which are not covered by Electrolux Canada Corp. Service calls to correct the installation of your appliance or to instruct you how to , any refrigerator or freezer failures. 6. DISCLAIMER OF IMPLIED WARRANTIES; If service is performed, it is shipped from its original owner to repair or replace appliance light bulbs, air filters, water filters, other consumables, or knobs...
... change or add to any parts of this warranty. 5. Service calls which are not covered by Electrolux Canada Corp. Service calls to correct the installation of your appliance or to instruct you how to , any refrigerator or freezer failures. 6. DISCLAIMER OF IMPLIED WARRANTIES; If service is performed, it is shipped from its original owner to repair or replace appliance light bulbs, air filters, water filters, other consumables, or knobs...


