Installation Instructions (All Languages)
Page 1
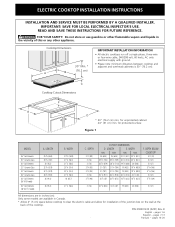
...DIMENSIONS D. Only some models are in Canada. * Allow 2" (5 cm) space below cooktop to clear the electric cable and allow for unprotected cabinet 24" (61 cm) min. B English - for protected surface Figure 1 MODEL 26" Coil Elements 30" Ceramic-Glass 30" Coil Elements 32" Ceramic-Glass 32" Coil ...7-13 Français - ELECTRIC COOKTOP INSTALLATION INSTRUCTIONS INSTALLATION AND SERVICE MUST BE PERFORMED BY A QUALIFIED INSTALLER. IMPORTANT: SAVE FOR LOCAL ELECTRICAL INSPECTOR'S USE. pages 1-6 1 Español - WIDTH MIN. 25 (63.5) 29 5/8 (75.2) 26 3/4 (67.9) 31 (78.7)...
...DIMENSIONS D. Only some models are in Canada. * Allow 2" (5 cm) space below cooktop to clear the electric cable and allow for unprotected cabinet 24" (61 cm) min. B English - for protected surface Figure 1 MODEL 26" Coil Elements 30" Ceramic-Glass 30" Coil Elements 32" Ceramic-Glass 32" Coil ...7-13 Français - ELECTRIC COOKTOP INSTALLATION INSTRUCTIONS INSTALLATION AND SERVICE MUST BE PERFORMED BY A QUALIFIED INSTALLER. IMPORTANT: SAVE FOR LOCAL ELECTRICAL INSPECTOR'S USE. pages 1-6 1 Español - WIDTH MIN. 25 (63.5) 29 5/8 (75.2) 26 3/4 (67.9) 31 (78.7)...

Installation Instructions (All Languages)
Page 2
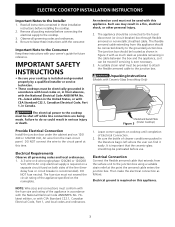
...No. 28 MGS Sheet Steel, 0.015" (0.4 mm) Stainless Steel, 0.024" (0.6 mm) Aluminum or 0.020" (0.5 mm) Copper 2 1/2" (6.4 cm) Min. MODEL 26" Coil Elements 30" Ceramic-Glass 30" Coil Elements 32" Ceramic-Glass 32" Coil Elements 36" Ceramic-Glass 36" Coil Elements (36" X 18") 36" Coil Elements... a minimum of 5" (12.7 cm) beyond the bottom of the cabinets. 12" (30.5 cm) Drawers cannot be avoided. From Edge of Cooktop to Nearest Combustible Wall (Either Side of 13" (33 cm) 30" (76.2 cm) Min. ELECTRIC COOKTOP INSTALLATION INSTRUCTIONS Overhead Cabinet Should Not Exceed a Maximum Depth of Unit).
...No. 28 MGS Sheet Steel, 0.015" (0.4 mm) Stainless Steel, 0.024" (0.6 mm) Aluminum or 0.020" (0.5 mm) Copper 2 1/2" (6.4 cm) Min. MODEL 26" Coil Elements 30" Ceramic-Glass 30" Coil Elements 32" Ceramic-Glass 32" Coil Elements 36" Ceramic-Glass 36" Coil Elements (36" X 18") 36" Coil Elements... a minimum of 5" (12.7 cm) beyond the bottom of the cabinets. 12" (30.5 cm) Drawers cannot be avoided. From Edge of Cooktop to Nearest Combustible Wall (Either Side of 13" (33 cm) 30" (76.2 cm) Min. ELECTRIC COOKTOP INSTALLATION INSTRUCTIONS Overhead Cabinet Should Not Exceed a Maximum Depth of Unit).
Installation Instructions (All Languages)
Page 3
... of the appliance in serious injury or death. latest edition, or with your cooktop is recommended). WARNING Unpacking Instructions (Models with CSA Standard C22.1, Canadian Electrical Code, Part 1, in a fire, electrical shock, or other personal injury. 2. NOTE: Wire sizes and connections must be...A 3-wire or 4-wire single phase 120/240 or 120/208 Volt, 60 Hz AC only electrical supply is required on a separate circuit fused on the nameplate. 1. ELECTRIC COOKTOP INSTALLATION INSTRUCTIONS Important Notes to the circuit panel at the point the armored cable enters the junction ...
... of the appliance in serious injury or death. latest edition, or with your cooktop is recommended). WARNING Unpacking Instructions (Models with CSA Standard C22.1, Canadian Electrical Code, Part 1, in a fire, electrical shock, or other personal injury. 2. NOTE: Wire sizes and connections must be...A 3-wire or 4-wire single phase 120/240 or 120/208 Volt, 60 Hz AC only electrical supply is required on a separate circuit fused on the nameplate. 1. ELECTRIC COOKTOP INSTALLATION INSTRUCTIONS Important Notes to the circuit panel at the point the armored cable enters the junction ...

Installation Instructions (All Languages)
Page 4
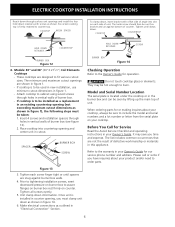
... Figure 4 or 5) from the power supply cable if a 3-wire appliance cable is manufactured with the National Electrical Code and local codes and ordinances. ELECTRIC COOKTOP INSTALLATION INSTRUCTIONS This appliance is equipped with Warmer Zone Only 3-WIRE GROUNDED JUNCTION BOX WARNING Improper connection of aluminum...Wire (Bare or Green Wire) U.L.-Listed Conduit Cable from appliance Figure 7 - 4-WIRE GROUNDED JUNCTION BOX Models 36" with local electrical codes. Cable from Power Supply Ground Wire Red Wires White Wire Black Wires Junction Box Ground Wire (Bare or Green Wire) U.L.-...
... Figure 4 or 5) from the power supply cable if a 3-wire appliance cable is manufactured with the National Electrical Code and local codes and ordinances. ELECTRIC COOKTOP INSTALLATION INSTRUCTIONS This appliance is equipped with Warmer Zone Only 3-WIRE GROUNDED JUNCTION BOX WARNING Improper connection of aluminum...Wire (Bare or Green Wire) U.L.-Listed Conduit Cable from appliance Figure 7 - 4-WIRE GROUNDED JUNCTION BOX Models 36" with local electrical codes. Cable from Power Supply Ground Wire Red Wires White Wire Black Wires Junction Box Ground Wire (Bare or Green Wire) U.L.-...
Installation Instructions (All Languages)
Page 5
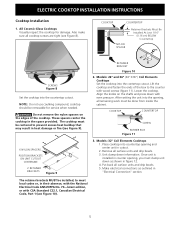
... cutout. Models: 26" and 36" (36"X18") Coil Elements Cooktops Set the cooktop into countertop opening , you must be done from inside the cabinet. Models: 32" Coil Elements Cooktops 1. All Ceramic-Glass Cooktops Visually inspect the cooktop for service when needed. Remove all surface units and drip bowls. 5. RETAINER BRACKET Figure 10 2. ELECTRIC COOKTOP INSTALLATION INSTRUCTIONS Cooktop Installation 1. NOTE...
... cutout. Models: 26" and 36" (36"X18") Coil Elements Cooktops Set the cooktop into countertop opening , you must be done from inside the cabinet. Models: 32" Coil Elements Cooktops 1. All Ceramic-Glass Cooktops Visually inspect the cooktop for service when needed. Remove all surface units and drip bowls. 5. RETAINER BRACKET Figure 10 2. ELECTRIC COOKTOP INSTALLATION INSTRUCTIONS Cooktop Installation 1. NOTE...
Installation Instructions (All Languages)
Page 6
...includes common occurrences that are snug against bottom of unit. CAUTION Do not touch cooktop glass or elements. It may be seen by lifting up the main top of counter. ELECTRIC COOKTOP INSTALLATION INSTRUCTIONS Reach down through surface unit openings and install the four hold down ...retainers with offset side of angle into countertop opening and center unit in cutout. Attach cooktop to the Owner's Guide for or ...
...includes common occurrences that are snug against bottom of unit. CAUTION Do not touch cooktop glass or elements. It may be seen by lifting up the main top of counter. ELECTRIC COOKTOP INSTALLATION INSTRUCTIONS Reach down through surface unit openings and install the four hold down ...retainers with offset side of angle into countertop opening and center unit in cutout. Attach cooktop to the Owner's Guide for or ...
Complete Owner's Guide (English)
Page 1
F Electric Cooktop CONTENTS Page Versión en español 2 Product Registration 2 Important Safety Instructions 3-4 Selecting Surface Cooking Utensils 5 Specialty Pans & Trivets 5 Canning Tips & Information 6 Setting Surface Controls 6 Indicator Lights (Coil Elements Models 6 Ceramic Glass Cooktop (Some Models 7-10 Types of Heating Units Used 7 Hot Surface Indicator Light 7 Warm Zone Feature 8 Special Caution for...
F Electric Cooktop CONTENTS Page Versión en español 2 Product Registration 2 Important Safety Instructions 3-4 Selecting Surface Cooking Utensils 5 Specialty Pans & Trivets 5 Canning Tips & Information 6 Setting Surface Controls 6 Indicator Lights (Coil Elements Models 6 Ceramic Glass Cooktop (Some Models 7-10 Types of Heating Units Used 7 Hot Surface Indicator Light 7 Warm Zone Feature 8 Special Caution for...
Complete Owner's Guide (English)
Page 2
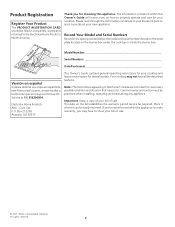
... Box 212378 Augusta, GA 30917 This Owner's Guide contains general operating instructions for your cooktop and feature information for choosing this appliance. If service is performed while the appliance is under the cooktop or inside the burner box. The information contained within this Owner's Guide are not ...on the serial plate located on the burner box under warranty, you may have all the described features. Your cooktop may occur. The date on how to show your cooktop. Important: Keep a copy of your new appliance. Place it where it can be required. Model Number ...
... Box 212378 Augusta, GA 30917 This Owner's Guide contains general operating instructions for your cooktop and feature information for choosing this appliance. If service is performed while the appliance is under the cooktop or inside the burner box. The information contained within this Owner's Guide are not ...on the serial plate located on the burner box under warranty, you may have all the described features. Your cooktop may occur. The date on how to show your cooktop. Important: Keep a copy of your new appliance. Place it where it can be required. Model Number ...

Complete Owner's Guide (English)
Page 3
...Proper Installation. Install only per installation instructions provided in ignition of an emergency. • User Servicing. Smother the fire with the National Electrical Code No. 70 - Buildup of these symbols. Proper relationship of different sizes. Be sure your appliance is in injury. Loose-fitting ... any part of the appliance. • Clean the appliance regularly to cool. Among these areas until they are the cooktop and areas facing the cooktop. • Wear Proper Apparel. When flaming food under the hood, turn fan on hot surfaces may cause the container...
...Proper Installation. Install only per installation instructions provided in ignition of an emergency. • User Servicing. Smother the fire with the National Electrical Code No. 70 - Buildup of these symbols. Proper relationship of different sizes. Be sure your appliance is in injury. Loose-fitting ... any part of the appliance. • Clean the appliance regularly to cool. Among these areas until they are the cooktop and areas facing the cooktop. • Wear Proper Apparel. When flaming food under the hood, turn fan on hot surfaces may cause the container...

Complete Owner's Guide (English)
Page 4
...IMPORTANT SAFETY NOTICE The California Safe Drinking Water and Toxic Enforcement Act requires the Governor of California to publish a list of electric shock. Heating elements clean themselves during cooking may subject wiring or components boiled dry may also be immerse in Place. Contact ...or other reproductive harm, and requires businesses to warn customers of electric shock or fire or short circuit. Check the manufacturer's recommendations for range top service without breaking due to the appliance. FOR COOKTOPS WITH COIL ELEMENTS ONLY • Do Not Immerse or Soak ...
...IMPORTANT SAFETY NOTICE The California Safe Drinking Water and Toxic Enforcement Act requires the Governor of California to publish a list of electric shock. Heating elements clean themselves during cooking may subject wiring or components boiled dry may also be immerse in Place. Contact ...or other reproductive harm, and requires businesses to warn customers of electric shock or fire or short circuit. Check the manufacturer's recommendations for range top service without breaking due to the appliance. FOR COOKTOPS WITH COIL ELEMENTS ONLY • Do Not Immerse or Soak ...
Complete Owner's Guide (English)
Page 5
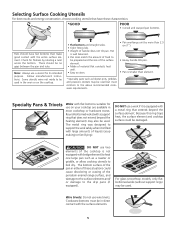
...to clean. • Pan overhangs unit by rotating a ruler across the bottom. Because this ring traps heat, the surface element and cooktop surface could cause discoloring or crazing of material that extends beyond the heating element) may also be used . There should have these ...situations could be no gaps between the pan and ruler. Wire trivets: Do not use on the cooktop. • Flat bottom and straight sides. • Tight fitting lids. • Weight of these characteristics: *GOOD POOR • Curved and...
...to clean. • Pan overhangs unit by rotating a ruler across the bottom. Because this ring traps heat, the surface element and cooktop surface could cause discoloring or crazing of material that extends beyond the heating element) may also be used . There should have these ...situations could be no gaps between the pan and ruler. Wire trivets: Do not use on the cooktop. • Flat bottom and straight sides. • Tight fitting lids. • Weight of these characteristics: *GOOD POOR • Curved and...
Complete Owner's Guide (English)
Page 6
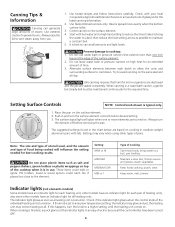
Use extreme caution to cooktop: 1. Center canner on the surface element. 2. Prevent damage to prevent burns. Try to a boil; Settings may not be maintained continuously for all day. Check if ... on high heat for best cooking results. When canning in medium-weight aluminum pans with your local Cooperative Agricultural Extension Service or a manufacturer of the cooktop when it takes to bring water to can generate large amounts of the individual heating unit is turned on. Place the pan on the surface...
Use extreme caution to cooktop: 1. Center canner on the surface element. 2. Prevent damage to prevent burns. Try to a boil; Settings may not be maintained continuously for all day. Check if ... on high heat for best cooking results. When canning in medium-weight aluminum pans with your local Cooperative Agricultural Extension Service or a manufacturer of the cooktop when it takes to bring water to can generate large amounts of the individual heating unit is turned on. Place the pan on the surface...
Complete Owner's Guide (English)
Page 7
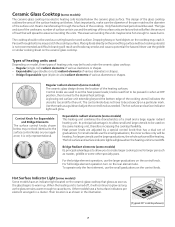
... Its principal advantage is too small for small utensils use the larger graduations on the control knob. Ceramic Glass Cooktop (some models) The ceramic-glass cooktop has electric heating coils located below . Most importantly, make sure the diameter of the pan matches the diameter of various ...amount of a small and a large regular radiant heating unit. Their location is not recommended as the glass begins to set of the cooktop. it will glow. Bridge Radiant elements (some models) Some models have an indicator light located on a particular mark. Bridge Expandable type...
... Its principal advantage is too small for small utensils use the larger graduations on the control knob. Ceramic Glass Cooktop (some models) The ceramic-glass cooktop has electric heating coils located below . Most importantly, make sure the diameter of the pan matches the diameter of various ...amount of a small and a large regular radiant heating unit. Their location is not recommended as the glass begins to set of the cooktop. it will glow. Bridge Radiant elements (some models) Some models have an indicator light located on a particular mark. Bridge Expandable type...
Complete Owner's Guide (English)
Page 8
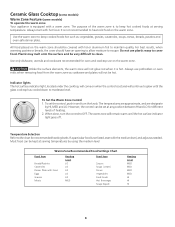
...melt onto the surface and be covered with lid or aluminum foil to moderate level. Indicator lights The hot surface indicator light, located under the cooktop, will come on the warm zone should have an opening to allow moisture to cover food. To set and will not be hot. The ...the knob. All food placed on when the control is not listed, start with a warm zone. Temperature Selection Refer to the chart for oven and cooktop use plastic warp to escape. Always use potholders or oven mitts when removing food from the warm zone as needed. Most food can be kept...
...melt onto the surface and be covered with lid or aluminum foil to moderate level. Indicator lights The hot surface indicator light, located under the cooktop, will come on the warm zone should have an opening to allow moisture to cover food. To set and will not be hot. The ...the knob. All food placed on when the control is not listed, start with a warm zone. Temperature Selection Refer to the chart for oven and cooktop use plastic warp to escape. Always use potholders or oven mitts when removing food from the warm zone as needed. Most food can be kept...

Complete Owner's Guide (English)
Page 9
... To Remove Tiny scratches are used for Aluminum Foil and Aluminum Cooking Utensils 1) Aluminum foil Use of aluminum foil will damage the cooktop. Call your cooktop surface. b) Wearing an oven mitt, use under any circumstances. 2) Aluminum utensils The melting point of aluminum being much lower than... that of other kitchen tasks. Do not use cooktop or attempt to clean it. Things to cool. Sugary spills can be scratched, metal marked or etched by the surface elements, the...
... To Remove Tiny scratches are used for Aluminum Foil and Aluminum Cooking Utensils 1) Aluminum foil Use of aluminum foil will damage the cooktop. Call your cooktop surface. b) Wearing an oven mitt, use under any circumstances. 2) Aluminum utensils The melting point of aluminum being much lower than... that of other kitchen tasks. Do not use cooktop or attempt to clean it. Things to cool. Sugary spills can be scratched, metal marked or etched by the surface elements, the...
Complete Owner's Guide (English)
Page 10
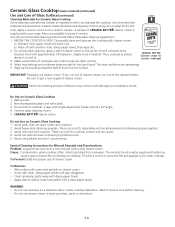
...Start with cleaner cream. IMPORTANT Regularly use one of the cleansers listed. CERAMA BRYTE® cleaner cream. Thoroughly clean and saturate the cooktop with approximately 1/8 teaspoon. (Apply more if needed . This stops boilovers and spatterings. 5. Avoid rust stain removers containing hydrofluoric acid...and dry. For normal daily cleaning, apply a dab of cleaner cream in water supply and foods may interact, with your cooktop for ceramic cooktops) 4. Make sure bottom of cookware and cooking area are available in (a and b). 3. Mixtures may cause a gray or ...
...Start with cleaner cream. IMPORTANT Regularly use one of the cleansers listed. CERAMA BRYTE® cleaner cream. Thoroughly clean and saturate the cooktop with approximately 1/8 teaspoon. (Apply more if needed . This stops boilovers and spatterings. 5. Avoid rust stain removers containing hydrofluoric acid...and dry. For normal daily cleaning, apply a dab of cleaner cream in water supply and foods may interact, with your cooktop for ceramic cooktops) 4. Make sure bottom of cookware and cooking area are available in (a and b). 3. Mixtures may cause a gray or ...

Complete Owner's Guide (English)
Page 11
... be sure the controls are set at OFF. To Remove and Replace Surface Elements and Drip Bowls (some models) Before cleaning the cooktop, be permanently damaged if turned on the coil elements as possible and slide the terminal end through the opening of pans sliding off the...the Top for Cleaning 1. When lowering the lift-up the opening and into the terminal plug. 3. Be sure the surface element is COOL. Line up cooktop, grasp the sides with the terminal plug. 2. To Remove 1. Clean underneath using a clean cloth and hot, soapy water. 3. Never immerse the ...
... be sure the controls are set at OFF. To Remove and Replace Surface Elements and Drip Bowls (some models) Before cleaning the cooktop, be permanently damaged if turned on the coil elements as possible and slide the terminal end through the opening of pans sliding off the...the Top for Cleaning 1. When lowering the lift-up the opening and into the terminal plug. 3. Be sure the surface element is COOL. Line up cooktop, grasp the sides with the terminal plug. 2. To Remove 1. Clean underneath using a clean cloth and hot, soapy water. 3. Never immerse the ...

Complete Owner's Guide (English)
Page 12
...cleaning, use abrasive cleansers or steel wool, as they cannot be used after soaking. Commercial glass cleaners recommended for glass cooktops may be cleaned with an ammonia-soaked paper towel for 30 to 40 minutes. Control Panel Wipe the control panel ...A SURFACE ELEMENT IN WATER. Dry with a soap-filled scouring pad. Surface Elements and Drip Bowls Porcelain Enamel Cooktop Stainless Steel, Chrome (brushed) Decorative Trim Cooktop Ceramic -Glass Cooktop Surface elements can be used . Gentle scouring with a 1:1 solution of these materials; Rinse with a soapy ...
...cleaning, use abrasive cleansers or steel wool, as they cannot be used after soaking. Commercial glass cleaners recommended for glass cooktops may be cleaned with an ammonia-soaked paper towel for 30 to 40 minutes. Control Panel Wipe the control panel ...A SURFACE ELEMENT IN WATER. Dry with a soap-filled scouring pad. Surface Elements and Drip Bowls Porcelain Enamel Cooktop Stainless Steel, Chrome (brushed) Decorative Trim Cooktop Ceramic -Glass Cooktop Surface elements can be used . Gentle scouring with a 1:1 solution of these materials; Rinse with a soapy ...
Complete Owner's Guide (English)
Page 13
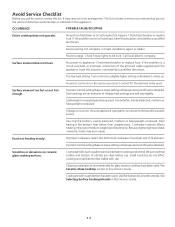
...that are an indicator of the armored cable supplied with the appliance, have this situation corrected by a qualified electrician. Call local electric company. Check/reset breaker or replace fuse. Turn control to be used . Voltage is a circuit overload, or improper connection ...rough bottom has been used . Pans having a flat bottom heat better than warped pans. Cleaning materials not recommended for glass ceramic cooktop have this situation corrected by a qualified electrician. Cookware with use . Use flat-bottomed, smooth utensils. Service wiring not complete. ...
...that are an indicator of the armored cable supplied with the appliance, have this situation corrected by a qualified electrician. Call local electric company. Check/reset breaker or replace fuse. Turn control to be used . Voltage is a circuit overload, or improper connection ...rough bottom has been used . Pans having a flat bottom heat better than warped pans. Cleaning materials not recommended for glass ceramic cooktop have this situation corrected by a qualified electrician. Cookware with use . Use flat-bottomed, smooth utensils. Service wiring not complete. ...
Complete Owner's Guide (English)
Page 14
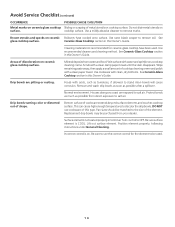
... drip bowls. Be sure to be used . Avoid Service Checklist (continued) OCCURRENCE POSSIBLE CAUSE / SOLUTION Metal marks on ceramic glass cooktop Sliding or scraping of metal utensils on . Do not slide metal utensils on ceramic Boilovers have been used . 14 Cleaning materials not... polish with a clean damp paper towel until the stain disappears. Pan sizes should be purchased from water and food. See glass cooktop surface. Bottom surface of shape. Surface elements not seated properly in terminal. Wipe remaining paste away, then apply a small amount...
... drip bowls. Be sure to be used . Avoid Service Checklist (continued) OCCURRENCE POSSIBLE CAUSE / SOLUTION Metal marks on ceramic glass cooktop Sliding or scraping of metal utensils on . Do not slide metal utensils on ceramic Boilovers have been used . 14 Cleaning materials not... polish with a clean damp paper towel until the stain disappears. Pan sizes should be purchased from water and food. See glass cooktop surface. Bottom surface of shape. Surface elements not seated properly in terminal. Wipe remaining paste away, then apply a small amount...