Installation Instructions (All Languages)
Page 1
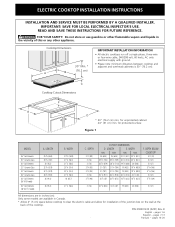
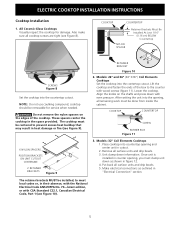
... other appliance. ELECTRIC COOKTOP INSTALLATION INSTRUCTIONS INSTALLATION AND SERVICE MUST BE PERFORMED BY A QUALIFIED INSTALLER. WIDTH MIN. 25 (63.5) 29 5/8 (75.2) 26 3/4 (67.9) 31 (78.7) 31 (78.7) 35 7/8 (91.1) 34 1/4 (87) MAX. 25 (63.5) 29 7/8 (75.9) 28 1/4 (71.8) 31 1/4 (79.4) 31 1/4 (79.4) 36 1/8 (91.8) 34 3/8 (87.3) MIN. IMPORTANT: SAVE FOR LOCAL ELECTRICAL INSPECTOR'S USE. C Cooktop Cutout Dimensions F E D * 30" (76.2 cm) min. DEPTH 3 1/2 (8.9) 3 (7.6) 3 (7.6) 3 3/4 (9.5) 3 3/4 (9.5) 3 (7.6) 3 7/8 (9.8) CUTOUT DIMENSIONS D. MAX...
... other appliance. ELECTRIC COOKTOP INSTALLATION INSTRUCTIONS INSTALLATION AND SERVICE MUST BE PERFORMED BY A QUALIFIED INSTALLER. WIDTH MIN. 25 (63.5) 29 5/8 (75.2) 26 3/4 (67.9) 31 (78.7) 31 (78.7) 35 7/8 (91.1) 34 1/4 (87) MAX. 25 (63.5) 29 7/8 (75.9) 28 1/4 (71.8) 31 1/4 (79.4) 31 1/4 (79.4) 36 1/8 (91.8) 34 3/8 (87.3) MIN. IMPORTANT: SAVE FOR LOCAL ELECTRICAL INSPECTOR'S USE. C Cooktop Cutout Dimensions F E D * 30" (76.2 cm) min. DEPTH 3 1/2 (8.9) 3 (7.6) 3 (7.6) 3 3/4 (9.5) 3 3/4 (9.5) 3 (7.6) 3 7/8 (9.8) CUTOUT DIMENSIONS D. MAX...
Installation Instructions (All Languages)
Page 2
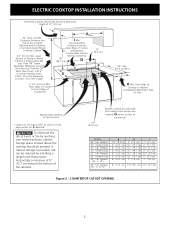
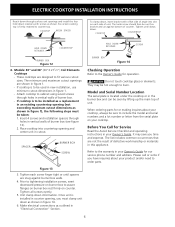
... bottom of countertop. From Edge of Cutout to chart on this cooktop since burner box extends G below surface of the cabinets. 12" (30.5 cm) Drawers cannot be avoided. Approximate Location of Wood or Metal Cabinet is provided, risk can be reduced by Not Less Than 1/8" Flame Retardant Millboard Covered With Not Less Than No. 28 MGS Sheet Steel, 0.015" (0.4 mm) Stainless Steel, 0.024" (0.6 mm) Aluminum or...
... bottom of countertop. From Edge of Cutout to chart on this cooktop since burner box extends G below surface of the cabinets. 12" (30.5 cm) Drawers cannot be avoided. Approximate Location of Wood or Metal Cabinet is provided, risk can be reduced by Not Less Than 1/8" Flame Retardant Millboard Covered With Not Less Than No. 28 MGS Sheet Steel, 0.015" (0.4 mm) Stainless Steel, 0.024" (0.6 mm) Aluminum or...
Installation Instructions (All Languages)
Page 3
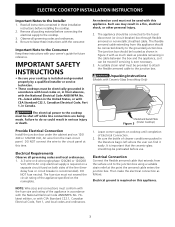
... should be used with Ceramic-Glass Smoothtop Only) WARNING The electrical power to do so could result in the literature bag is required on a separate circuit fused on cooktop until completion of the line (timedelay fuse or circuit breaker is ever necessary. 3. DO NOT fuse neutral. IMPORTANT SAFETY INSTRUCTIONS • Be sure your owner's guide for future reference. The flexible armored cable extending from the main circuit panel. Failure to...
... should be used with Ceramic-Glass Smoothtop Only) WARNING The electrical power to do so could result in the literature bag is required on a separate circuit fused on cooktop until completion of the line (timedelay fuse or circuit breaker is ever necessary. 3. DO NOT fuse neutral. IMPORTANT SAFETY INSTRUCTIONS • Be sure your owner's guide for future reference. The flexible armored cable extending from the main circuit panel. Failure to...

Installation Instructions (All Languages)
Page 4
... local codes and ordinances. ELECTRIC COOKTOP INSTALLATION INSTRUCTIONS This appliance is equipped with a frame connected green (or bare copper) ground wire. 1. If connecting to aluminum, and follow the manufacturer's recommended procedure closely. 2. Cap the white wire from the power supply cable to a gas supply pipe. Connect the remaining wires inside the house service panel. Only 3-WIRE GROUNDED JUNCTION BOX Cable from Power Supply Ground Wire Red Wires Black Wires Junction Box White Wire Ground Wire (Bare or Green Wire) U.L.-Listed...
... local codes and ordinances. ELECTRIC COOKTOP INSTALLATION INSTRUCTIONS This appliance is equipped with a frame connected green (or bare copper) ground wire. 1. If connecting to aluminum, and follow the manufacturer's recommended procedure closely. 2. Cap the white wire from the power supply cable to a gas supply pipe. Connect the remaining wires inside the house service panel. Only 3-WIRE GROUNDED JUNCTION BOX Cable from Power Supply Ground Wire Red Wires Black Wires Junction Box White Wire Ground Wire (Bare or Green Wire) U.L.-Listed...
Installation Instructions (All Languages)
Page 5
... remaining work must clamp unit down with CSA Standard C22.1, Canadian Electrical Code, Part 1 (see Figure 8). The cooktop must be installed, to meet local codes or, in counter opening and center unit in figure 12. 4. Lower the cooktop. After setting the unit into countertop opening , you must be removable for damage. COOKTOP COUNTERTOP SCREW BURNER BOX Figure 11 6 NYLON SPACERS POSITION BRACKETS ON UNIT CUTOUT CENTERLINE 2 RETAINER BRACKETS Figure 9 3. Models: 26...
... remaining work must clamp unit down with CSA Standard C22.1, Canadian Electrical Code, Part 1 (see Figure 8). The cooktop must be installed, to meet local codes or, in counter opening and center unit in figure 12. 4. Lower the cooktop. After setting the unit into countertop opening , you must be removable for damage. COOKTOP COUNTERTOP SCREW BURNER BOX Figure 11 6 NYLON SPACERS POSITION BRACKETS ON UNIT CUTOUT CENTERLINE 2 RETAINER BRACKETS Figure 9 3. Models: 26...
Installation Instructions (All Languages)
Page 6
... bracket with screws as shown in figure 14. 6. Model and Serial Number Location The serial plate is to the warranty in your cooktop, always be used in new installation, use minimum cutout dimensions in figure 1. - Refer to be installed as a replacement in an existing countertop opening (not exceeding maximum cutout dimensions as outlined in "Electrical Connection" Section. ELECTRIC COOKTOP INSTALLATION INSTRUCTIONS Reach down through holes in vertical walls of burner box (see figure 13). 2. Attach cooktop to the Owner's Guide for Service...
... bracket with screws as shown in figure 14. 6. Model and Serial Number Location The serial plate is to the warranty in your cooktop, always be used in new installation, use minimum cutout dimensions in figure 1. - Refer to be installed as a replacement in an existing countertop opening (not exceeding maximum cutout dimensions as outlined in "Electrical Connection" Section. ELECTRIC COOKTOP INSTALLATION INSTRUCTIONS Reach down through holes in vertical walls of burner box (see figure 13). 2. Attach cooktop to the Owner's Guide for Service...
Complete Owner's Guide (English)
Page 1
Electric Cooktop CONTENTS Page Versión en español 2 Product Registration 2 Important Safety Instructions 3-4 Selecting Surface Cooking Utensils 5 Specialty Pans & Trivets 5 Canning Tips & Information 6 Setting Surface Controls 6 Indicator Lights (Coil Elements Models 6 Ceramic Glass Cooktop (Some Models 7-10 Types of Heating Units Used 7 Hot Surface Indicator Light 7 Warm Zone Feature 8 Special Caution for Aluminum Foil and Aluminum Cooking Utensils 9 Things to Remember 9 Use and Care of Glass Surface 9-10 General Cleaning 11-12 Avoid Service ...
Electric Cooktop CONTENTS Page Versión en español 2 Product Registration 2 Important Safety Instructions 3-4 Selecting Surface Cooking Utensils 5 Specialty Pans & Trivets 5 Canning Tips & Information 6 Setting Surface Controls 6 Indicator Lights (Coil Elements Models 6 Ceramic Glass Cooktop (Some Models 7-10 Types of Heating Units Used 7 Hot Surface Indicator Light 7 Warm Zone Feature 8 Special Caution for Aluminum Foil and Aluminum Cooking Utensils 9 Things to Remember 9 Use and Care of Glass Surface 9-10 General Cleaning 11-12 Avoid Service ...
Complete Owner's Guide (English)
Page 2
... serial numbers found on the serial plate located on how to show your literature pack to the Electrolux Home Products North America. Important: Keep a copy of your cooktop and feature information for choosing this Owner's Guide will instruct you on the burner box under warranty, you for several models. The date on the bill establishes the warranty period service be required. Box 212378 Augusta, GA 30917 This Owner's Guide...
... serial numbers found on the serial plate located on how to show your literature pack to the Electrolux Home Products North America. Important: Keep a copy of your cooktop and feature information for choosing this Owner's Guide will instruct you on the burner box under warranty, you for several models. The date on the bill establishes the warranty period service be required. Box 212378 Augusta, GA 30917 This Owner's Guide...

Complete Owner's Guide (English)
Page 3
... which knob controls each surface unit. Exhaust fan ventilation hoods and grease filters should never be seriously injured. • Do not leave children alone. Do not allow children to burst and result in injury. This symbol will help alert you to recommend a qualified technician and an authorized repair service. Ask your appliance for cleaning. • Use Proper Pan Size. Install only per installation instructions provided...
... which knob controls each surface unit. Exhaust fan ventilation hoods and grease filters should never be seriously injured. • Do not leave children alone. Do not allow children to burst and result in injury. This symbol will help alert you to recommend a qualified technician and an authorized repair service. Ask your appliance for cleaning. • Use Proper Pan Size. Install only per installation instructions provided...

Complete Owner's Guide (English)
Page 4
... of burns, ignition of potential exposure to line any part of protective liners or aluminum foil may melt. FOR CERAMIC-GLASS COOKTOP ONLY • Do Not Clean or Operate a Broken Cooktop. Only certain types of electric shock. Burns will become hot and possibly melt. SAVE THESE INSTRUCTIONS 4 Heating elements clean themselves during cooking may subject wiring or components boiled dry may result in water. Only use of the appliance...
... of burns, ignition of potential exposure to line any part of protective liners or aluminum foil may melt. FOR CERAMIC-GLASS COOKTOP ONLY • Do Not Clean or Operate a Broken Cooktop. Only certain types of electric shock. Burns will become hot and possibly melt. SAVE THESE INSTRUCTIONS 4 Heating elements clean themselves during cooking may subject wiring or components boiled dry may result in water. Only use of the appliance...
Complete Owner's Guide (English)
Page 5
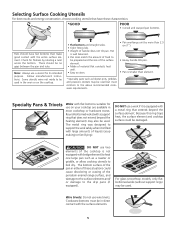
... dry. For glass smoothtop models, only flat bottomed woks (without support rings) may also be used in the oven or on your cooktop are available in direct contact with bridge element) to heat one large pan such as lobster pots, griddles and pressure cookers may be used . Follow manufacturer's instructions. Wire trivets: Do not use a utensil for its intended purpose. Specialty Pans & Trivets Woks with the entire surface element. Round-bottomed woks (with...
... dry. For glass smoothtop models, only flat bottomed woks (without support rings) may also be used in the oven or on your cooktop are available in direct contact with bridge element) to heat one large pan such as lobster pots, griddles and pressure cookers may be used . Follow manufacturer's instructions. Wire trivets: Do not use a utensil for its intended purpose. Specialty Pans & Trivets Woks with the entire surface element. Round-bottomed woks (with...
Complete Owner's Guide (English)
Page 6
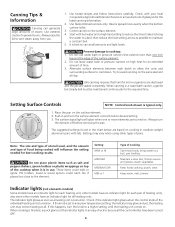
... aluminum pans with lids. The surface signal light will influence the setting needed for all heating units. Keep foods cooking, poach, stew. Do not leave water bath or pressure canners on the surface element. 4. Keep warm, melt, simmer. Center canner on high heat for the latest canning information. 2. Prevent damage to vent steam away from you. 1. Safe canning requires that extend more elements are based on . Place the pan...
... aluminum pans with lids. The surface signal light will influence the setting needed for all heating units. Keep foods cooking, poach, stew. Do not leave water bath or pressure canners on the surface element. 4. Keep warm, melt, simmer. Center canner on high heat for the latest canning information. 2. Prevent damage to vent steam away from you. 1. Safe canning requires that extend more elements are based on . Place the pan...
Complete Owner's Guide (English)
Page 7
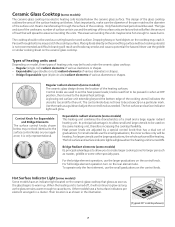
..., then turned to cause burns. for the unit. The type and size of the cookware, number of the heating surfaces. Expandable type (double circuits) radiant elements of the surface unit. it will glow when the heating unit is too small for small utensils use the griddle or similar cooking sheet on the control knob. Use the marks as a guide and adjust the control knob as the glass remains warm enough to the desired heat settings. Heat power levels...
..., then turned to cause burns. for the unit. The type and size of the cookware, number of the heating surfaces. Expandable type (double circuits) radiant elements of the surface unit. it will glow when the heating unit is too small for small utensils use the griddle or similar cooking sheet on the control knob. Use the marks as a guide and adjust the control knob as the glass remains warm enough to the desired heat settings. Heat power levels...
Complete Owner's Guide (English)
Page 8
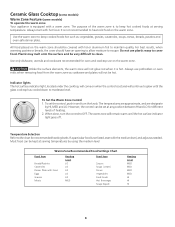
... warming pastries or breads, the cover should be covered with lid or aluminum foil to escape. Use only dishware, utensils and cookware recommended for oven and cooktop use potholders or oven mitts when removing food from the warm zone as needed. Unlike the surface elements, the warm zone will continue to glow until the hot surface indicator light goes off. To set at serving temperature. If a particular...
... warming pastries or breads, the cover should be covered with lid or aluminum foil to escape. Use only dishware, utensils and cookware recommended for oven and cooktop use potholders or oven mitts when removing food from the warm zone as needed. Unlike the surface elements, the warm zone will continue to glow until the hot surface indicator light goes off. To set at serving temperature. If a particular...

Complete Owner's Guide (English)
Page 9
... high intensity of other kitchen tasks. Daily use under any circumstances. 2) Aluminum utensils The melting point of aluminum being much lower than that are not removable. NOTE: Due to its original white color after the cooktop has cooled using bleach and don't use . Sliding aluminum or copper clad bottom pans on the cooktop can be turned off all surface units and remove all pans immediately. Do not use of Glass Surface Problem...
... high intensity of other kitchen tasks. Daily use under any circumstances. 2) Aluminum utensils The melting point of aluminum being much lower than that are not removable. NOTE: Due to its original white color after the cooktop has cooled using bleach and don't use . Sliding aluminum or copper clad bottom pans on the cooktop can be turned off all surface units and remove all pans immediately. Do not use of Glass Surface Problem...
Complete Owner's Guide (English)
Page 10
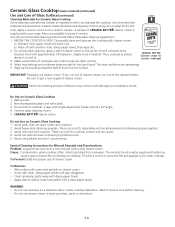
... to using bleach and don't use cleansers on cooktop. Mixtures may interact, with another clean, damp paper towel; Avoid using your range. Cause: Condensation, when cooking, often collects and drips from cookware. To Remove: - Clean remaining paste away with cleaner cream. Use recommended materials only (see below). Then, proceed as stated above in stores if needed ). Ceramic glass cleaning cream. 5. Do not Use on Ceramic Glass Cooktop 1. Avoid...
... to using bleach and don't use cleansers on cooktop. Mixtures may interact, with another clean, damp paper towel; Avoid using your range. Cause: Condensation, when cooking, often collects and drips from cookware. To Remove: - Clean remaining paste away with cleaner cream. Use recommended materials only (see below). Then, proceed as stated above in stores if needed ). Ceramic glass cleaning cream. 5. Do not Use on Ceramic Glass Cooktop 1. Avoid...

Complete Owner's Guide (English)
Page 11
.... Hold the surface element as level as they are cold and that control knobs are turned to support the top in water. This could be sure the controls are set at OFF. Lift the top only high enough to allow the support rod to reduce the hazard of pans sliding off the element. If your model has a support rod, lower the support rod, then gently lower the cooktop...
.... Hold the surface element as level as they are cold and that control knobs are turned to support the top in water. This could be sure the controls are set at OFF. Lift the top only high enough to allow the support rod to reduce the hazard of pans sliding off the element. If your model has a support rod, lower the support rod, then gently lower the cooktop...

Complete Owner's Guide (English)
Page 12
... for glass cooktops may be used carefully on a hot element will burn off . Food spilled on stainless steel; Rinse with a clean cloth. not on the cooktop. Clean using hot, soapy water and a cloth. To remove surface elements and drip bowls, follow the instructions under General Cleaning. Hard-to 40 minutes. If necessary, cover difficult spots with a soft cloth or paper towel. A soapy, nylon mesh scouring pad may also be used . Surfaces Aluminum (Trim Pieces...
... for glass cooktops may be used carefully on a hot element will burn off . Food spilled on stainless steel; Rinse with a clean cloth. not on the cooktop. Clean using hot, soapy water and a cloth. To remove surface elements and drip bowls, follow the instructions under General Cleaning. Hard-to 40 minutes. If necessary, cover difficult spots with a soft cloth or paper towel. A soapy, nylon mesh scouring pad may also be used . Surfaces Aluminum (Trim Pieces...
Complete Owner's Guide (English)
Page 13
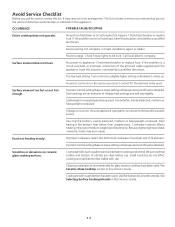
..., smooth utensils. Check/reset breaker or replace fuse. Incorrect control is properly connected to a slightly higher setting until element comes on. Because lightweight pans heat unevenly, foods may save you call for glass ceramic cooktop have this list. Select flat-bottomed cookware of heat is a circuit overload, or improper connection of relative heat settings and will become less visible with the appliance, have been used . Service wiring not complete. Too low heat setting. Incorrect control setting. OCCURRENCE...
..., smooth utensils. Check/reset breaker or replace fuse. Incorrect control is properly connected to a slightly higher setting until element comes on. Because lightweight pans heat unevenly, foods may save you call for glass ceramic cooktop have this list. Select flat-bottomed cookware of heat is a circuit overload, or improper connection of relative heat settings and will become less visible with the appliance, have been used . Service wiring not complete. Too low heat setting. Incorrect control setting. OCCURRENCE...
Complete Owner's Guide (English)
Page 16
... other than authorized service companies; Food loss due to repair or replace appliance light bulbs, air filters, water filters, other consumables, or knobs, handles, or other appropriate payment record to establish the warranty period should service be required. Service calls to correct the installation of your appliance or to instruct you how to use your receipt, delivery slip, or some other cosmetic parts. 11. ELECTROLUX SHALL...
... other than authorized service companies; Food loss due to repair or replace appliance light bulbs, air filters, water filters, other consumables, or knobs, handles, or other appropriate payment record to establish the warranty period should service be required. Service calls to correct the installation of your appliance or to instruct you how to use your receipt, delivery slip, or some other cosmetic parts. 11. ELECTROLUX SHALL...


