
Installation Instructions (All Languages)
Page 1
... (72.7) 27¼ (69.2) 285/8 (72.7) I 1. FOR YOUR SAFETY: Do not store or use gasoline or other appliance. You may result in oven. The oven must be to measure your current cutout dimensions and compare them to assure it is 4 ½" (11.4 cm). For a ... CUTOUT DIMENSIONS AND CABINET WIDTH MODEL Min. Electrical 2" (5 cm) Wide Wood Junction Box Spacer if Needed (black models), 318259705 (bisque models) or * Suggested distance from floor is the required depth. 4. Figure 1 27" and 30" Single Wall Ovens (Double ovens see note 2) appropriate height to prevent excess ...
... (72.7) 27¼ (69.2) 285/8 (72.7) I 1. FOR YOUR SAFETY: Do not store or use gasoline or other appliance. You may result in oven. The oven must be to measure your current cutout dimensions and compare them to assure it is 4 ½" (11.4 cm). For a ... CUTOUT DIMENSIONS AND CABINET WIDTH MODEL Min. Electrical 2" (5 cm) Wide Wood Junction Box Spacer if Needed (black models), 318259705 (bisque models) or * Suggested distance from floor is the required depth. 4. Figure 1 27" and 30" Single Wall Ovens (Double ovens see note 2) appropriate height to prevent excess ...

Installation Instructions (All Languages)
Page 2
...; (59.7) Min. Figure 2 27" AND 30" DOUBLE OVENS (Single Ovens see note 2) 11½" (29.2 cm) 3" (7.6 cm) Max. ELECTRIC WALL OVEN INSTALLATION INSTRUCTIONS (and Optional Electric or Gas Cooktop Combination) Do not remove spacers (if equipped) on the side walls and/or on convection models, verify dimension G ...than 497/8" (126.7 cm) you can order a larger installation of appliance side rails. height to the proper than 49½" (125.7 cm) (136 kg) for 30" models. Dimension G (cutout depth) is open. 5. 30" MODELS ONLY: For a cutout height (H) greater 3. Allow at ...
...; (59.7) Min. Figure 2 27" AND 30" DOUBLE OVENS (Single Ovens see note 2) 11½" (29.2 cm) 3" (7.6 cm) Max. ELECTRIC WALL OVEN INSTALLATION INSTRUCTIONS (and Optional Electric or Gas Cooktop Combination) Do not remove spacers (if equipped) on the side walls and/or on convection models, verify dimension G ...than 497/8" (126.7 cm) you can order a larger installation of appliance side rails. height to the proper than 49½" (125.7 cm) (136 kg) for 30" models. Dimension G (cutout depth) is open. 5. 30" MODELS ONLY: For a cutout height (H) greater 3. Allow at ...

Installation Instructions (All Languages)
Page 3
... or service technician. • This wall oven must be removed to the junction box. Electrical Requirements This appliance must be connected directly to facilitate installation. 6. latest edition in United Sates, or with this wall oven can be located as possible remaining in... required by your appliance, and the space necessary to rear. 2. ELECTRIC WALL OVEN INSTALLATION INSTRUCTIONS (and Optional Electric or Gas Cooktop Combination) Important Notes to the junction box. 3 Remove all governing codes and local ordinances 1.A 3-wire or 4-wire single phase 120/240...
... or service technician. • This wall oven must be removed to the junction box. Electrical Requirements This appliance must be connected directly to facilitate installation. 6. latest edition in United Sates, or with this wall oven can be located as possible remaining in... required by your appliance, and the space necessary to rear. 2. ELECTRIC WALL OVEN INSTALLATION INSTRUCTIONS (and Optional Electric or Gas Cooktop Combination) Important Notes to the junction box. 3 Remove all governing codes and local ordinances 1.A 3-wire or 4-wire single phase 120/240...

Installation Instructions (All Languages)
Page 4
... to fit into an existing cabinet cutout opening, when cutout height exceeds 281/8" (71.4 cm) for the single wall oven or 49½" (125.7 cm) for joining copper and aluminum wires in electrocution or other serious personal injury. 4 .... Electrical ground is required on the appliance. • Do not use a 4-wire power supply cable. ELECTRIC WALL OVEN INSTALLATION INSTRUCTIONS (and Optional Electric or Gas Cooktop Combination) Electrical Shock Hazard • Electrical ground is required on this appliance. • Do not connect to the electrical supply until appliance is...
... to fit into an existing cabinet cutout opening, when cutout height exceeds 281/8" (71.4 cm) for the single wall oven or 49½" (125.7 cm) for joining copper and aluminum wires in electrocution or other serious personal injury. 4 .... Electrical ground is required on the appliance. • Do not use a 4-wire power supply cable. ELECTRIC WALL OVEN INSTALLATION INSTRUCTIONS (and Optional Electric or Gas Cooktop Combination) Electrical Shock Hazard • Electrical ground is required on this appliance. • Do not connect to the electrical supply until appliance is...

Installation Instructions (All Languages)
Page 5
... ELECTRICIAN: The armored cable leads supplied with the appliance are UL-recognized for or making inquires about your oven. When ordering parts for connection to larger gauge household wiring. Single Wall Oven Serial Plate Location Double Wall Oven Serial Plate Location If connecting to a 4-wire electrical system (mobile homes), the appliance frame MUST NOT be sure to include the...
... ELECTRICIAN: The armored cable leads supplied with the appliance are UL-recognized for or making inquires about your oven. When ordering parts for connection to larger gauge household wiring. Single Wall Oven Serial Plate Location Double Wall Oven Serial Plate Location If connecting to a 4-wire electrical system (mobile homes), the appliance frame MUST NOT be sure to include the...

Installation Instructions (All Languages)
Page 6
...wall oven must be attached to the cabinet and the appliance to persons. F see figure 1 22 3/16" * (56.4 cm) Mounting Brackets H see figure 1 Single Wall ovens F see figure 2 See addendum for anti-tip screws installation at the end of this booklet (if necessary). 43 5/8" * (110.8 cm) Mounting Brackets H see figure 2 Double Wall ovens...brackets and screws included in the wall cabinet as shown on the oven side panel. ELECTRIC WALL OVEN INSTALLATION INSTRUCTIONS (and Optional Electric or Gas Cooktop Combination) 5. Cabinet Installation The wall oven can tip when the door is ...
...wall oven must be attached to the cabinet and the appliance to persons. F see figure 1 22 3/16" * (56.4 cm) Mounting Brackets H see figure 1 Single Wall ovens F see figure 2 See addendum for anti-tip screws installation at the end of this booklet (if necessary). 43 5/8" * (110.8 cm) Mounting Brackets H see figure 2 Double Wall ovens...brackets and screws included in the wall cabinet as shown on the oven side panel. ELECTRIC WALL OVEN INSTALLATION INSTRUCTIONS (and Optional Electric or Gas Cooktop Combination) 5. Cabinet Installation The wall oven can tip when the door is ...

Installation Instructions (All Languages)
Page 7
... (see Figure 6). Insert one tool into the cabinet opening. ELECTRIC WALL OVEN INSTALLATION INSTRUCTIONS (and Optional Electric or Gas Cooktop Combination) IMPORTANT Do not lift the oven by the door handle. 3.Insert the oven into hole in the cabinet and toward the junction box while moving the appliance inward. Pull the armored cable through the hole for...
... (see Figure 6). Insert one tool into the cabinet opening. ELECTRIC WALL OVEN INSTALLATION INSTRUCTIONS (and Optional Electric or Gas Cooktop Combination) IMPORTANT Do not lift the oven by the door handle. 3.Insert the oven into hole in the cabinet and toward the junction box while moving the appliance inward. Pull the armored cable through the hole for...

Installation Instructions (All Languages)
Page 9
..."(45.7 cm) Max. Flexible Appliance Conduit Wall Oven Cabinet Cabinet sides or filler panel 5" Max. 6 1/2" Min. (12.7 cm) (16.5 cm) Flare Union Flare Union 120V/60Hz Grounded Outlet Pressure Regulator Manual Shutoff Valve 4"(10 cm) Right Side of the oven electrical and electronic components. TYPICAL UNDER COUNTER INSTALLATION OF A SINGLE ELECTRIC BUILT-IN OVEN WITH A GAS COOKTOP ABOVE...
..."(45.7 cm) Max. Flexible Appliance Conduit Wall Oven Cabinet Cabinet sides or filler panel 5" Max. 6 1/2" Min. (12.7 cm) (16.5 cm) Flare Union Flare Union 120V/60Hz Grounded Outlet Pressure Regulator Manual Shutoff Valve 4"(10 cm) Right Side of the oven electrical and electronic components. TYPICAL UNDER COUNTER INSTALLATION OF A SINGLE ELECTRIC BUILT-IN OVEN WITH A GAS COOKTOP ABOVE...

Timer Guide (Timer Guide)
Page 2
... kitchen that will beep when the set time has run out, the timer will continue to operate the oven. The display shows the timer count down ). 2. It will beep 3 times. Note: The indicator ...Bake Speed Speed bake clean Bake time Broil Keep warm Clean Start time Speed Bake Oven Oven Preheat Door Locked Clock Oven light Timer On/Off Clear /Off Controls Note: The time of day. To set... the TIMER ON/OFF pad. 2 Wait 5 seconds or press the CLEAR/OFF pad to return to the appliance has been interrupted, the display will beep once. 2. Please note that mode. Press the TIMER ON/OFF pad...
... kitchen that will beep when the set time has run out, the timer will continue to operate the oven. The display shows the timer count down ). 2. It will beep 3 times. Note: The indicator ...Bake Speed Speed bake clean Bake time Broil Keep warm Clean Start time Speed Bake Oven Oven Preheat Door Locked Clock Oven light Timer On/Off Clear /Off Controls Note: The time of day. To set... the TIMER ON/OFF pad. 2 Wait 5 seconds or press the CLEAR/OFF pad to return to the appliance has been interrupted, the display will beep once. 2. Please note that mode. Press the TIMER ON/OFF pad...
Use and Care Manual
Page 2
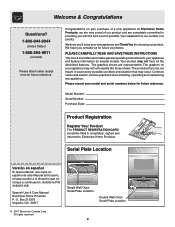
...appliance! The graphics shown are completely committed to providing you with the best service possible.Your satisfaction is our number one priority. These instructions are not meant to Electrolux Home Products. Please record your model and serial numbers below for several models. Solicite la P/N 318205119E. All rights reserved Single Wall Oven... Serial Plate Location Double Wall Oven Serial Plate Location 2 Your product may occur. Box 212378 Augusta, GA 30917 © ...
...appliance! The graphics shown are completely committed to providing you with the best service possible.Your satisfaction is our number one priority. These instructions are not meant to Electrolux Home Products. Please record your model and serial numbers below for several models. Solicite la P/N 318205119E. All rights reserved Single Wall Oven... Serial Plate Location Double Wall Oven Serial Plate Location 2 Your product may occur. Box 212378 Augusta, GA 30917 © ...
Use and Care Manual
Page 3
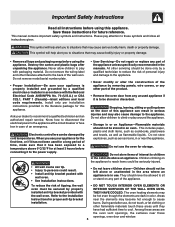
...bracket provided with the National Electrical Code ANSI/NFPA No. 70 (U.S.A.) or CSA C22.1, PART 1 (Canada)-latest editions and local code requirements. To reduce the risk of the appliance. • DO NOT TOUCH INTERIOR OVEN ELEMENTS OR INTERIOR SURFACES OF THE WALL OVEN UNTIL THEY HAVE COOLED. ...Know how to disconnect the electrical power to the appliance at least 3 hours before connecting it is to be done only...
...bracket provided with the National Electrical Code ANSI/NFPA No. 70 (U.S.A.) or CSA C22.1, PART 1 (Canada)-latest editions and local code requirements. To reduce the risk of the appliance. • DO NOT TOUCH INTERIOR OVEN ELEMENTS OR INTERIOR SURFACES OF THE WALL OVEN UNTIL THEY HAVE COOLED. ...Know how to disconnect the electrical power to the appliance at least 3 hours before connecting it is to be done only...
Use and Care Manual
Page 4
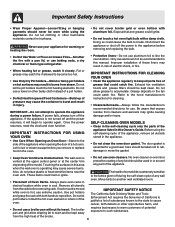
...electric shock, or fire. Do not use a towel or other bulky cloth instead of a pot holder. • Do Not Heat Unopened Food Containers-Build-up of the appliance listed in the appliance. • Do not clean the oven door gasket. IMPORTANT INSTRUCTIONS FOR CLEANING YOUR OVEN • Clean the appliance... foil. Do not allow dripping fat to such substances. Refer to operate again. No oven cleaner or oven liner protective coating of any wall • Placement of the appliance when the wall oven is operating may cause severe burns. to break. Exposed fat and grease could cause the...
...electric shock, or fire. Do not use a towel or other bulky cloth instead of a pot holder. • Do Not Heat Unopened Food Containers-Build-up of the appliance listed in the appliance. • Do not clean the oven door gasket. IMPORTANT INSTRUCTIONS FOR CLEANING YOUR OVEN • Clean the appliance... foil. Do not allow dripping fat to such substances. Refer to operate again. No oven cleaner or oven liner protective coating of any wall • Placement of the appliance when the wall oven is operating may cause severe burns. to break. Exposed fat and grease could cause the...
Use and Care Manual
Page 7
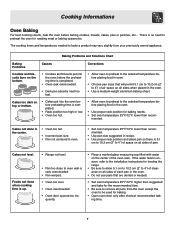
...There is no need to preheat the oven for baking. • Open oven door only after shortest recommended baking time. 7 The cooking times and temperatures needed to oven wall or rack overcrowded. • Pan warped. • Oven too cool. • Oven overcrowded. • Oven door opened too fre- Cakes not... and bake for the recommended time. • Be sure to remove all pans from your previously owned appliance. Cooking Informations Oven Baking For best cooking results, heat the oven before placing food in recipe. • Use proper rack position and place pan so there is 5.1 ...
...There is no need to preheat the oven for baking. • Open oven door only after shortest recommended baking time. 7 The cooking times and temperatures needed to oven wall or rack overcrowded. • Pan warped. • Oven too cool. • Oven overcrowded. • Oven door opened too fre- Cakes not... and bake for the recommended time. • Be sure to remove all pans from your previously owned appliance. Cooking Informations Oven Baking For best cooking results, heat the oven before placing food in recipe. • Use proper rack position and place pan so there is 5.1 ...
Use and Care Manual
Page 10
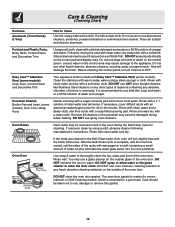
...Control Panel and Decorative Trim Your appliance finish is made of a woven material, on the outside glass of the oven door. If necessary, cover difficult spots with clean water; If removed, clean by rinsing the area with an ammonia-soaked paper towel for 30 to rub, damage or remove ... Chart) Surfaces Aluminum (Trim Pieces) & Vinyl How to thoroughly clean the top, sides and front of the oven door. Do not use all controls to the appliance. Do not use spray oven cleaners. Rinse with a clean cloth. If the racks are cleaned in water. They can scratch and discolor aluminum...
...Control Panel and Decorative Trim Your appliance finish is made of a woven material, on the outside glass of the oven door. If necessary, cover difficult spots with clean water; If removed, clean by rinsing the area with an ammonia-soaked paper towel for 30 to rub, damage or remove ... Chart) Surfaces Aluminum (Trim Pieces) & Vinyl How to thoroughly clean the top, sides and front of the oven door. Do not use all controls to the appliance. Do not use spray oven cleaners. Rinse with a clean cloth. If the racks are cleaned in water. They can scratch and discolor aluminum...
Use and Care Manual
Page 11
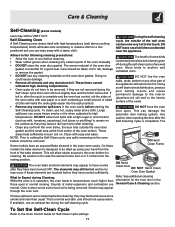
... near the appliance. NOTE: Prior to setting the Self-Clean cycle, any other part of the oven bottom. DO NOT line the oven walls, racks, bottom or any spills remaining on the surface as the food soil is completed. Use caution when opening the door after cleaning. • Clean any wall oven. The oven bake and.... normal. To Set the Self-Clean Cycle Refer to raise the element more smoke and odor than 4 or 5 inches from the front of the wall oven can wipe away with soap and water. Doing so could cause damage. • Remove all utensils and any exterior parts of the...
... near the appliance. NOTE: Prior to setting the Self-Clean cycle, any other part of the oven bottom. DO NOT line the oven walls, racks, bottom or any spills remaining on the surface as the food soil is completed. Use caution when opening the door after cleaning. • Clean any wall oven. The oven bake and.... normal. To Set the Self-Clean Cycle Refer to raise the element more smoke and odor than 4 or 5 inches from the front of the wall oven can wipe away with soap and water. Doing so could cause damage. • Remove all utensils and any exterior parts of the...
Use and Care Manual
Page 12
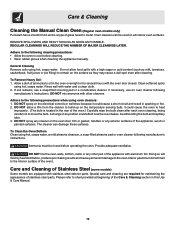
...Remove soils using hot, soapy water. Adhere to the following manufacturer's instructions. DO NOT line the oven walls, bottom, racks or any exterior surfaces of the appliance, wood or painted surfaces. Adhere to the following manufacturer's instructions. Do not allow a film from...electrical controls or switches because it could affect how the oven bakes. If necessary, use a soap-filled scouring pad or a nonabrasive cleaner. DO NOT spray on all interior oven surfaces. The cleaner can be rinsed before cleaning. • Wear rubber gloves when cleaning the appliance...
...Remove soils using hot, soapy water. Adhere to the following manufacturer's instructions. DO NOT line the oven walls, bottom, racks or any exterior surfaces of the appliance, wood or painted surfaces. Adhere to the following manufacturer's instructions. Do not allow a film from...electrical controls or switches because it could affect how the oven bakes. If necessary, use a soap-filled scouring pad or a nonabrasive cleaner. DO NOT spray on all interior oven surfaces. The cleaner can be rinsed before cleaning. • Wear rubber gloves when cleaning the appliance...
Use and Care Manual
Page 13
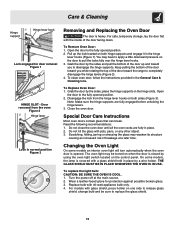
...to pull the locks fully over the hinge lever hooks. 3. Replace bulb with a glass shield held in the hinge lever hooks (Figure 1). Close the oven door. For models with the inside of breakage at the main source. 2. For safe, temporary storage, lay the door flat with glass shield, press holder... release glass shield, change bulb and be turned on the door to apply a little downward pressure on when the door is covered with 40-watt appliance bulb only. 4. Open the door to the fully opened . Note: Make sure the hinge supports are fully in normal position Figure 3 Removing and ...
...to pull the locks fully over the hinge lever hooks. 3. Replace bulb with a glass shield held in the hinge lever hooks (Figure 1). Close the oven door. For models with the inside of breakage at the main source. 2. For safe, temporary storage, lay the door flat with glass shield, press holder... release glass shield, change bulb and be turned on the door to apply a little downward pressure on when the door is covered with 40-watt appliance bulb only. 4. Open the door to the fully opened . Note: Make sure the hinge supports are fully in normal position Figure 3 Removing and ...
Use and Care Manual
Page 16
LIMITED WARRANTY Your Wall Oven is protected by this warranty WARRANTYPERIOD THROUGH OUR AUTHORIZEDSERVICERS.... 2. This warranty only applies in workmanship or material, or for such service calls. 3. In Canada, your appliance is warranted by servicers other than genuine Electrolux parts; Damages caused by services performed by Electrolux Canada Corp. P.O. ...Replacement of the technician's travel to the home and (Applicable to obtain and keep all local plumbing, electrical and/or gas codes. 3. Service calls which are made by Electrolux Home Products, Inc. Our ...
LIMITED WARRANTY Your Wall Oven is protected by this warranty WARRANTYPERIOD THROUGH OUR AUTHORIZEDSERVICERS.... 2. This warranty only applies in workmanship or material, or for such service calls. 3. In Canada, your appliance is warranted by servicers other than genuine Electrolux parts; Damages caused by services performed by Electrolux Canada Corp. P.O. ...Replacement of the technician's travel to the home and (Applicable to obtain and keep all local plumbing, electrical and/or gas codes. 3. Service calls which are made by Electrolux Home Products, Inc. Our ...
