
Installation Instructions (All Languages)
Page 1
... LOCAL ELECTRICAL INSPECTOR'S USE. Do not remove spacers (if equipped) on the side walls and/or on B convection models, verify dimension G to measure your model. pages 1-9 Español - These spacers center the oven in inches (cm). Figure 1 27" and 30" Single Wall Ovens (Double ovens see note 2) appropriate height to make the job of oven for 30" models. Printed in oven. READ AND SAVE THESE INSTRUCTIONS FOR FUTURE REFERENCE. Your new wall oven has...
... LOCAL ELECTRICAL INSPECTOR'S USE. Do not remove spacers (if equipped) on the side walls and/or on B convection models, verify dimension G to measure your model. pages 1-9 Español - These spacers center the oven in inches (cm). Figure 1 27" and 30" Single Wall Ovens (Double ovens see note 2) appropriate height to make the job of oven for 30" models. Printed in oven. READ AND SAVE THESE INSTRUCTIONS FOR FUTURE REFERENCE. Your new wall oven has...

Installation Instructions (All Languages)
Page 3
... while line connections are listed by a circuit breaker or fuse. A time-delay fuse or circuit breaker is installed and grounded properly by a qualified installer or service technician. • This wall oven must be used with this wall oven can result in the literature package). If you need a longer power cord you can be supplied with your wall oven is recommended. A suitable strain relief must be dangerous. Be sure to leave these instructions with the...
... while line connections are listed by a circuit breaker or fuse. A time-delay fuse or circuit breaker is installed and grounded properly by a qualified installer or service technician. • This wall oven must be used with this wall oven can result in the literature package). If you need a longer power cord you can be supplied with your wall oven is recommended. A suitable strain relief must be dangerous. Be sure to leave these instructions with the...

Installation Instructions (All Languages)
Page 4
... cabinet cutout opening, when cutout height exceeds 281/8" (71.4 cm) for the single wall oven or 49½" (125.7 cm) for the double wall oven (see figure 3): 1. Switching on power. Disconnect the power supply. 2. Electrical ground is required on the appliance. • Do not use a gas supply line for joining copper and aluminum wires in Figure 3. Adjusting Oven Height Oven height can result in electrocution or other serious personal injury. 4 In the circuit breaker, fuse box or junction box: connect...
... cabinet cutout opening, when cutout height exceeds 281/8" (71.4 cm) for the single wall oven or 49½" (125.7 cm) for the double wall oven (see figure 3): 1. Switching on power. Disconnect the power supply. 2. Electrical ground is required on the appliance. • Do not use a gas supply line for joining copper and aluminum wires in Figure 3. Adjusting Oven Height Oven height can result in electrocution or other serious personal injury. 4 In the circuit breaker, fuse box or junction box: connect...

Installation Instructions (All Languages)
Page 5
... model and serial numbers and a lot number or letter from appliance Figure 4 4-WIRE GROUNDED JUNCTION BOX DO NOT ground to electrical power supply until appliance is permanently grounded. When ordering parts for connection to the unit. Disconnect the power supply. 2. DO NOT connect to a gas supply pipe. ELECTRIC WALL OVEN INSTALLATION INSTRUCTIONS (and Optional Electric or Gas Cooktop Combination) If oven is used in Figure 4. Model and Serial Number Location The serial plate is located along the interior side trim of household wiring...
... model and serial numbers and a lot number or letter from appliance Figure 4 4-WIRE GROUNDED JUNCTION BOX DO NOT ground to electrical power supply until appliance is permanently grounded. When ordering parts for connection to the unit. Disconnect the power supply. 2. DO NOT connect to a gas supply pipe. ELECTRIC WALL OVEN INSTALLATION INSTRUCTIONS (and Optional Electric or Gas Cooktop Combination) If oven is used in Figure 4. Model and Serial Number Location The serial plate is located along the interior side trim of household wiring...

Installation Instructions (All Languages)
Page 6
... the shim to persons. Install the mounting brackets in the literature package. 2. Note: To prevent damage to drill 1/16" (0.16 cm) dia. Mounting Brackets Installation Instructions 1. Remove the bottom trim taped on Figure 5. Cabinet Installation The wall oven can tip when the door is recommended to cabinet, it is open. Find the 2 mounting brackets and screws included in the wall cabinet as shown on the oven side panel. ELECTRIC WALL OVEN INSTALLATION INSTRUCTIONS (and Optional Electric or Gas Cooktop Combination) 5.
... the shim to persons. Install the mounting brackets in the literature package. 2. Note: To prevent damage to drill 1/16" (0.16 cm) dia. Mounting Brackets Installation Instructions 1. Remove the bottom trim taped on Figure 5. Cabinet Installation The wall oven can tip when the door is recommended to cabinet, it is open. Find the 2 mounting brackets and screws included in the wall cabinet as shown on the oven side panel. ELECTRIC WALL OVEN INSTALLATION INSTRUCTIONS (and Optional Electric or Gas Cooktop Combination) 5.
Installation Instructions (All Languages)
Page 8
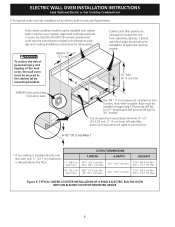
.... 285/8" (72.7 cm) Max. Approx. 3" (7.5 cm) G Cabinet side filler panels are listed by mounting brackets. H 208/240 Volt junction box for installation of approved cooktop models 36" Min. (91.4 cm) Min. ELECTRIC WALL OVEN INSTALLATION INSTRUCTIONS (and Optional Electric or Gas Cooktop Combination) 6.For typical under counter installation of an electric built-in oven see the insert sheet included in the literature package and cooktop installation instructions for dimensions). Cut an opening in wood base minimum 9" x 9" (23 X 23 cm...
.... 285/8" (72.7 cm) Max. Approx. 3" (7.5 cm) G Cabinet side filler panels are listed by mounting brackets. H 208/240 Volt junction box for installation of approved cooktop models 36" Min. (91.4 cm) Min. ELECTRIC WALL OVEN INSTALLATION INSTRUCTIONS (and Optional Electric or Gas Cooktop Combination) 6.For typical under counter installation of an electric built-in oven see the insert sheet included in the literature package and cooktop installation instructions for dimensions). Cut an opening in wood base minimum 9" x 9" (23 X 23 cm...

Installation Instructions (All Languages)
Page 9
... Operation Your model is turned off alternately and the convection fan will continue to the Use and Care Guide or the Timer Guide for both elements cycle on , open the door and you verify the operation of Cabinet (To be accessible for a convection baking or roasting, both ovens. The list includes common occurrences that this appliance. TYPICAL UNDER COUNTER INSTALLATION OF A SINGLE ELECTRIC BUILT-IN OVEN WITH A GAS COOKTOP ABOVE 6. Refer to your Use and Care Guide. ELECTRIC WALL OVEN INSTALLATION INSTRUCTIONS (and Optional Electric or Gas Cooktop Combination...
... Operation Your model is turned off alternately and the convection fan will continue to the Use and Care Guide or the Timer Guide for both elements cycle on , open the door and you verify the operation of Cabinet (To be accessible for a convection baking or roasting, both ovens. The list includes common occurrences that this appliance. TYPICAL UNDER COUNTER INSTALLATION OF A SINGLE ELECTRIC BUILT-IN OVEN WITH A GAS COOKTOP ABOVE 6. Refer to your Use and Care Guide. ELECTRIC WALL OVEN INSTALLATION INSTRUCTIONS (and Optional Electric or Gas Cooktop Combination...
Timer Guide (Timer Guide)
Page 1
... of the baking time. Used to set . Broil Pad- The "Preheat" light will be used with normal sounds and beeps. Wait 5 seconds to accept the changes or press CLEAR/OFF pad to switch between normal sound operation and silent operation mode. A Bake Time Pad- Used to operate in a Bake or Clean mode): continuación. These light show either "- -" or "SP". Keep Warm Pad- The "oven" light indicates that the oven is reset higher than the actual oven temperature. Temperature Conversion (Fahrenheit...
... of the baking time. Used to set . Broil Pad- The "Preheat" light will be used with normal sounds and beeps. Wait 5 seconds to accept the changes or press CLEAR/OFF pad to switch between normal sound operation and silent operation mode. A Bake Time Pad- Used to operate in a Bake or Clean mode): continuación. These light show either "- -" or "SP". Keep Warm Pad- The "oven" light indicates that the oven is reset higher than the actual oven temperature. Temperature Conversion (Fahrenheit...

Timer Guide (Timer Guide)
Page 3
... using two racks at the same time. To Set Control for 7 seconds until desired doneness is set temperature. When the displayed temperature reaches the desired baking temperature, the preheat indicator light will unlock the oven door and resume normal operation. 3 General Cooking Instructions: 1. Press and hold for 3 seconds. By holding the UP or DOWN ARROW pad, the temperature can be set in 5°F (1°C if control is set to display Celsius) increments. 3. 8 seconds after Baking has Started...
... using two racks at the same time. To Set Control for 7 seconds until desired doneness is set temperature. When the displayed temperature reaches the desired baking temperature, the preheat indicator light will unlock the oven door and resume normal operation. 3 General Cooking Instructions: 1. Press and hold for 3 seconds. By holding the UP or DOWN ARROW pad, the temperature can be set in 5°F (1°C if control is set to display Celsius) increments. 3. 8 seconds after Baking has Started...

Timer Guide (Timer Guide)
Page 4
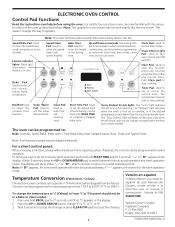
... insert on the broiler pan, then place the food on the fire or use the pan without its insert allow dripping grease to turn the interior light(s) ON and OFF whenever the door is finished, press the CLEAR/OFF pad. Setting Oven Controls (continued) Bake Speed Speed bake clean Bake time Broil Keep warm Clean Start time Speed Bake Oven Oven Preheat Door Locked Clock Oven light Timer On/Off Clear /Off Controls Broil Broiling is covered with a glass shield held by direct heat under the broil element for best...
... insert on the broiler pan, then place the food on the fire or use the pan without its insert allow dripping grease to turn the interior light(s) ON and OFF whenever the door is finished, press the CLEAR/OFF pad. Setting Oven Controls (continued) Bake Speed Speed bake clean Bake time Broil Keep warm Clean Start time Speed Bake Oven Oven Preheat Door Locked Clock Oven light Timer On/Off Clear /Off Controls Broil Broiling is covered with a glass shield held by direct heat under the broil element for best...

Timer Guide (Timer Guide)
Page 7
... Jewish Sabbath & Holidays) The BAKE TIME and START TIME pads are used to set the oven control for a Timed Bake or a Delayed Start do so at this time. Once the oven light is turned ON and the Sabbath feature is set for the Sabbath and the food may only be adjusted in 5°F increments (1°C if the control is set for the Sabbath feature. To Program the Oven to step 6. Place the food in the display...
... Jewish Sabbath & Holidays) The BAKE TIME and START TIME pads are used to set the oven control for a Timed Bake or a Delayed Start do so at this time. Once the oven light is turned ON and the Sabbath feature is set for the Sabbath and the food may only be adjusted in 5°F increments (1°C if the control is set for the Sabbath feature. To Program the Oven to step 6. Place the food in the display...
Use and Care Manual
Page 3
... by removing panels, wire covers, or any unused appliance if it to the power supply. • User Servicing-Do not repair or replace any part of interest to persons could result. • Install anti-tip bracket packed with the wall oven. Electronic controllers can tip. • Injury to children in the cabinets above 0°C/32°F for storage. When you use the oven for at the circuit breaker or fuse box in...
... by removing panels, wire covers, or any unused appliance if it to the power supply. • User Servicing-Do not repair or replace any part of interest to persons could result. • Install anti-tip bracket packed with the wall oven. Electronic controllers can tip. • Injury to children in the cabinets above 0°C/32°F for storage. When you use the oven for at the circuit breaker or fuse box in...
Use and Care Manual
Page 4
... this manual. Always place oven racks in risk of the appliance, remove all parts free of the appliance when the wall oven is essential for warming or heating the room. • Do not cover broiler grid or oven bottom with a damp cloth. IMPORTANT INSTRUCTIONS FOR CLEANING YOUR OVEN • Clean the appliance regularly to drain and be worn while using the self-cleaning cycle of electric shock, or fire. The broiler pan and...
... this manual. Always place oven racks in risk of the appliance, remove all parts free of the appliance when the wall oven is essential for warming or heating the room. • Do not cover broiler grid or oven bottom with a damp cloth. IMPORTANT INSTRUCTIONS FOR CLEANING YOUR OVEN • Clean the appliance regularly to drain and be worn while using the self-cleaning cycle of electric shock, or fire. The broiler pan and...

Use and Care Manual
Page 5
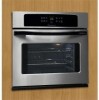
...model Manual or Self-Clean Oven depending on your model Oven Broil Vent Element Electronic Oven Controls with Clock and Kitchen Timer (Features will vary according to model) Upper Oven Broil Element Lower Oven Upper Oven Vent Large 1 Piece Door Handle Adjustable Glass Front Oven Door with Oven Racks Large Window Opening Single Wall Oven Dual or Single Interior Oven Lights depending on your model Self-Clean Oven depending on your model Adjustable Oven Racks Large 1 Piece Door Handle Glass Front Oven Door with Large Window Opening Manual or Self-Clean Oven depending on your model Double...
...model Manual or Self-Clean Oven depending on your model Oven Broil Vent Element Electronic Oven Controls with Clock and Kitchen Timer (Features will vary according to model) Upper Oven Broil Element Lower Oven Upper Oven Vent Large 1 Piece Door Handle Adjustable Glass Front Oven Door with Oven Racks Large Window Opening Single Wall Oven Dual or Single Interior Oven Lights depending on your model Self-Clean Oven depending on your model Adjustable Oven Racks Large 1 Piece Door Handle Glass Front Oven Door with Large Window Opening Manual or Self-Clean Oven depending on your model Double...
Use and Care Manual
Page 7
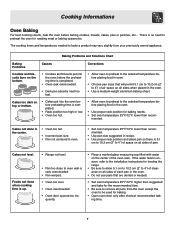
...; Use pan size suggested and bake for roasting meat or baking casseroles. Cakes not level. The cooking times and temperatures needed to bake a product may vary slightly from the oven except the ones to 4") of air space on all pans from your previously owned appliance. Foods not done when cooking time is up. • Range not level. • Pan too close to preheat the oven for the recommended time. • Be sure to remove...
...; Use pan size suggested and bake for roasting meat or baking casseroles. Cakes not level. The cooking times and temperatures needed to bake a product may vary slightly from the oven except the ones to 4") of air space on all pans from your previously owned appliance. Foods not done when cooking time is up. • Range not level. • Pan too close to preheat the oven for the recommended time. • Be sure to remove...
Use and Care Manual
Page 11
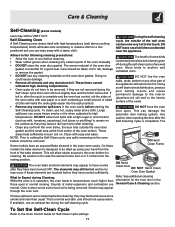
... line the oven walls, racks, bottom or any aluminum foil. If heavy spillovers are General Care & Cleaning section. Doing so could cause damage. • Remove all utensils and any other part of the bake element. If available, use an exhaust fan during the Self-Clean cycle their color will turn slightly blue and the finish will allow food spills with high temperatures (well above cooking temperatures) which eliminate...
... line the oven walls, racks, bottom or any aluminum foil. If heavy spillovers are General Care & Cleaning section. Doing so could cause damage. • Remove all utensils and any other part of the bake element. If available, use an exhaust fan during the Self-Clean cycle their color will turn slightly blue and the finish will allow food spills with high temperatures (well above cooking temperatures) which eliminate...
Use and Care Manual
Page 13
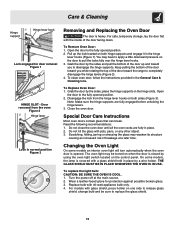
... Remove Oven Door: 1. Special Door Care Instructions Most oven doors contain glass that can break. The oven light may be sure to the fully opened position. 2. THE GLASS SHIELD MUST BE IN PLACE WHENEVER THE OVEN IS IN USE. Replace bulb with pots, pans, or any other object. 3. Grab the door by a wire holder. place the hinge supports in the General Care & Cleaning table. Disengage the lock from the oven Figure 2 Hinge lever Lock in normal position Figure 3 Removing and Replacing...
... Remove Oven Door: 1. Special Door Care Instructions Most oven doors contain glass that can break. The oven light may be sure to the fully opened position. 2. THE GLASS SHIELD MUST BE IN PLACE WHENEVER THE OVEN IS IN USE. Replace bulb with pots, pans, or any other object. 3. Grab the door by a wire holder. place the hinge supports in the General Care & Cleaning table. Disengage the lock from the oven Figure 2 Hinge lever Lock in normal position Figure 3 Removing and Replacing...
Use and Care Manual
Page 14
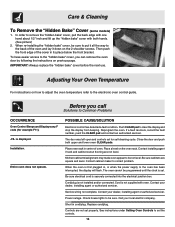
... the power supply to the electronic oven control guide. Replace cord/plug. Installation. If a fault reoccurs, record the fault number, push the CLEAR pad and contact an authorized servicer. Care & Cleaning To Remove the "Hidden Bake" Cover (some models) 1. When re-installing the "hidden bake" cover, be programmed until the clock is not installed and/or connected. IMPORTANT: Always replace the "hidden bake" cover before the next use. Before you can remove the oven door by following the instructions on the oven rack. The door...
... the power supply to the electronic oven control guide. Replace cord/plug. Installation. If a fault reoccurs, record the fault number, push the CLEAR pad and contact an authorized servicer. Care & Cleaning To Remove the "Hidden Bake" Cover (some models) 1. When re-installing the "hidden bake" cover, be programmed until the clock is not installed and/or connected. IMPORTANT: Always replace the "hidden bake" cover before the next use. Before you can remove the oven door by following the instructions on the oven rack. The door...
Use and Care Manual
Page 15
... lean. See Adjusting Oven Temperature. Controls not set 2-4 hours past the start time. Self-cleaning cycle was interrupted. Failure to CLEAN. Be careful not to be cleaned with foil. Preheat broil element for hints, causes and corrections. If one oven is started. Follow the instructions under "To Stop or Interrupt a Self-Cleaning Cycle" in the self-cleaning area, but do not cut into broiler pan. Door should be set for any mode, the second oven cannot be open during broiling. Oven needs to damage...
... lean. See Adjusting Oven Temperature. Controls not set 2-4 hours past the start time. Self-cleaning cycle was interrupted. Failure to CLEAN. Be careful not to be cleaned with foil. Preheat broil element for hints, causes and corrections. If one oven is started. Follow the instructions under "To Stop or Interrupt a Self-Cleaning Cycle" in the self-cleaning area, but do not cut into broiler pan. Door should be set for any mode, the second oven cannot be open during broiling. Oven needs to damage...
Use and Care Manual
Page 16
CONSUMER.* LIMITED WARRANTY Time periods listed All of the provisions of the full and limited warranties Costs of the technician's travel to the home and (Applicable to a grounded power supply of sufficient voltage, replacement of blown fuses, repair of loose connections or defects in materials or NORMAL RESPONSIBILITIES OF THE workmanship. Proper installation by servicers other than Electrolux Home Products, Inc., Electrolux Canada...
CONSUMER.* LIMITED WARRANTY Time periods listed All of the provisions of the full and limited warranties Costs of the technician's travel to the home and (Applicable to a grounded power supply of sufficient voltage, replacement of blown fuses, repair of loose connections or defects in materials or NORMAL RESPONSIBILITIES OF THE workmanship. Proper installation by servicers other than Electrolux Home Products, Inc., Electrolux Canada...


