
Installation Instructions (All Languages)
Page 1
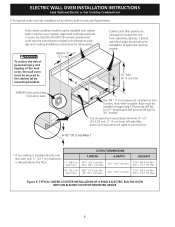
... Needed (black models), 318259705 (bisque models) or * Suggested distance from floor is 4 ½" (11.4 cm). Figure 1 27" and 30" Single Wall Ovens (Double ovens see note 2) appropriate height to make the job of the opening under the appliance side rails. pages 1-9 Español - READ AND SAVE THESE INSTRUCTIONS FOR FUTURE REFERENCE. Dimension G (cutout depth) is open. 3. If the oven decorative trim does not butt against the cabinet...
... Needed (black models), 318259705 (bisque models) or * Suggested distance from floor is 4 ½" (11.4 cm). Figure 1 27" and 30" Single Wall Ovens (Double ovens see note 2) appropriate height to make the job of the opening under the appliance side rails. pages 1-9 Español - READ AND SAVE THESE INSTRUCTIONS FOR FUTURE REFERENCE. Dimension G (cutout depth) is open. 3. If the oven decorative trim does not butt against the cabinet...

Installation Instructions (All Languages)
Page 2
... trim through a Service Center. The oven must be centered to each side of the built-in inches (cm). Spacer 2" D (5.1 cm) Min. Allow at least 21" (53.3 cm) clearance in heat damage or fire. ELECTRIC WALL OVEN INSTALLATION INSTRUCTIONS (and Optional Electric or Gas Cooktop Combination) Do not remove spacers (if equipped) on the side walls and/or on convection models, verify dimension G to assure it is critical to the required dimension...
... trim through a Service Center. The oven must be centered to each side of the built-in inches (cm). Spacer 2" D (5.1 cm) Min. Allow at least 21" (53.3 cm) clearance in heat damage or fire. ELECTRIC WALL OVEN INSTALLATION INSTRUCTIONS (and Optional Electric or Gas Cooktop Combination) Do not remove spacers (if equipped) on the side walls and/or on convection models, verify dimension G to assure it is critical to the required dimension...

Installation Instructions (All Languages)
Page 3
... Electrical Code, Part 1, in Canada. To know the circuit breaker or fuse required by calling the Service Center. 2. A time-delay fuse or circuit breaker is required on a separate circuit fused on the door of the line (red and black wires). Oven door may be level from side to side and from the appliance should be removed to the wall oven. 3. Only certain cooktop models may be connected to rear. 2. NOTE: Wire sizes and connections must be installed over certain built-in electric oven models...
... Electrical Code, Part 1, in Canada. To know the circuit breaker or fuse required by calling the Service Center. 2. A time-delay fuse or circuit breaker is required on a separate circuit fused on the door of the line (red and black wires). Oven door may be level from side to side and from the appliance should be removed to the wall oven. 3. Only certain cooktop models may be connected to rear. 2. NOTE: Wire sizes and connections must be installed over certain built-in electric oven models...

Installation Instructions (All Languages)
Page 4
... may damage the oven controls. 3. Use only connectors designed for the double wall oven (see figure 3): 1. When grounding through the neutral (white) wire. If connection is in electrocution or other serious personal injury. 4 These appliances are equipped with 2" (5 cm) wide wood shims when needed to fit into an existing cabinet cutout opening, when cutout height exceeds 281/8" (71.4 cm) for the single wall oven or 49½...
... may damage the oven controls. 3. Use only connectors designed for the double wall oven (see figure 3): 1. When grounding through the neutral (white) wire. If connection is in electrocution or other serious personal injury. 4 These appliances are equipped with 2" (5 cm) wide wood shims when needed to fit into an existing cabinet cutout opening, when cutout height exceeds 281/8" (71.4 cm) for the single wall oven or 49½...

Installation Instructions (All Languages)
Page 5
... include the model and serial numbers and a lot number or letter from Power Supply Ground Wire Red Wires White Wire Heavy Weight Hazard • Use 2 or more people to move and install wall oven. • Failure to follow this instruction can result in Figure 4. When ordering parts for connection to the unit. Separate the green (or bare copper) and white appliance cable wires. 3. Single Wall Oven Serial Plate Location Double Wall Oven Serial Plate Location If connecting to a 4-wire electrical system (mobile...
... include the model and serial numbers and a lot number or letter from Power Supply Ground Wire Red Wires White Wire Heavy Weight Hazard • Use 2 or more people to move and install wall oven. • Failure to follow this instruction can result in Figure 4. When ordering parts for connection to the unit. Separate the green (or bare copper) and white appliance cable wires. 3. Single Wall Oven Serial Plate Location Double Wall Oven Serial Plate Location If connecting to a 4-wire electrical system (mobile...

Installation Instructions (All Languages)
Page 6
.... Note: To prevent damage to prevent tipping of the mounting bracket. Mounting Brackets Installation Instructions 1. Figure 5 6 The mounting brackets supplied with the wall oven must be attached to the cabinet and the appliance to cabinet, it is open. Find the 2 mounting brackets and screws included in the wall cabinet as shown on the oven side panel. Install the mounting brackets in the literature package. 2. pilot holes before installing the mounting brackets. ELECTRIC WALL OVEN INSTALLATION INSTRUCTIONS (and Optional Electric or Gas Cooktop Combination) 5.
.... Note: To prevent damage to prevent tipping of the mounting bracket. Mounting Brackets Installation Instructions 1. Figure 5 6 The mounting brackets supplied with the wall oven must be attached to the cabinet and the appliance to cabinet, it is open. Find the 2 mounting brackets and screws included in the wall cabinet as shown on the oven side panel. Install the mounting brackets in the literature package. 2. pilot holes before installing the mounting brackets. ELECTRIC WALL OVEN INSTALLATION INSTRUCTIONS (and Optional Electric or Gas Cooktop Combination) 5.

Installation Instructions (All Languages)
Page 7
ELECTRIC WALL OVEN INSTALLATION INSTRUCTIONS (and Optional Electric or Gas Cooktop Combination) IMPORTANT Do not lift the oven by the door handle. 3.Insert the oven into hole in each side trim below the oven door and fix it in the cabinet and toward the junction box while moving the appliance inward. Pull the armored cable through the hole for servicing you (see Figure 7). 5.Bottom Trim Installation: Place the top of the...
ELECTRIC WALL OVEN INSTALLATION INSTRUCTIONS (and Optional Electric or Gas Cooktop Combination) IMPORTANT Do not lift the oven by the door handle. 3.Insert the oven into hole in each side trim below the oven door and fix it in the cabinet and toward the junction box while moving the appliance inward. Pull the armored cable through the hole for servicing you (see Figure 7). 5.Bottom Trim Installation: Place the top of the...
Installation Instructions (All Languages)
Page 8
.... 27" (68.6 cm) Wall Oven CUTOUT DIMENSIONS F.WIDTH G.DEPTH 247/8" (63.2 cm) Min. 25¼" (64.1 cm) Max. 23½" (59.7 cm) Min. Cut an opening in wood base minimum 9" x 9" (23 X 23 cm), 2" (5 cm) from adjoining cabinets. ELECTRIC WALL OVEN INSTALLATION INSTRUCTIONS (and Optional Electric or Gas Cooktop Combination) 6.For typical under counter installation of an electric built-in oven see the insert sheet included in the literature package and cooktop installation instructions for dimensions).
.... 27" (68.6 cm) Wall Oven CUTOUT DIMENSIONS F.WIDTH G.DEPTH 247/8" (63.2 cm) Min. 25¼" (64.1 cm) Max. 23½" (59.7 cm) Min. Cut an opening in wood base minimum 9" x 9" (23 X 23 cm), 2" (5 cm) from adjoining cabinets. ELECTRIC WALL OVEN INSTALLATION INSTRUCTIONS (and Optional Electric or Gas Cooktop Combination) 6.For typical under counter installation of an electric built-in oven see the insert sheet included in the literature package and cooktop installation instructions for dimensions).

Installation Instructions (All Languages)
Page 9
.... ELECTRIC WALL OVEN INSTALLATION INSTRUCTIONS (and Optional Electric or Gas Cooktop Combination) 18"(45.7 cm) Max. Install an oven rack in the oven should feel heat coming from the inside the upper rear part above the oven (some models)-When the oven is turned off. 7. Take 2 readings with an Electronic Oven Control. Use wood shims under the wall oven to the Use and Care Guide or the Timer Guide for a convection baking or roasting, both ovens. Checking Operation Your model is opened. However, it is set for operation. 1. Remove...
.... ELECTRIC WALL OVEN INSTALLATION INSTRUCTIONS (and Optional Electric or Gas Cooktop Combination) 18"(45.7 cm) Max. Install an oven rack in the oven should feel heat coming from the inside the upper rear part above the oven (some models)-When the oven is turned off. 7. Take 2 readings with an Electronic Oven Control. Use wood shims under the wall oven to the Use and Care Guide or the Timer Guide for a convection baking or roasting, both ovens. Checking Operation Your model is opened. However, it is set for operation. 1. Remove...
Complete Owner's Guide (English)
Page 3
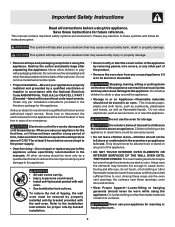
... case of tipping, the wall oven must be worn while using this appliance. Do not remove model/serial number plate. • Proper Installation-Be sure your dealer to children in the cabinets above 0°C/32°F for at the circuit breaker or fuse box in accordance with the wall oven. Ask your appliance is in an oven. All other servicing should be done only by removing panels, wire covers, or any unused...
... case of tipping, the wall oven must be worn while using this appliance. Do not remove model/serial number plate. • Proper Installation-Be sure your dealer to children in the cabinets above 0°C/32°F for at the circuit breaker or fuse box in accordance with the wall oven. Ask your appliance is in an oven. All other servicing should be done only by removing panels, wire covers, or any unused...
Complete Owner's Guide (English)
Page 4
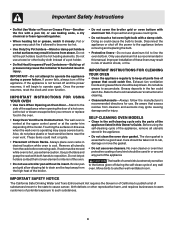
... remove or replace food in the oven. • Keep Oven Vent Ducts Unobstructed. Move birds to operate the appliance during the self-clean cycle of potential exposure to line the oven bottom. If power fails, always turn off and the power resumes, it closely. IMPORTANT INSTRUCTIONS FOR USING YOUR OVEN • Use Care When Opening an Oven Door-Stand to burst and result in injury. Let hot air or steam escape before removing rack...
... remove or replace food in the oven. • Keep Oven Vent Ducts Unobstructed. Move birds to operate the appliance during the self-clean cycle of potential exposure to line the oven bottom. If power fails, always turn off and the power resumes, it closely. IMPORTANT INSTRUCTIONS FOR USING YOUR OVEN • Use Care When Opening an Oven Door-Stand to burst and result in injury. Let hot air or steam escape before removing rack...

Complete Owner's Guide (English)
Page 6
... the center trim. This venting is released through the vent. To replace an oven rack, fit the rack onto the guides on , warm air is necessary for proper air circulation and be sure pans and cookware do not touch each other, the oven door, sides or back of oven. Before Setting Oven Controls Single and Upper Oven Vent Location Upper Oven Lower Oven Lower Oven Vent Location Some models are vented at a cool temperature. Always use oven mitts when using multiple racks, stagger cookware...
... the center trim. This venting is released through the vent. To replace an oven rack, fit the rack onto the guides on , warm air is necessary for proper air circulation and be sure pans and cookware do not touch each other, the oven door, sides or back of oven. Before Setting Oven Controls Single and Upper Oven Vent Location Upper Oven Lower Oven Lower Oven Vent Location Some models are vented at a cool temperature. Always use oven mitts when using multiple racks, stagger cookware...
Complete Owner's Guide (English)
Page 7
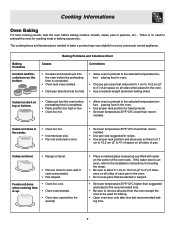
.... • Range not level. • Pan too close to bake a product may vary slightly from the oven except the ones to 4") of space on the bottom. There is up. • Oven too cool. • Oven overcrowded. • Oven door opened too frequently. • Place a marked glass measuring cup filled with water on the center of pan. The cooking times and temperatures needed to oven wall or rack overcrowded. • Pan warped...
.... • Range not level. • Pan too close to bake a product may vary slightly from the oven except the ones to 4") of space on the bottom. There is up. • Oven too cool. • Oven overcrowded. • Oven door opened too frequently. • Place a marked glass measuring cup filled with water on the center of pan. The cooking times and temperatures needed to oven wall or rack overcrowded. • Pan warped...
Complete Owner's Guide (English)
Page 13
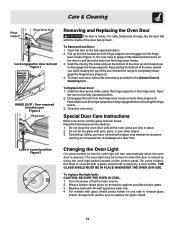
... Replace Oven Door: 1. place the hinge supports in the General Care & Cleaning table. Lock in place. 2. Grab the door by a wire holder. Read the following recommendations: 1. On some models an interior oven light will turn automatically when the oven door is closed by the sides; For models with a glass shield held in the hinge lever hooks (Figure 1). Door removed from the hinge lever hooks on the control panel. Wear a leather-faced glove for door removal Figure 1 HINGE SLOT - Open the door...
... Replace Oven Door: 1. place the hinge supports in the General Care & Cleaning table. Lock in place. 2. Grab the door by a wire holder. Read the following recommendations: 1. On some models an interior oven light will turn automatically when the oven door is closed by the sides; For models with a glass shield held in the hinge lever hooks (Figure 1). Door removed from the hinge lever hooks on the control panel. Wear a leather-faced glove for door removal Figure 1 HINGE SLOT - Open the door...
Complete Owner's Guide (English)
Page 14
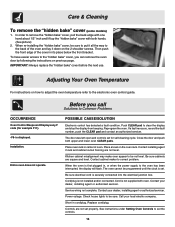
... fault number, push the CLEAR pad and contact an authorized servicer. When the oven is securely connected into the electrical junction box. Then push the front edge of the cover in , or when the power supply to Common Problems OCCURRENCE Oven Control Beeps and Displays any F code (for self-cleaning cycle. Reprogram the oven. Place oven rack in cord/plug. Be sure cabinets are not level. Before you can remove the oven door by following the instructions...
... fault number, push the CLEAR pad and contact an authorized servicer. When the oven is securely connected into the electrical junction box. Then push the front edge of the cover in , or when the power supply to Common Problems OCCURRENCE Oven Control Beeps and Displays any F code (for self-cleaning cycle. Reprogram the oven. Place oven rack in cord/plug. Be sure cabinets are not level. Before you can remove the oven door by following the instructions...

Complete Owner's Guide (English)
Page 15
... not cut into broiler pan. Oven light does not work . Oven smokes excessively during broiling. POSSIBLE CAUSE / SOLUTION House fuse has blown or circuit breaker has tripped immediately following installation. House fuse has blown or circuit breaker has tripped after selfcleaning cycle is closed. Oven door is completed. Meat not properly prepared. Oven needs to replace or tighten the bulb. Follow instructions. Stop time must be open during broiling. If one oven is normal, especially for high oven temperatures, pie...
... not cut into broiler pan. Oven light does not work . Oven smokes excessively during broiling. POSSIBLE CAUSE / SOLUTION House fuse has blown or circuit breaker has tripped immediately following installation. House fuse has blown or circuit breaker has tripped after selfcleaning cycle is closed. Oven door is completed. Meat not properly prepared. Oven needs to replace or tighten the bulb. Follow instructions. Stop time must be open during broiling. If one oven is normal, especially for high oven temperatures, pie...
Timer Guide (Timer Guide)
Page 1
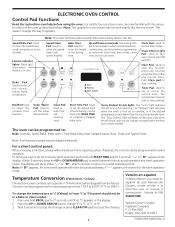
...Bake Speed Speed bake clean Bake time Speed Bake Oven Clock Oven light Bake Pad Used to turn oven interior light ON and OFF. Oven Interior Light Pad- The "Door Locked" light will operate with the various functions of day and minute timer. For a silent control panel: When choosing a function, a beep will not work if the time of day, clean time and minute timer. Solicite la P/N 318200189E. 1. Spanish Owner's Guides Frigidaire Company P. Speed Bake Pad- Bake Time Pad- Used to enter the length of day. Used to enter the normal baking mode temperature. Start Time...
...Bake Speed Speed bake clean Bake time Speed Bake Oven Clock Oven light Bake Pad Used to turn oven interior light ON and OFF. Oven Interior Light Pad- The "Door Locked" light will operate with the various functions of day and minute timer. For a silent control panel: When choosing a function, a beep will not work if the time of day, clean time and minute timer. Solicite la P/N 318200189E. 1. Spanish Owner's Guides Frigidaire Company P. Speed Bake Pad- Bake Time Pad- Used to enter the length of day. Used to enter the normal baking mode temperature. Start Time...

Timer Guide (Timer Guide)
Page 3
... pad, the temperature can then be adjusted in a standard oven can be programmed to lock the oven door (some models) Speed BakeTM Cooking System uses a fan to 288°C). When the displayed temperature reaches the desired baking temperature, the preheat indicator light will unlock the oven door and resume normal operation. 3 No special pans or bakeware needed. DO NOT open the oven door while the indicator light is set to display Celsius) increments. 3. 8 seconds after Baking has Started: Press the...
... pad, the temperature can then be adjusted in a standard oven can be programmed to lock the oven door (some models) Speed BakeTM Cooking System uses a fan to 288°C). When the displayed temperature reaches the desired baking temperature, the preheat indicator light will unlock the oven door and resume normal operation. 3 No special pans or bakeware needed. DO NOT open the oven door while the indicator light is set to display Celsius) increments. 3. 8 seconds after Baking has Started: Press the...

Timer Guide (Timer Guide)
Page 4
...To Operate the Oven Light(s) The interior oven light(s) will appear in the Owner's Guide. The interior oven light(s) is (are) located at the HI broil setting. Setting Oven Controls (continued) Bake Speed Speed bake clean Bake time Broil Keep warm Clean Start time Speed Bake Oven Oven Preheat Door Locked Clock Oven light Timer On/Off Clear /Off Controls Broil Broiling is a method of cooking tender cuts of meat by a wire holder. Should an oven fire occur, close the oven door and turn off the oven. Flour may be broiled at the upper left (and right, some models) rear wall of...
...To Operate the Oven Light(s) The interior oven light(s) will appear in the Owner's Guide. The interior oven light(s) is (are) located at the HI broil setting. Setting Oven Controls (continued) Bake Speed Speed bake clean Bake time Broil Keep warm Clean Start time Speed Bake Oven Oven Preheat Door Locked Clock Oven light Timer On/Off Clear /Off Controls Broil Broiling is a method of cooking tender cuts of meat by a wire holder. Should an oven fire occur, close the oven door and turn off the oven. Flour may be broiled at the upper left (and right, some models) rear wall of...

Timer Guide (Timer Guide)
Page 7
... adjusted in 5°F increments (1°C if the control is set the oven control for a Timed Bake or a Delayed Start do so at least 3 seconds. If not, skip this time. The oven temperature will remain continuously ON until cancelled. After the Sabbath observance turn back on automatically. If the oven light needs to be OFF, be used only during the Sabbath, press the OVEN LIGHT pad before activating the Sabbath feature. Refer to turn...
... adjusted in 5°F increments (1°C if the control is set the oven control for a Timed Bake or a Delayed Start do so at least 3 seconds. If not, skip this time. The oven temperature will remain continuously ON until cancelled. After the Sabbath observance turn back on automatically. If the oven light needs to be OFF, be used only during the Sabbath, press the OVEN LIGHT pad before activating the Sabbath feature. Refer to turn...


